How to replace needle on a sewing machine
how to fix sewing machine needle
how to change sewing machine needle.
 |
| Replace needle on a sewing machine |
The above mentioned questions are frequently asked questions by sewing learners. Frequently asked questions about sewing machine needles. I will show you how to fix sewing machine needle properly.
In this post, we will learn how to fix the needle in the sewing machine.
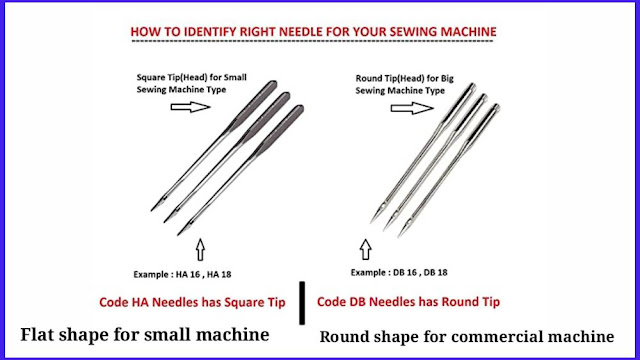
It is easy to fix needle on sewing machine. Before that we need to know that there are two types of sewing machine needles. Two types of needles are commonly used in sewing machines. A flat shaped needle is used in some small models of machines for home use only. It is cylindrical on the other side. This is called flat shape needle.
A slightly larger model machine is sewn using a roller needle. It is completely cylindrical in shape. It is important to know how to replace a sewing machine needle if it breaks or becomes bent. First let's know how to fix flat shape needle. Secondly, we will learn how to do the roller shape needle fix
While buying a needle, you should pay attention to whether your machine uses a flat shape needle or a round shape needle. Needles are available at stores that sell sewing supplies. Also available on amazon website.
 |
| Sewing machine needle (image credit amazon) |
1. Flat shape needle replacement:
Hello welcome to sewing for beginners series in this short post I'm going to be explain you how to change or replace the needle on your sewing machine if you'd like to learn more about what type of needle you should be using how long you should be using that needle for then follow the link to corresponding video here
Now you should have a little bit of a screw on the top of the needle bar here it might be a screw like it is here you might even need a little screwdriver or tool in the kit that came with your sewing machine you will want to undo this generally that's turning it to the left whilst you do this hold on tightly to the needle
Because you don't want to lose the needle in the sewing machine once you have loosened it enough you should be able to pull the needle out just like so now in order to position the needle back in you have a flat part of the needle this most of the time in a sewing machine goes towards the back so to position it in I'm going to hold onto it with my left hand
I will need to sort of position the needle almost down in the center of the presser foot to get the angle to come back up straight and I'm going to try and find the hole for the needle you might want to get visual with this and get quite low so that you can see where the hole is for the needle and where you should be inserting the needle make sure you are positioning the flat part of the needle towards the back of the sewing machine.
The most important thing here is that you really make sure that the needle is as high as it can go make sure that your screw is very very loose or as loose as it can be to allow the needle to go as high as possible once you're happy that the needle is as high as it can go you can retighten the screw either using your fingers or perhaps the tool that's come with your sewing machine .
You must make sure that this is very tight so that the needle does not drop out whilst you are sewing and there you have it that is how you replace or change your needle the next question is going to be how often you should be changing your needle thanks for watching I really hope you enjoyed the tutorial
Watch the video posted below to know more about it
2. Cylindrical shape needle change:
Next we're going to be reviewing how to replace a broken needle on the commercial lockstitch machine. In the event that you have broken a needle your first step is to remove any of the remaining pieces and the broken needle itself, be very careful as you clean up the shards from your needle.
In order to do this you will require a screwdriver and all screw drivers are located in the corresponding drawer for each machine Begin by loosing the screw just above your needle; you do this by turning to the left.
You do not need to loosen the screw all the way, a couple of turns will loosen the needle just enough for you to remove it and dispose of it in a sharp's bin. All of the sharp's bin in the ADP studio are brightly labeled in orange. When replacing your new needle make sure that you inspect it thoroughly.
Holding your needle you want to insert it by pushing all the way up as far as a needle will go with that screw loosened. From here you are going to spin the needle so that the scarf is facing the inside of the machine.
Using your screwdriver tighten your needle by turning to the right. Before moving on double check that that the scarf is on the inside. Keep in mind that you should be changing your needle after every project as they wear down.
Buy Sewing accessories in amazon

Leave your comments ConversionConversion EmoticonEmoticon