
Okay, here is a long-form blog post about cutting fabric from a sewing pattern, written for beginners with a focus on high readability and incorporating the requested elements.
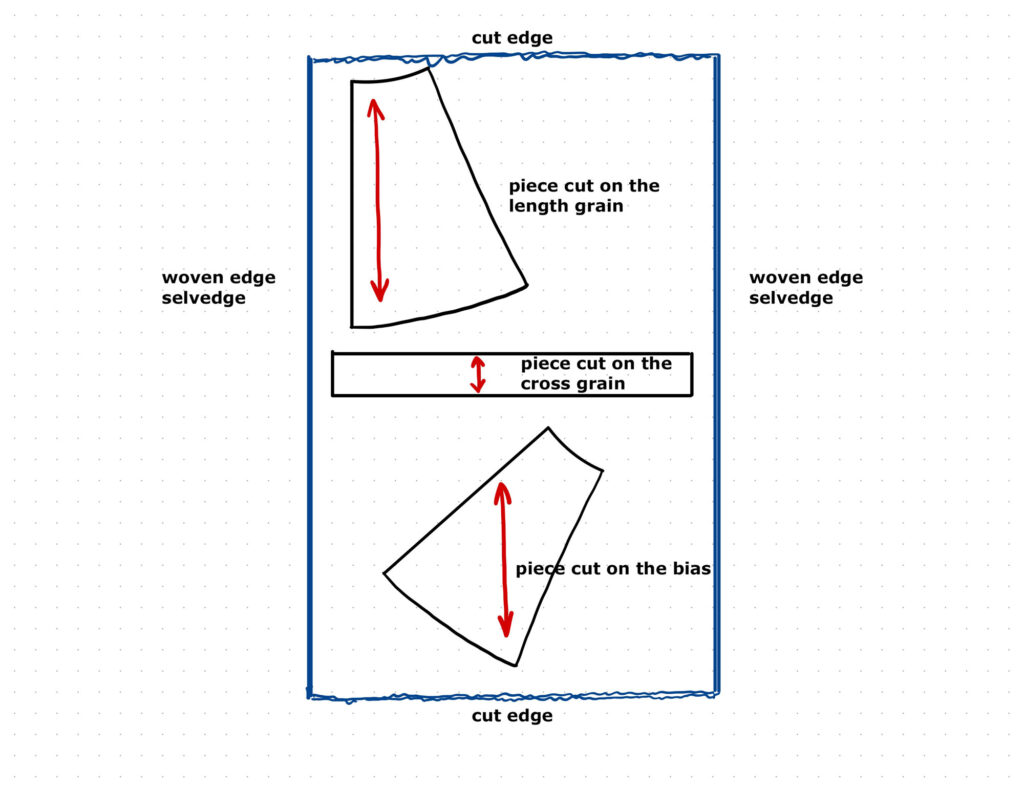
Image Source: thedailysew.com
How To Cut Fabric From A Sewing Pattern For Beginners
Do you want to make your own clothes or home items? Learning to cut fabric the right way from a sewing pattern is a big first step. People often ask, “What tools do I need to cut fabric?” You will need good fabric scissors or a rotary cutter, a mat if using a rotary cutter, pins or weights, and tools to mark your fabric. “How do I know what size to cut?” You find your size by measuring yourself and looking at the pattern’s size chart. “Why is cutting fabric correctly so important?” Cutting carefully makes sure your fabric pieces fit together the way the pattern designer planned. This helps your final project look good and fit well. This guide will walk you through each step to help you cut your fabric like a pro beginner.
Why Cutting Fabric Right Matters So Much
Cutting fabric might seem simple. You just cut along a line, right? But it’s more than that. Think of your pattern pieces as puzzle pieces. If you cut them wrong – maybe a bit too big, too small, or wobbly – they won’t fit together well. This can make sewing harder. Your seams might not line up. Your garment might not hang straight because the fabric’s natural lines (called the grain) are off. Good cutting makes sewing smoother and helps you get a nice result you’ll be proud of. It’s the foundation for everything you sew.
Getting Your Fabric Ready To Cut
Before you even look at your scissors, you need to get your fabric ready. This step is called preparing fabric for cutting. It’s super important and helps avoid problems later.
Cleaning Your Fabric
Most fabrics can shrink the first time they get wet. Imagine you make a dress that fits perfectly. Then you wash it, and it shrinks! Now it’s too small. To stop this surprise, you should prepare fabric for cutting by washing it before you cut.
- Wash your fabric the same way you will wash the finished item.
- Use the same temperature water and drying method.
- This lets the fabric shrink before you cut your pattern pieces.
Making Fabric Smooth
After washing and drying, your fabric might be wrinkled. It’s hard to cut wrinkled fabric flat and true. Wrinkles can cause your pieces to be cut slightly off.
- Iron your fabric to make it smooth and flat.
- Use the right heat setting for your fabric type (cotton likes hot, synthetics like cooler).
- A smooth, flat surface is key for accurate cutting.
Gathering Your Cutting Tools
You need the right tools to cut well. Having sharp tools makes a huge difference.
- Fabric Shears (Scissors): These are only for fabric. Paper makes them dull quickly. Buy the best you can afford. They should feel good in your hand and be very sharp. Using fabric shears that are sharp makes cutting smooth and easy.
- Rotary Cutter and Mat: A rotary cutter and mat is like a pizza cutter for fabric. It has a sharp, round blade. You use it with a special ruler and a self-healing mat. This is great for cutting straight lines and curves, especially through multiple layers of fabric.
- Cutting Mat: If you use a rotary cutter, you need a rotary cutter and mat. The mat protects your table and keeps the blade sharp.
- Pins: You will use pins to hold your paper pattern pieces onto the fabric.
- Pattern Weights: Some people prefer weights instead of pins, especially for delicate or slippery fabrics. Weights hold the pattern piece down without poking holes.
- Fabric Marking Tools: You need something to put marks from the pattern onto your fabric. Options include tailor’s chalk, fabric pens or pencils, or tailor’s tacks.
- Measuring Tape or Ruler: Useful for checking grainline and layout.
- Small Snips or Scissors: Good for cutting notches or clipping curves after cutting the main shape.
Interpreting Your Sewing Pattern
Your sewing pattern is like a map. It tells you what pieces to cut and how to cut them. Don’t skip reading sewing pattern instructions.
Understanding the Pattern Envelope
The envelope front shows you what the finished item looks like. The back gives you important information:
- Sizes included.
- Body measurements for each size.
- How much fabric you need (it tells you based on fabric width and view/size).
- What other things you need (zipper, buttons, thread – these are called notions).
- Suggests types of fabric that work well.
Deciphering the Guide Sheet
Inside the envelope is a large paper guide sheet. This has more detailed reading sewing pattern instructions:
- Pictures of the different views you can make.
- Layout guides showing you how to place pattern pieces on your fabric. This is key for laying out fabric for cutting.
- Sewing steps.
Finding Your Size and Pattern Pieces
Look at the size chart on the envelope or guide sheet. Measure your body (bust, waist, hips) and find the size that matches best. If your measurements are between sizes or different for top and bottom, the guide sheet might explain how to blend sizes.
The pattern pieces themselves are usually printed on large tissue paper. Each piece is numbered or lettered and tells you:
- What the piece is (e.g., “Front Bodice,” “Sleeve”).
- Which sizes are on this piece (usually different lines for each size).
- How many of this piece to cut (e.g., “Cut 2,” “Cut 1 on Fold”).
- Important symbols like the grainline, fold line, notches, dots, and arrows.
Setting Up Your Space For Cutting
Choose a large, flat area to cut. A big table is great. The floor can also work if it’s clean and hard. You need enough space to lay out your fabric and pattern pieces flat.
- Make sure you have good light so you can see the lines clearly.
- Clear away clutter.
Laying Out Your Fabric For Cutting
This is where you spread your fabric out. How you fold and place the fabric is important and is shown in the laying out fabric for cutting pictures on your pattern guide sheet.
Finding the Fabric Grainline
Fabric is made of threads woven together. The threads that run parallel to the finished edge (the edge that doesn’t fray, called the selvage) are the lengthwise grain. This is the fabric grainline. It’s the strongest and least stretchy grain. Pattern pieces have a long arrow symbol on them. This arrow must line up perfectly with the lengthwise fabric grainline on your fabric. If you don’t line it up, your garment could twist or hang strangely.
To find the grainline in your fabric:
- Look at the selvage edge (the tightly woven edge).
- The threads that run next to this edge, all the way down the fabric roll, are the lengthwise grain or fabric grainline.
- Pattern pieces should be placed so the grainline arrow is parallel to this edge.
Folding the Fabric
Pattern layouts often tell you to fold your fabric. Common folds are:
- Lengthwise Fold: Fold the fabric in half lengthwise, matching the selvages. This is the most common fold for cutting fabric on the fold or cutting mirrored pieces at once. The fold itself runs parallel to the selvage and the fabric grainline.
- Crosswise Fold: Fold the fabric in half the other way, so the cut ends meet. The fold runs across the fabric, perpendicular to the selvages and fabric grainline.
- Double Fold: Sometimes you fold both selvages in towards the center. This makes two folds.
Always follow the picture in your pattern guide sheet for how to fold your specific fabric width and the pieces you are cutting. Make sure the fabric is laid out smoothly with no wrinkles or bumps under it.
Cutting Fabric On The Fold
Some pattern pieces need to be cut “on the fold.” These are usually pieces that should be symmetrical, like the front or back of a shirt where you don’t want a seam in the middle.
- The pattern piece will have a “Place on Fold” symbol (often a double arrow with text).
- When cutting fabric on the fold, you place that edge of the pattern piece exactly along the folded edge of your fabric.
- When you cut and then open the fabric, you get one full, mirrored piece.
Placing and Securing Pattern Pieces
Once your fabric is laid out and smoothed, put your pattern pieces on top following the layout guide in your pattern instructions (laying out fabric for cutting).
Aligning the Grainline
This step is critical! For each pattern piece, find the long arrow symbol (the grainline).
- Use a ruler or measuring tape.
- Measure the distance from both ends of the grainline arrow to the nearest selvage or the folded edge (if the fold is on grain).
- Adjust the pattern piece until the measurement is the same at both ends of the arrow. This ensures the grainline arrow on the pattern is perfectly straight with the fabric grainline.
Pinning Pattern Pieces To Fabric
After lining up the grainline, you need to hold the pattern piece firmly in place. The most common way is pinning pattern pieces to fabric.
- Use sharp, fine pins that won’t damage your fabric.
- Start by pinning along the grainline to keep it true.
- Place pins smoothly within the cutting line (the outer line) of the pattern piece. This way, your scissors or rotary cutter won’t hit the pins.
- Pin more on curves to hold the paper steady.
- Place pins closer together on slippery fabrics.
- Pin perpendicular (at a right angle) to the cutting line if you’re using shears; this makes it easier to cut around them. Pin parallel if using a rotary cutter near the edge, but still within the cutting line.
Using Pattern Weights
Instead of pins, you can use pattern weights. These are simply heavy objects like washers, cans, or special pattern weights sold in fabric stores.
- Place weights on the pattern pieces after lining up the grainline.
- Put weights on flat areas and curves.
- Use enough weights to hold the pattern piece still while you cut. This is often better for very fine or delicate fabrics that might snag on pins.
Cutting The Fabric Carefully
Now it’s time to cut! Choose your tool based on your preference and the fabric.
Using Fabric Shears
If you are using fabric shears:
- Hold the fabric flat with one hand.
- With your other hand, cut smoothly along the cutting line.
- Use long, confident strokes. Avoid making small, choppy cuts, which can lead to a jagged edge.
- Keep the lower blade of your shears flat against the cutting surface.
- Try not to lift the fabric as you cut.
- Cut precisely on the line. Don’t cut inside or outside the line.
Using A Rotary Cutter and Mat
If you are using a rotary cutter and mat:
- Place your fabric on the self-healing mat.
- Position the pattern piece, secure it with pins or weights.
- Use a heavy, clear ruler designed for rotary cutting.
- Place the ruler along the straight cutting lines.
- Hold the ruler firmly down to prevent slipping.
- Open your rotary cutter blade (most have a safety catch).
- Place the cutter against the edge of the ruler.
- Press down firmly and roll the cutter along the ruler’s edge. Keep your fingers away from the blade!
- For curves, cut carefully along the line without a ruler, guiding the cutter with your hand.
- Always close the blade immediately after cutting a section.
Cutting Around Notches
Sewing pattern notches are little marks on the edge of pattern pieces (often triangles, diamonds, or just short lines). They are very important! They help you match up pattern pieces correctly when you sew them together (e.g., matching a notch on the front bodice to a notch on the back bodice at the side seam).
- When cutting with shears, you can often cut around the notches, making them little tabs sticking out.
- With a rotary cutter, it’s harder to cut around them. Instead, you can make a tiny snip into the fabric edge at the notch location, but only about 1/4 inch (6mm) deep, within the seam allowance. Or you can mark the notch location with chalk instead of snipping.
Marking Fabric From Pattern
Your pattern pieces have symbols other than the grainline and notches. These are marking fabric from pattern points like dots, squares, or triangles. They show where to place pockets, darts (folds sewn into the fabric to shape it), buttonholes, zippers, or other details.
You need to transfer these marks from the tissue pattern piece onto your cut fabric pieces. Do this before you unpin the pattern piece from the fabric.
Tools for marking fabric from pattern:
- Tailor’s Chalk: Comes in different colors and wipes or brushes away. Good for most fabrics.
- Fabric Marking Pens/Pencils: Some disappear with water, some with heat (ironing), some just fade over time. Test on a scrap first!
- Tailor’s Tacks: Using needle and thread to make small, loose stitches through the pattern and fabric layers. Good for delicate or expensive fabrics where chalk might not be ideal or visible.
- Tracing Wheel and Paper: Special carbon paper for fabric and a spiked or smooth wheel. You put the paper between the pattern and fabric, then trace over the marks with the wheel. Not good for all fabrics (can tear delicate ones or not mark fuzzy ones).
Choose the method that works best for your fabric and that will be visible while you sew but can be removed later. Mark carefully and accurately.
Organizing Your Cut Pieces
Once all your pieces are cut and marked, keep them tidy.
- You can gently refold the pattern piece inside the fabric piece it came from.
- Keep pieces for the same project together.
- Stack them neatly or hang them if you have space.
This stops pieces from getting lost or mixed up.
Common Cutting Mistakes and How to Avoid Them
Even experienced sewers make cutting mistakes sometimes! Here are a few common ones for beginners and how to steer clear:
- Cutting Off-Grain: Not lining up the grainline arrow correctly. This is probably the most common mistake that affects how the finished item hangs. How to avoid: Always measure from the grainline arrow to the selvage or fold at both ends to make sure it’s parallel.
- Cutting the Wrong Size: Accidentally following the line for a different size. How to avoid: Circle or highlight your size line on the pattern piece before you start cutting. Cut one piece at a time carefully.
- Not Marking Important Points: Forgetting to transfer dots, squares, or other markings. How to avoid: Make a habit of marking all symbols before unpinning the pattern from the fabric. Check the pattern piece carefully for all marks.
- Cutting Jagged Edges: Using dull scissors or making choppy cuts. How to avoid: Only use fabric shears for fabric. Sharpen your shears or change your rotary blade often. Use long, smooth strokes with shears.
- Fabric Slipping: The fabric moves while you are cutting. How to avoid: Smooth your fabric well. Use enough pins or pattern weights. Cut on a non-slippery surface. Some people put an old sheet or mat under the fabric on the floor.
- Rushing: Trying to cut too quickly. How to avoid: Give yourself enough time. Cutting is a precise step. It’s better to take your time and cut accurately than rush and make mistakes.
Comparing Cutting Tools: Shears vs. Rotary Cutter
Let’s look at when you might use one tool over the other.
| Feature | Fabric Shears | Rotary Cutter and Mat |
|---|---|---|
| Best For | Curves, intricate shapes, single layers | Straight lines, cutting multiple layers |
| Technique | Lifting fabric slightly, scissor action | Pressing down, rolling along a ruler/line |
| Required | Sharp shears only | Cutter, mat, and usually a ruler |
| Edge Quality | Can be slightly jagged if not sharp/smooth | Very clean, precise edge (especially with ruler) |
| Speed | Good for complex shapes, can be slower on long straight lines | Very fast for straight cuts and long lines |
| Safety | Pointy tip, sharp blades (keep closed) | Extremely sharp rolling blade (keep covered when not in use) |
| Space | Can be used on any firm surface | Requires a cutting mat |
Most sewers have both and use the best tool for the job! For beginners, a good pair of fabric shears is a great place to start.
Interpreting Pattern Symbols: A Quick Reference
Here’s a table with some common symbols you’ll find on pattern pieces and what they mean for marking fabric from pattern:
| Symbol | Name | What it Looks Like | What it Means For You | Action (Cutting/Marking) |
|---|---|---|---|---|
| Grainline | Grainline Arrow | Long arrow with a line through it | Piece must line up with fabric grain | Line up with fabric grainline |
| Place on Fold | Fold Symbol | Double-pointed arrow bending | This edge goes exactly on fabric fold | Place edge on folded fabric edge |
| Notches | Notches | Little diamonds, triangles, or lines on edge | Points for matching seams | Cut around or snip into fabric edge |
| Dots, Squares, Triangles | Marking Points | Circles, squares, triangles | Important matching or placement points | Mark accurately on fabric |
| Darts | Dart Lines | Lines forming a V or diamond | Indicates a dart to be sewn | Mark lines on fabric |
| Buttonholes | Buttonhole Marking | Lines showing buttonhole size/place | Where buttonholes will go | Mark position and length |
| Lengthen/Shorten Line | Adjustment Line | Double line across the pattern | Place to adjust length if needed | Not for cutting, for pattern fitting |
These symbols are your helpers! Pay attention to them when reading sewing pattern instructions and when cutting and marking.
You’ve Cut Your Fabric! What’s Next?
Once all your pattern pieces are carefully cut out and marked, you are ready for the next exciting step: sewing! Gather your cut pieces, refer back to your pattern guide sheet, and start putting your project together. Good cutting sets you up for sewing success.
Cutting fabric right is a skill that improves with practice. Don’t worry if your first few attempts aren’t perfect. Focus on lining up that grainline, cutting smoothly, and marking your pieces. Soon, you’ll be cutting with confidence!
Frequently Asked Questions (FAQ)
How close to the cutting line should I cut?
You should aim to cut right on the cutting line. Not inside it (making the piece too small) and not outside it (making the piece too big). Cutting on the line ensures your seam allowance is the correct width as planned by the pattern designer.
What if my fabric is really slippery?
Slippery fabrics like satin or rayon can be tricky. Here are a few tips:
* Lay fabric out on a non-slip surface (like a flannel-backed tablecloth or an old sheet).
* Use lots of fine pins or pattern weights to hold everything still.
* Consider using a rotary cutter with a mat and ruler, as it can sometimes handle slippery fabrics better than shears, which can lift the fabric.
* Cut in a single layer instead of on the fold if the fabric is very difficult to manage. Just remember to flip the pattern piece over to cut a mirrored piece if needed.
Can I use regular paper scissors to cut fabric?
No, please don’t! Using paper scissors on fabric will quickly make them dull. Dull scissors will not cut fabric cleanly; they will chew or snag it. This makes cutting difficult and creates jagged edges. Reserve one pair of sharp scissors only for fabric.
Do I need to cut along the seam line?
No, the cutting line is the outermost line on the pattern piece. It includes the seam allowance (the extra fabric outside the stitching line that you sew). You cut on the cutting line, not the seam line. The seam line is usually marked on the pattern (or you sew at the standard seam allowance width, like 5/8 inch or 1.5 cm, from the cut edge).
What is the selvage?
The selvage is the finished edge of the fabric roll. It runs along the lengthwise grain and doesn’t fray. It often looks slightly different from the cut edges, sometimes with small holes or a tighter weave. You use the selvage to find the lengthwise fabric grainline when laying out fabric for cutting.
What if my pattern pieces overlap on the layout diagram?
The layout diagram in your pattern instructions is a suggestion to help you fit all the pieces onto the fabric efficiently. If pieces overlap in the diagram, it just means you place one piece, cut it, remove it, and then place the next piece in that spot. You never cut through more than one pattern piece at a time unless instructed (like cutting identical pieces together). Always cut only through the paper pattern piece and the fabric layer(s) beneath it.