
Image Source: suzyquilts.com
How To Tie A Quilt With Embroidery Thread: A Simple Tutorial
Do you wonder how to hand tie a quilt? Hand tying a quilt is a simple method. It secures the layers together. You do not need a sewing machine. This quilt tying tutorial will show you how. It is a popular alternative to machine quilting. Knotting quilts by hand creates a charming look. Using embroidery thread for quilt ties is a great choice. It is strong and colorful. This guide covers the hand tie quilting method. You will learn different quilt tying techniques. We will focus on using embroidery floss for tying quilts. It is one of the best threads for hand tying quilts. Securing quilt layers with ties is easy with this method.
What is Quilt Tying?
Quilt tying is a way to hold your quilt layers together. A quilt has three layers.
1. The top fabric (quilt top).
2. The middle layer (batting).
3. The backing fabric.
These layers must stay together. Tying uses thread to do this. You make stitches through all layers. Then you tie a knot on top. This keeps the layers from shifting. It is a traditional hand tie quilting method. People have done it for many years. It is a simple way to secure quilt layers with ties.
Why Tie a Quilt?
There are many reasons to tie a quilt.
* It is fast. Tying is much quicker than machine quilting. It is also faster than hand quilting stitches.
* It is easy. Anyone can tie a quilt. You do not need special skills. You do not need a sewing machine.
* It costs less. You only need thread and a needle. Machine quilting can be costly.
* It looks nice. Tying gives a quilt a unique look. It adds texture. The little knots are charming.
* It is good for thick batting. Tying works well with fluffy batting. Machine quilting can be hard with thick batting.
* It saves time. If you want a quick finish, tying is great. It is a fast alternative to machine quilting.
Securing quilt layers with ties is a satisfying process. It is a simple method for beautiful results.
Choosing Your Thread
What is the best thread for hand tying quilts? Many people use embroidery thread. This is also called embroidery floss. Why is embroidery floss for tying quilts a good choice?
* It is strong. Embroidery floss is made of six strands. You can use all six. Or you can use fewer. It holds up well.
* It has many colors. Embroidery floss comes in hundreds of colors. You can match your fabric. Or you can pick a bright color. The ties can be a design feature.
* It feels soft. The ties feel nice on the quilt.
* It is easy to handle. The thickness is good for knots. It is easy to thread a needle with it.
Using embroidery thread for quilt ties gives you lots of options. It is a popular choice for the hand tie quilting method. Other threads can be used. Pearl cotton is another good choice. But embroidery floss is widely available. It is also very affordable.
Materials You Need
Gather your supplies before you start. Here is what you will need:
* Your finished quilt top.
* Batting (the middle layer).
* Backing fabric.
* Embroidery thread (floss).
* A needle made for hand quilting or tying. These needles are strong. They have a large eye. This helps with thicker thread.
* Sharp scissors.
* Safety pins or basting spray. You need these to hold the quilt layers together.
* A ruler or measuring tape. This helps with spacing.
* A fabric marker or tailor’s chalk. This is for marking where to tie. (Optional)
Having everything ready makes the process smooth. Securing quilt layers with ties needs these basic tools.
Preparing Your Quilt Layers
Before you tie, you must make your quilt sandwich. This means putting the three layers together.
1. Lay out the backing fabric. Put it on a flat surface. A table or the floor works. The wrong side should face up. Make it smooth. Tape the edges down if you like. This keeps it flat.
2. Place the batting on top. Center the batting over the backing. Make sure the batting is smooth. There should be no wrinkles. The batting should be a little bigger than your quilt top. About 2 inches extra all around is good.
3. Place the quilt top last. Put your finished quilt top on top of the batting. The right side faces up. Center it. Make sure it is smooth. Again, no wrinkles.
Now the layers are stacked. Backing (wrong side up), batting, quilt top (right side up). This stack is your quilt sandwich.
Securing the Quilt Sandwich
The layers must not move while you tie. You need to hold them together. There are two main ways to do this.
Using Safety Pins
- Use special curved safety pins. They are easier to use for pinning layers.
- Start in the center of the quilt.
- Place pins every 4-6 inches. Work your way out to the edges.
- Put pins through all three layers.
- Make sure the layers stay smooth as you pin.
- Avoid puckers on the back.
Using Basting Spray
- Lay out your backing, wrong side up.
- Spray the backing lightly with basting spray. Follow the can directions.
- Place the batting smoothly on the backing. Press it down gently.
- Lay out the batting. Spray the batting lightly.
- Place the quilt top smoothly on the batting. Press it down gently.
Basting spray is fast. Safety pins are reusable. Choose the method you like best. The goal is to keep the layers from shifting. This is key for securing quilt layers with ties well.
Planning Where to Tie
Where do you put the ties? The tie points should be spread out. The distance between ties depends on the batting. Check the batting package. It will say how far apart the ties can be. This is called the ‘maximum quilting distance’. Common distances are 4 inches, 6 inches, or 8 inches.
- If the batting says 4 inches, your ties should be no more than 4 inches apart.
- If it says 6 inches, they can be up to 6 inches apart.
Closer ties make the quilt stiffer. Wider spacing makes it softer.
Marking Your Tie Points (Optional)
You can mark your tie points. This helps keep the spacing even.
* Use a ruler to measure.
* Put a small mark with a fabric marker or chalk. Mark where each tie will go.
* You can mark a grid of dots. For example, dots every 5 inches across and down.
* Test your marker on a scrap first. Make sure it comes off.
Many people skip marking. They just eye the distance. They place ties based on seam lines or fabric patterns. Find a system that works for you. Consistent spacing is important for securing quilt layers with ties evenly.
The Tying Process: A Step-by-Step Quilt Tying Tutorial
Now you are ready to tie! This is the fun part of knotting quilts by hand.
Step 1: Thread Your Needle
- Cut a comfortable length of embroidery floss. About 18-24 inches is good. Too long gets tangled.
- Embroidery floss usually has six strands. You can use all six for a thicker tie. Or split it and use fewer strands. For most quilts, 3 or 4 strands are enough. Using all six makes a big knot.
- Thread the floss through the large eye of your needle.
- Do NOT tie a knot at the end of the thread yet.
Step 2: Make the First Stitch
- Start at one of your planned tie points.
- Push the needle down through all three layers of the quilt.
- Bring the needle back up about 1/4 inch away from where you went down. This makes a small stitch on the back of the quilt. The stitch goes down and comes back up close by.
- Leave a tail of thread on the front of the quilt. This tail should be about 2-3 inches long. Do not pull it all the way through.
Step 3: Bring the Thread Up
- You now have the needle and thread on the front of the quilt.
- You have a loop of thread on the back where the stitch was made.
- You have a tail of thread on the front.
Step 4: Cut the Loop
- Carefully cut the loop of thread on the back of the quilt.
- You now have two ends of thread coming out on the front of the quilt, right next to each other. One is the tail you left. The other is the end you just cut.
Step 5: Tie the Knot
- This is where you are knotting quilts by hand.
- Take the two ends of thread on the front.
- Tie them together in a knot. A simple square knot works well.
- Cross the right end over the left end. Wrap it around and pull snug. This makes a simple knot.
- Now cross the left end over the right end. Wrap it around and pull snug. This makes the second part of the square knot.
- Pull the knot tight but not too tight. You don’t want to pucker the fabric. The knot should sit close to the quilt surface.
Step 6: Trim the Ends
- Use sharp scissors to trim the thread ends.
- Leave about 1/2 inch or more of thread sticking out from the knot. Don’t cut too close! If you cut too close, the knot can come undone.
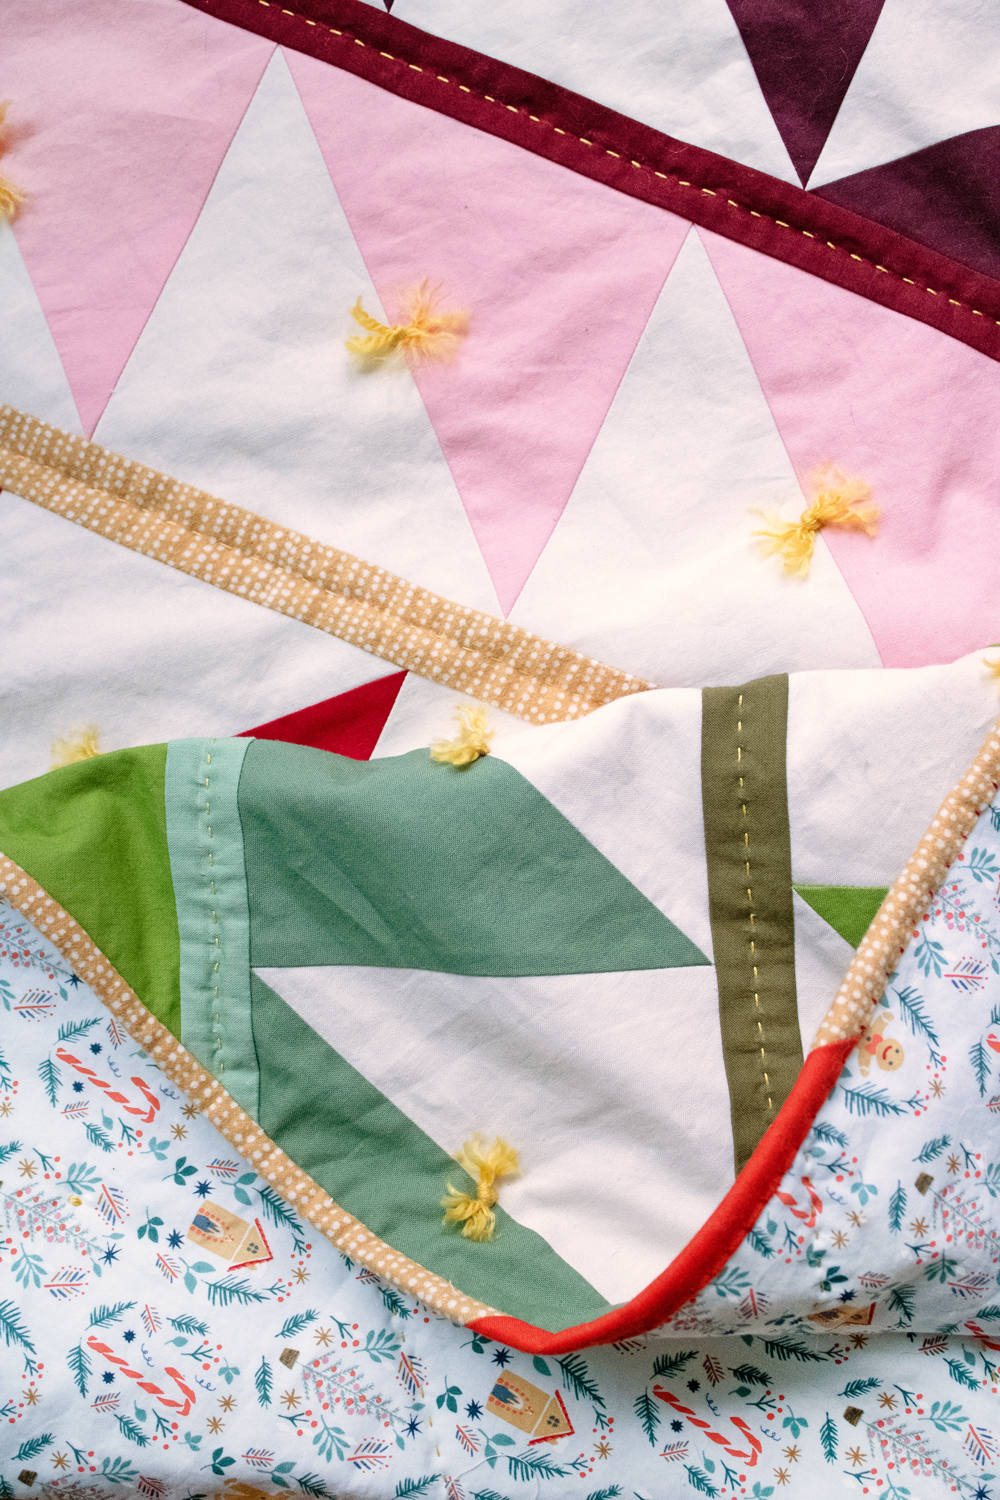
- The little tassels are part of the look of a tied quilt.
Repeat these steps for every tie point on your quilt. Work from the center outwards to help keep the layers smooth.
Quilt Tying Techniques: Placement Tips
Getting the placement right is key for securing quilt layers with ties effectively and for a nice look.
Start in the Middle
Always start tying in the center of the quilt. Work your way out to the edges. This pushes any extra fabric or batting towards the edges, preventing wrinkles in the middle.
Keep Spacing Consistent
Use your measuring tape or just eye it. Try to keep the distance between ties similar across the whole quilt. This ensures the batting is held evenly. Look at the maximum spacing recommended for your batting. Stay within that limit.
Edges and Corners
Add ties close to the edges of the quilt. This helps hold the binding edge down. Place a tie near each corner, perhaps 1-2 inches in from each edge. Then place ties along the perimeter, spaced according to your plan.
Following Patterns
Sometimes the quilt top pattern can guide your ties. You can place ties at the corners of blocks. Or in the center of plain blocks. This integrates the ties into the design.
Spacing Table Example
Here is a possible spacing guide based on batting recommendations:
| Batting Maximum Spacing | Suggested Tie Grid (Inches) |
|---|---|
| 4 inches | 3 x 3 inches |
| 5 inches | 4 x 4 inches |
| 6 inches | 5 x 5 inches |
| 8 inches | 6 x 6 inches |
You can adjust these numbers slightly. The main rule is not to exceed the batting’s maximum recommended spacing.
Different Knotting Styles
While a simple square knot is most common for knotting quilts by hand, you can use others.
Simple Square Knot
Described above. It’s reliable and easy. Tie right-over-left, then left-over-right. Pull snug.
Surgeon’s Knot
This knot is extra secure. It’s good if you worry about knots coming loose.
* Start with the first part of a square knot. Cross right over left, but wrap the thread around twice instead of once. Pull snug.
* Then do the second part of the square knot. Cross left over right. Wrap around once. Pull snug.
This knot holds very well.
Double Overhand Knot
Simpler than a square knot.
* Take the two threads.
* Tie a basic knot (like tying your shoe for the first step). Pull snug.
* Tie another basic knot right on top of the first one. Pull snug.
This makes a bulkier knot than a square knot.
Choose the knot you feel most comfortable with. The simple square knot is the most popular for the hand tie quilting method.
Caring for Your Tied Quilt
A quilt secured with ties needs care.
* Washing: Wash your tied quilt gently. Use a mild soap. A gentle cycle on a washing machine is okay. Or wash by hand. The knots are strong, but rough handling can stress them.
* Drying: Tumble dry on low heat or air dry. High heat can be hard on fabrics and knots.
* Check ties: Over time, a tie might come loose. It is easy to replace it. Just make a new tie in the same spot.
Proper care helps your knots and thread last. It keeps your quilt looking good.
Comparing Tying to Machine Quilting
Tying is a popular alternative to machine quilting. How do they compare?
| Feature | Quilt Tying | Machine Quilting |
|---|---|---|
| Method | Stitches and knots by hand | Stitches made by a sewing machine |
| Speed | Fast | Can be fast (on a machine) |
| Skill Level | Beginner friendly | Requires sewing machine skill |
| Tools Needed | Needle, thread, scissors, pins/spray | Sewing machine, special needles, thread |
| Cost | Low (basic supplies) | Higher (machine cost, maintenance) |
| Look/Feel | Puffy, soft, noticeable knots/tassels | Flatter, dense stitches, various patterns |
| Batting Use | Good for thick batting, specific max spacing | Can use many batting types, often closer stitches needed |
| Durability | Relies on knot strength | Relies on stitch density and thread |
| Effort | Manual hand work | Machine guided work |
| Portability | Easy to do anywhere | Needs the machine setup |
Tying is a great alternative to machine quilting if you don’t have a machine. Or if you want a quick finish. Or if you like the look. Machine quilting offers complex designs. It creates a different feel. Both methods are valid for securing quilt layers with ties or stitches.
Troubleshooting Common Issues
Sometimes things might go wrong when knotting quilts by hand. Here are fixes:
- Knot came loose: This usually happens if you trimmed the ends too short. Or the knot was not pulled tight enough. Tie a new knot in the same spot. Make sure to leave enough tail.
- Thread broke while tying: This can happen if you pull too hard. Or the thread was old or weak. Just cut the thread. Re-thread your needle. Start the tie again in the same spot. Leave a tail and tie the two ends.
- Puckers on the back: This means your layers shifted. Or you pulled the knots too tight. If it’s minor, you can try to smooth it out. For big puckers, you might need to remove pins/spray in that area and re-smooth. Better pinning/basting helps prevent this.
- Running out of thread: Keep extra spools or skeins of your chosen embroidery floss handy. It’s better to have too much than too little.
Practice makes perfect. Your first ties might not be perfect. Keep going! You will get better.
Using Embroidery Thread for Quilt Ties: Advanced Tips
Once you are comfortable with the basics, try these ideas:
- Use different colors: Pick colors that contrast with the fabric. This makes the ties stand out. Use a different color for each quilt block. Or use colors that match your backing fabric.
- Mix thread types: You can use embroidery floss for some ties. Use pearl cotton for others. See which you like best.
- Vary the number of strands: Use all six strands for big, fluffy knots. Use fewer strands (2 or 3) for smaller, less noticeable knots. This changes the look.
- Add beads: Before tying the knot, thread a bead onto the two strands. Tie the knot right below the bead. This adds sparkle. Make sure the beads are safe for washing. And pick beads with holes large enough for your thread.
Using embroidery thread for quilt ties offers many creative options. It lets you add unique touches.
Benefits of the Hand Tie Quilting Method
Let’s look again at why the hand tie quilting method is great.
* It is accessible. Almost anyone can do it.
* It is portable. You can tie while watching TV or traveling.
* It is forgiving. Mistakes are easy to fix.
* It adds texture and dimension to the quilt.
* It requires minimal equipment.
* It is a fast finish compared to detailed quilting.
Securing quilt layers with ties is a traditional craft. It connects you to past quilt makers.
Summary of Quilt Tying Techniques
To recap the main quilt tying techniques:
* Layering: Make the quilt sandwich flat and smooth.
* Securing: Use pins or basting spray to hold layers. Start center, work out.
* Marking (Optional): Decide where ties go. Check batting for max distance. Mark if you like.
* Stitching: Go down through all layers, come up 1/4 inch away. Leave a tail on top.
* Cutting: Cut the loop on the back.
* Knotting: Tie the two thread ends on top. Square knot is common. Leave thread tails.
* Trimming: Cut tails to about 1/2 inch or more.
* Placement: Start tying in the center. Work outwards. Maintain spacing. Add ties on edges.
Mastering these steps means you know how to hand tie a quilt effectively.
Frequently Asked Questions (FAQ)
Here are answers to common questions about the quilt tying tutorial and using embroidery thread.
H4 What is the Best Thread for Hand Tying Quilts?
Many quilters think embroidery floss is the best thread for hand tying quilts. It is strong, comes in many colors, and is easy to work with. Pearl cotton is another good choice. It depends on the look you want.
H4 How Far Apart Should Quilt Ties Be?
The distance depends on your batting. Check the batting package for its maximum recommended spacing. Common distances are 4 to 8 inches. Ties must be no further apart than this number. Closer ties make the quilt stiffer.
H4 Can I Use Regular Sewing Thread for Tying?
Regular sewing thread is usually not strong enough. It can break easily when tying knots. It is also very thin. The ties would not be noticeable. Embroidery floss or pearl cotton is much better. They are thicker and stronger.
H4 How Many Strands of Embroidery Floss Should I Use?
Embroidery floss has six strands. You can use all six for a thick tie. Or split it and use 3 or 4 strands for a thinner tie. Most people use 3 or 4 strands. It gives a nice knot without being too bulky. Experiment to see what you like.
H4 Do I Need a Special Needle for Tying?
Yes, a needle made for hand quilting or tying is best. These needles are strong. They can go through all three quilt layers. They also have a larger eye. A large eye makes it easier to thread with embroidery floss.
H4 How Long Should the Thread Tails Be?
After tying the knot, trim the ends. Leave about 1/2 inch or more of thread sticking out. This length helps keep the knot secure. Shorter tails are more likely to slip out of the knot. The tails are part of the look.
H4 Will the Knots Come Undone?
If tied correctly, using a good knot like a square knot, and trimmed with enough tail, the knots should stay put. Over time, with lots of washing, a knot might loosen. But it is easy to re-tie it. Using a surgeon’s knot can add extra security.
H4 Is Tying Just for Beginner Quilters?
No! Tying is a valid and beautiful finishing method for any quilter. Many experienced quilters choose to tie. They might want a fast finish. Or they love the look and feel of a tied quilt. It is a design choice, not just a beginner technique.
H4 How Does Tying Compare to Hand Quilting Stitches?
Hand quilting uses many small running stitches to make a pattern across the quilt. Tying uses stitches that go down and back up in almost the same spot, then a knot is tied. Hand quilting is much slower and requires more skill to make even stitches. Tying is faster and simpler. Both are hand methods for securing quilt layers with ties or stitches.
Wrapping Up Your Tied Quilt
You did it! You learned how to hand tie a quilt using embroidery thread. This quilt tying tutorial covered the steps. You used embroidery floss for tying quilts. You practiced knotting quilts by hand. You know about securing quilt layers with ties. You learned quilt tying techniques. You saw how it is an alternative to machine quilting. And why embroidery thread is the best thread for hand tying quilts for many people.
Tying is a simple skill. It gives a lovely finish. Your quilt is now ready to be bound. Then it will be ready to be loved and used. Enjoy your beautiful, tied quilt!