
Yes, you absolutely can attach Velcro to fabric without sewing! Many simple, no-sew methods use special glues or tapes. These ways help you put Velcro on cloth quickly and easily. You do not need a sewing machine or even a needle and thread. You just need the right sticky stuff and a few simple tools. This guide will show you how to do it using different easy steps.
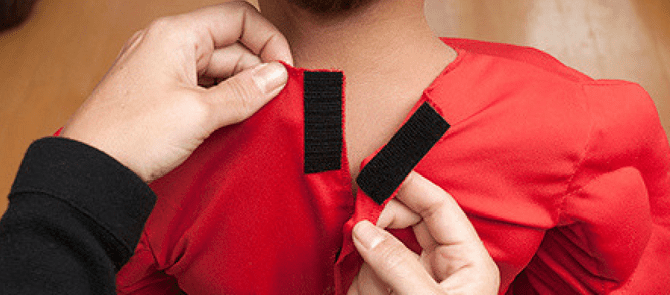
Image Source: s23775.pcdn.co
Grasping How No-Sew Velcro Works
People often think of sewing when they need to attach things to fabric. But for Velcro, sewing is not always needed. You can use strong glues or tapes made just for cloth. These sticky helpers create a strong hold between the Velcro and the fabric. This lets you use Velcro for many projects without sewing at all.
There are a few main ways to attach Velcro this way:
- Using fabric glue.
- Using stick-on Velcro that already has glue on it.
- Using iron-on Velcro that sticks with heat.
- Sometimes, using hot glue for simple craft jobs.
Each way has good points and not-so-good points. The best way for you depends on your project. Think about what kind of fabric you are using. Think about if the item needs to be washed. Also, think about how strong you need the hold to be.
Choosing the right stuff is key. Not all glues work well on all fabrics. Not all sticky tapes stay stuck after washing. Picking the correct fabric adhesive for velcro is important. Let’s look at the different ways you can do this.
Attaching Velcro With Fabric Glue
Using fabric glue is a very common way to attach Velcro to fabric without sewing. This method is great because you can pick a glue that works best for your fabric and how you will use the item. Fabric glues are made to stick to cloth and often stay stuck even after washing.
Selecting The Right Glue
Not just any glue will work. You need a glue that is made for fabric. Look for glues that say they are for textiles or fabric. Also, check if the glue is permanent and washable. Some good types of fabric glue for velcro include:
- Liquid Fabric Glue: This is a popular choice. You put it right on the Velcro or the fabric. Brands like Beacon Fabri-Tac or E6000 Craft Adhesive (use in a place with fresh air, it smells strong) work well for many fabrics.
- Spray Fabric Adhesive: A spray glue can cover a large area quickly. It is good for thin fabrics where liquid glue might soak through. Make sure the spray is meant for permanent fabric use.
- Permanent Fabric Adhesive Velcro: Some adhesives are sold specifically for this job. They are made to create a strong, lasting bond.
Make sure the glue you pick is right for your fabric. Some glues work better on cotton. Others are better for synthetic fabrics like polyester or nylon. Read the glue bottle to be sure.
Steps To Glue Velcro To Fabric
Here are the easy steps to glue velcro to fabric:
- Get Ready: First, get your fabric, your Velcro (both the hook side and the loop side), the fabric glue, some paper or plastic to protect your work surface, and something to press the Velcro down with (like a heavy book).
- Clean Your Fabric: This step is super important. The fabric must be clean and dry. Any dirt, oil, or fabric softener will stop the glue from sticking well. If the fabric is new, it’s best to wash it first without using fabric softener. Let it dry completely.
- Cut The Velcro: Cut the Velcro tape for fabric to the size and shape you need. Cut both the hook piece and the loop piece.
- Plan Where It Goes: Put the pieces of Velcro on your fabric where you want them to go. Use pins or a fabric marker to lightly mark the exact spot. This helps you put the glue and Velcro in the right place.
- Put Glue On One Side: Put the fabric glue on the back of one piece of Velcro (either the hook or the loop side). Do not use too much glue. A thin, even layer is best. If you use too much, it can squeeze out the sides and make a mess. For liquid glue, put it near the edges and a bit in the middle. For spray glue, spray in a box or protected area to avoid getting glue everywhere.
- Place Velcro On Fabric: Carefully put the Velcro piece with glue on it onto the marked spot on your fabric.
- Press It Down: Press the Velcro down firmly onto the fabric. You can use your fingers, a smooth tool, or put a heavy book on top. Pressing helps the glue spread and stick well.
- Let It Dry: This is very important. Let the glue dry completely. Check the glue bottle for how long this takes. Some glues dry in an hour, but others need 24 hours or even longer to get full strength. Do not move the fabric or the Velcro while it is drying.
- Repeat For The Other Side: Once the first piece of Velcro is dry and stuck, attach the second piece. If the two Velcro pieces need to match up (like on a jacket flap), stick the hook and loop sides together first. Put glue on the back of the second piece (the one not yet on the fabric). Carefully line up the second piece (with the first one still attached) on the spot it needs to go on the other piece of fabric (or another spot on the same fabric). Press it down. Then, gently pull the two pieces of Velcro apart, leaving the second piece stuck to the fabric. Press it down again firmly. Let it dry completely, just like the first piece.
- Let It Cure: Some glues need more time to cure (get to their strongest hold) than they need to just dry. This can take 72 hours or even longer. Do not wash the item or pull hard on the Velcro until the glue is fully cured.
Tips For Using Fabric Glue
- Always test the glue on a small, hidden piece of your fabric first. This shows you how the glue looks and sticks on that specific material.
- Work in a place with good air flow, especially if using strong-smelling glues.
- Keep glue off your fingers! It can be hard to get off.
- Use clamps or heavy objects to keep pressure on the Velcro while the glue dries. This helps make a stronger bond.
- Be patient! Letting the glue dry and cure completely is key to a lasting hold. Rushing this step can make the Velcro come off later.
Using fabric glue is a great no-sew velcro method. When done right, it can create a very strong hold, making it good for many uses.
Using Stick-On Velcro For Fabric
Stick-on velcro for fabric is one of the easiest no-sew options. It comes with the adhesive already on the back. You just peel off a paper layer and stick it onto the fabric. This is also called pressure-sensitive adhesive Velcro.
How Stick-On Velcro Works
Stick-on Velcro has a special sticky layer on the back of both the hook and loop tapes. This sticky layer is protected by a paper liner. When you peel off the liner, the sticky part is ready to attach. You press it onto the fabric, and the pressure helps it stick.
It seems simple, but the type of sticky stuff matters. Not all stick-on Velcro is made for fabric. Some are made for smooth, hard surfaces like walls or plastic. For fabric, you need stick-on Velcro that says it is specifically for textiles or fabric. The adhesive on these types is designed to grab onto fabric fibers better.
Steps To Use Stick-On Velcro Tape For Fabric
Applying velcro without sewing using stick-on tape is very quick.
- Get Ready: You need your fabric and the stick-on velcro tape for fabric. Scissors are helpful to cut the tape.
- Clean Your Fabric: Just like with glue, the fabric must be clean, dry, and free of fabric softener. Wash and dry the fabric if needed.
- Cut The Velcro: Cut the hook and loop pieces to the size you need.
- Plan Where It Goes: Put the cut Velcro pieces on the fabric where you want them to go. Mark the spots if needed.
- Peel and Stick One Side: Take one piece of Velcro. Peel the paper liner off the back carefully. Try not to touch the sticky part too much. Line it up with your mark on the fabric. Gently place it down.
- Press It Down Firmly: Once it’s in place, press it down hard. Rub it firmly with your fingers or a smooth, hard tool all over the piece. The pressure helps the adhesive stick to the fabric fibers.
- Wait A Little: Even though it sticks right away, the adhesive often gets stronger over time. Many stick-on Velcro products recommend waiting a little while before using them, maybe 24 hours, to let the adhesive bond fully.
- Attach The Second Side: To get the second piece in the right spot, it’s often easiest to stick the hook and loop pieces together first. Peel the paper off the back of the second piece. Place the combined Velcro pieces onto the spot where the second piece needs to go on the fabric. Press down firmly. Then, gently pull the two Velcro pieces apart, leaving the second piece stuck to the fabric. Press that piece down firmly again.
- Allow Time To Bond: Let the stick-on Velcro sit without being pulled apart for at least 24 hours if possible. This helps create a stronger bond.
Pros and Cons of Stick-On Velcro
- Pros: Very fast and easy to use. No drying time needed before you can handle the item (though waiting for full bond is best). No mess from liquid glue.
- Cons: The adhesive might not be as strong or as washable as some fabric glues. It can sometimes peel off, especially on fabrics that are bumpy, fuzzy, or stretch a lot. It might not be the best for items that need to be washed often or used roughly. Not all stick-on Velcro is meant for fabric, so you must buy the right kind.
Stick-on velcro for fabric is great for quick fixes, craft projects, or items that won’t be washed much.
Applying Iron-On Velcro To Cloth
Iron-on velcro to cloth uses heat to activate the adhesive. This method can create a very strong and durable bond, often able to handle washing well if done correctly.
How Iron-On Velcro Works
Iron-on Velcro has a special heat-activated adhesive on the back. This adhesive is dry and not sticky at room temperature. When you heat it with an iron, the adhesive melts slightly and soaks into the fabric fibers. As it cools, it hardens, creating a strong link between the Velcro and the cloth.
This method is similar to how iron-on patches work. The heat makes the glue grab onto the fabric really well.
Steps To Iron-On Velcro To Cloth
Using iron-on velcro requires an iron and a safe place to iron.
- Get Ready: You need your fabric, iron-on velcro tape for fabric, an iron, an ironing board, and a pressing cloth (a thin piece of cotton fabric or a special ironing sheet).
- Clean Your Fabric: As always, start with clean, dry fabric. No fabric softener! Iron the fabric smooth where the Velcro will go.
- Cut The Velcro: Cut the hook and loop pieces of iron-on Velcro to the size you need.
- Plan Where It Goes: Put the Velcro pieces on the fabric where you want them. Mark the spots lightly.
- Heat Your Iron: Set your iron to the correct heat setting for your fabric. Do not use steam. The iron needs to be hot enough to melt the adhesive, but not so hot it damages your fabric. A medium to high heat setting is usually needed for the adhesive, but check the Velcro package instructions and consider your fabric type. If using delicate fabric, iron from the back or use a lower setting and press longer.
- Place One Piece: Put one piece of iron-on Velcro onto the marked spot on your fabric. Make sure the shiny or rough (adhesive) side is down against the fabric.
- Use A Pressing Cloth: Place your pressing cloth over the Velcro and the fabric. This protects your fabric and the Velcro from direct heat and helps spread the heat evenly.
- Iron It: Press the hot iron down firmly onto the pressing cloth, right over the Velcro piece. Do not slide the iron around like you normally would. Just press straight down. Hold the iron there for the time given in the iron-on Velcro’s instructions (usually 10-20 seconds). Lift the iron and press down again, making sure you cover the whole Velcro piece.
- Let It Cool: This is critical! Let the Velcro and fabric cool down completely. The bond gets strong as the adhesive cools and hardens. Do not touch or move the Velcro while it is hot.
- Check The Edge: Once cool, try to gently lift an edge of the Velcro. If it peels up, it means the adhesive did not melt enough or you did not press long enough. Press again with the iron.
- Repeat For The Other Side: Attach the second piece of iron-on Velcro in the same way. If lining up, you can stick the two pieces together first, place them on the fabric, iron the top piece, let it cool, then gently peel the pieces apart, iron the second piece, and let it cool.
Tips For Iron-On Velcro
- Always test on a scrap piece of your fabric first. This helps you find the right heat setting and timing.
- Make sure your iron is hot enough. Too low a heat means the adhesive won’t melt properly.
- Press down firmly. Good pressure helps the melting adhesive get into the fabric fibers.
- Do NOT use steam. Steam can stop the adhesive from sticking right.
- Let it cool fully before testing or using. Patience makes the bond stronger.
- Iron-on is generally good for fabrics that can handle heat. Be careful with delicate fabrics like nylon, silk, or some synthetics. You might need a very low heat setting or another method.
Iron-on velcro to cloth offers a strong, lasting, no-sew bond that usually handles washing well.
Thinking About Hot Glue Velcro On Fabric
Hot glue is often used in crafts because it sticks quickly. You can use hot glue velcro on fabric for some simple, light-use projects. However, it’s usually not the best choice for things you want to last or wash.
Why Use Hot Glue?
- It sticks very fast.
- It’s easy to use for quick jobs.
- It works okay for craft items that won’t be touched much or washed.
Why Hot Glue Is Often Not Ideal For Fabric
- Washability: Most hot glues do not hold up in the washing machine. The heat and water can make the glue soft and let go of the fabric.
- Flexibility: Hot glue dries hard. Fabric is soft and moves. The hard glue can break or peel away as the fabric bends and flexes.
- Strength: Hot glue bond might not be as strong or permanent as fabric glue or iron-on adhesive, especially on certain fabrics.
- Applying: It can be hard to put a thin, even layer of hot glue, and it cools fast, so you have to work quickly.
When You Might Use Hot Glue
You might consider hot glue for:
- Kids’ crafts where the item won’t be washed.
- Temporary holds.
- Adding Velcro to stiff materials like felt or cardboard backed with fabric, used for display only.
Steps To Use Hot Glue Velcro On Fabric (For Craft Use)
- Get Ready: Fabric, Velcro, hot glue gun and glue sticks, and a safe surface.
- Cut Velcro: Cut the pieces you need.
- Plan Where It Goes: Put the Velcro on the fabric to see where it goes.
- Apply Hot Glue: Put a small amount of hot glue on the back of one Velcro piece. Work quickly, as it cools fast. Keep glue away from the edges so it doesn’t squeeze out.
- Press On Fabric: Quickly press the Velcro piece onto the fabric in the right spot.
- Hold Firmly: Hold it in place for about 30 seconds as the glue cools and sets.
- Repeat: Do the same for the second piece of Velcro.
Using hot glue velcro on fabric is simple, but remember it’s often not a permanent or washable solution.
Comparing No-Sew Velcro Methods
Here is a quick look at the different ways to attach Velcro without sewing:
| Method | How it Sticks | Strength/Permanence | Washability | Ease of Use | Best For |
|---|---|---|---|---|---|
| Fabric Glue | Liquid or spray adhesive | Can be very strong/permanent depending on glue | Good (if glue is washable) | Medium | Clothing, bags, home decor needing strong hold |
| Stick-On Velcro | Pressure-sensitive adhesive | Medium | Limited (often not recommended for washing) | Easy | Crafting, temporary fixes, items not washed |
| Iron-On Velcro | Heat-activated adhesive | Can be very strong/permanent | Good (if applied correctly) | Medium | Clothing, items needing durable, washable hold |
| Hot Glue | Hot melt adhesive | Low to Medium | Poor | Easy | Simple crafts, temporary use |
Choosing the permanent fabric adhesive velcro option (like a good fabric glue or iron-on) is key for items you want to last.
Getting Fabric and Velcro Ready
No matter which no-sew velcro method you pick, getting your fabric and Velcro ready is a very important step for success.
Why Preparation Matters
Think of glue like tape. Tape sticks best to a clean, smooth surface. If the surface is dirty, oily, or bumpy, the tape won’t stick well. It’s the same with fabric and adhesives.
- Clean Fabric: Fabric can have dirt, dust, oils from your hands, or finishes from the factory. Washing removes these things. Fabric softener is especially bad for adhesives, as it leaves a coating that stops glue from sticking. Always wash new fabric before attaching Velcro.
- Dry Fabric: The fabric must be completely dry. Any wetness will stop the adhesive from working right.
- Flat Fabric: For ironing, the fabric should be smooth and not wrinkled. For gluing or sticking, having the fabric lay flat helps get good contact between the Velcro and the fabric.
Preparing Your Fabric
- Wash: Wash the fabric according to its care instructions. Do not use fabric softener.
- Dry: Dry the fabric completely.
- Iron (Optional but Recommended): Iron the area where the Velcro will go to make it smooth. This is extra important for iron-on methods.
Preparing Your Velcro
Velcro usually comes ready to use. Just cut the pieces you need. Handle the adhesive side as little as possible, especially with stick-on Velcro, so you don’t get oils from your skin on the sticky part.
Taking Care of Items With No-Sew Velcro
Once you have attached Velcro using a no-sew method, you want it to stay stuck! How you care for the item, especially how you wash it, makes a big difference.
Washing Items With Adhered Velcro
- Check Adhesive Instructions: Always check the instructions for the specific glue, stick-on tape, or iron-on product you used. They will tell you if it is washable and how to wash it.
- Wait for Full Cure: Do not wash the item until the adhesive has fully dried and cured. This can take several days for some fabric glues. Washing too soon is the fastest way to make the Velcro peel off.
- Close The Velcro: Before washing, close the hook and loop pieces together. This stops the hook side from catching on other clothes in the wash and potentially pulling the Velcro piece away from the fabric.
- Use Gentle Settings: Wash on a gentle cycle with cold or warm water (not hot). Hot water and strong washing can weaken the adhesive.
- Mild Detergent: Use a mild laundry soap.
- Air Dry is Best: Lay the item flat or hang it to air dry. High heat in a dryer can damage some adhesives, especially glue or stick-on types. If you must use a dryer, use a low heat setting.
Other Care Tips
- Avoid pulling hard on the Velcro bond if possible.
- If an edge starts to peel up, you might be able to re-glue or re-iron that spot if the fabric allows.
By taking these simple steps, you can help your no-sew velcro attachments last longer.
Picking The Right No-Sew Method
Choosing the best way to attach Velcro to fabric without sewing depends on several things:
- What is the fabric? Is it thick cotton, thin silk, stretchy knit, or waterproof nylon?
- How will the item be used? Is it a craft item, a piece of clothing, a bag that gets heavy use?
- Will it be washed? How often? This is a major factor in choosing a washable adhesive.
- How strong does the hold need to be? A small closure on a light pouch is different from a main closure on a heavy bag.
- How quickly do you need it done? Stick-on is fast, glue needs drying time, iron-on needs heating and cooling time.
Fabric Type Matters
- Cotton/Cotton Blends: These usually work well with most fabric glues and iron-on methods. The fibers give the adhesive something good to grab onto.
- Synthetics (Polyester, Nylon): Some adhesives work well, but test first. Iron-on needs care with melting points. Some glues might not stick as well to very smooth synthetic fibers.
- Delicate Fabrics (Silk, Rayon): Be very careful with heat (iron-on) and strong glues. Test on a hidden spot. A gentle fabric glue might be best.
- Fleece/Fuzzy Fabrics: Adhesives might have trouble sticking well to the fibers. You need an adhesive that can get through the fuzz to the fabric base. Iron-on might be difficult because of the texture.
- Waterproof/Coated Fabrics: These are often the hardest. The coating stops the adhesive from reaching the fabric fibers. Sewing is often the most reliable method for these. If you must use glue, look for one that states it works on plastics or outdoor fabrics, and test very well.
When To Choose Which Method
- For washable clothing or bags needing a strong hold: Fabric glue (washable type) or Iron-on Velcro are usually the best choices for permanent fabric adhesive velcro.
- For crafts, decorations, or things that won’t be washed: Stick-on velcro for fabric is super easy. Hot glue can work for very simple crafts on stiff materials.
- For quick fixes or temporary use: Stick-on Velcro is the fastest applying velcro without sewing.
Think about your project and use the right method and product for the best results. Using the correct fabric adhesive for velcro is the key to making it stick well without sewing.
Troubleshooting Common Issues
Sometimes, even with the right steps, your no-sew Velcro might not stick perfectly. Here are some common problems and what to do:
- Velcro is peeling off:
- Did you clean the fabric first? Fabric softener, dirt, or oil stops glue from sticking. Rewash the fabric without softener, let it dry, and try again with new Velcro and adhesive.
- Did you use the right type of adhesive for the fabric and use? Make sure your stick-on was for fabric, your glue was for fabric, or your iron-on was heated correctly for your material.
- Did you press it down firmly? Pressure helps the bond.
- Did you let the adhesive dry/cure completely? Rushing this step means a weak bond. Wait the full recommended time.
- Did you wash it too soon or too roughly? Follow care instructions carefully.
- If it’s stick-on Velcro, the adhesive might not be strong enough for the fabric type or use. You might need to switch to fabric glue or iron-on.
- Glue squeezed out the sides: You used too much glue. Use a thin layer next time. You can try to gently clean up wet glue with a damp cloth (check glue instructions). Dried glue can sometimes be carefully peeled or trimmed away, but it might leave a mark.
- Iron-on Velcro isn’t sticking after heating:
- Was the iron hot enough? You need enough heat to melt the adhesive.
- Did you press long enough? The heat needs time to get through the Velcro and fabric.
- Did you use a pressing cloth? It helps, but make sure it’s not too thick.
- Did you use steam? Turn steam off.
- Did you let it cool before checking? Let it cool completely.
- Try pressing it again, making sure the heat, time, and pressure are right.
- Stick-on Velcro won’t stay stuck to fuzzy fabric: Stick-on adhesive needs a smooth, flat surface to grab onto. On fuzzy fabric, it just sticks to the fibers, not the fabric base. Try using fabric glue that can soak into the fuzz and reach the base fabric, or consider iron-on if the fabric can handle heat.
Most problems come from not preparing the fabric, not using the right adhesive, or not letting the adhesive set fully. Be patient and follow the steps carefully.
FAQs About Attaching Velcro Without Sewing
Q: Can I wash fabric with glue-on Velcro?
A: Yes, if you use a fabric glue that is specifically marked as washable. Make sure the glue is fully cured before washing, and wash on a gentle cycle.
Q: Is stick-on Velcro as strong as sewing?
A: No, generally sewing creates the strongest and most permanent hold. Stick-on Velcro is very easy to use but often less durable than sewing or using a strong fabric glue or iron-on method, especially after washing.
Q: Can I use hot glue to put Velcro on clothes?
A: It’s not recommended for clothes that will be worn and washed often. Hot glue is usually not washable and can peel or break easily on soft, moving fabric. It’s better for crafts that don’t need to be washed.
Q: How long does fabric glue take to dry and cure?
A: Drying time (when it feels dry to touch) can be from 1 hour to 24 hours. Curing time (when it reaches full strength) can take 24 to 72 hours or even longer. Always check the specific glue bottle’s instructions.
Q: Will stick-on Velcro work on all fabrics?
A: Stick-on works best on smooth, flat fabrics. It might not stick well to bumpy, fuzzy, or heavily textured fabrics. Always test on a small area first.
Q: Is iron-on Velcro permanent?
A: When applied correctly at the right temperature and pressure, and allowed to cool fully, iron-on Velcro creates a strong, usually permanent bond that can handle washing.
Q: What is the best no-sew method for a strong, washable hold?
A: Using a high-quality, washable fabric glue or using iron-on Velcro are generally the best methods for a strong, permanent fabric adhesive velcro bond that can be washed.
Q: Do I need a special type of Velcro for no-sew methods?
A: Yes, you need Velcro that is made for fabric. This means it will either be labeled as “fabric fusion,” “iron-on,” or come with a specific fabric adhesive for velcro included or already on the back (stick-on for fabric). Regular Velcro meant for sewing does not have the necessary adhesive.
You can attach Velcro to fabric without sewing in many easy ways. Pick the right method for your project, prepare your materials well, follow the steps carefully, and take good care of your finished item. You can add the ease of Velcro closures to many things without ever picking up a needle!