
Many people ask about the best way to transfer embroidery patterns onto fabric or how to get their drawings onto material for stitching. There are several simple ways to do this, depending on your fabric and design. Some popular embroidery pattern transfer methods include tracing with light, using special papers, or ironing on designs. You can even draw directly onto the fabric with certain tools.
Embroidery starts with a great design. But getting that design onto your fabric so you can stitch it is key. A clear line to follow makes your stitching look neat and tidy. Let’s look at easy ways to move your pictures from paper to cloth.
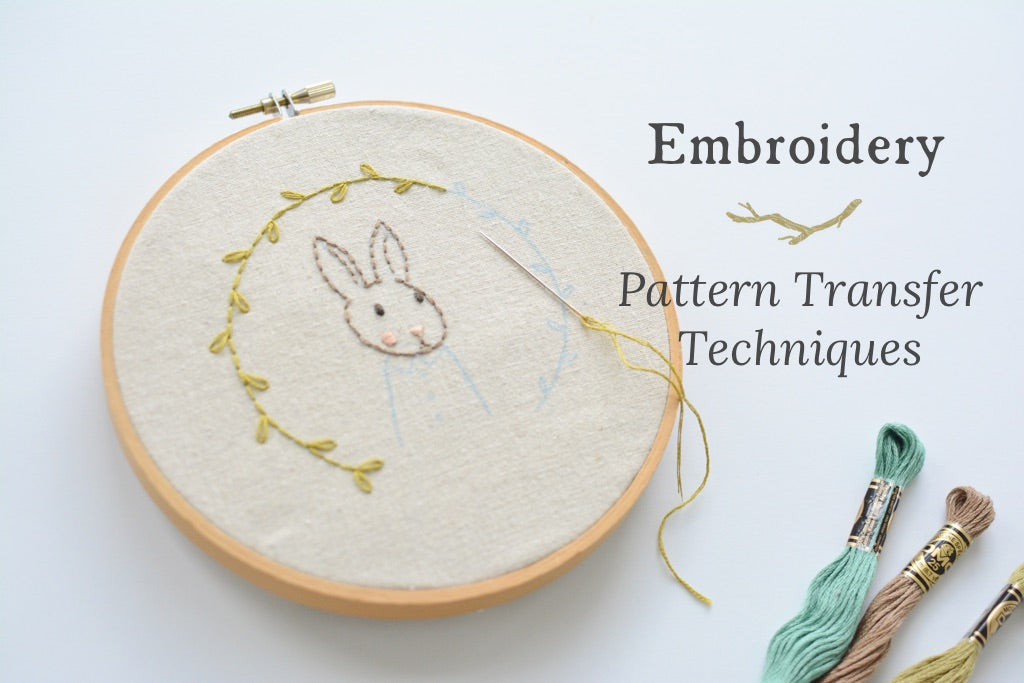
Image Source: www.twigandtale.com
Common Embroidery Pattern Transfer Methods
Picking the right way to transfer your pattern depends on a few things. What color is your fabric? How thick is it? How detailed is your pattern? Do you want the lines to wash away when you’re done? Here are some popular methods people use.
Tracing Methods
Tracing is a favorite for many stitchers. It works best on light-colored fabrics. You put the fabric over your pattern and draw the lines.
Tracing with a Window or Light Box
Using a window or a light box helps you see the pattern through the fabric. This is a simple and low-cost way to transfer your design.
How to Trace with Light
- Get Your Pattern Ready: Print your embroidery patterns onto thin paper. The lines should be clear and dark.
- Find Your Light Source: If it’s daytime, a window is perfect. Tape your pattern to the window glass. If it’s dark or you want more control, use a light box for embroidery. Place the light box on a table and turn it on.
- Put Fabric Over Pattern: Center your fabric over the pattern taped to the window or placed on the light box. You should be able to see the pattern lines through the fabric.
- Secure Fabric: Tape the fabric edges to the window or light box to stop it from moving while you trace.
- Trace the Design: Use a water soluble embroidery pen or a heat erasable pen to draw the lines onto your fabric. These pens make lines that disappear later.
- Check Your Work: Lift the fabric carefully. Make sure all the lines are there and easy to see.
Pros of Tracing with Light
- It’s simple and easy to do.
- It works well for detailed patterns.
- You can see the pattern exactly as it is.
- Uses pens that wash away or disappear with heat.
Cons of Tracing with Light
- Doesn’t work well on dark fabrics.
- Thick fabrics are harder to see through.
- Your hand might block the light sometimes.
- You need a light source (window during the day, or buy a light box).
Tracing with Paper (Tissue or Tracing Paper)
This method uses thin paper that you can see through. You draw the pattern onto this paper first, then attach it to your fabric.
How to Trace with Paper
- Draw or Print Pattern: Get your design onto a piece of tracing paper or thin tissue paper. Make the lines clear.
- Pin Paper to Fabric: Place the tracing paper with the pattern exactly where you want it on your fabric. Use small pins or tacking stitches to hold it firmly in place.
- Stitch Through Paper: Stitch your design directly through the paper and into the fabric.
- Remove Paper: Once you finish stitching, carefully tear the paper away. You can use tweezers to pull out small bits of paper stuck under stitches.
Pros of Tracing with Paper
- Works on any color fabric.
- Good for detailed designs.
- You don’t need special pens or light boxes.
- The paper stays put, so your pattern doesn’t shift.
Cons of Tracing with Paper
- Tearing the paper away can be fiddly, especially with small stitches or detailed patterns.
- Might leave tiny paper bits behind.
- Not good for patterns where you need to leave some areas unstitched, as the paper covers everything.
Using Transfer Papers
Transfer papers are like carbon paper, but made for fabric. You put the transfer paper between your pattern and the fabric and draw over the lines. The color on the transfer paper goes onto the fabric.
Using Carbon Paper for Embroidery
Special carbon paper for sewing or embroidery is used. Do not use regular carbon paper meant for office work, as it might not wash out and could stain your fabric.
How to Use Carbon Paper
- Get Supplies: You need dressmaker’s carbon paper (comes in different colors) and a pointed tool like a tracing wheel or a dry ballpoint pen (one that doesn’t write ink).
- Layer: Place your fabric flat. Put the carbon paper on top of the fabric, color side down. Place your pattern paper on top of the carbon paper.
- Secure: Tape the layers together or weigh them down so they don’t move.
- Trace Lines: Use your tracing wheel or dry pen to go over all the lines of your pattern. Press hard enough to transfer the color, but not so hard you damage the fabric.
- Check Transfer: Carefully lift the pattern and carbon paper. See if the lines have transferred clearly onto the fabric. If some lines are faint, put the papers back and trace those spots again.
Pros of Carbon Paper
- Works well on many fabric types.
- Can work on medium-dark fabrics if you use a light-colored carbon paper (like white or yellow).
- Creates clear lines.
- Relatively fast method.
Cons of Carbon Paper
- The lines might be hard to wash out completely on some fabrics. Test on a scrap piece first.
- Can smudge if you rub it while stitching.
- Need to use special dressmaker’s carbon paper.
Using Water Soluble Transfer Paper (Sulky Fabri-Solvy, etc.)
This is a popular modern option. It’s a clear or white sheet that feels a bit like plastic or thick paper. You can draw on it or print on it, then stick it to your fabric. When you finish stitching, the paper dissolves completely in water.
How to Use Water Soluble Paper
- Get Your Pattern: You can draw your design directly onto the paper using a permanent pen, or print your design onto the printable versions of this paper using an inkjet printer. Make sure the lines are clear.
- Stick to Fabric: Some types are sticky on the back. Peel off the backing and stick it firmly onto your fabric where you want the pattern. If it’s not sticky, pin it in place.
- Stitch Through Paper: Stitch your design right through the paper and into the fabric.
- Wash Away: Once stitching is done, soak the fabric in cool water. The paper will dissolve. You might need to rinse it a few times to get rid of all traces.
- Dry Fabric: Let your fabric dry completely.
Pros of Water Soluble Paper
- Works on any fabric color, including transferring embroidery onto dark fabric.
- Great for intricate designs because you stitch directly on the lines.
- Leaves no trace once washed away.
- Can be printed on, which is very handy.
Cons of Water Soluble Paper
- Costs more than other methods.
- Requires washing the finished piece, which isn’t always ideal (e.g., for delicate threads or materials).
- The paper can stretch a little when wet before stitching, so place it carefully.
Iron-On Embroidery Transfers
Some patterns come ready to iron onto your fabric. These are often stamped embroidery patterns found in kits or sold separately. The design is printed with a special ink that transfers when heated.
How to Use Iron-On Transfers
- Prepare Fabric: Make sure your fabric is clean, dry, and wrinkle-free. Iron it smooth.
- Place Transfer: Put the iron-on transfer face down on your fabric where you want the pattern.
- Heat Your Iron: Heat your iron to a medium-hot setting (often linen or cotton setting), with NO steam. Steam will make the transfer blurry or not work.
- Iron the Design: Press the hot, dry iron down firmly onto the back of the transfer paper. Don’t slide the iron around. Hold it in place for 10-30 seconds (check the transfer’s instructions). Lift and move to the next spot, overlapping slightly.
- Check Transfer: Lift a corner of the transfer paper carefully to see if the design has transferred. If not, put it back down and iron that spot again.
- Remove Paper: Once the design is transferred, let the fabric cool a little, then peel off the paper.
Pros of Iron-On Transfers
- Quick and easy for repeating patterns or simple designs.
- Creates clear lines.
- Good for beginners.
Cons of Iron-On Transfers
- The lines are usually permanent and will not wash out. You must cover them all with stitches.
- Can only be used once or a few times faintly.
- Doesn’t work well on textured or very thick fabrics.
- Getting an even transfer can be tricky sometimes.
Direct Application Methods
Sometimes, the simplest way is to just draw the pattern onto the fabric. This requires tools specifically made for fabric.
Using Pens or Pencils for Embroidery Transfer
You can use special pens or pencils designed for fabric. These are some of the best pens for embroidery transfer because their marks disappear later.
Types of Pens and Pencils
- Water Soluble Pens: These are common. The ink disappears completely when you dab it with water or soak the fabric. Great for light to medium fabrics.
- Heat Erasable Pens: The ink disappears when you apply heat, like from an iron or even rubbing it quickly. Be careful, sometimes the lines can reappear if the fabric gets very cold.
- Air Erasable Pens: The ink fades away on its own after a few hours or days. This can be risky if you are a slow stitcher. Test how long it takes to fade on a scrap.
- Embroidery Pencils: These are like colored pencils but made for fabric. They are usually water soluble. Can be good for finer lines or adding shading guides.
How to Use Pens or Pencils
- Prepare Fabric: Make sure your fabric is smooth.
- Position Pattern: You can’t usually put the pattern underneath unless the fabric is very thin and light. Instead, you might freehand the design, use the tracing-with-light method described earlier, or use the pen/pencil with a stencil.
- Draw Lines: Use a light touch. Draw the pattern lines onto the fabric. Don’t press too hard, especially with pencils, as it can mark the fibers permanently.
- Test First: ALWAYS test the pen or pencil on a scrap of your fabric to make sure the mark disappears completely!
Pros of Pens/Pencils
- Simple to use.
- Allows for freehand drawing directly onto fabric.
- Marks usually disappear (if using the right type).
- Good for touch-ups or adding small details.
Cons of Pens/Pencils
- Using them without a transfer method means you need to be good at drawing freehand or tracing with light.
- Risk of permanent marks if you use the wrong type or press too hard.
- Doesn’t work well for transferring complex designs without help from light or paper.
- Water soluble pens are hard to see on dark fabrics.
Transferring Embroidery Onto Dark Fabric
Putting a pattern on dark fabric is harder because you can’t see through it with light. You need methods where the mark shows up clearly on the dark surface.
Methods Good for Dark Fabric
- Tracing Paper (Stitch through): As described above, you pin the paper on top and stitch through it. Works perfectly on dark fabric.
- Water Soluble Transfer Paper: This white or clear paper is placed on top. You stitch through it, then wash it away. The pattern lines on the paper are visible against the dark fabric.
- Dressmaker’s Carbon Paper (White or Yellow): Use a light-colored carbon paper on dark fabric. Place the fabric, then the carbon paper (color side down), then the pattern. Trace firmly. The light color transfers onto the dark fabric.
- White or Light-Colored Fabric Pens/Pencils: Some companies make fabric pens or pencils with white or pastel ink specifically for dark fabrics. Test them thoroughly on a scrap to ensure they are visible and removable.
- Temporary Fabric Paint/Puff Paint: For very thick lines or outlines on dark fabric, some people use a tiny amount of temporary fabric paint (like Scribbles or Tulip brand, non-toxic) in a fine-tip bottle. Draw the outline with the paint, let it dry, and stitch over the paint line. Test this method first! It might be hard to stitch through or affect the fabric feel.
Tips for Dark Fabric
- Always test your transfer method on a scrap of the exact fabric you are using.
- White marks can sometimes be harder to remove than blue or black marks on light fabric.
- Consider outlining the design on the paper pattern with a thick black marker so the lines are bolder for tracing, even through slightly thicker fabric (if using light method).
Getting Your Pattern Ready
Before you can transfer a pattern, you need to have it ready. This often means printing embroidery patterns.
Printing Your Design
Most people design patterns on a computer or get them from websites. You’ll need to print the pattern at the size you want for your embroidery.
Steps for Printing
- Size Your Pattern: Make sure the pattern is the right size for your hoop or project. You might need to adjust the size in your computer’s print settings.
- Print Clearly: Print the pattern onto plain paper. If you plan to trace it with light, make sure the lines are dark enough to see through your fabric. Use the ‘best’ quality print setting if needed.
- Consider Paper Type: For tracing with paper (the stitch-through method), print onto very thin paper like tissue paper or lightweight tracing paper if your printer can handle it, or print onto regular paper and then trace it onto thin paper by hand. For printable water-soluble stabilizers, follow the product’s instructions for printing (usually through the printer’s paper tray).
Tips for Printing
- Print a test copy on plain paper first to check the size.
- If using a home printer, make sure the ink levels are good so lines are clear.
- If printing directly onto special paper like water-soluble stabilizer, check the paper type setting on your printer.
Choosing the Right Method
With many embroidery pattern transfer methods available, how do you pick the best one for your project? Think about these things:
Fabric Type and Color
- Light, thin fabrics: Tracing with light (window or light box) is often easiest. Water soluble pens work well. Carbon paper can also work.
- Medium to thick fabrics: Tracing with light might not work. Carbon paper, water soluble paper, or tracing paper (stitch-through) are better choices.
- Dark fabrics: Tracing paper, water soluble paper, white/light carbon paper, or special white pens are needed.
- Textured fabrics (like linen, terry cloth): Smooth tracing methods like carbon paper or tracing through paper are usually better than direct tracing with light, where the bumps can make lines uneven. Iron-ons might not stick well.
- Delicate fabrics: Be careful with methods that require heat (iron-ons) or could leave marks (carbon paper). Water soluble methods might require gentle washing. Stitching through paper is often safe.
Pattern Complexity
- Simple shapes, bold lines: Direct drawing with pens/pencils (if skilled), iron-ons (if available for that design), or carbon paper are fast.
- Detailed, intricate designs: Tracing with light, stitching through paper, or water soluble paper methods give you the best control for accurately transferring fine lines.
Need for Removable Marks
- Stitching will cover all lines: Iron-on transfers (lines are permanent), or carbon paper (might not wash out fully) are options.
- Lines will show, or you need to wash them away: Water soluble pens, heat erasable pens, air erasable pens, or water soluble paper are necessary.
- No marks left at all: Stitching through tracing paper or using water soluble paper are the best methods, as they are removed completely.
Your Skill Level and Tools Available
- Beginners might find iron-ons or stamped embroidery patterns easiest to start with.
- Having a light box makes tracing with light very convenient.
- Using water soluble paper requires having water accessible later.
- If you hate tearing paper, avoid the tracing-through-paper method.
Quick Comparison Table of Transfer Methods
| Method | Best Fabric Color | Fabric Thickness | Removable? | Pattern Detail | Ease of Use | Tools Needed | Notes |
|---|---|---|---|---|---|---|---|
| Tracing with Light | Light | Thin to Medium | Yes (pen dependent) | High | Medium | Light source (window/box), soluble pen | Simple, good for detail on light fabric. |
| Tracing with Paper (Stitch) | Any | Any | Yes (paper removed) | High | Medium | Tracing paper, pins/thread, scissors | Works everywhere, can leave paper bits. |
| Dressmaker’s Carbon Paper | Light to Medium / Dark (use white/yellow) | Any | Sometimes (test!) | Medium | Easy | Carbon paper, tracing tool | Can smudge, test washability. |
| Water Soluble Paper | Any | Any | Yes (washes away) | High | Medium | Water soluble paper (maybe printer) | Great for detail & dark fabric, needs wash. |
| Iron-On Transfers | Light to Medium | Smooth | No (permanent) | Simple to Medium | Easy | Iron (no steam), transfer paper | Quick, but permanent marks. |
| Fabric Pens/Pencils (Direct) | Light / Dark (special pens) | Any | Yes (pen dependent) | Simple (or trace) | Easy | Soluble/erasable pen/pencil | Good for freehand/touch-ups, test pen. |
| Stamped Embroidery Patterns | Varies (often light) | Varies | Usually No (permanent) | Varies (pre-done) | Very Easy | Pattern is pre-printed on fabric/transfer | Bought this way, easy to start. |
Tips for Successful Pattern Transfer
- Wash and Iron Fabric First: Make sure your fabric is clean and smooth. This helps the transfer lines go on evenly and helps washable lines come out later. Don’t use fabric softener if using water-soluble or iron-on methods, as it can create a coating.
- Test Everything: Always, always, always test your transfer method and pen/pencil on a small scrap of the exact fabric you are using for your project. Make sure the lines are clear and, if they are meant to disappear, that they do disappear completely without leaving a trace or damaging the fabric.
- Use a Light Hand: Whether tracing with a pen, pencil, or tracing tool with carbon paper, don’t press harder than you need to get a clear line. Heavy pressure can leave marks on the fabric fibers themselves, even if the ink or powder washes away.
- Keep it Clean: Avoid rubbing the transferred design with your hands while you stitch, especially with carbon paper or certain pens, as this can cause smudging.
- Don’t Transfer the Whole Design at Once (Sometimes): If you are a very slow stitcher, especially when using air-erasable pens, only transfer the part of the design you plan to stitch in that sitting so the lines don’t disappear before you get to them.
- Mind the Pen Color: Choose a pen color that shows up well on your fabric but isn’t so dark it’s hard to cover with your stitches. Blue is common for light fabrics, while white or yellow is used for dark fabrics with certain methods.
- Check Instructions: If you buy a specific transfer product (like iron-ons or water soluble paper), read the instructions that come with it. They might have specific tips or requirements.
Following these methods and tips will help you get your beautiful embroidery designs onto your fabric cleanly and easily, setting you up for stitching success.
Frequently Asked Questions about Transferring Embroidery Patterns
h4 What is the best pen for embroidery transfer?
The “best” pen depends on your fabric and how you want the mark to disappear. Water soluble embroidery pens (blue or black) are popular for light fabrics because they wash away easily. Heat erasable pens are also common, disappearing with heat. For dark fabrics, you might need special white pens or choose a method that puts a light mark on top. Always test the pen on a scrap first.
h4 Can I use regular carbon paper for embroidery?
No, you should not use regular carbon paper from an office. It contains waxes and inks that are usually permanent and will not wash out of fabric, leaving stubborn stains. Always use dressmaker’s carbon paper (sometimes called transfer paper or tracing paper for fabric) which is designed to be used on textiles and has different formulations, often including clay or pigments that are meant to be washable or brushed away.
h4 How do I transfer an embroidery pattern onto black fabric?
Transferring embroidery onto dark fabric requires methods where the mark shows up brightly. Good options include stitching through tracing paper pinned onto the fabric, using white or light-colored dressmaker’s carbon paper, or using a water soluble paper that you stick or pin on top and stitch through. Some special white or light-colored fabric pens/pencils also exist, but test them well.
h4 Are stamped embroidery patterns easy for beginners?
Yes, stamped embroidery patterns are very easy for beginners. They are patterns already printed onto the fabric or provided as iron-on transfers, meaning you don’t have to worry about the transfer process at all. You just start stitching directly onto the marked lines.
h4 How do I print embroidery patterns at the right size?
When you print from your computer, open the pattern file and look at the print options. There is usually a scaling option (like “Fit to page,” “Actual size,” or a percentage). If the pattern is meant for a specific hoop size (e.g., 6 inches), you might need to print at a custom scale percentage until the printed design measures that size. Always print a test copy on plain paper first to check the size before using special transfer paper or fabric.
h4 How do I remove embroidery transfer marks?
How you remove the marks depends on the method you used.
* Water Soluble Pens/Pencils: Dab with a wet cloth or rinse the finished piece in cool water.
* Heat Erasable Pens: Apply heat with an iron or hairdryer. Be aware marks can sometimes reappear in freezing temperatures.
* Air Erasable Pens: The marks fade on their own over time.
* Dressmaker’s Carbon Paper: Some types wash out, some brush away. Test first.
* Water Soluble Paper: Dissolves completely when soaked in water.
* Iron-On Transfers / Stamped Patterns: The marks are usually permanent and meant to be covered by your stitches.
Always test the removal method on a scrap of your fabric with the transfer mark applied, before you stitch your main piece.
Transferring your embroidery pattern is an important first step. By picking the right method for your fabric and design, you set yourself up for a smooth and enjoyable stitching experience. Happy embroidering!