
What is the correct way to put a bobbin into a Brother sewing machine? The correct way involves first winding the bobbin properly, then inserting it into the bobbin case or shuttle, and finally ensuring the thread is routed correctly through the tension discs and needle. This guide will walk you through the entire process for successful Brother sewing machine bobbin loading.
Sewing is a rewarding craft, and at its heart lies the humble bobbin. This small spool of thread works in tandem with the needle to create stitches. For any Brother sewing machine owner, mastering how to thread a bobbin Brother machine is a fundamental skill. This article provides a comprehensive, step-by-step explanation for successfully placing your bobbin and ensuring your machine runs smoothly. We’ll cover everything from winding a bobbin Brother style to troubleshooting common Brother sewing machine bobbin issues.
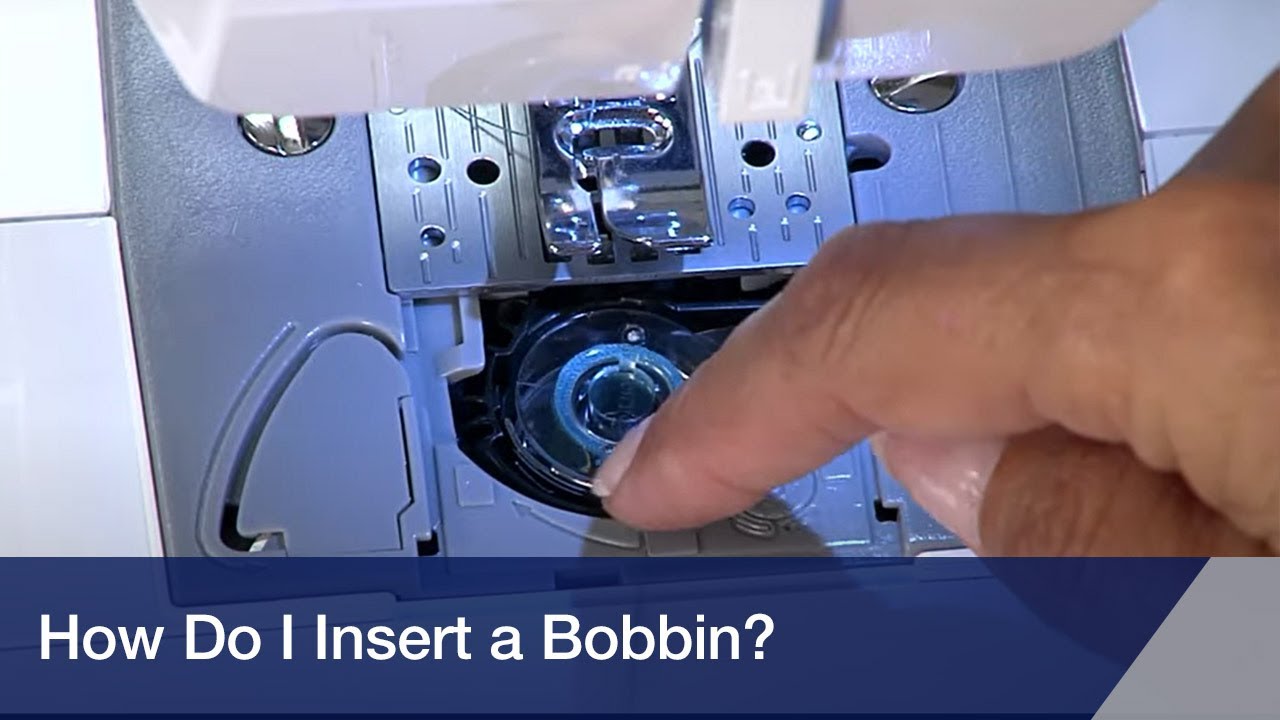
Image Source: i.ytimg.com
Preparing Your Bobbin: The Winding Process
Before you can even think about placing bobbin Brother sewing, the bobbin itself needs to be filled with thread. This is known as winding a bobbin. A properly wound bobbin is crucial for consistent stitch formation.
The Bobbin Winding Process Brother
Most Brother sewing machines have a dedicated bobbin winder. The process generally involves these steps:
- Select the Correct Bobbin: Ensure you are using a bobbin that is compatible with your specific Brother sewing machine model. Using the wrong type of bobbin can lead to poor stitch quality or even damage to your machine. Check your machine’s manual if you’re unsure.
- Thread the Bobbin Winder:
- Find the bobbin winder spindle on your machine.
- Place the bobbin onto the spindle.
- Locate the thread path for bobbin winding. This is usually marked with small numbers or arrows on the machine’s surface.
- Guide the thread from your spool through the designated thread guides.
- Pass the thread through one of the small holes in the bobbin.
- Use your finger to hold the end of the thread against the bobbin.
- Engage the Bobbin Winder:
- Some machines have a small clutch mechanism. You may need to push the bobbin winder spindle to the right or left to engage it. This disengages the needle from the winding process.
- Start the machine at a slow speed.
- Gently press the foot pedal.
- Winding the Bobbin:
- As the bobbin begins to wind, guide the thread to ensure it winds evenly.
- Hold the thread tail securely until a few wraps have been made.
- When the bobbin is nearly full, it will automatically slow down or stop on many models, indicating the winding is complete. For manual stopping, keep an eye on the thread.
- Cut the thread.
- Remove the wound bobbin from the spindle.
Tips for a Good Bobbin Wind:
- Even Winding: The thread should be wound evenly across the bobbin, without overlapping or gaps. This ensures a consistent thread supply.
- No Slack: The thread should be wound tautly, but not so tight that it distorts the bobbin.
- Secure Thread Tail: Make sure the thread tail is trimmed neatly after winding.
Inserting the Bobbin: Getting it Ready to Sew
Once your bobbin is wound, the next step is inserting bobbin Brother sewing machine. This process can vary slightly between different Brother models, but the general principles remain the same.
Brother Sewing Machine Bobbin Loading
There are two main types of bobbin systems found in Brother sewing machines: top-loading (drop-in) and front-loading (traditional).
1. Top-Loading (Drop-In) Bobbin System
Many modern Brother sewing machines feature a top-loading bobbin system, often called a “drop-in” bobbin. This system is generally considered more user-friendly.
- Locate the Bobbin Cover: On the sewing machine bed, there will be a removable plate or cover that lifts to reveal the bobbin area.
- Remove the Bobbin Cover: Gently lift or slide off the bobbin cover.
- Place the Bobbin:
- Take your wound bobbin.
- Observe the bobbin case: You’ll see a small slot or opening in the bobbin case.
- Crucially, note the direction of the thread as it unwinds from the bobbin. For most Brother drop-in systems, the thread should unwind counter-clockwise. Consult your machine’s manual if you’re uncertain.
- Place the bobbin into the bobbin case with the thread unwinding in the correct direction. The thread should come off the top of the bobbin.
- Thread the Bobbin Holder:
- There’s a small slit or channel on the side of the bobbin case.
- Guide the thread from the bobbin through this slit and then pull it towards the back of the machine.
- There’s usually a small blade or cutting notch in the bobbin cover area that helps to trim the thread end.
- Replace the Bobbin Cover: Once the bobbin is correctly seated and threaded, replace the bobbin cover.
2. Front-Loading (Traditional) Bobbin System
Older Brother sewing machines, and some current models, utilize a front-loading bobbin system. This involves a removable bobbin case.
- Locate the Bobbin Area: This is typically found under a small metal or plastic plate on the front of the machine, often referred to as the “needle plate” or “throat plate.”
- Remove the Needle Plate: You might need a screwdriver to remove a small screw holding the needle plate in place, or it may simply lift off.
- Remove the Bobbin Case (if applicable): Some front-loading systems have a removable bobbin case. This usually slides or lifts out.
- Insert the Bobbin into the Bobbin Case:
- Take your wound bobbin.
- Hold the bobbin case with the open side facing upwards.
- Place the bobbin into the bobbin case.
- Determine the correct thread direction. For most Brother machines with front-loading systems, the thread should unwind clockwise from the bobbin. Again, your manual is the best resource.
- Guide the thread through the small slot in the bobbin case.
- Pull the thread through until it comes out of the small hole at the end of the bobbin case. You should feel a slight resistance, indicating it’s going through the tension spring.
- Insert the Bobbin Case into the Shuttle:
- Ensure the bobbin case has a small hook or lever that needs to be aligned correctly.
- Slide the bobbin case back into the shuttle race of the machine, aligning the hook with the notch in the shuttle. It should click or seat firmly into place.
- Thread the Machine: After the bobbin case is in place, you’ll need to thread the upper thread. Pull the upper thread down through the machine, and crucially, bring the upper thread under the bobbin thread. You can do this by holding the bobbin thread tail and turning the handwheel towards you once. The upper thread will catch the bobbin thread and pull a loop up.
- Pull Up the Bobbin Thread: Pull the loop of bobbin thread up through the needle plate hole.
- Place Threads to the Back: With the needle in its highest position, pull both the upper thread and the bobbin thread towards the back of the machine. You can use the presser foot to hold them in place.
- Replace the Needle Plate: Securely reattach the needle plate.
Setting Bobbin Brother Machine for Optimal Performance
Once the bobbin is correctly loaded, the next crucial step is setting bobbin Brother machine for consistent stitching. This primarily involves ensuring the thread is properly routed and the Brother sewing machine bobbin tension is correctly adjusted if needed.
Routing the Thread
- Top-Loading: After placing the bobbin and threading through the slot, ensure the thread is pulled smoothly towards the needle. The thread should pass under the presser foot.
- Front-Loading: As mentioned, bringing the upper thread under the bobbin thread and pulling both to the back is essential for the machine to pick up the bobbin thread correctly.
Checking Bobbin Tension
Most Brother sewing machine bobbin tension issues stem from the upper thread tension, but the bobbin itself also has a tension mechanism.
- Drop-in Systems: The bobbin tension is usually pre-set and rarely needs adjustment. If you suspect a bobbin tension issue with a drop-in system, it’s often related to lint or damage within the bobbin case.
- Front-loading Systems: The bobbin case for front-loading systems has a small tension screw.
- When you pull the thread, you should feel a slight resistance.
- If the bobbin thread is too loose, the stitches on the top of your fabric will look loopy or puckered. You may need to tighten the screw slightly (usually turning it clockwise).
- If the bobbin thread is too tight, the upper thread will break frequently, or the stitch will be pulled too tightly to the underside of the fabric. You may need to loosen the screw slightly (usually turning it counter-clockwise).
- Make only very small adjustments. Turn the screw a quarter-turn at a time and test.
Table: Common Bobbin Tension Symptoms
| Symptom on Fabric Top | Likely Cause | Adjustment |
|---|---|---|
| Loopy or baggy stitches on top | Bobbin thread too loose | Tighten bobbin case screw slightly |
| Upper thread breaking frequently | Bobbin thread too tight | Loosen bobbin case screw slightly |
| Stitches pulled to the underside | Upper thread tension too loose | Increase upper thread tension |
| Stitches pulled to the top side | Upper thread tension too tight | Decrease upper thread tension |
Troubleshooting Common Brother Sewing Machine Bobbin Issues
Even with careful loading, you might encounter Brother sewing machine bobbin issues. Here are some common problems and their solutions:
- Thread Bunching or Knotting Underneath:
- Cause: Bobbin not inserted correctly, or upper thread not properly threaded through the tension discs.
- Solution: Re-thread the entire machine, ensuring the bobbin is correctly placed and the upper thread is guided through all tension points. Make sure the presser foot is down when sewing.
- Bobbin Thread Breaking:
- Cause: Bobbin wound unevenly, thread snagging on the bobbin case, bobbin case tension too tight, or burr on the needle plate or bobbin case.
- Solution: Rewind the bobbin. Check the bobbin case for lint or damage. Make slight adjustments to the bobbin case tension screw if applicable. Inspect the needle plate and bobbin case for rough spots.
- Skipped Stitches:
- Cause: Needle inserted incorrectly, bent or blunt needle, incorrect needle for the fabric, or improperly seated bobbin.
- Solution: Ensure the needle is inserted with the flat side facing correctly and is pushed all the way up. Replace the needle. Ensure the bobbin is properly seated and the thread is pulling freely.
- Bobbin Stops Feeding Thread:
- Cause: Bobbin thread has run out, or the thread has become tangled around the bobbin.
- Solution: Replace the bobbin with a new one and ensure the thread is not caught.
- Bobbin Winder Not Working:
- Cause: Clutch not engaged, or the bobbin winder motor is malfunctioning.
- Solution: Ensure the bobbin winder spindle is properly engaged. Refer to your manual for specific instructions. If the issue persists, it might require professional servicing.
FAQs About Brother Sewing Machine Bobbin Loading
Here are some frequently asked questions regarding Brother sewing machine bobbin loading and related topics.
Q1: What is the correct direction to wind a bobbin on a Brother sewing machine?
A1: For most Brother machines, the thread should wind onto the bobbin in a counter-clockwise direction when viewed from the top. However, it’s always best to check your specific machine’s manual, as there can be slight variations.
Q2: Can I use any bobbin with my Brother sewing machine?
A2: No, you must use bobbins that are specifically designed for your Brother sewing machine model. Using incorrect bobbins can lead to poor stitch quality, thread jamming, or even damage to your machine. Check your manual or the manufacturer’s website for compatible bobbin types.
Q3: My Brother sewing machine is skipping stitches. What should I do?
A3: Skipped stitches can be caused by several factors related to the bobbin and threading. First, ensure the bobbin is correctly inserted and the thread is pulling smoothly. Then, re-thread the entire machine, making sure the upper thread is properly seated in the tension discs and that the needle is correctly inserted (flat side to the back, pushed all the way up). Try changing the needle to a new, sharp one suitable for your fabric.
Q4: How do I adjust the bobbin tension on my Brother sewing machine?
A4: For top-loading (drop-in) bobbin systems, the bobbin tension is usually pre-set and not designed for user adjustment. For front-loading systems, there is a small screw on the bobbin case. Tightening this screw (usually clockwise) increases tension, and loosening it (usually counter-clockwise) decreases tension. Make very small adjustments and test your stitches after each change.
Q5: Why is the thread bunching up under my fabric when I sew with my Brother machine?
A5: This is a common sign that the upper thread is not engaging correctly with the bobbin thread, or the bobbin is not seated properly. Ensure the presser foot is down, the bobbin is inserted correctly, and the machine is threaded properly with the upper thread passing between the tension discs.
By following these detailed steps and troubleshooting tips, you’ll be well-equipped to handle how to put bobbin into Brother sewing machine and ensure your sewing projects run smoothly and efficiently. Happy sewing!