
Learning how to install a bobbin in your Singer sewing machine is a fundamental skill that unlocks a world of creative possibilities. Can you sew without a bobbin? No, you cannot sew without a bobbin; it’s essential for creating stitches. This guide will walk you through the entire process, from selecting the right bobbin to troubleshooting common issues. We’ll cover everything you need to know to ensure your Singer sewing machine is ready to stitch, making Singer bobbin setup a breeze.
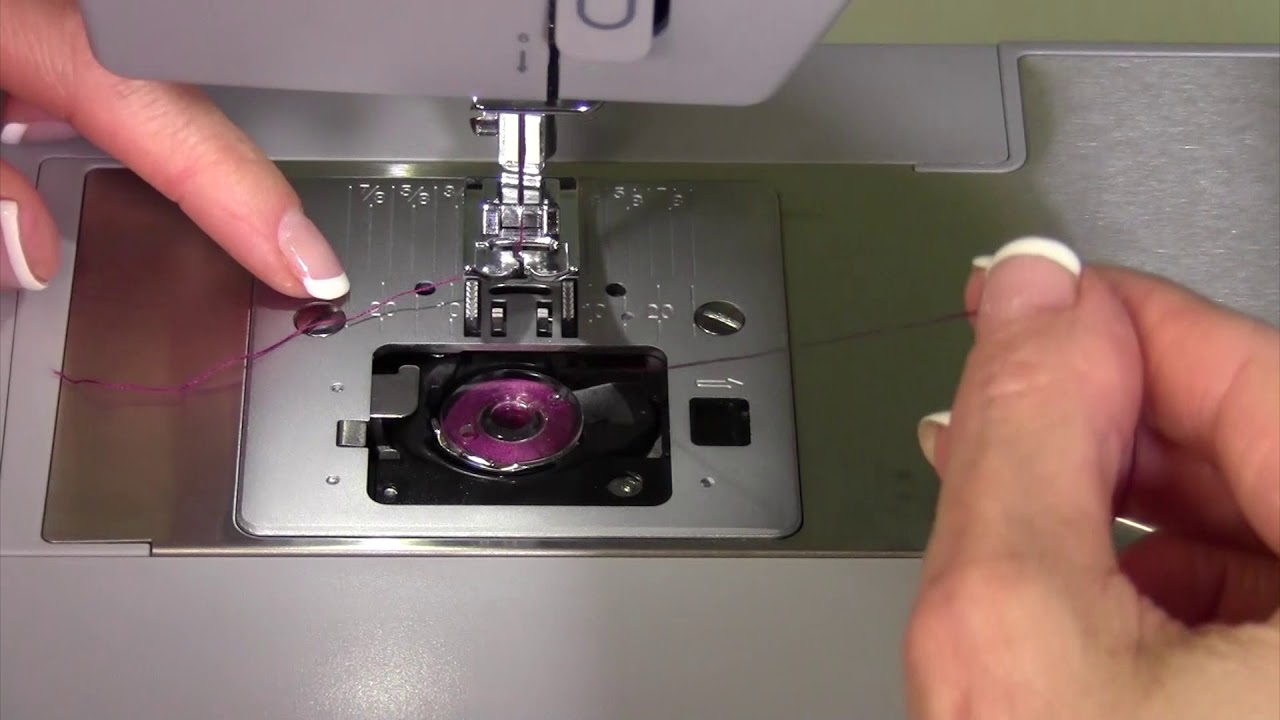
Image Source: i.ytimg.com
Why the Bobbin Matters
The bobbin is the unsung hero of your sewing machine. It holds the lower thread, which intertwines with the upper thread from the needle to form a strong, secure stitch. Without a properly installed and wound bobbin, your sewing machine won’t be able to create a consistent stitch, leading to skipped stitches, thread breaks, or an uneven mess.
The Role of the Bobbin
- Provides Lower Thread: The bobbin is a spool that carries the thread from the underside of the fabric.
- Creates Stitches: It works in conjunction with the upper thread, passing through the fabric loop to form the stitch.
- Affects Stitch Quality: The tension and proper placement of the bobbin directly impact the overall look and strength of your stitches.
Preparing for Bobbin Installation
Before you dive into installing the bobbin, a little preparation goes a long way. This ensures a smooth and successful experience.
Essential Supplies
- Your Singer Sewing Machine: Ensure it’s clean and in good working order.
- Correct Bobbins: Use only bobbins designed for your specific Singer model. Generic bobbins might not fit or function correctly.
- Thread: Make sure your thread is suitable for your project and machine.
- Sewing Machine Manual: Keep it handy for model-specific instructions.
Identifying Your Bobbin Type
Singer sewing machines come with different bobbin systems. It’s crucial to know which type you have.
Common Singer Bobbin Types
| Bobbin Type | Description | Common Models |
|---|---|---|
| Top-Loading | Bobbin sits in an open, accessible area on the machine bed, often with a clear cover. | Singer Quantum, Singer Confidence |
| Front-Loading | Bobbin case is inserted into a compartment at the front of the machine. | Singer Tradition, Singer Simple |
| Drop-in Bobbin | Similar to top-loading, the bobbin is placed directly into a designated slot. | Many modern Singer models |
How to tell if you have the right bobbin? The bobbin should fit snugly into the bobbin case or holder without being too tight or too loose. It should also spin freely when wound.
Step-by-Step: How to Install Bobbin in Singer Sewing Machine
This section provides a detailed, easy-to-follow guide for installing your bobbin. We will cover both winding and inserting the bobbin.
Step 1: Winding the Bobbin (Singer Bobbin Winding)
The first step is to wind thread onto an empty bobbin. This is an integral part of the Singer bobbin winding process.
Preparing for Winding
- Turn on the Machine: Plug in and turn on your Singer sewing machine.
- Place the Thread Spool: Position your spool of thread on the spool pin.
- Locate the Bobbin Winder: Find the Singer bobbin winder assembly on your machine. This typically includes a bobbin winder spindle and a tension disc.
- Thread the Bobbin Winder:
- Guide the thread from the spool pin through the upper threading path, just as you would for regular sewing, but stop before it goes through the needle.
- Pass the thread through the small hole in the bobbin.
- Secure the thread by wrapping it around the bobbin a few times, counter-clockwise, to prevent it from slipping.
Winding the Bobbin
- Place the Bobbin on the Spindle: Push the bobbin onto the bobbin winder spindle. You might need to push it to the right or left, depending on your model, to engage the winder.
- Engage the Winder: Many machines have a mechanism that disengages the needle when the bobbin winder is engaged. You might need to push the spindle in or pull it out. Refer to your manual if unsure.
- Start Winding: Gently press the foot pedal. The bobbin will begin to wind.
- Guide the Thread: Use your finger to guide the thread evenly across the bobbin as it winds. This ensures a neat and consistent wind.
- Stop Winding: Once the bobbin is full, the machine may automatically stop, or you’ll need to release the foot pedal. Some machines have an automatic thread cutter.
- Disengage the Winder: Push the bobbin winder spindle back to its original position.
- Cut the Thread: Cut the thread coming from the spool.
- Remove the Bobbin: Carefully slide the wound bobbin off the spindle.
What is the correct Singer bobbin direction when winding? The thread should wind onto the bobbin in a way that the starting tail can be easily pulled off after winding, usually by pulling it from the top and letting it hang off the side. The thread should wrap smoothly without overlapping too much or creating knots.
Step 2: Inserting the Bobbin (Singer Bobbin Case/Setup)
Now that your bobbin is wound, it’s time for the Singer bobbin setup and insertion. This process varies slightly depending on whether you have a top-loading or front-loading machine.
For Top-Loading or Drop-in Bobbin Systems
- Lift the Machine Cover: Remove the clear plastic cover over the bobbin area.
- Place the Bobbin: Hold the wound bobbin with the thread unwinding in the Singer bobbin direction that is indicated by an arrow on the machine’s bobbin cover or the machine itself. Typically, for top-loading systems, the thread unwinds counter-clockwise.
- Guide the Thread:
- Pass the thread through the small notch or slit in the bobbin case holder.
- Gently pull the thread to the left, letting it slide under a small spring mechanism. You should hear a slight click or feel a gentle resistance.
- Continue pulling the thread towards the back of the machine.
- Replace the Cover: Put the clear plastic cover back in place.
For Front-Loading Bobbin Systems
- Access the Bobbin Compartment: Open the bobbin cover plate located at the front of the machine. This usually involves removing a small metal or plastic plate.
- Remove the Bobbin Case: Carefully slide out the Singer bobbin case. This is a small, often metal, casing that holds the bobbin.
- Insert the Bobbin into the Case:
- Place the wound bobbin into the Singer bobbin case.
- Ensure the thread unwinds in the correct Singer bobbin direction. For most front-loading systems, this means the thread unwinds counter-clockwise. There’s often a small notch or slot to guide the thread.
- Pull the thread through the small slit or notch in the bobbin case until it can be pulled out from the back.
- Insert the Bobbin Case into the Machine:
- Hold the bobbin case with the thread loop hanging down.
- Align the bobbin case with the hook assembly in the machine. There’s usually a small metal arm or lever on the bobbin case that needs to fit into a corresponding slot in the machine.
- Slide the bobbin case firmly into place until it clicks or sits securely.
- Replace the Cover Plate: Securely reattach the cover plate.
How do you set up the Singer bobbin case? Ensure the bobbin is seated correctly within the case, and the thread is pulled through the designated channel or slit in the case. The case itself must be correctly oriented and clicked into the machine’s hook assembly.
Completing the Threading Process
After installing the bobbin, you need to bring the bobbin thread up to meet the upper thread. This is a crucial part of Singer sewing machine threading.
Bringing Up the Bobbin Thread
- Hold the Upper Thread: With one hand, lightly hold the tail of the upper thread coming from the needle.
- Turn the Handwheel: Slowly turn the handwheel towards you (always towards you!). This will lower and then raise the needle.
- Catch the Bobbin Thread: As the needle rises, it will catch the bobbin thread and pull a loop of it up through the bobbin area.
- Pull Up the Loop: Use your finger or tweezers to pull the loop of bobbin thread up through the needle plate.
- Position the Threads: Bring both the upper thread and the bobbin thread under the presser foot and towards the back of the machine.
Your Singer sewing machine threading is now complete, and you are ready to sew!
Troubleshooting Common Bobbin Issues
Even with careful installation, you might encounter problems. Here are solutions for frequent issues.
Bobbin Not Feeding Properly (Singer Bobbin Not Feeding)
Why is my Singer bobbin not feeding? This usually happens due to incorrect bobbin placement, lint buildup, or thread tangles.
- Check Bobbin Placement: Remove the bobbin and reinsert it, ensuring it’s in the correct Singer bobbin direction and seated securely.
- Clear Lint and Debris: Open the bobbin area and clean out any lint or thread scraps with a small brush or compressed air.
- Verify Thread Path: Ensure the bobbin thread is properly guided through the tension discs on the bobbin case (if applicable) and the machine’s threading path.
- Inspect the Bobbin: Make sure the bobbin isn’t damaged and that the thread isn’t snagged or knotted on the bobbin itself.
Singer Bobbin Jammed
Why is my Singer bobbin jammed? A jam typically means the thread has gotten caught or tangled.
- Stop Immediately: If you feel resistance, stop sewing at once to prevent further damage.
- Remove Upper Thread: Take out the upper thread first.
- Remove Bobbin and Case: Carefully remove the bobbin and its case from the machine.
- Untangle Thread: Gently pull out any tangled thread from the bobbin area and the bobbin case. If necessary, cut the tangled thread.
- Clean the Area: Thoroughly clean the bobbin area to remove any stray threads or lint.
- Reinstall Carefully: Reinstall the bobbin and rethread the machine, paying close attention to the Singer bobbin direction and threading path.
Uneven or Loose Stitches
This often relates to Singer bobbin tension.
- Check Bobbin Tension:
- Top-Loading/Drop-in: The tension is usually controlled by a small screw on the bobbin case holder. Turn the screw slightly clockwise to increase tension, or counter-clockwise to decrease it.
- Front-Loading: The Singer bobbin case itself has a tension mechanism. You can try swapping the bobbin case for a new one if you suspect the tension is faulty. Minor adjustments can sometimes be made with a small screwdriver on the screw holding the bobbin case spring, but this is delicate work.
- Check Upper Thread Tension: Ensure the upper thread tension is also set correctly.
- Thread Quality: Sometimes, low-quality or old thread can cause tension issues.
What happens if Singer bobbin tension is too loose? If the bobbin tension is too loose, the bobbin thread will appear as loops or thread nests on the top of your fabric.
What happens if Singer bobbin tension is too tight? If the bobbin tension is too tight, the upper thread will be pulled to the underside of the fabric, creating a puckered or uneven appearance.
Bobbin Stops Winding Prematurely
- Check Thread Supply: Ensure there is enough thread on the spool.
- Bobbin Placement: Make sure the bobbin is fully seated on the bobbin winder spindle.
- Winder Tension: Some machines have a small knob or screw that adjusts the pressure against the bobbin. Check your manual for this feature.
- Thread Path: Verify the thread is correctly guided through the tension discs for the winder.
Replacing Your Bobbin (Singer Bobbin Replacement)
Over time, bobbins can become damaged or worn. Singer bobbin replacement is straightforward.
When to Replace a Bobbin
- Cracked or Chipped: If a bobbin has any physical damage, it can affect stitch quality and even damage your machine.
- Warped: A warped bobbin won’t spin evenly.
- Incorrect Size/Type: Using the wrong bobbin can cause the issues mentioned above.
How to Replace a Bobbin
- Purchase Correct Bobbins: Obtain new bobbins specifically designed for your Singer sewing machine model. Check your manual or the Singer website for compatibility.
- Follow Winding Instructions: Wind the new bobbin following the steps outlined earlier.
- Insert and Test: Insert the new bobbin and test your sewing to ensure it’s working correctly.
Maintenance Tips for Your Bobbin System
Regular maintenance will keep your bobbin system running smoothly.
Cleaning the Bobbin Area
- Frequency: Clean the bobbin area after every few sewing projects, or more often if you’re sewing with linty fabrics like fleece or cotton.
- Tools: Use a small brush, a lint brush, or a can of compressed air.
- Procedure: Remove the needle plate (if applicable) and the bobbin case. Gently brush away all lint and dust.
Lubrication
- Check Your Manual: Your Singer manual will specify which parts require lubrication and with what type of oil.
- Bobbin Area: Some machines may require a tiny drop of oil in the bobbin hook area. Be sparing with oil, as too much can attract lint.
Frequently Asked Questions (FAQ)
Q1: What is the correct Singer bobbin direction when threading my machine?
A1: For most Singer machines, especially top-loading and drop-in systems, the thread unwinds counter-clockwise from the bobbin when being inserted into the bobbin case holder. For front-loading systems, the bobbin is inserted into the bobbin case, and the thread typically unwinds counter-clockwise from the bobbin itself. Always check your machine’s manual for the exact direction.
Q2: Why does my Singer bobbin keep falling out?
A2: If your bobbin keeps falling out, it likely means it’s not seated correctly in the bobbin case or the machine’s bobbin holder. Ensure the bobbin is snug, and the thread is guided through any securing slots or tension springs. For front-loading machines, the bobbin case itself needs to be firmly clicked into place.
Q3: Can I use any bobbin in my Singer sewing machine?
A3: No, you cannot use any bobbin. Singer machines require specific types and sizes of bobbins. Using the wrong bobbin can cause stitching problems, damage your machine, or not fit at all. Always refer to your Singer sewing machine manual or contact Singer customer support to identify the correct bobbin for your model.
Q4: How do I adjust the Singer bobbin tension?
A4: For machines with a removable bobbin case, tension is usually adjusted via a small screw on the case. Turning the screw clockwise tightens the tension, and counter-clockwise loosens it. For drop-in systems, there might be a small tension mechanism visible when the bobbin is in place. Make small adjustments and test your stitches after each change. If you’re unsure, consult your manual or a sewing machine repair technician.
Q5: What should I do if my Singer bobbin thread is looping on the top of the fabric?
A5: This indicates an issue with the bobbin tension or how the bobbin thread is threaded. Most commonly, the bobbin tension is too loose, or the bobbin thread isn’t properly seated in the bobbin case’s tension spring. Remove the bobbin and case, re-seat the bobbin, ensure the thread is pulled through the tension slit in the case, and then re-insert the case. If the problem persists, slightly tighten the bobbin tension.
By following these detailed steps and tips, you’ll master the art of installing your bobbin in your Singer sewing machine, ensuring smooth, beautiful stitches for all your sewing projects. Happy sewing!