
Image Source: www.theshapesoffabric.com
5 Simple Steps: How To Draft A Sewing Pattern Yourself
Can you draft your own sewing patterns? Yes! And you don’t need to be an expert to start. Learning how to draft a sewing pattern is a simple process that anyone can try, even if you are just starting out. You can create sewing patterns from measurements you take yourself. This guide covers drafting sewing patterns for beginners, showing you how to make a basic pattern that fits you perfectly.
Pattern making techniques help you make clothes that feel and look great. When you draft a sewing pattern yourself, you get clothes that fit your unique body. It’s a great way to express your own style and make clothing that no one else has. It is also a key part of garment pattern construction. This guide will show you five easy steps to begin your journey in sewing pattern design and making custom sewing patterns.
Getting Started With Pattern Drafting
Making your own sewing patterns means creating the paper shapes that you use to cut fabric. These shapes tell you where to cut and sew to make a garment. It starts with your body shape and turns into a flat paper pattern. This is how fashion pattern making begins for a perfect fit.
Why make your own patterns?
* Clothes fit you just right. Store patterns are made for standard sizes. Your body is not standard.
* You can make any design you like. Your ideas become real clothes.
* It helps you learn how clothes are made. This makes you a better sewer.
* It saves money. You make your own patterns instead of buying many.
We will focus on drafting a sloper. A sloper is a basic pattern that fits your body closely. It has no style details, like gathers or flares. Think of it like a second skin pattern. It is the basic block pattern. Once you have your sloper, you can change it to create endless different clothes. This is the core of making custom sewing patterns.
Let’s get ready to make your first DIY sewing pattern.
Gathering Your Tools
You need a few simple things to start drafting a pattern. Most items are easy to find.
- Paper: Large sheets are best. Pattern paper, tracing paper rolls, or even the back of wrapping paper work. It needs to be big enough for your pattern pieces.
- Pencils: Use a regular pencil to draw lines. A fine-tip pencil is good for details.
- Eraser: Mistakes happen. Keep one handy.
- Rulers:
- A long straight ruler (like 24 inches or 60 cm).
- A L-shaped ruler or “square.” This helps you draw perfect 90-degree corners.
- A curved ruler or “French curve.” This helps you draw smooth curves for necklines and armholes. A “hip curve” is also helpful for side seams.
- Measuring Tape: A flexible cloth or plastic one. This is for taking your body measurements.
- Scissors: Paper scissors, not your fabric scissors!
- Tape: To stick paper pieces together if needed.
- Push Pins or Weights: To hold the paper still.
- Notebook: To write down your measurements and notes.
- Body: You need your body or the body of the person you are making the pattern for.
Make sure you have a large, flat surface to work on, like a table or the floor.
Taking Accurate Measurements
This is a very important step. Your pattern will only fit well if your measurements are correct. Have someone help you take measurements if you can. This makes it easier and more accurate. Wear the kind of undergarments you plan to wear with the finished clothes. Don’t wear bulky clothes.
Here are key measurements you need for a basic bodice and skirt/trouser sloper:
For Bodice:
- Full Bust: Measure around the fullest part of your bust. Keep the tape level around your back.
- Waist: Measure around the narrowest part of your torso. This is usually above your belly button.
- High Bust/Upper Chest: Measure around your chest, just under your armpits and above your bust.
- Hip: Measure around the fullest part of your hips and backside. Keep the tape level.
- Shoulder Seam: Measure from the base of your neck (where it meets your shoulder) out to the tip of your shoulder bone.
- Back Width: Measure across your upper back, from armhole crease to armhole crease.
- Front Width: Measure across your chest, from armhole crease to armhole crease.
- Back Waist Length: Measure from the bone at the base of your neck (it sticks out when you tilt your head down) straight down your back to your natural waistline.
- Front Waist Length: Measure from the top of your shoulder (where it meets your neck) over the fullest part of your bust down to your natural waistline.
- Across Shoulder: Measure straight across your upper back from the tip of one shoulder bone to the tip of the other shoulder bone.
- Armhole Depth: Measure from the tip of your shoulder bone straight down to a point level with your armpit crease. (This can also be figured out using your back waist length and shoulder measurement later, but measuring helps confirm).
For Skirt/Trouser:
- Waist: (Same as bodice) Measure around the narrowest part of your torso.
- Hip: (Same as bodice) Measure around the fullest part of your hips and backside.
- Waist to Hip: Measure from your natural waistline straight down the side of your body to the fullest part of your hip.
- Skirt Length: Measure from your natural waistline straight down the side to where you want the hem of the skirt to be.
- Crotch Depth/Rise: Sit on a flat chair. Measure from your natural waistline down the side of your hip to the chair seat.
- Thigh: Measure around the fullest part of one thigh, right at the top.
- Knee: Measure around your knee.
- Ankle: Measure around your ankle bone.
- Inseam: Measure from your crotch point down the inside of your leg to where you want the hem of the trousers to be.
- Outseam/Side Length: Measure from your natural waistline down the side of your leg to where you want the hem of the trousers to be.
Write all these numbers down right away! Double-check them if possible. You will use these numbers to draw your pattern pieces.
Putting Together Your Basic Block (Sloper)
Now you will use your measurements to draw the flat patterns for your body. Remember, a sloper is a basic pattern that fits you exactly. It has no extra room for movement (called ease). You add that later. We will make half patterns because bodies are usually the same on both sides.
Let’s start with the bodice. You will make a front piece and a back piece.
Drawing the Bodice Back Sloper
This is often easier to start with. You will draw a rectangle first, using some key measurements.
h5 Initial Rectangle for Back
- Draw a straight line near the bottom of your paper. This is your waistline.
- From one end of the waistline, draw a line straight up using your square ruler. This is your center back line.
- Measure up your center back line the length of your Back Waist Length measurement. Mark this point. This is your neck point.
- Draw a line straight out from the neck point using your square ruler. This is your shoulder line.
- Now, let’s make the top line of the rectangle. Measure down from your neck point along the center back line by your Armhole Depth measurement (or calculate it: usually about 1/4 of your Bust measurement + 1 inch, but use your measurement if you took it). Draw a line straight out from this point using your square. This is your bust line (or chest line).
- The width of your rectangle will be half of your Bust measurement (or High Bust if it’s much smaller, use the larger of the two ÷ 2) plus a small amount for ease (maybe 0.5 inch total ease for the full pattern, so 0.25 inch for your half pattern). Let’s use half of your Bust measurement for the true sloper. Mark this width along the bust line, shoulder line, and waist line, measuring from the center back line.
- Connect the points to form your rectangle. The center back line is one side, the waist line is the bottom, the shoulder line is the top, and the side seam line is the other side.
h5 Shaping the Back
- Neckline: From the neck point on the center back line, measure out towards the side seam about 2.5 to 3 inches (6 to 7.5 cm). Mark this point. Measure down the center back line about 0.75 to 1 inch (2 to 2.5 cm). Mark this point. Use your French curve to draw a smooth curve connecting these two points. This is the back neckline.
- Shoulder Slope: From the neck point, measure down the center back line about 1.5 to 2 inches (4 to 5 cm). Draw a temporary line straight across from this point. Now, measure out along the shoulder line from the center back point by your Across Shoulder measurement ÷ 2. Mark this point. Draw a line from your neckline point on the shoulder line to this new point. This is your shoulder line. Your actual shoulder length (Shoulder Seam measurement) should fit along this line. Adjust the slope slightly up or down until your Shoulder Seam measurement fits on this line, starting from the neckline edge.
- Armhole: Find the point on the shoulder line where your shoulder seam ends. Find the point on the bust line where the side seam line meets it. You need to shape the armhole curve between these two points. You can use your Back Width measurement ÷ 2 to help place the curve. Mark a point about 1 inch (2.5 cm) in from the side seam line on the bust line. Measure up from the bust line along the side seam line by about 3-4 inches (7.5-10 cm). Use your French curve to draw the armhole shape, connecting the shoulder point, passing near the back width mark (which you can place about halfway between the shoulder point and bust line, measuring in from the center back), and ending about 1 inch from the side seam on the bust line. The curve should look like half an oval opening.
- Waist Shaping (Dart): Bodies are smaller at the waist than the bust. You need to take some width out at the waist. On the waistline, find the center point between the center back and the side seam. From this center point, measure out about 0.5 to 0.75 inch (1.2 to 2 cm) on each side. Mark these points. Measure up from the center point on the waistline about 4 to 5 inches (10 to 12.5 cm). Mark this point (the dart point). Draw lines from the two waist points to the dart point. This triangle is your back waist dart. You fold or cut this out when sewing.
- Side Seam: Draw a line connecting the end of the armhole curve on the bust line down to the outer edge of the waist dart (the point on the waistline furthest from the center). This is your side seam.
Cut out this pattern piece. This is your Bodice Back sloper. Remember it’s only half the back pattern.
Drawing the Bodice Front Sloper
The front pattern is similar but has shaping for the bust.
h5 Initial Rectangle for Front
- Draw a straight line for the waistline.
- From one end, draw a line straight up for the center front line.
- Measure up the center front line by your Front Waist Length measurement. Mark this point (neck point).
- Draw a line straight out for the shoulder line from the neck point.
- Measure down from the neck point along the center front line by your Armhole Depth measurement (same as back). Draw a line straight out for the bust line from this point.
- The width of this rectangle will be half of your Full Bust measurement ÷ 2 (for your half pattern). Add the same ease amount you added to the back (if any, for a true sloper, add very little or none). Mark this width on the bust line, shoulder line, and waist line, measuring from the center front line.
- Connect the points to form your rectangle. Center front, waist line, shoulder line, side seam line.
h5 Shaping the Front
- Neckline: From the neck point on the center front line, measure out towards the side seam about 2.5 to 3 inches (6 to 7.5 cm) (same as back neckline width). Mark this point. Measure down the center front line about 3 to 4 inches (7.5 to 10 cm) (front neck drop is usually deeper than the back). Mark this point. Use your French curve to draw a smooth curve connecting these two points. This is the front neckline.
- Shoulder Slope: This is different from the back because of the bust. From the neck point, measure down the center front line about 2 to 2.5 inches (5 to 6 cm) (slightly more slope than the back). Draw a temporary line straight across. Measure out along the shoulder line from the center front by your Across Shoulder measurement ÷ 2. Mark this point. Draw a line from your neckline point on the shoulder line towards this new point. This is your shoulder line. The length should match your Shoulder Seam measurement. Adjust the slope if needed.
- Armhole: Find the point on the shoulder line where your shoulder seam ends. Find the point on the bust line where the side seam line meets it. You need to shape the armhole curve. Use your Front Width measurement ÷ 2 to help. Mark a point about 1 inch (2.5 cm) in from the side seam line on the bust line. Measure up from the bust line along the side seam line by about 4-5 inches (10-12.5 cm) (slightly more than the back). Use your French curve to draw the armhole shape, connecting the shoulder point, passing near the front width mark (placed about halfway between the shoulder point and bust line, measuring in from the center front), and ending about 1 inch from the side seam on the bust line. The curve should look like an opening. The front armhole is usually slightly deeper than the back.
- Bust Dart: This dart shapes the pattern over your bust. It usually comes from the side seam. Find your Bust Point. This is the fullest point of your bust. You need two measurements to locate it on your pattern:
- Horizontal Bust Dart Placement: Measure from your center front seam to the fullest point of your bust. Mark this distance out from the center front line on your bust line.
- Vertical Bust Dart Placement: Measure from your shoulder seam (about midway) straight down to your bust point. Mark this distance down from the shoulder line, across from your horizontal bust point mark.
- Your bust point is where these two marks meet.
- Now, draw a line from the side seam, somewhere between the armhole and waist, pointing towards your bust point. The exact angle depends on your body, but often it’s roughly level with the bust point or slightly lower.
- The dart takes out the extra fabric needed to go over your bust. The size of the dart relates to the difference between your Full Bust and High Bust measurements. The bigger the difference, the bigger the dart.
- Measure the difference between your Bust and High Bust. Divide this by 2 (for your half pattern). This is roughly how much width needs to be taken out by the bust dart and potentially a waist dart combined.
- From the line you drew from the side seam to the bust point, measure down along the side seam by about 1 to 2 inches (2.5 to 5 cm). Mark this as one side of the dart opening on the side seam.
- Now, rotate a ruler from the bust point until it hits the side seam higher up. The distance between the two points you marked on the side seam (the lower one and the new higher one) should equal the amount of width you need to remove for the bust (Bust – High Bust) / 2. Draw lines from these two points on the side seam to the bust point. These are the dart legs.
- Important Note: The dart point should not go exactly to the bust point. Stop the dart legs about 0.5 to 1 inch (1.2 to 2.5 cm) away from the bust point. This creates a smoother shape.
- Waist Dart: You may also need a dart at the waist on the front, similar to the back. Find the center point between the center front and the bust dart point on the waistline. From this center point, measure out about 0.5 inch (1.2 cm) on each side. Mark these points. Measure up from the center point about 3 to 4 inches (7.5 to 10 cm) (shorter than the back dart). Mark this point (the dart point). Draw lines from the two waist points to this dart point.
- Side Seam: Draw a line from the lower leg of the bust dart on the side seam down to the outer edge of the waist dart (the point on the waistline furthest from the center). This is your side seam. Note: The side seam length on the front should match the side seam length on the back. You might need to adjust slightly here or there.
Cut out this pattern piece. This is your Bodice Front sloper. Remember it’s half the front pattern.
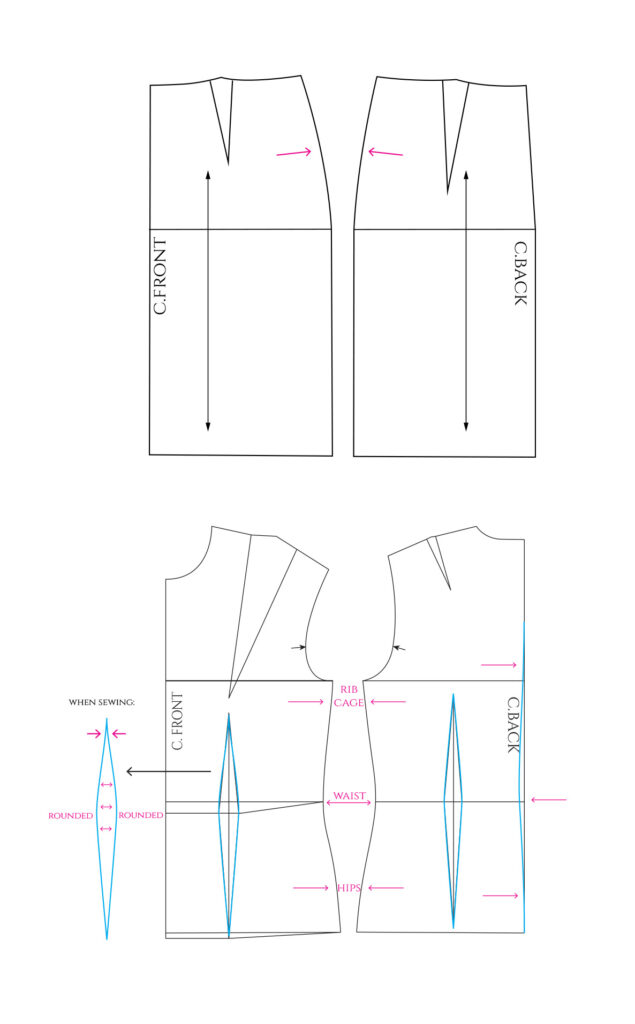
Drawing the Skirt Back Sloper
Let’s move to the lower body. A basic skirt sloper is simpler than the bodice.
h5 Initial Rectangle for Skirt Back
- Draw a straight line near the top of your paper. This is your waistline.
- From one end, draw a line straight down for the center back line.
- Measure down the center back line by your Waist to Hip measurement. Mark this point. Draw a line straight out from this point using your square. This is your hip line.
- Measure down from the waistline the desired Skirt Length. Mark this point on the center back line. Draw a line straight out from this point. This is your hemline.
- Now, for the width. The width of the pattern at the hip line is half of your Hip measurement ÷ 2 plus a small amount for ease (maybe 0.5 inch total ease, so 0.25 inch for your half pattern). Let’s use half of your Hip measurement for the true sloper width at the hip. Measure this width out from the center back line on the hip line. Mark this point. Draw a line straight up from this point to the waistline and straight down to the hemline. This is your side seam line.
- You now have a rectangle from waist to hip, and a longer rectangle from waist to hem.
h5 Shaping the Skirt Back
- Waist Shaping (Dart): Your waist is smaller than your hip. You need a dart or two at the waist. The total amount of width to remove at the waist is (Hip measurement – Waist measurement) ÷ 2. This is the total dart intake for the half pattern.
- For the back, you usually have two darts or one slightly larger one. Let’s do one dart for simplicity in the sloper. Find the center point between the center back and the side seam on the waistline. From this center point, measure out half of your total waist intake amount on each side. Mark these points on the waistline.
- Measure down from the center point on the waistline about 5 to 6 inches (12.5 to 15 cm). Mark this point (the dart point). Draw lines from the two waist points to the dart point. This is your back waist dart.
- Side Seam: Draw a line connecting the end of the side seam line on the hip line up to the outer edge of the waist dart (the point on the waistline furthest from the center). This is your side seam. From the hip line down to the hemline, the side seam is usually a straight line for a basic sloper.
Cut out this pattern piece. This is your Skirt Back sloper (half pattern).
Drawing the Skirt Front Sloper
Similar to the back, but often with less waist shaping needed.
h5 Initial Rectangle for Skirt Front
- Draw a waistline.
- From one end, draw a straight down line for the center front line.
- Measure down the center front line by your Waist to Hip measurement. Mark the hip line. Draw line straight out.
- Measure down from the waistline the desired Skirt Length. Mark the hemline. Draw line straight out.
- The width of this rectangle at the hip line is half of your Hip measurement ÷ 2 (same as back). Mark this width out from the center front line on the hip line. Draw a line straight up to the waistline and down to the hemline. This is your side seam line.
h5 Shaping the Skirt Front
- Waist Shaping (Dart): The total amount of width to remove at the front waist is part of the total (Hip – Waist) ÷ 2 amount. The front usually needs slightly less dart intake than the back. Divide the total intake between front and back (e.g., 40% for front, 60% for back, or adjust based on your body shape). Let’s say you need to remove 1 inch total at the front waist. You could do one dart removing 1 inch, or two darts removing 0.5 inch each. Let’s do one dart.
- Find the center point between the center front and the side seam on the waistline. From this center point, measure out half of your total front waist intake amount on each side. Mark these points on the waistline.
- Measure down from the center point on the waistline about 4 to 5 inches (10 to 12.5 cm) (shorter than the back dart). Mark this point (the dart point). Draw lines from the two waist points to the dart point. This is your front waist dart.
- Side Seam: Draw a line connecting the end of the side seam line on the hip line up to the outer edge of the waist dart on the waistline. This is your side seam. From the hip line down to the hemline, the side seam is usually a straight line. Note: The side seam length on the front should match the side seam length on the back.
Cut out this pattern piece. This is your Skirt Front sloper (half pattern).
Drawing the Trouser Sloper (Optional, More Complex)
Drafting trousers is more complex than skirts because you need to account for the legs and the crotch curve. It follows similar principles: start with rectangles based on measurements, then add shaping and curves.
h5 Basic Trouser Structure
- You will need front and back leg pieces. The back leg is usually wider and has a deeper crotch curve than the front.
- Start with a rectangle based on your Crotch Depth (Rise) and Hip measurement. The width is related to your Hip measurement plus ease. The height is your Crotch Depth.
- You need to add lines for the waist, hip, crotch line, knee line, and hem line using your measurements (Outseam, Inseam, Waist to Hip, Crotch Depth).
- The key part is drawing the crotch curve, which is different for the front and back legs and gives shape for sitting and movement.
- You will also shape the pattern at the waist with darts and shape the legs using your thigh, knee, and ankle measurements, blending curves smoothly from the hip down.
- Trousers often require more fitting and adjustment than bodices or skirts due to the complexity of the lower body shape and movement.
For a beginner, starting with the bodice and skirt slopers is recommended before tackling trousers. However, the process of using measurements to build a flat pattern is the same core principle in all garment pattern construction.
Testing the Fit (Making a Muslin)
Your drafted sloper is based on your measurements, but paper doesn’t curve like a body. You must test your pattern to see how it fits in 3D. This test garment is often called a “muslin,” even if you use cheap fabric like calico or an old sheet.
h4 Sewing Your Test Garment
- Use cheap, woven fabric that is similar in weight to the kind of fabric you might use for clothes (like cotton broadcloth).
- Cut out your sloper pieces from the fabric. Remember your sloper has NO seam allowance. You need to add seam allowance around all the edges before you cut the fabric (e.g., 0.5 inch or 1.5 cm).
- Mark your dart lines onto the fabric using tailor’s chalk or thread tracing.
- Sew the darts.
- Sew the shoulder seams and side seams for the bodice.
- Sew the darts, side seams, and maybe a center back seam for the skirt.
- For trousers, sew the darts, side seams, inseams, and the crotch seam.
- Don’t finish edges or worry about zippers or necklines yet. Just sew the main seams together.
h4 Trying It On and Checking
Put on your muslin test garment inside out. This makes it easier to pin adjustments. Look in a mirror, or better, have your helper look at the fit.
h5 How a Sloper Should Fit
A sloper should fit closely, like a second skin, but not be tight or pulling anywhere.
- Bodice:
- Shoulder seams should sit on top of your shoulders, not falling off or pulled inwards.
- Neckline should lie flat, not gape or pull.
- Armholes should follow your armpit crease smoothly, not dig in or gape open.
- Side seams should hang straight down from your armpit to your waist.
- Waistline should be at your natural waist.
- The fabric should be smooth over your bust and back, with the darts pointing towards the fullest part but not reaching it. There should be no major wrinkles pointing to the bust or shoulder blades.
- Skirt:
- Waistline should be at your natural waist.
- Side seams should hang straight down from your waist to your hip and hem.
- Fabric should be smooth over your hips and backside. No horizontal pulling lines (too small) or baggy areas (too big or wrong shape).
- Darts should shape the fabric smoothly from waist to hip.
h5 Making Adjustments
Pinch out any extra fabric and pin the excess amount. Let out seams if it’s too tight (if you added enough seam allowance). Draw new lines on the fabric where the seams should be using a pencil or chalk.
Common fit issues and what they mean:
* Horizontal wrinkles on the back bodice: Upper back is too wide or shoulder blades need more room.
* Vertical wrinkles under the back armhole: Upper back is too narrow.
* Neckline gaping: Neckline is too wide or dart is needed near the neck.
* Armhole digging in: Armhole curve needs to be lower or wider.
* Armhole gaping: Armhole curve needs to be higher or narrower.
* Fabric pulling across the bust: Bust dart is too small or needs to be moved. Pattern is too narrow.
* Horizontal wrinkles below the bust: Bust dart is too big or dart point is too high.
* Fabric pooling at the back waist: Back waist is too big, need larger dart.
* Horizontal wrinkles across hips: Hip is too small, pattern needs to be wider at hip line.
* Diagonal wrinkles from hip to crotch (trousers): Crotch curve issue or leg width issue.
Transfer the adjustments from your muslin back onto your paper pattern. Carefully unpick your muslin seams. Lay the flat muslin pieces on top of your paper pattern. Redraw the lines on your paper pattern following the adjusted lines on your muslin. Smooth out curves with your French curve.
You might need to make a second muslin to check the adjustments are correct. This process is key to making custom sewing patterns that truly fit.
Refining Your Pattern Design
Now you have a basic block pattern that fits you perfectly. This is the foundation for creating any garment you want. Fashion pattern making uses these basic shapes and changes them into different styles. This step involves pattern making techniques to change your sloper.
Adding Ease
A sloper fits closely with almost no ease. Clothes need ease so you can move, sit, and breathe. Ease is extra room in the pattern.
- Wearing Ease: This is the minimum ease needed for basic movement. It depends on the garment type. A close-fitting dress needs less wearing ease than a loose shirt.
- Design Ease: This is extra ease added for style. A flowing dress has a lot of design ease. A fitted jacket has less.
Add ease to your sloper by drawing new lines outside the original ones. For example, add 0.5 to 1 inch (1.2 to 2.5 cm) to the side seams of the bodice and skirt for moderate ease (spread this amount over the whole pattern width, so maybe 0.125 to 0.25 inch on each half side seam). Add length if needed.
Changing Darts
You can move darts or turn them into style lines. This is a core pattern making technique called “dart manipulation.”
- You can move the bust dart to the shoulder, neckline, or armhole.
- You can split one dart into two or three smaller darts.
- You can turn the dart fullness into gathers, pleats, or released tucks.
- You can blend the dart value into a seam line, like a princess seam.
To move a dart:
1. Draw a new line from the dart point to where you want the new fullness to be (e.g., the center of the shoulder).
2. Cut along the dart legs to the dart point (but not through it!).
3. Cut along your new line from the edge of the pattern to the dart point.
4. Close the original dart legs by taping them together. This will cause the pattern piece to open up along your new cut line.
5. The opening is the new dart (or where gathers/pleats will go). Tape paper under the opening. Redraw the dart legs to the dart point (or mark gathers/pleats).
Creating Style Lines
You can cut your pattern piece into multiple pieces to create seams that shape the garment or are decorative. Princess seams are a common example, often replacing side seams and darts.
To create a princess seam from the shoulder:
1. On your bodice front sloper, draw a curved line from the middle of the shoulder seam, going over the bust point (but curving around it slightly), and down to the waist or hem.
2. Draw a line from the bust point to the waist dart point.
3. Cut along this new curved line from the shoulder down.
4. Cut from the waist dart point up to the bust point.
5. You now have two pieces. The waist dart and the bust dart fullness are now contained within the seams of these two new pieces. Smooth out the seam lines.
This is just one example of how you can use garment pattern construction to turn your basic shape into a unique sewing pattern design. You can add yokes, change necklines, add collars, design sleeves (sleeves are drafted separately, often starting from the armhole shape of your sloper), add fullness for gathers or flares, etc.
Use tracing paper to trace your sloper, then make changes on the traced copy. Keep your original sloper safe! It is your master basic block pattern.
Completing Your Pattern
Once you have designed your pattern and made changes to your sloper, you need to finalize the pattern pieces so they are ready to use for cutting fabric.
Adding Seam Allowances
Remember your sloper has no seam allowance. You need to add this width around all the edges where pieces will be sewn together.
- A standard seam allowance is often 0.5 inches (1.5 cm) or 0.625 inches (5/8 inch).
- Hem allowances are usually wider, 1 to 3 inches (2.5 to 7.5 cm), depending on the garment and fabric.
- Use your ruler to measure out from the edge of your pattern pieces and draw new lines.
- Use your French curve or hip curve to add seam allowance smoothly around curves like armholes and necklines.
- Corners need special attention. Where two seams meet, the seam allowance lines should meet at a right angle. Where a seam and a hem meet, the seam allowance should extend the width of the hem allowance.
Adding Pattern Markings
Pattern markings are symbols and notes on the pattern piece that help you sew the garment correctly. This is a crucial part of garment pattern construction.
- Grainline: Draw a long line with arrows at both ends. This line must be placed parallel to the selvedge (finished edge) of the fabric when cutting. Use your measuring tape or ruler to ensure it is the same distance from the selvedge along its entire length. This tells you how to lay the pattern on the fabric. The grainline affects how the fabric hangs.
- Fold Line: If a pattern piece is cut on the fold of the fabric (like the center front of many shirts or skirts), indicate this with a line and arrows showing the direction of the fold. You only draft half the pattern piece in this case.
- Notches: Small marks (often triangles or lines) placed on the edges of pattern pieces. They help you match up seams correctly when sewing. Add notches at the top, bottom, and any key points along seams (like where a sleeve cap meets the armhole, or where darts are). Double notches often mean the back piece, single notches mean the front piece.
- Darts: Draw the dart lines clearly. Mark the dart point.
- Dots or Circles: Used to indicate specific points, like pocket placement, button placement, or where gathers or pleats start/stop.
- Buttonholes and Button Placement: Mark the exact location and size.
- Pattern Name: Write the name of the pattern piece (e.g., “Bodice Front,” “Skirt Back”).
- Size: Write the size your pattern is drafted for (your measurements).
- Number of Pieces to Cut: Write how many of this piece you need to cut from the fabric (e.g., “Cut 2,” “Cut 1 on Fold”).
- Any special instructions: (e.g., “Interfacing,” “Lining”).
Write all this information clearly on each pattern piece. This completes your DIY sewing pattern.
Making Custom Sewing Patterns: Beyond the Basics
Drafting a basic bodice and skirt sloper is a great start to making custom sewing patterns. From these simple shapes, you can create almost any top, dress, or skirt. Adding sleeves, collars, cuffs, and other details involves more pattern making techniques.
Sleeves, for example, are drafted to fit into the armhole shape of your bodice sloper. Collars are drafted to fit the neckline. Learning these techniques opens up even more design possibilities in fashion pattern making.
Resources for learning more:
* Books on pattern making (often used in fashion schools).
* Online courses and tutorials.
* Practice! The more you draft and sew, the better you become.
Why Draft Your Own Patterns?
Making custom sewing patterns gives you control over fit, style, and fabric choice. It moves you from following instructions to being the designer. It helps you truly understand garment pattern construction. Your DIY sewing pattern journey starts with these basic steps but can lead to a wardrobe perfectly suited to you.
It might seem like a lot of work compared to buying a pattern. But once you have a sloper that fits, changing it to make new designs is faster than starting over or trying to fix a store pattern. It’s a valuable skill for anyone serious about sewing and creating clothes that fit beautifully.
Frequently Asked Questions (FAQ)
h4 What is a sloper used for?
A sloper is a very basic, fitted pattern based on your body measurements. It is like a second skin pattern with no extra room or style details. You use it as a starting point to create other patterns by adding ease, changing darts, or adding design lines. It ensures the final pattern fits your unique body shape before you add style.
h4 How much fabric do I need for a garment I draft?
Once your pattern is finished (with seam allowances and markings), you will need to lay out all the pattern pieces on fabric to figure out how much you need. Pattern layout is another skill. You usually need at least the length of the longest pattern piece, multiplied by the number of pieces you need to cut, plus extra for layout adjustments. It’s best to do a test layout with your actual pattern pieces on paper the width of your fabric before you buy fabric.
h4 Can I use my sloper for stretchy fabrics?
No. A sloper drafted for woven fabrics (fabrics with no stretch) will not work for knit fabrics (stretchy fabrics). Knit slopers are drafted differently, using negative ease (meaning the pattern is smaller than your body) because the fabric stretches. You would need to draft a separate sloper for knit fabrics.
h4 Is pattern drafting hard for beginners?
It requires patience and careful measuring and drawing. The steps are simple, but getting the fit right can take practice. Starting with basic slopers like a bodice and skirt is a good way for beginners to learn the fundamental pattern making techniques. Don’t expect perfection on your first try!
h4 How do I add a sleeve to my bodice sloper?
Drafting a sleeve is a separate process. You use the armhole measurements from your fitted bodice sloper (the measurement around the armhole edge) to help draft a sleeve cap that will fit into that opening. There are formulas and techniques specifically for sleeve drafting, which build upon the basic bodice block pattern.
h4 Can I draft patterns for children or men using the same method?
Yes, the basic principles are the same: take accurate body measurements and translate them into a flat pattern. The specific measurements and the shape of the blocks will be different, but the process of drafting a sloper, testing the fit, and changing it for design remains the same for any body shape or size.