
Can I put any needle in my sewing machine? No, you cannot put just any needle in your sewing machine. Using the wrong sewing machine needle size or type can cause skipped stitches, broken threads, and even damage to your machine.
When you’re ready for sewing machine needle replacement, the process is straightforward. Knowing how to properly insert a sewing machine needle ensures your projects run smoothly. This guide will walk you through changing a sewing machine needle with clarity and ease, covering everything from selecting the right needle to the final secure fit. It’s a fundamental skill for any sewer, whether you’re a beginner or have been installing a sewing needle for years.
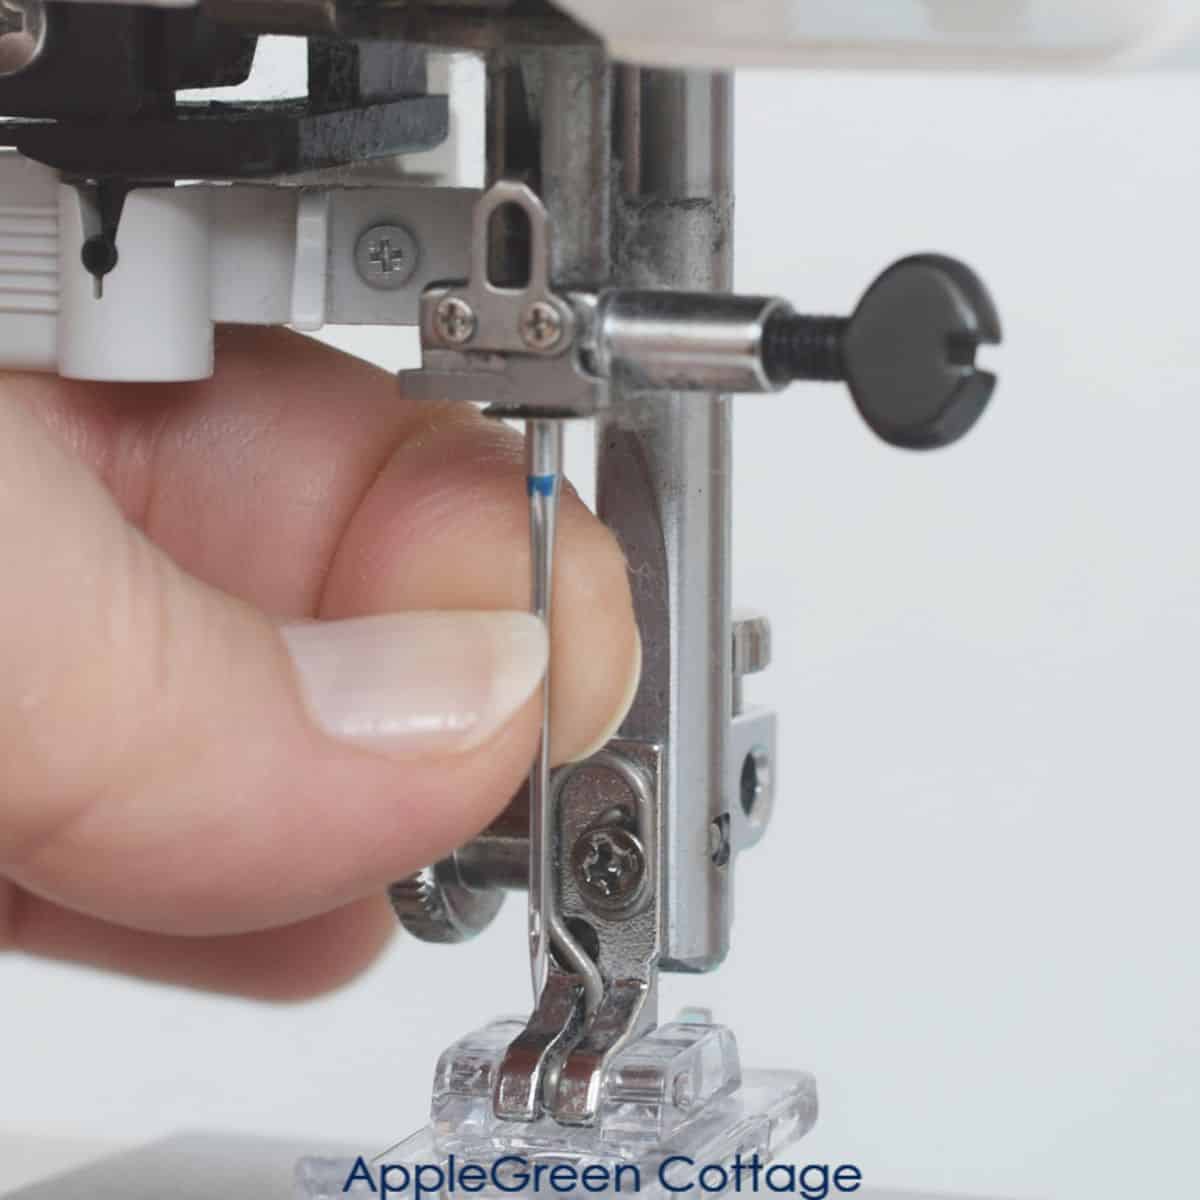
Image Source: www.applegreencottage.com
Why Proper Needle Insertion Matters
Sewing machine needle insertion is more than just screwing a needle into a hole. It’s about aligning the needle correctly within the machine’s mechanics to interact with the bobbin and thread path. When done correctly, you get clean, consistent stitches. When done incorrectly, you can encounter a host of problems that halt your sewing progress.
Common Problems from Incorrect Needle Insertion:
- Skipped Stitches: The needle isn’t hitting the thread loop at the right time.
- Thread Breakage: The needle eye might be misaligned, causing friction or snagging.
- Fabric Puckering: The needle size or sharpness might be wrong for the fabric.
- Machine Damage: A bent or broken needle can hit vital machine parts, causing costly repairs.
Choosing the Right Sewing Machine Needle
Before you even think about sewing needle insertion, you need the right needle. There’s a vast array of sewing machine needle types available, each designed for specific fabrics and threads.
Understanding Needle Systems
Sewing machine needles are categorized by their system. This system refers to the shank (the top part of the needle that fits into the machine) and its length. Most modern domestic sewing machines use the universal needle system, which is often denoted by numbers like 130/705H or 2020. Always check your sewing machine manual to confirm the correct system for your model.
Selecting the Correct Needle for Your Project:
The sewing machine needle size is just as crucial as the type. Needles are numbered from 60 to 120, with lower numbers indicating finer needles and higher numbers indicating thicker needles.
Table: Common Needle Types and Their Uses
| Needle Type | Size Range | Best For | Key Features |
|---|---|---|---|
| Universal | 70-100 | Most woven fabrics, light to medium-weight knits | Slightly rounded point, general-purpose use. |
| Ballpoint | 70-100 | Knits, stretch fabrics, jersey, t-shirts | Rounded tip pushes between fabric fibers, preventing runs and tears. |
| Sharp/Microtex | 60-80 | Woven fabrics, silk, microfibers, quilting | Very sharp point for precise piercing of tightly woven or delicate fabrics. |
| Jeans/Denim | 80-110 | Denim, canvas, upholstery, multiple layers | Stronger shaft and sharper point to pierce dense, tough fabrics. |
| Leather | 90-110 | Leather, vinyl, faux leather | Wedge-shaped tip cuts through tough materials like leather, leaving a small slit. |
| Embroidery | 75-90 | Embroidery, decorative stitching | Large eye for thicker embroidery threads, large scarf to help form the stitch loop. |
| Topstitch | 80-100 | Topstitching, decorative threads | Larger eye and longer “groove” to accommodate thicker threads and reduce friction, preventing breakage. |
| Quilting | 70-90 | Quilting, piecing | Stronger shaft, sharp point, and a “scarf” to help form a larger loop for easier thread capture. |
| Stretch | 75-90 | Very stretchy fabrics, spandex, lycra, activewear | Designed to flex with the fabric, preventing skipped stitches and thread breakage on highly elastic materials. |
When in doubt, start with a Universal needle. As you gain experience, you’ll develop a better sense of which needle works best for different materials. Always consider the weight and weave of your fabric. A fine fabric needs a fine needle, and a heavy fabric needs a robust needle.
Preparing for Needle Insertion
Safety first! Before you begin changing a sewing machine needle, always unplug your sewing machine. This prevents accidental starts and potential injuries.
Step-by-Step Preparation:
- Turn Off and Unplug: Locate the power switch and unplug the machine from the wall outlet.
- Lower the Presser Foot: Lower the presser foot using its lever. This helps stabilize the needle bar.
- Remove Old Needle: If there’s a needle already in place, you’ll need to remove it. Most machines have a small screw or a needle clamp that holds the needle.
- Gather Supplies: Have your new, correct sewing machine needle size and a small screwdriver (if needed for your machine) ready.
The Art of Sewing Needle Insertion
Now you’re ready for the actual sewing machine needle insertion. The key to correct needle insertion sewing machine is ensuring the needle is seated properly in the needle clamp.
How to Put In a Sewing Needle:
- Locate the Needle Clamp Screw: Most sewing machines have a screw at the end of the needle bar (the part that moves up and down). This screw holds the needle in place.
- Loosen the Screw: Use your fingers or a small screwdriver to turn the screw counter-clockwise. You don’t need to remove the screw completely, just loosen it enough to slide the old needle out and the new one in.
- Identify the Flat Side: This is a critical step for how to put in a sewing needle. Look closely at the shank of your new needle. There will be a distinct flat side. The sewing machine needle flat side always faces towards the back of the sewing machine, away from you. In most machines, this means the flat side faces towards the center of the machine, where the bobbin case is located.
- Insert the New Needle: Slide the shank of the new needle into the needle clamp. Push it all the way up until it hits the back of the needle hole in the needle bar.
- Secure the Needle: While holding the needle firmly in place with the flat side towards the back, tighten the needle clamp screw. Turn it clockwise until it is snug. Don’t overtighten, as this can strip the screw or damage the needle.
- Check for Stability: Gently try to wiggle the needle. It should feel secure and not move within the clamp.
Visualizing the Flat Side:
Imagine the needle bar as a tiny arm. The flat side of the needle needs to be oriented so that it allows the machine’s internal mechanism to correctly interact with the needle’s scarf (a groove on the back of the needle, near the eye). This interaction is essential for the hook or bobbin case to catch the thread loop and create a stitch.
Post-Insertion Checks and Threading
Once the needle is securely in place, it’s time to thread your machine and test it.
Threading Your Machine:
Proper sewing machine needle threading is the next step after sewing machine needle replacement.
- Follow Your Machine’s Manual: Each sewing machine has a specific threading path. Refer to your manual to ensure you are threading correctly.
- Thread the Upper Thread: Make sure the presser foot is UP when threading the upper thread. This opens the tension discs, allowing the thread to pass through correctly.
- Thread the Bobbin: Ensure your bobbin is wound evenly and correctly.
- Bring Up the Bobbin Thread: After threading the upper thread, you’ll need to bring the bobbin thread up through the bobbin case. Hold the end of the upper thread loosely, turn the handwheel towards you to lower and then raise the needle. The needle will catch the bobbin thread and bring it up. Pull about 4-6 inches of both threads to the back of the presser foot.
Testing the New Needle:
Before starting your project, it’s wise to do a test stitch.
- Use a Scrap Piece: Grab a scrap piece of fabric similar to what you’ll be sewing.
- Sew a Straight Line: Sew a few inches in a straight line.
- Inspect the Stitch: Look at the stitches on both the top and the bottom of the fabric. Are they consistent? Are there any skipped stitches or thread breaks? If so, re-check your needle insertion and threading.
Troubleshooting Common Needle Issues
Even with careful sewing machine needle insertion, problems can arise. Here’s how to tackle them.
Skipped Stitches:
This is often the first sign that your needle isn’t seated correctly, is the wrong type, or is bent.
- Re-seat the Needle: Ensure the sewing machine needle flat side is in the correct position and the needle is pushed all the way up.
- Try a New Needle: Needles can become microscopicly bent without you realizing it, especially after hitting a pin. Sometimes, simply using a brand-new needle of the correct type and size can fix skipped stitches.
- Check Needle-to-Hook Timing: In rare cases, the issue might be with the machine’s timing. This is a more complex repair that might require professional service.
Thread Breakage:
This can happen for several reasons:
- Incorrect Needle: A needle that is too fine for the thread or fabric can cause it to break.
- Burrs on the Needle: A new needle might have a burr (a rough spot) on its eye or shaft. Try a different needle.
- Threading Errors: Make sure you followed the threading path correctly, especially with the presser foot up.
- Tension Issues: Incorrect tension settings can also lead to thread breakage.
Fabric Damage (Puckering or Snags):
- Wrong Needle Size: A needle that’s too large for the fabric can create unnecessary holes and cause puckering. A needle that’s too small for a dense fabric can bend or break.
- Wrong Needle Type: Using a sharp needle on a knit fabric can cause snags. Switch to a ballpoint or stretch needle.
- Dull Needle: A dull needle can snag and pull threads. Replace the needle.
When to Replace Your Sewing Machine Needle
Needles are consumables! They don’t last forever. Regularly replacing your needle is a crucial part of maintaining your sewing machine and ensuring good stitch quality.
Signs It’s Time for a New Needle:
- Skipped stitches: As mentioned above.
- Thread snagging or breaking: Indicates damage or a dull point.
- Puckered fabric: Suggests the needle might be too large or dull for the material.
- Audible “thud” or “click” when sewing: The needle might be hitting the needle plate or bobbin casing, which can happen if it’s bent or not inserted correctly.
- Visible damage: Any bend, burr, or dullness you can see means it’s time for a change.
- After long periods of use: Most sewing experts recommend sewing machine needle replacement after every 6-8 hours of sewing or after completing a significant project. It’s also a good habit to change it at the start of a new project.
Frequently Asked Questions (FAQ)
Q: How often should I change my sewing machine needle?
A: It’s best practice to change your needle every 6-8 hours of sewing or at the start of each new project. This ensures optimal performance and prevents common sewing issues.
Q: What does the flat side of the sewing machine needle do?
A: The sewing machine needle flat side is designed to align with the machine’s internal mechanism, specifically the hook or bobbin case. This alignment is crucial for the hook to correctly catch the thread loop and form a stitch. For most domestic machines, the flat side faces the back.
Q: My needle keeps breaking. What’s wrong?
A: A breaking needle can be caused by several factors: it might be the wrong sewing machine needle size for the fabric, it could be bent, or it might be dull. Ensure you’re using the correct type and size of needle, and try a new one. Also, check that the needle is inserted correctly and pushed all the way up into the needle clamp.
Q: Can I use a sewing machine needle from one brand in a machine of another brand?
A: As long as the needles are from the same system (e.g., 130/705H), you can usually use them across different brands of domestic sewing machines. Always consult your sewing machine’s manual to confirm the compatible needle system.
Q: What is the difference between a universal needle and a ballpoint needle?
A: A universal needle has a slightly rounded point and is suitable for most woven fabrics. A ballpoint needle has a more rounded tip designed to push between the fibers of knit fabrics, preventing snags and skipped stitches.
Q: How do I know if my needle is inserted correctly?
A: The sewing machine needle flat side should be facing the back of the machine. Push the needle as far up as it will go into the needle clamp and tighten the screw securely. The needle should feel firm and not wiggle.
By following these steps and paying attention to the details of sewing machine needle insertion, you’ll be well on your way to creating beautiful, consistent stitches with your sewing machine. Happy sewing!