
Image Source: letslearntosew.com
How To Read Patterns Sewing: A Beginner’s Guide
Sewing patterns help you make clothes and other fabric items. They are like maps. Learning to read them is the first step to sewing success. This guide will show you how to understand sewing patterns.
Getting to Know Your Pattern
Every sewing project starts with a pattern. Think of it as a guide. It tells you what to make. It also tells you how to make it.
Patterns come in an envelope. The envelope has lots of facts you need. This is your first stop.
Grasping Pattern Envelope Information
The envelope front shows you what the finished item looks like. It shows different versions or “views” you can make from this one pattern. Look closely at these pictures.
The back of the envelope gives important details. It is full of helpful facts.
- What you can make: It shows line drawings of the different views. These are simpler pictures. They show the shape clearly.
- Sizes: It lists the sizes included in the envelope. Check if your size is there.
- Fabric Suggestions: It suggests what kind of fabric works best. This is important. Using the wrong fabric can change how the item looks and fits. It might say “cotton,” “linen,” or “knit.”
- Notions List: Notions are the extra bits you need. This list tells you. It might include zippers, buttons, elastic, thread, ribbon, or trim. Buy these before you start sewing.
- Fabric Amounts: This tells you how much fabric to buy. It lists amounts for each size and view. It often gives amounts for different fabric widths (like 45 inches or 60 inches). Check your size and view. Look at the fabric width you plan to buy. Get the right amount. It is better to have a little extra than not enough.
- Body Measurement Chart: This chart helps you find your size. Pattern sizes are often different from store clothing sizes. You need to measure your body. Measure your bust, waist, and hips. Compare your measurements to the chart. This helps you pick the best size pattern to use.
- Finished Garment Measurements: Sometimes the envelope or instructions show finished sizes. This tells you how big the final item will be. This helps you see how loose or tight it will be on you. It helps you pick if you want it tighter or looser.
Look at all these details on the envelope. They guide your choices. They tell you what you need to buy. They help you pick the right size.
Interpreting the Pattern Pieces
Inside the envelope, you find large sheets of tissue paper. These are the pattern pieces. Each piece is a part of the item you are making. There is also a set of instructions. The instructions tell you step-by-step how to sew the pieces together.
The pattern pieces look confusing at first. They have many lines, shapes, and words on them. These are sewing pattern symbols and pattern markings. They all mean something important.
Think of each pattern piece as a template. You place it on your fabric. Then you cut around it. But you must pay attention to all the marks on the piece.
Deciphering Sewing Pattern Symbols and Markings
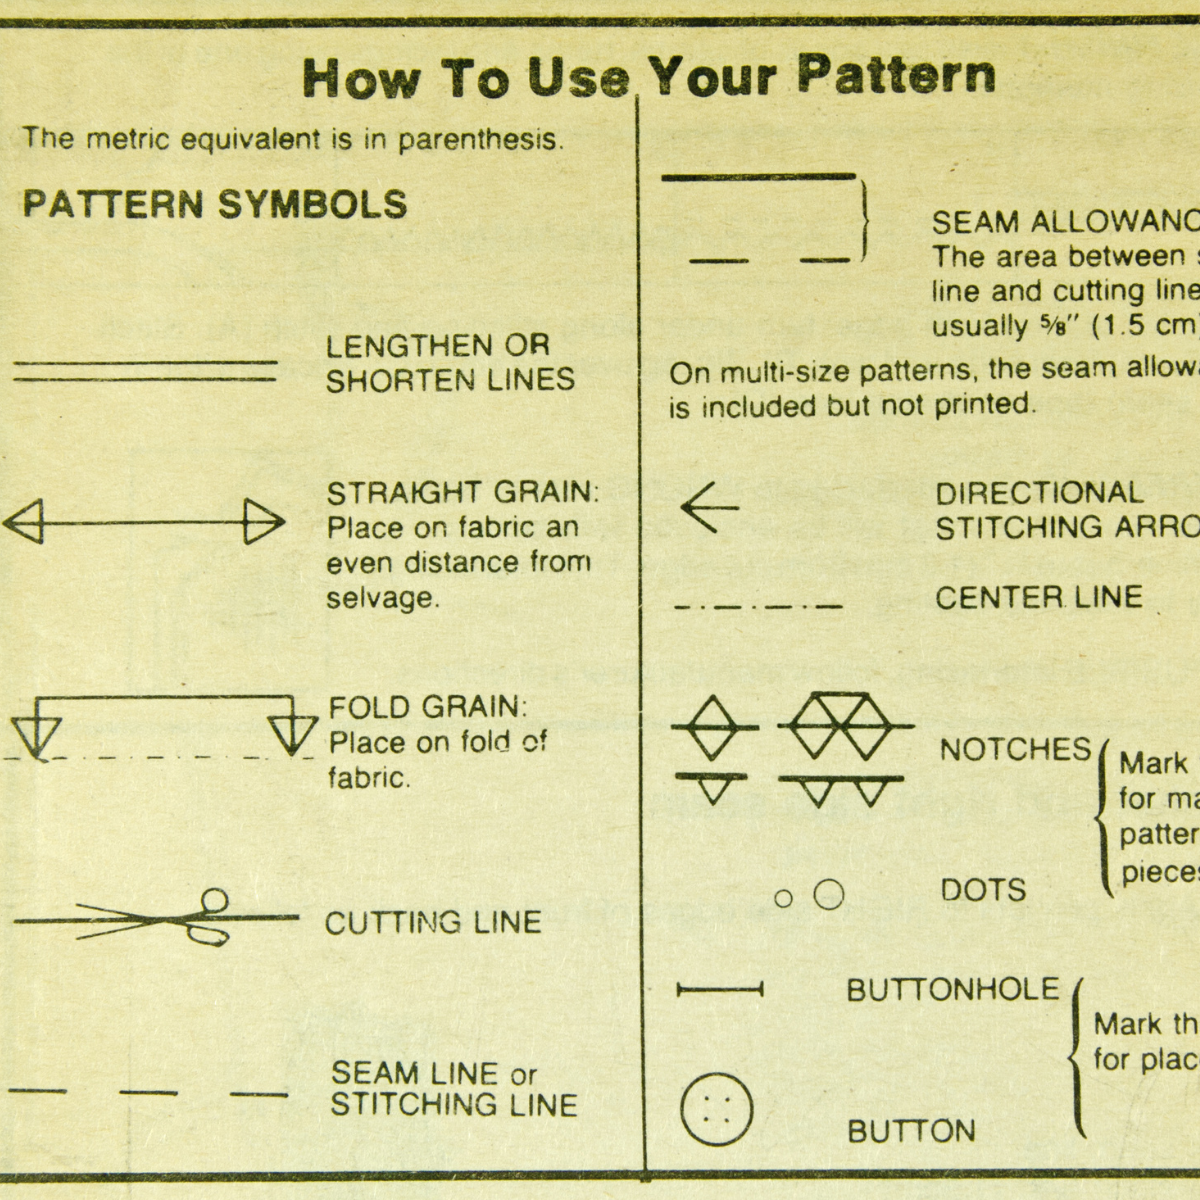
Pattern pieces use a kind of secret code. The code is made of lines, dots, triangles, and other shapes. These are the sewing pattern symbols and pattern markings. They tell you where to cut, where to fold, where to sew, and how to match pieces.
Here are some common sewing pattern symbols and what they mean:
- Grainline: This is a very important symbol. It is a long line with arrows at both ends. It shows you how to place the pattern piece on your fabric. Fabric has a “grain.” This means the threads run in a certain direction. The grainline must be lined up with the lengthwise threads of your fabric. If you don’t do this, your finished item might twist or hang strangely. This is a key part of reading patterns.
- Place on Fold Line: This is usually a line with a bent arrow or arrows pointing towards the edge. It tells you to place this edge of the pattern piece right on the folded edge of your fabric. This lets you cut one piece that opens up into a full piece without a seam (like the front of a dress or the back of a shirt).
- Cutting Lines: These are the lines you cut along. They are often shown as solid lines. Sometimes there are different cutting lines for different sizes. Make sure you follow the line for the size you picked.
- Sewing Lines (Stitching Lines): These lines show where you will stitch. They are often shown as dashed lines. They are usually a set distance inside the cutting line. This space between the cutting line and the stitching line is called the seam allowance.
- Dots or Circles: These are small filled-in circles. They mark a specific point on the pattern piece. They are used to match pieces, start or stop stitching, or place other things like pockets or darts.
- Squares or Triangles: Like dots, these are matching points. You match a triangle on one piece to a triangle on another piece. They help you line up edges correctly before sewing. Often, single triangles are for one seam, double triangles for another, and triple triangles for a third. These are also known as pattern notches, though notches on the edge are more common.
- Darts: Darts are shown as lines forming a triangle or diamond shape. You sew along these lines to shape the fabric. Darts make flat fabric curve to fit the body, like at the bust or waist.
- Buttonholes: These are usually marked with lines showing the length and place of the buttonhole.
- Buttons: These are marked with an ‘X’ or ‘O’ to show where to sew on the button.
- Gathering or Easing Lines: These lines show where to make fabric fullness. Gathering makes small folds. Easing fits a slightly larger edge to a smaller edge without making folds.
- Fold Lines (within the pattern piece): These lines show where to fold the fabric after cutting, like for a hem or facing.
- Center Front / Center Back: These lines show the middle of the pattern piece. They help you align the pattern correctly on the fabric.
It is helpful to have a pattern key. Most pattern instruction sheets have a key. It explains all the sewing pattern symbols used in that specific pattern. Look at the key. It will help you understand the marks.
Recognizing Pattern Notches
Pattern notches are special marks. They are small lines or shapes on the edge of the pattern piece. They are there to help you match up different pattern pieces correctly.
Think of notches like puzzle pieces. The notch on one piece fits with the matching notch on another piece.
- Single Notches: These are usually found on one seam. They help you match up the seam edges.
- Double Notches: These are often found on a different seam than the single notches. They also help you match edges. Using single and double notches helps you know which seam edge connects to which other seam edge, especially if edges look similar.
- Triple Notches: These are often used to mark the back seam of something.
When you cut your fabric, you cut around the notches. You can cut them as little snips into the seam allowance or as small triangles pointing out from the cutting line. Be careful not to cut past the seam line. Notches are a key part of pattern markings. They make putting pieces together much easier. Always mark your notches!
Following the Pattern Instructions
Inside the envelope, you also find the pattern instructions. These are printed sheets. They tell you step-by-step how to sew your project.
Grasping Pattern Instructions
The instructions start after you have cut your fabric. They tell you which pieces to sew together first. They tell you what kind of stitch to use. They tell you when to press seams.
Read all the instructions before you start sewing. This helps you see the whole process. It helps you understand the order of steps. It helps you know what is coming next.
The instructions often include small drawings. These pictures show you what to do at each step. Look at the pictures. They make the words clearer.
Interpreting Sewing Pattern Terminology
Pattern instructions use special words. These are sewing pattern terminology. Learning these words makes reading patterns much easier.
Here are some common sewing terms you will see:
- Seam Allowance (SA): This is the space between the cutting line and the stitching line. Patterns tell you how wide the seam allowance is. It is often 5/8 inch (1.5 cm) or 1/2 inch (1.3 cm). You sew your seam that distance from the cut edge. The instructions will usually state the seam allowance at the beginning.
- Right Sides Together (RST): This means you put the sides of the fabric that will show on the outside of the finished item facing each other. You sew pieces with their right sides together. Then when you open them up, the seam is hidden inside.
- Wrong Side (WS): This is the back side of the fabric. It is the side that will be hidden inside the finished item.
- Wrong Sides Together (WST): Sometimes you sew with the wrong sides together. This is often for certain types of seams or finishes.
- Basting: This is sewing with a long stitch. It is temporary. You use basting to hold pieces together to check the fit. Or to hold things in place before sewing permanently. You remove basting stitches later.
- Staystitching: This is a line of stitches sewn through one layer of fabric. It is sewn just inside the seam line on curved or angled edges. It stops the fabric from stretching out of shape while you work with it.
- Understitching: This is a line of stitches sewn through a facing and the seam allowance. It is sewn after the seam is done. It helps a facing or lining stay on the inside. It stops it from rolling to the outside.
- Topstitching: This is a line of stitches sewn on the outside (right side) of the fabric. It is decorative. It can also help flatten seams.
- Edgestitching: This is like topstitching. But it is sewn very close to the edge of the fabric.
- Press: This means using an iron to flatten the fabric. You press seams open. You press hems up. Pressing is very important in sewing. It makes your work look neat and professional. The instructions will tell you when to press. They often tell you how to press the seam allowances (open or to one side).
- Finish Seams: This means doing something to the raw edges of the fabric inside the seam. Finishing stops the edges from fraying (unraveling). You can finish seams with a serger, a zigzag stitch on a sewing machine, or by pressing the edges under.
Don’t worry about knowing all these words at once. You will learn them as you sew. Use the instructions as your guide.
Reading Sewing Pattern Abbreviations
Pattern instructions often use short forms for words. These are sewing pattern abbreviations. Learning these saves you time and helps you read faster.
Here is a table of common abbreviations:
| Abbreviation | Full Term | What it Means |
|---|---|---|
| SA | Seam Allowance | The space between the cut edge and stitch line |
| RST | Right Sides Together | Put good sides of fabric facing each other |
| WS | Wrong Side | The back side of the fabric |
| WST | Wrong Sides Together | Put back sides of fabric facing each other |
| CF | Center Front | The middle line of the front piece |
| CB | Center Back | The middle line of the back piece |
| Pcs | Pieces | Pattern pieces |
| R | Right | The right side |
| L | Left | The left side |
| Sts | Stitches | Single stitches |
| Skirt F | Skirt Front | The front pattern piece for the skirt |
| Bodice B | Bodice Back | The back pattern piece for the bodice |
The pattern instructions will usually have a list of the abbreviations they use. Look for it.
Planning Your Cutting Layout
Before you cut your fabric, you need a plan. This plan is shown in the instructions. It is called the cutting layout.
Fathoming the Cutting Layout
The cutting layout is a diagram. It shows you how to place your pattern pieces on your fabric. It shows you the best way to fit all the pieces.
Why is this important?
- Saves Fabric: A good layout uses your fabric wisely. It helps you avoid wasting fabric.
- Gets Pieces Right: It shows you how to place pieces to get the grainline correct. Remember the grainline? It must line up with the fabric threads. The cutting layout shows you how to do this for each piece.
- Different Options: There are usually different cutting layouts shown.
- One for each fabric width (like 45 inch or 60 inch).
- One for each view you are making.
- One for fabric that has a nap or is one-way print (fabric where the pattern goes only one way, like velvet or some pictures).
- One for fabric that is folded differently (like folded in half lengthwise or crosswise).
Look at the cutting layout for your size, your view, your fabric width, and your fabric type (with or without nap).
The diagram shows you how to fold your fabric. It shows where to place each pattern piece. It shows the grainline on the pattern piece lined up with the fabric edge or fold.
Lay your fabric out on a large flat surface. Fold it as shown in the diagram. Place the pattern pieces carefully. Check that the grainline on each piece is straight on the fabric. You can use a ruler to measure from the grainline to the fabric edge. Make sure the distance is the same at both ends of the grainline arrow.
Pin the pattern pieces to the fabric. Use enough pins to keep the pieces from moving. Now you are ready to cut.
Cut carefully along the cutting lines for your size. Do not cut into the seam allowance where the notches are. Cut around them or snip into the seam allowance edges slightly.
Choosing Your Size
Picking the right pattern size is key to a good fit.
Selecting the Right Size
Pattern sizes are not like ready-to-wear clothing sizes. A size 12 pattern is not the same as a size 12 dress you buy in a store.
Pattern companies use body measurements. You need to measure your body with a tape measure.
- Bust: Measure around the fullest part of your chest.
- Waist: Measure around the narrowest part of your waist. This is usually above your belly button.
- Hips: Measure around the fullest part of your hips.
Look at the body measurement chart on the pattern envelope or instruction sheet. Find your measurements on the chart. This tells you which pattern size to use.
What if your measurements are between sizes? Or if your bust is one size, your waist another, and your hips a third?
You can pick the size that fits your most important measurement for that item. For a dress or top, bust size is often most important. For pants or skirts, waist and hip size matter most.
You can also learn to blend sizes. This means cutting the pattern lines from one size at the bust or waist and smoothly changing to another size at the hips or waist. This is a bit more advanced. For your first project, try to pick the size closest to your key measurement or the largest measurement if unsure. You can make simple size changes later if needed.
Remember ease. Patterns include “ease.” This is extra room so you can move and breathe. Some clothes are meant to be fitted (less ease). Some are meant to be loose (more ease). The finished garment measurements (if given) help you see how much ease is included.
Steps to Reading a Pattern for Sewing
Let’s put it all together. Here are the steps:
- Look at the Envelope: Study the front and back. See the views. Check the sizes. Read the fabric needs. Note the notions. Find the fabric amount you need.
- Find Your Size: Measure your body. Use the chart to find your pattern size.
- Read the Instructions: Read all the steps from start to finish. Look at the pictures. Check the sewing pattern terminology and sewing pattern abbreviations section. Understand the process.
- Decipher Pattern Symbols and Markings: Look at the pattern pieces. Find the key in the instructions. Learn what the lines and shapes mean. Pay close attention to the grainline and pattern notches.
- Pick Your Pattern Pieces: Find the pattern pieces you need for the view and size you are making. Cut them out neatly along the edge lines (or outside them if they have a border).
- Study the Cutting Layout: Find the diagram for your size, view, fabric width, and fabric type.
- Layout and Cut: Fold your fabric as shown. Place pattern pieces using the cutting layout. Line up the grainlines straight on the fabric. Pin the pieces. Cut carefully around the edges, marking notches.
- Mark Pattern Details: Transfer important pattern markings (like dots, squares, dart lines) from the pattern piece onto your fabric. You can use tailor’s chalk, fabric pens, or tailor’s tacks for this. These marks help you sew correctly.
- Follow the Instructions: Now start sewing! Go step by step through the instructions. Use the pictures to help you.
Tips for Beginner Pattern Readers
Reading patterns gets easier with practice. Here are some tips:
- Start Simple: Choose a pattern marked “Easy” or “Beginner.” Look for patterns with few pieces and simple shapes.
- Read Everything Twice: Read the envelope and instructions all the way through more than one time before you start. This helps you understand the whole project.
- Highlight Your Size: If the pattern pieces have lines for many sizes, trace or highlight the cutting line for your size. This stops you from getting confused.
- Keep Pieces Organized: When you cut out the paper pattern pieces, label them. Pin the paper label from the instructions onto the cut fabric piece. This helps you know what each piece is.
- Mark Clearly: Transfer all the important pattern markings to your fabric. Don’t skip this step. Those dots and triangles are there for a reason.
- Press As You Go: Pressing seams after sewing each one makes a big difference. It makes your project look much neater.
- Don’t Rush: Take your time. Sewing should be fun. If you get stuck, take a break.
- Use Resources: Look online for videos. Sewing blogs and websites can show you how to do specific steps or explain symbols. Join a sewing group or class. Ask for help!
Frequently Asked Questions
Here are some questions beginners often ask about reading patterns.
Q: What if my fabric is wider than the pattern suggests?
A: That’s okay! You might need less fabric than the pattern lists. The cutting layout for the wider fabric width will show you how to place the pieces. If there isn’t a layout for your width, you might need to figure out the best way to fit the pieces yourself, making sure to follow grainlines and “place on fold” instructions.
Q: Can I use any fabric I want with a pattern?
A: Not always. The pattern envelope suggests fabric types for a reason. Using a stretchy knit fabric with a pattern made for stiff cotton will change how the item fits and hangs. It might not work at all. For your first projects, stick to the suggested fabric types.
Q: What is “ease” in a sewing pattern?
A: Ease is extra room in the pattern beyond your body measurements. It allows you to move. Design ease is put in for style (like a flowy dress). Wearing ease is needed just to live in the clothes (like lifting your arms). Patterns have ease built in.
Q: My body size is between two sizes on the chart. Which size should I use?
A: For tops and dresses, many people choose the size that matches their bust measurement. For skirts and pants, waist and hip are key. If you are between sizes, you can try the larger size and take it in if needed. Or learn to blend between the sizes on the pattern piece. Start with the size matching your largest key measurement for that item.
Q: The pattern piece is bigger than my body measurement. Why?
A: This is because of seam allowances and ease. The pattern piece includes the seam allowance (the edge you cut along). It also includes the ease (extra room for wearing and design). Don’t worry if the pattern piece looks big compared to your body.
Q: What if the pattern envelope says “with nap”?
A: Fabric with nap has a texture or design that goes in one direction (like velvet or corduroy). If you pet it one way it feels smooth, the other way it feels rough. Prints that only go one way (like cats all facing left) also need “with nap” layout. All pattern pieces must be placed on the fabric with the tops facing the same direction. The cutting layout for “with nap” will show you how to do this. It often needs more fabric.
Q: I cut out the pattern piece, but it doesn’t have a label. How do I know what it is?
A: Look at the shape of the piece. Compare it to the small diagrams of the pattern pieces on the instructions. They often show the shape and number of each piece. Match the piece you cut to the diagram.
You Can Do It!
Reading sewing patterns might seem hard at first. There are many symbols, words, and steps. But each part tells you something important.
Start simple. Go step by step. Use this guide as a help. Read the envelope. Look at the pieces and instructions. Find the symbols and markings. Check the cutting layout.
Sewing is a rewarding hobby. Learning to read patterns unlocks a world of projects you can make. Practice makes reading patterns feel natural. Soon, you will look at a pattern envelope and know exactly what to do. Happy sewing!