
Can you thread a Janome sewing machine? Yes, you can thread a Janome sewing machine by following a series of steps, typically involving winding the bobbin, setting up the upper thread, and guiding it through the designated path and needle.
Threading your Janome sewing machine might seem a bit daunting at first, but with this step-by-step guide, you’ll be stitching in no time. Every Janome sewing machine model is a little different, but the core principles of threading remain the same. We’ll cover the essential steps to get your machine ready for action, from winding the bobbin to passing the thread through the needle. Let’s dive into the art of Janome sewing machine threading!
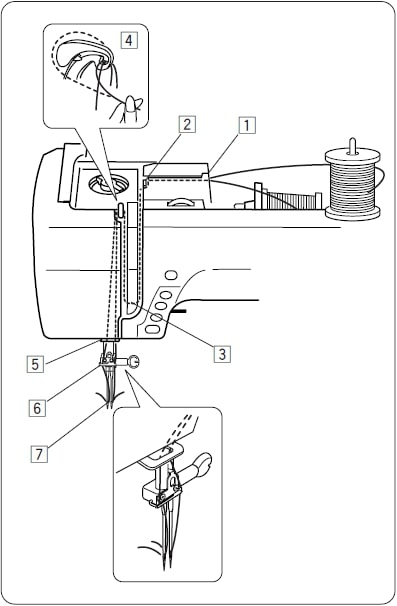
Image Source: www.janomesewingcentre.com.au
Preparing Your Janome Sewing Machine for Threading
Before you even think about thread, ensure your machine is set up correctly. This makes the threading process much smoother.
Ensuring the Needle is in the Correct Position
It’s crucial to have the needle at its highest point.
- Raise the presser foot: Always lift the presser foot before threading. This releases the tension discs, allowing the thread to pass through smoothly. If you try to thread with the presser foot down, the thread won’t go in correctly, and you’ll likely have tension issues.
- Turn the handwheel: Rotate the handwheel towards you (counter-clockwise) until the needle reaches its absolute highest position. You should feel it stop.
Checking the Thread Path
Most Janome sewing machines have a numbered thread path or a diagram printed directly on the machine itself. This is your best friend!
- Locate the Janome sewing machine threading diagram: Look for a series of numbers or arrows on the machine’s body. These visually guide you through the Janome sewing machine thread path. Often, the numbers correspond to the order in which you should guide the thread.
Step 1: Winding the Bobbin
A properly wound bobbin is essential for successful sewing. This is a fundamental part of threading a Janome sewing machine.
Setting Up the Bobbin Winder
Your Janome sewing machine will have a dedicated bobbin winder.
- Place the bobbin: Put a bobbin onto the bobbin winder spindle. It usually has a small notch or peg that the thread catches on to keep it from unwinding too quickly.
- Secure the bobbin: Push the spindle to the right (or as indicated by your machine’s specific mechanism) to engage the winder.
- Thread the bobbin winder: Guide the thread from the spool pin, through any designated thread guides for the bobbin winder, and then down into the hole of the bobbin.
- Catch the thread end: Wrap the thread around the bobbin a few times in the direction indicated by your machine (usually counter-clockwise). Hold the thread end firmly as you start the winder.
- Start winding: Gently press the foot pedal. Hold the thread tail until it’s secured by the winding bobbin.
- Cut the excess thread: Once a few wraps have been made, snip the excess thread tail close to the bobbin.
- Wind the bobbin: Continue winding until the bobbin is full. Most Janome machines have an automatic stop mechanism when the bobbin is full, or you can feel the resistance increase. Don’t overfill the bobbin, as this can cause tangles.
- Finish: Cut the thread and push the bobbin winder spindle back to its original position (usually to the left).
Table: Bobbin Winding Tips
| Tip | Why it’s Important |
|---|---|
| Use the correct bobbin | Wrong bobbins can damage the machine or cause issues. |
| Hold the thread tail | Prevents thread from unraveling and causing tangles. |
| Wind evenly | Ensures consistent thread supply for smooth sewing. |
| Stop when full | Prevents overfilling, which leads to poor stitching. |
| Use the correct thread color | Important for aesthetic and functional seams. |
Step 2: Threading the Upper Thread
This is where the Janome sewing machine upper thread comes into play. Follow these steps carefully.
Guide the Thread from the Spool
- Place the spool: Put your spool of thread onto the spool pin. Make sure it’s facing the correct direction (usually with the thread unwinding from the front). Some machines have a horizontal spool pin, while others have a vertical one. Use the appropriate spool cap if provided.
- Follow the numbered guides: This is where the Janome sewing machine threading diagram is crucial. Start with the first thread guide. This is typically a hook or a small metal loop near the spool pin.
- Pass through the tension discs: Guide the thread down and around the tension discs. These are usually located behind a cover or dial. Make sure the thread is firmly seated in the tension disc’s slot. This step is critical for proper Janome sewing machine thread tension.
- Go up and over the take-up lever: Bring the thread up and loop it through the eye of the take-up lever. The thread should go through the slot of the lever, not around the arm. Then, bring it down again.
- Continue down the thread path: Follow the remaining thread guides, usually numbered arrows or metal loops. Ensure the thread passes through each one smoothly.
- Thread the needle clamp: Guide the thread to the needle clamp area. There’s often another thread guide before reaching the needle itself.
Needle Threading
This is often the trickiest part, especially with fine threads.
Manual Needle Threading
This method requires precision.
- Thread the needle: Bring the thread to the needle. Guide the thread from the front of the needle towards the back, passing it through the eye of the needle.
- Pull through a small amount: Pull about 4-6 inches of thread through the needle’s eye. This provides enough slack for the next step.
Using the Automatic Needle Threader (If Available)
Many Janome models have an automatic needle threader, which is a real time-saver!
- Position the needle: Make sure the needle is at its highest position.
- Engage the threader: Follow your Janome’s specific mechanism. Usually, you’ll pull down a small lever. This lever will swing a tiny hook through the needle’s eye.
- Guide the thread: Place the thread into a small notch on the threader’s hook.
- Release the lever: Gently release the lever. The hook will pull the thread loop through the needle’s eye.
- Pull through: Grab the loop of thread that has come through the needle and pull about 4-6 inches through.
Step 3: Inserting and Threading the Bobbin Case
This is the final step in Janome sewing machine bobbin threading and crucial for Janome sewing machine manual threading to be complete.
Inserting the Bobbin
Most Janome machines have a front-loading or top-loading bobbin system. We’ll cover both.
For Front-Loading Bobbin Systems:
- Open the cover: Remove the needle plate or accessory tray to expose the bobbin case area.
- Remove the bobbin case: If there’s a bobbin case already in place, remove it.
- Prepare the bobbin: Take your wound bobbin. Make sure the thread is coming off the bobbin in the correct direction (usually counter-clockwise).
- Place the bobbin in the case: Insert the bobbin into the bobbin case. There’s usually a small notch on the bobbin case that needs to align with a corresponding notch or slit on the bobbin itself.
- Thread the bobbin case: Guide the thread from the bobbin through the small slit or tension spring on the bobbin case. Pull about 4-6 inches of thread through.
- Insert the bobbin case: Hold the bobbin case with the thread hanging down. Align the bobbin case’s beak or notch with the corresponding groove in the machine. Slide the bobbin case into place. You should hear a click, or it will sit snugly.
- Replace the needle plate: Put the needle plate back on.
For Top-Loading (Drop-In) Bobbin Systems:
These are generally simpler.
- Remove the bobbin cover: Lift off the clear plastic cover.
- Place the bobbin: Insert the wound bobbin into the bobbin case holder. The thread should be coming off the bobbin counter-clockwise. There’s a slot on the bobbin case holder for the thread to pass through.
- Guide the thread: Pull the thread through the slot in the bobbin case holder. Make sure it sits in the small groove.
- Replace the cover: Put the clear plastic bobbin cover back on.
Step 4: Picking Up the Bobbin Thread
Now you need to bring that lower thread up to meet the upper thread.
- Hold the upper thread: With your left hand, gently hold the end of the upper thread that you just threaded through the needle.
- Turn the handwheel: Slowly turn the handwheel towards you (counter-clockwise) by one full rotation. This will lower the needle and then bring it back up.
- Catch the bobbin thread: As the needle rises, the Janome sewing machine upper thread will catch the bobbin thread and create a loop.
- Pull up the loop: Use your fingers or a seam ripper to grab the loop of bobbin thread that has emerged from the needle plate. Pull this loop through so you have both the upper thread and the bobbin thread coming up through the needle plate.
- Pull through a few inches: Pull about 4-6 inches of the bobbin thread through the needle plate.
Step 5: Setting the Janome Sewing Machine Thread Tension
Proper Janome sewing machine thread tension is key to creating beautiful stitches.
Basic Tension Settings
- Upper thread tension: The upper thread tension is controlled by the numbered dial, usually located at the front or top of the machine. The numbers typically range from 0 to 9. For most fabrics, a setting between 3 and 5 is a good starting point.
- Bobbin thread tension: The bobbin thread tension is usually factory-set and is not meant to be adjusted frequently. There’s a small screw on the bobbin case (if you have a separate bobbin case) that can be adjusted by a very small amount if necessary.
How to Test Your Tension
- Prepare a fabric sample: Use a scrap of the fabric you plan to sew.
- Sew a test seam: Sew a few inches with the upper thread and bobbin threaded correctly.
- Examine the stitches:
- Balanced tension: Stitches look neat and uniform on both sides of the fabric. You shouldn’t see loops of thread on either side.
- Too much upper tension: The upper thread will be pulled to the underside of the fabric, creating a sunken, tight look on the top. Adjust the upper tension dial to a lower number.
- Too little upper tension: The bobbin thread will be pulled to the top side of the fabric, creating loops or puckering on the top. Adjust the upper tension dial to a higher number.
- Bobbin tension issues: If the bobbin thread is too loose, you’ll see loops on the top. If it’s too tight, the stitches will be pulled down into the bobbin area. Adjusting bobbin tension is rare and requires a tiny screwdriver.
Table: Troubleshooting Common Tension Issues
| Problem | Cause | Solution |
|---|---|---|
| Loops on top of fabric | Upper thread tension too low, or bobbin tension too high | Increase upper thread tension, or check if bobbin is inserted correctly. |
| Loops on bottom of fabric | Upper thread tension too high, or bobbin tension too low | Decrease upper thread tension, or check bobbin insertion and thread path. |
| Puckering | Upper thread tension too high | Decrease upper thread tension. |
| Stitches breaking | Thread snagging, wrong needle, tension too high/low | Check thread path, change needle, adjust tension, use quality thread. |
Common Janome Sewing Machine Threading Mistakes to Avoid
Even with a clear guide, mistakes can happen. Here are some common pitfalls to watch out for when Janome sewing machine threading.
- Not raising the presser foot: This is a big one! It prevents the thread from engaging the tension discs properly.
- Skipping a thread guide: Even one missed guide can throw off your tension and stitching quality.
- Incorrect bobbin insertion: The thread must come off the bobbin in the correct direction and be seated in the bobbin case’s tension slot.
- Thread not in the take-up lever: If the thread bypasses the take-up lever, you won’t have any stitches at all.
- Threading with the machine turned on: Always turn your machine off or unplug it if you’re unsure about electrical components.
- Using damaged or old thread: Old thread can be brittle and break easily.
- Using the wrong needle for the fabric: A needle that’s too thick or too thin can cause skipped stitches or fabric damage.
Frequently Asked Questions (FAQ) about Janome Sewing Machine Threading
Q1: Why is my Janome sewing machine not picking up the bobbin thread?
A1: This is usually due to incorrect threading of the upper thread, the bobbin not being inserted correctly, or the needle being in the wrong position. Double-check that the presser foot is up, the thread is in all guides including the take-up lever, the bobbin is seated properly with the thread in the tension slot, and the needle is at its highest point before picking up the bobbin thread.
Q2: My stitches are loose and look like loops on the top. What’s wrong?
A2: This indicates that the upper thread tension is too loose or the bobbin thread tension is too tight. First, try increasing the upper thread tension by turning the dial to a higher number. If that doesn’t fix it, ensure the bobbin is inserted correctly.
Q3: My thread keeps breaking. How can I fix this?
A3: Thread breakage can have several causes.
* Tension: The tension might be too high.
* Needle: The needle could be blunt, bent, or the wrong size for the fabric or thread. Try changing the needle.
* Thread path: Ensure the thread is not snagging on anything and is correctly seated in all guides and the tension discs.
* Bobbin: The bobbin might be wound unevenly or the bobbin case is dirty.
* Thread quality: Old or poor-quality thread can break easily.
Q4: How often should I re-thread my Janome sewing machine?
A4: You should re-thread your machine every time you change the upper thread color or type, or when you change the bobbin thread. It’s also a good idea to re-thread if you notice stitch quality issues.
Q5: What is the correct way to thread the needle on my Janome?
A5: Thread the needle from front to back. If your Janome has an automatic needle threader, use that mechanism as it’s much easier. Ensure the needle is in its highest position and the presser foot is up before attempting to thread.
By following these detailed steps and tips, you’ll become proficient in Janome sewing machine threading. Happy stitching!