
Image Source: i.ytimg.com
How To Replace A Bobbin In A Singer Sewing Machine Guide
What is a bobbin, and why is it important? A bobbin is a small spool that holds the bottom thread in your sewing machine. It works with the top thread to create stitches. If your bobbin is empty, unwound, or not inserted correctly, your machine won’t sew properly.
Replacing a bobbin in a Singer sewing machine is a fundamental skill for any sewer. This guide will walk you through the entire process, from preparing your bobbin to troubleshooting common issues. We’ll cover everything you need to know to ensure smooth and successful sewing.
Why Changing Your Bobbin Matters
A Singer bobbin is crucial for creating stitches. When you sew, the top thread loops around the bobbin thread, forming a strong stitch. If your bobbin runs out of thread mid-project, you’ll have gaps or incomplete stitches. It’s also important to use the correct type of bobbin for your specific Singer sewing machine model. Using the wrong bobbin can cause tension issues, thread jams, or even damage to your machine.
Preparing Your Bobbin: Winding a Bobbin Singer Style
Before you can replace a bobbin, you need to have one ready to go. This involves winding a new bobbin with thread. Most Singer sewing machines have a dedicated bobbin winding unit.
Steps for Winding a Bobbin:
- Select Your Thread: Choose the thread color and type that matches your upper thread. Ensure the thread is smooth and free from knots or snags.
- Place the Bobbin: Take a new, empty bobbin. You’ll notice a small slit or hole in the side of the bobbin.
- Thread the Bobbin Winder:
- Find the bobbin winder spindle on your Singer sewing machine. It often looks like a small, thin rod.
- Insert the thread spool onto the spool pin.
- Guide the thread through the thread guide on top of the machine.
- Next, find the bobbin winder thread guide. This is usually a small hook or loop near the winder spindle.
- Bring the thread through this guide.
- Now, thread the end of the thread through the small hole or slit in the bobbin.
- Pull a few inches of thread through the hole to secure it.
- Engage the Bobbin Winder:
- You’ll usually need to move a small lever or guide the bobbin winder spindle to the right or left to engage it. This disengages the main sewing mechanism.
- Hold the thread end firmly as you start.
- Begin Winding: Gently press the foot pedal to start the machine. The bobbin winder will begin to spin, winding the thread onto the bobbin.
- Even Winding: Make sure the thread winds evenly across the bobbin. Your Singer sewing machine has a thread tension disc for the bobbin winder. Guide the thread through this disc before it reaches the bobbin. This tension helps create a neatly wound bobbin.
- Stop Winding: When the bobbin is full, it will usually slow down or stop automatically, or you can stop by lifting your foot off the pedal. Some machines have an automatic shut-off.
- Cut the Thread and Remove Bobbin: Cut the thread close to the bobbin. Slide the bobbin winder spindle back to its original position. Remove the wound bobbin.
Tips for Perfect Bobbin Winding:
- Tension: The thread should be wound firmly but not so tight that it’s difficult to unspool. The tension disc is key here.
- Evenness: Aim for an even wind across the entire bobbin. This prevents tangles and skipped stitches.
- Thread Type: Always use the same type and weight of thread for both the bobbin and the upper thread.
Replacing the Bobbin: Singer Bobbin Insertion Explained
Once you have a wound bobbin, it’s time to insert it into your Singer sewing machine. The process can vary slightly depending on your Singer model, but the core principles remain the same. We will cover the most common methods.
Method 1: Top Loading Bobbin Systems
Many modern Singer sewing machines feature a top-loading bobbin system, often called a “drop-in” bobbin. This system is generally easier to use and allows you to see how much thread is left on the bobbin.
Steps for Top Loading Bobbin Insertion:
- Turn Off Your Machine: Always turn off your sewing machine before changing the bobbin.
- Remove Old Bobbin (if applicable): If there’s a bobbin already in place, gently lift it out.
- Locate the Bobbin Case: In a top-loading system, there isn’t a separate bobbin case that you remove. The bobbin sits directly in a clear plastic or metal cover. Remove this cover if it’s attached.
- Insert the New Bobbin:
- Take your wound bobbin. Notice the direction the thread is coming off the bobbin. For most Singer machines, the thread should be coming off the bobbin counter-clockwise. Refer to the diagram on your machine or in your manual if you are unsure.
- Place the bobbin into the bobbin area, ensuring the thread is unwinding in the correct direction. The top of the bobbin should be facing upwards.
- Thread the Bobbin:
- You’ll see a small slot or notch in the bobbin cover or the bobbin area itself.
- Pull the thread from the bobbin through this slot.
- Continue pulling a few inches of thread towards the front of the machine.
- Replace the Bobbin Cover: Securely replace the clear bobbin cover.
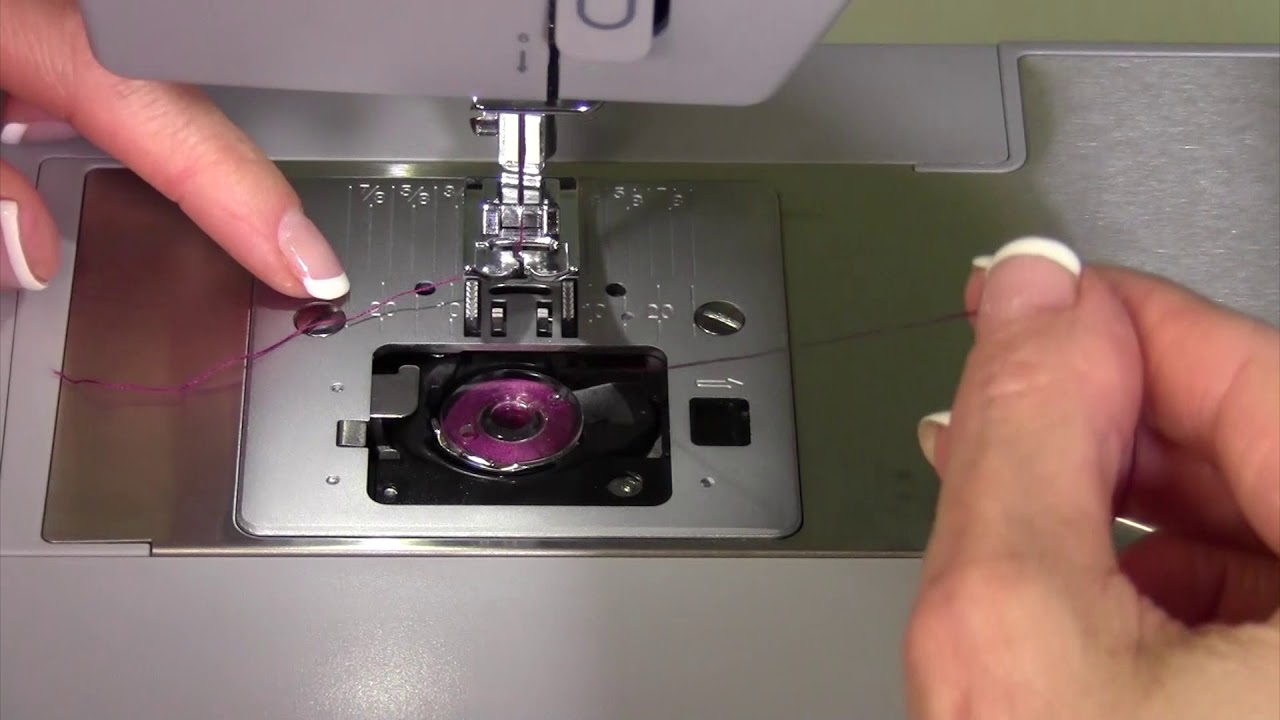
- Bring Up the Bobbin Thread:
- Now, you need to bring the bobbin thread up to meet the top thread.
- Hold the end of the top thread with your left hand.
- Turn the handwheel towards you (counter-clockwise) one full rotation. This will catch the bobbin thread and bring it up through the needle plate.
- Gently pull the top thread, and you should see the bobbin thread loop appear. Pull the loop of bobbin thread completely out.
- You should now have both the top thread and the bobbin thread coming out from under the presser foot.
- Prepare for Sewing: Place the presser foot down. Make sure the bobbin cover is properly seated.
Method 2: Front Loading Bobbin Systems (with Removable Bobbin Case)
Older Singer sewing machines, and some current models, use a front-loading bobbin system where you remove a bobbin case to insert the bobbin.
Steps for Front Loading Bobbin Insertion:
- Turn Off Your Machine: Safety first! Turn off your sewing machine.
- Locate the Bobbin Area: This is usually a small compartment at the front of your machine, below the needle.
- Remove the Bobbin Case:
- Open the bobbin cover or slide out the bobbin case holder.
- The bobbin case is a small, metal or plastic cup that holds the bobbin. There’s usually a small lever or latch to release it.
- Gently pull the bobbin case out of the machine.
- Insert the Bobbin into the Case:
- Take your wound bobbin. For most Singer machines, the thread should be coming off the bobbin clockwise when looking at the bobbin from the top (the end that faces upwards).
- Place the bobbin into the bobbin case.
- Find the small slit or notch on the side of the bobbin case.
- Pull the thread from the bobbin through this slit and pull a few inches of thread to the left or right, depending on the case design.
- Insert the Bobbin Case Back into the Machine:
- Align the bobbin case with the groove or notch in the bobbin driver (the part that holds the case in the machine). This is critical for correct Singer bobbin loading.
- Gently push the bobbin case back into the machine until it clicks into place.
- Bring Up the Bobbin Thread:
- Hold the end of the top thread with your left hand.
- Turn the handwheel towards you (counter-clockwise) one full rotation.
- The needle will go down and pick up the bobbin thread, bringing it up as a loop.
- Pull the top thread to bring the entire loop of bobbin thread out from under the presser foot.
- Prepare for Sewing: Ensure the bobbin case is securely seated. You can then put the bobbin cover back on if your machine has one.
Correct Bobbin Placement Singer: Key Details
Regardless of your Singer machine’s bobbin system, correct placement is paramount.
- Thread Direction: This is the most common point of error. Always verify the correct thread direction for your machine. An incorrect unwinding direction will lead to improper stitch formation.
- Bobbin Seating: Ensure the bobbin (or bobbin case) is fully seated in its housing. If it’s not properly in place, the machine won’t pick up the thread correctly.
- Tension Spring: In front-loading systems, the bobbin case has a small tension spring. Ensure the thread passes through this spring correctly.
Troubleshooting Common Bobbin Issues Singer
Encountering problems with your bobbin? Here are some common bobbin troubleshooting Singer tips:
| Problem | Possible Cause | Solution |
|---|---|---|
| Skipped Stitches | Incorrect bobbin thread direction | Verify the thread direction as per your Singer bobbin insertion guide. |
| Bobbin not fully seated | Reinsert the bobbin or bobbin case, ensuring it clicks into place. | |
| Lint or debris in the bobbin area | Clean the bobbin area thoroughly with a brush. | |
| Wrong type of bobbin or thread | Ensure you are using the correct, Singer-approved bobbins and matching thread types. | |
| Dull or bent needle | Replace the needle. | |
| Thread Bunching/Bird’s Nest | Bobbin tension too loose | Adjust the bobbin tension (refer to your machine manual). If using a front-loading case, ensure the thread is correctly threaded through the tension spring. |
| Top thread tension too tight | Loosen the top thread tension. | |
| Bobbin thread snagging | Ensure the bobbin is wound smoothly and isn’t catching on anything. Check for burrs on the bobbin itself. | |
| Bobbin Not Feeding | Bobbin is empty or nearly empty | Wind a new bobbin. |
| Bobbin is wound too loosely | Rewind the bobbin for a tighter, more even wind. | |
| Thread snagged on bobbin | Gently pull thread from the bobbin to remove any snags. | |
| Bobbin Stops Winding | Thread snapped | Re-thread the bobbin winder and start again. |
| Bobbin winder spindle not fully engaged | Ensure the winder spindle is correctly positioned for winding. | |
| Tension disc too tight for winding | Briefly loosen the tension disc pressure while winding the bobbin. | |
| Bobbin Doesn’t Fit | Incorrect bobbin type for your machine | Consult your Singer sewing machine manual or contact customer support to identify the correct Singer sewing machine parts bobbin. |
Essential Singer Sewing Machine Parts: The Bobbin
Understanding the different components involved is key to successful bobbin management.
- The Bobbin: This is the spool that holds your lower thread. Singer bobbins are often made of plastic or metal and come in different sizes and shapes. Always use the bobbins specifically designed for your Singer model.
- The Bobbin Case (for front-loading systems): This is a small cup that holds the bobbin and has a small tension spring. It’s a crucial part of the bobbin mechanism.
- The Bobbin Winder Spindle: The spindle on which you place the bobbin to wind it.
- The Bobbin Area/Cavity: The space within the machine where the bobbin or bobbin case is inserted.
- The Needle Plate: The metal plate under the presser foot, which has a slit for the needle and often grooves for the thread to pass through.
Changing Bobbin Singer: A Quick Recap
- Wind a Bobbin: Ensure you have a properly wound bobbin with the correct thread.
- Identify Your Bobbin System: Top-loading (drop-in) or front-loading.
- Remove Old Bobbin/Case: If applicable.
- Insert New Bobbin/Case: Pay close attention to thread direction and proper seating.
- Bring Up Bobbin Thread: Use the handwheel to bring the bobbin thread up to the needle plate.
- Check: Ensure both threads are out from under the presser foot before starting to sew.
Frequently Asked Questions (FAQ)
- Can I use any bobbin in my Singer sewing machine?
No. Singer sewing machines are designed to work with specific types of bobbins. Using incorrect bobbins can lead to poor stitch quality and potential machine damage. Always check your manual for the correct bobbin type for your model. - How do I know when to change the bobbin?
You’ll know your bobbin is running low when you start to see gaps or incomplete stitches in your sewing, or when the thread runs out entirely. For top-loading systems, you can often visually check the remaining thread. - Why is my thread bunching up underneath the fabric?
This is a common sign of the bobbin thread tension being too loose, or the top thread tension being too tight. Ensure the bobbin thread is wound correctly and seated properly. You may need to adjust your machine’s tension settings. - What is the small metal piece that holds the bobbin in some Singer machines?
That’s the bobbin case. It’s a crucial component for front-loading bobbin systems and helps control the tension of the bobbin thread. - How do I thread the bobbin winder on my Singer?
Thread the bobbin winder by guiding the thread from the spool pin, through the machine’s thread guides, through the bobbin winder thread guide, and then through the hole in the bobbin itself. Refer to your machine’s manual for precise routing.
By following these detailed steps and troubleshooting tips, you’ll be able to confidently replace the bobbin in your Singer sewing machine, ensuring your sewing projects are completed with beautiful, consistent stitches. Happy sewing!