
Image Source: i.ytimg.com
How To Put A Bobbin In A Singer Sewing Machine: Simple Steps
Getting your Singer sewing machine ready to stitch is a straightforward process once you know the steps. What is a bobbin? A bobbin is a small spool that holds the lower thread for your sewing machine. Can I sew without a bobbin? No, the bobbin is essential for creating stitches. Who is this guide for? This guide is for anyone looking to successfully insert a bobbin into their Singer sewing machine.
Singer bobbin placement is a crucial step in preparing your machine for sewing. A properly inserted bobbin ensures smooth, even stitches and prevents frustrating snags and thread breaks. Whether you’re a beginner just learning the ropes or an experienced sewer who wants a quick refresher, this guide will walk you through the process with clear, easy-to-follow instructions. We’ll cover everything from identifying the right bobbin to ensuring it’s threaded correctly, making how to load bobbin Singer machines a breeze.
This detailed guide will help you master the art of sewing machine bobbin insertion, specifically focusing on Singer machines. We’ll delve into the components involved, provide step-by-step instructions for both winding bobbin Singer machines and then placing it correctly, and offer tips for troubleshooting common issues.
Preparing Your Singer Sewing Machine for Bobbin Insertion
Before you even think about putting a bobbin into your machine, there are a few preparatory steps that will make the entire process smoother and more successful.
Gathering Your Supplies
To get started, you’ll need a few key items:
- Your Singer Sewing Machine: Ensure it’s on a stable surface.
- A Bobbin: This should be a genuine Singer bobbin or one specifically recommended for your Singer model. Using the wrong type of bobbin can cause serious damage to your machine.
- Thread: Choose the thread you intend to use for your project. Make sure it’s a good quality thread that matches your fabric.
- Bobbin Winder Assembly: Most Singer machines have this built-in.
- Your Machine’s Manual: While this guide is comprehensive, your specific machine’s manual is the ultimate reference.
Checking Your Bobbin Type
Singer has produced many different models of sewing machines over the years, and not all bobbins are interchangeable. It’s vital to use the correct Singer sewing machine bobbin for your specific machine.
- Identifying Your Machine Model: Look for a model number on your machine. It’s usually on the front, back, or underside.
- Consulting Your Manual: Your owner’s manual will clearly state the type of bobbin required. It might specify a class number (e.g., Class 15, Class 66).
- Visual Inspection: Singer bobbins are typically made of plastic or metal. They have a specific diameter and height. Comparing your bobbin to a known compatible one is a good way to check. If you’re unsure, it’s always best to err on the side of caution and purchase bobbins explicitly listed for your machine model.
Understanding the Bobbin Area
Every Singer sewing machine has a designated area for the bobbin. This area is usually located beneath the needle plate.
- The Bobbin Case: In most modern Singer machines, the bobbin sits within a removable bobbin case Singer. This case often has a small metal clip or spring to help hold the thread in place. Some older or different types of Singer machines might have a “shuttle” mechanism where the bobbin sits directly.
- The Bobbin Compartment: This is the space where the bobbin case (or the bobbin itself) is inserted. It’s designed to allow the bobbin to rotate smoothly as the machine sews.
Step-by-Step Guide to Winding a Bobbin for Your Singer
Before you can place a bobbin in your machine, you often need to fill it with thread. The process of winding bobbin Singer machines is generally consistent across most models, but always refer to your manual for specifics.
Setting Up the Bobbin Winder
- Locate the Bobbin Winder: This is usually a spindle or peg on the top or side of your machine.
- Place the Empty Bobbin: Slide the empty bobbin onto the winder spindle. It should fit snugly.
- Engage the Winder: Most machines have a mechanism to engage the bobbin winder. This might involve pushing the spindle to one side or lowering a presser foot onto the bobbin. Consult your manual to find the specific lever or mechanism for your model.
- Thread the Winder: This is a critical step.
- Bring the end of your thread from the spool pin, through the upper thread guides, tension discs, and down towards the bobbin winder.
- There’s usually a small hole or slot in the bobbin itself. Insert the thread end through this hole from the inside out.
- Pull about 4-6 inches of thread through the bobbin.
- Hold the thread tail firmly.
- Many Singer machines have a small metal tab or notch near the winder spindle. You’ll need to loop the thread through this tab before guiding it to the bobbin. This ensures the initial wraps are secured and don’t come undone.
Winding the Bobbin
- Begin Winding: Gently press the foot pedal. The bobbin should start to wind evenly.
- Guide the Thread: As the bobbin winds, use your fingers to guide the thread evenly across the bobbin. This helps ensure consistent thread delivery during sewing.
- Cut the Thread Tail: Once you have a few wraps around the bobbin, snip the thread tail that you were holding.
- Continue Winding: Let the bobbin wind until it’s full. Most machines have an automatic stop mechanism that disengages the winder when the bobbin is full. If yours doesn’t, keep an eye on it to prevent over-winding, which can cause the thread to bunch up or break.
- Disengage the Winder: Once the bobbin is wound, disengage the bobbin winder mechanism (often by pushing the spindle back to its original position).
- Cut the Thread: Cut the thread from the spool.
- Remove the Wound Bobbin: Carefully slide the wound bobbin off the winder spindle.
Table 1: Bobbin Winding Best Practices
| Practice | Reason |
|---|---|
| Use the correct bobbin | Prevents damage and ensures proper stitch formation. |
| Thread through the hole | Secures the thread end. |
| Loop through the tab | Prevents the start of the winding from unraveling. |
| Wind evenly | Ensures consistent thread tension and smooth sewing. |
| Avoid over-winding | Prevents thread bunching, breaking, and potential machine damage. |
| Use quality thread | Leads to stronger seams and fewer thread breaks. |
How to Load a Bobbin in a Singer Sewing Machine: The Core Process
Now that you have a neatly wound bobbin, it’s time for the main event: how to load bobbin Singer machines. This process involves changing bobbin Singer machines in and out of the bobbin compartment Singer.
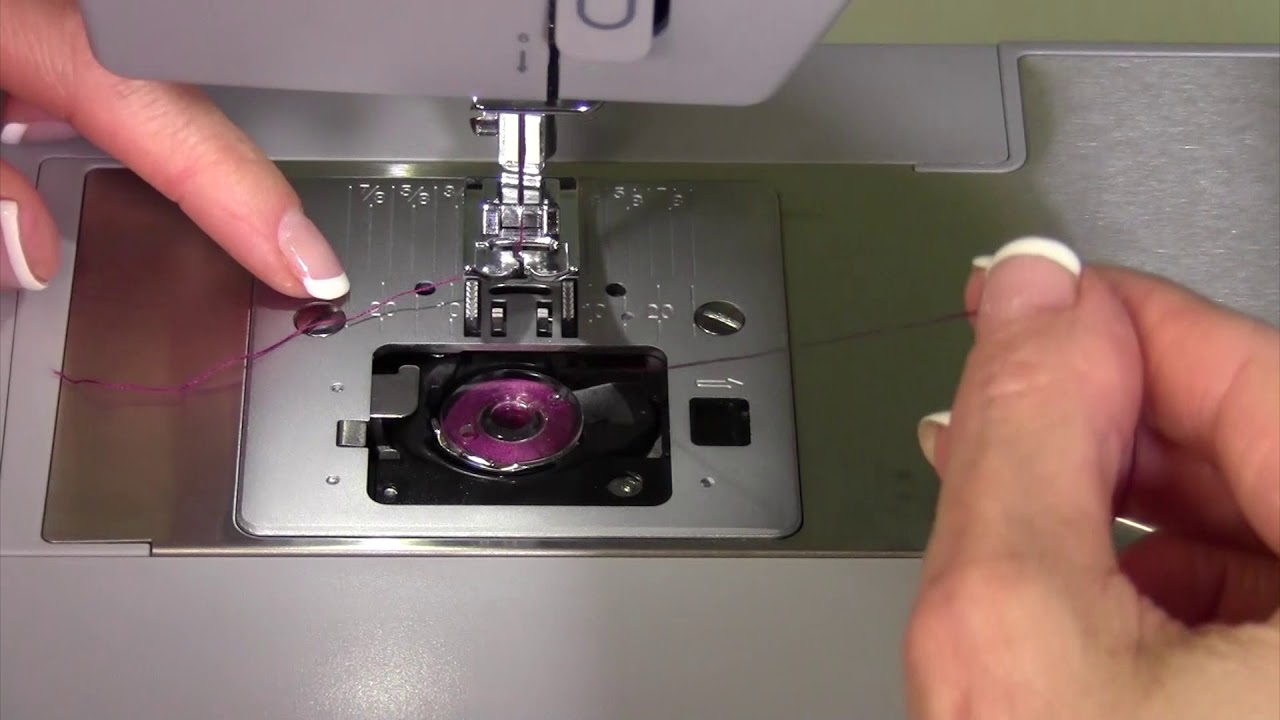
Scenario 1: Top-Loading Bobbin (Horizontal or Vertical Drop-In)
Many modern Singer machines feature a “drop-in” bobbin system, which is incredibly user-friendly. These can be horizontal (where the bobbin sits in a clear plastic cover) or vertical.
For Horizontal Drop-In Bobbins:
- Remove the Needle Plate Cover: If your machine has one, lift off the plastic cover over the bobbin area.
- Remove the Bobbin Case (if applicable): Some horizontal systems have a removable bobbin case. If yours does, gently lift it out.
- Identify the Thread Slot: Look for a small slot or notch on the bobbin case (or the bobbin holder if it’s not removable). This is where the thread needs to go.
- Place the Bobbin: Place the wound bobbin into the bobbin case or bobbin holder. Ensure the bobbin spins in the correct direction. For most Singer machines with a horizontal bobbin, the thread should unwind from the front of the bobbin (counter-clockwise). Check your manual for the exact direction.
- Thread the Bobbin Case:
- Bring the thread from the bobbin to the slot or notch on the bobbin case.
- Pull the thread through the slot.
- There’s usually a small tension spring or a small cut-out in the case. Guide the thread under this spring or into the cut-out.
- Pull about 4-6 inches of thread tail through and let it hang.
- Insert the Bobbin Case: Carefully place the bobbin case (with the bobbin inside and threaded) into the bobbin compartment Singer. It should click or seat firmly into place. There’s usually a small groove or indicator that shows you the correct orientation.
- Replace the Needle Plate Cover: Put the cover back on.
- Bring Up the Bobbin Thread: Hold the upper thread tail loosely. Turn the machine’s handwheel towards you (one full revolution). This will catch the bobbin thread and pull it up through the needle plate, bringing the loop of the bobbin thread up to meet the upper thread.
- Position the Threads: Pull both thread tails (upper and lower) to the back of the machine and place them under the presser foot.
For Vertical Drop-In Bobbins:
- Remove the Needle Plate: Lift off the needle plate or the accessory tray that covers the bobbin area.
- Place the Bobbin: Place the wound bobbin directly into the bobbin holder. Again, ensure the bobbin spins in the correct direction. For vertical drop-in bobbins, the thread typically unwinds clockwise. Check your manual.
- Thread the Bobbin Holder:
- You’ll see a small slit or channel where the thread needs to be guided.
- Bring the thread from the bobbin to this slit.
- Guide the thread through the slit, ensuring it sits correctly in the tension mechanism.
- Pull about 4-6 inches of thread tail through.
- Insert the Bobbin Holder: The bobbin holder assembly is typically a single unit. Place it back into its designated spot in the bobbin compartment Singer. It should seat securely.
- Replace the Needle Plate: Put the needle plate or tray back in place.
- Bring Up the Bobbin Thread: As with the horizontal system, hold the upper thread loosely and turn the handwheel towards you to bring the bobbin thread up.
- Position the Threads: Pull both thread tails to the back of the machine.
Scenario 2: Front-Loading Bobbin (Removable Bobbin Case)
Older or different models of Singer sewing machines might have a front-loading system where you access the bobbin by opening a small flap or cover at the front of the machine.
- Open the Bobbin Cover: Locate the bobbin cover, usually a small hinged door or a removable plate on the front of the machine. Open it.
- Remove the Bobbin Case: Gently slide out the metal or plastic bobbin case Singer. It usually has a small finger or lever to help you grasp it.
- Place the Bobbin in the Case: Insert the wound bobbin into the bobbin case. Make sure it fits snugly and spins freely. For these systems, the thread usually unwinds counter-clockwise.
- Thread the Bobbin Case: This is similar to the horizontal drop-in, but the threading path might be slightly different.
- Find the slot or notch on the bobbin case.
- Pass the thread through this slot.
- Ensure the thread is seated in the tension spring.
- Pull about 4-6 inches of thread tail through.
- Insert the Bobbin Case: Slide the threaded bobbin case back into its housing in the bobbin compartment Singer. It needs to be oriented correctly; there’s usually a small lever or hook on the case that needs to align with a corresponding notch in the machine. If you don’t get this right, the machine won’t stitch.
- Close the Bobbin Cover: Close the flap or replace the cover.
- Bring Up the Bobbin Thread: Hold the upper thread and turn the handwheel towards you to pull the bobbin thread up.
- Position the Threads: Gather both thread tails and pull them to the back.
Key Step for All Systems: Bringing Up the Bobbin Thread
This is arguably the most critical step after placing the bobbin. If the bobbin thread isn’t brought up, you won’t be able to create a stitch.
- Hold the Upper Thread: Gently hold the upper thread in your left hand.
- Turn the Handwheel: Slowly turn the machine’s handwheel towards you (in the direction of the arrow, usually indicated on the machine). You’ll see the needle go down and then come back up.
- Catch the Bobbin Thread: As the needle comes up, it will catch the loop of the bobbin thread.
- Pull the Loop: Continue turning the handwheel until the loop of bobbin thread is visible. Use your fingers or tweezers to pull this loop completely through the needle plate.
- Position the Threads: With the loop of bobbin thread now out, you should have both the upper thread and the bobbin thread tail. Pull both of these tails gently to the back of the machine, sliding them under the presser foot. This positions them correctly for starting your sewing.
Common Issues and How to Fix Them
Even with clear instructions, you might encounter a few hiccups. Here’s how to address them when threading bobbin Singer machines or during Singer bobbin placement.
Bobbin Not Winding Evenly
- Problem: Thread is bunching up or winding loosely on one side.
- Solution:
- Ensure you’re guiding the thread evenly across the bobbin as it winds.
- Check that the thread is properly threaded through the tension discs and the guide tab before winding.
- Make sure the bobbin is seated correctly on the winder spindle.
Thread Snapping During Winding
- Problem: Thread breaks while winding.
- Solution:
- The thread might be caught on something. Check the spool and the threading path.
- The thread might be old or frayed. Try a fresh spool of thread.
- The bobbin might be cracked or damaged. Use a new bobbin.
- Ensure you’re not winding too fast for the machine.
Bobbin Thread Not Coming Up
- Problem: After turning the handwheel, the bobbin thread doesn’t appear.
- Solution:
- Most Common: The bobbin case was not inserted correctly. Re-seat it firmly, ensuring the thread is in the tension guide.
- The upper thread is not threaded correctly through the machine’s tension discs or the needle. Re-thread the upper thread.
- The needle might be bent or broken. Replace the needle.
- The bobbin itself might be wound incorrectly or is the wrong type, causing it to not engage properly.
Stitches Are Uneven or Looping
- Problem: You see loops of thread on the underside or top side of your fabric.
- Solution:
- Upper Thread Tension: This is the most frequent cause. Adjust the upper thread tension dial. If the loops are on the top, the upper thread tension is too loose; increase the number. If loops are on the bottom, the upper thread tension is too tight; decrease the number.
- Bobbin Tension: While less common to need adjustment, the bobbin tension can be an issue. This is usually controlled by a small screw on the bobbin case Singer. Be very careful with this adjustment, as turning it too much can cause problems. Consult your manual.
- Threading Error: Ensure both the upper thread and lower thread bobbin are threaded correctly. Re-thread both from scratch.
- Needle Issue: A dull, bent, or incorrect needle can cause poor stitching. Replace the needle.
- Bobbin Type: Using the wrong type of bobbin can affect tension.
Bobbin Case Won’t Stay in Place
- Problem: The bobbin case keeps popping out of the bobbin compartment Singer.
- Solution:
- Make sure you are seating it correctly. There’s usually a specific way it locks into place.
- Check for any lint or debris in the bobbin area that might be preventing it from seating properly.
- Inspect the bobbin case and the housing for any damage or wear.
Frequently Asked Questions (FAQ)
Q1: How often should I change the bobbin?
A1: You should change the bobbin when it runs out of thread, or when you need to use a different color thread for your project.
Q2: Can I use any brand of bobbin with my Singer sewing machine?
A2: It’s highly recommended to use genuine Singer bobbins or bobbins specifically listed as compatible with your Singer model. Generic bobbins may not fit correctly or have the right tension, potentially damaging your machine.
Q3: What does it mean to “thread the bobbin case”?
A3: This refers to guiding the thread from the wound bobbin through the small slot and tension spring in the bobbin case before inserting it into the machine. This step is essential for proper stitch formation.
Q4: My sewing machine is making a strange noise when I try to sew after putting in the bobbin. What could be wrong?
A4: This often indicates that the bobbin case is not inserted correctly, or the upper thread is not threaded properly. Double-check both steps carefully. Lint buildup in the bobbin area can also cause noises.
Q5: How do I know which direction my bobbin should spin when winding or inserting?
A5: This varies by machine type. Most horizontal drop-in bobbins spin counter-clockwise, while vertical drop-in bobbins often spin clockwise. Always refer to your Singer sewing machine’s manual for the correct direction.
By following these steps and paying attention to the details, you’ll be able to confidently master the Singer bobbin placement and threading bobbin Singer processes. A properly loaded bobbin is the foundation for beautiful, consistent stitches, allowing you to enjoy your sewing projects to the fullest!