
What is a bobbin in a sewing machine? A bobbin is a small, cylindrical spool that holds the bottom thread for your sewing machine. Can I sew without a bobbin? No, you cannot sew without a bobbin, as it is essential for creating stitches.
Getting to grips with your sewing machine can feel like learning a new language. There are so many parts, each with a specific job. But don’t let the jargon scare you! At the heart of every stitch is a small but mighty component: the bobbin. This guide will walk you through how to correctly put a bobbin into your sewing machine, ensuring smooth and successful sewing every time. We’ll cover everything from winding a bobbin to making sure your bobbin tension is just right.
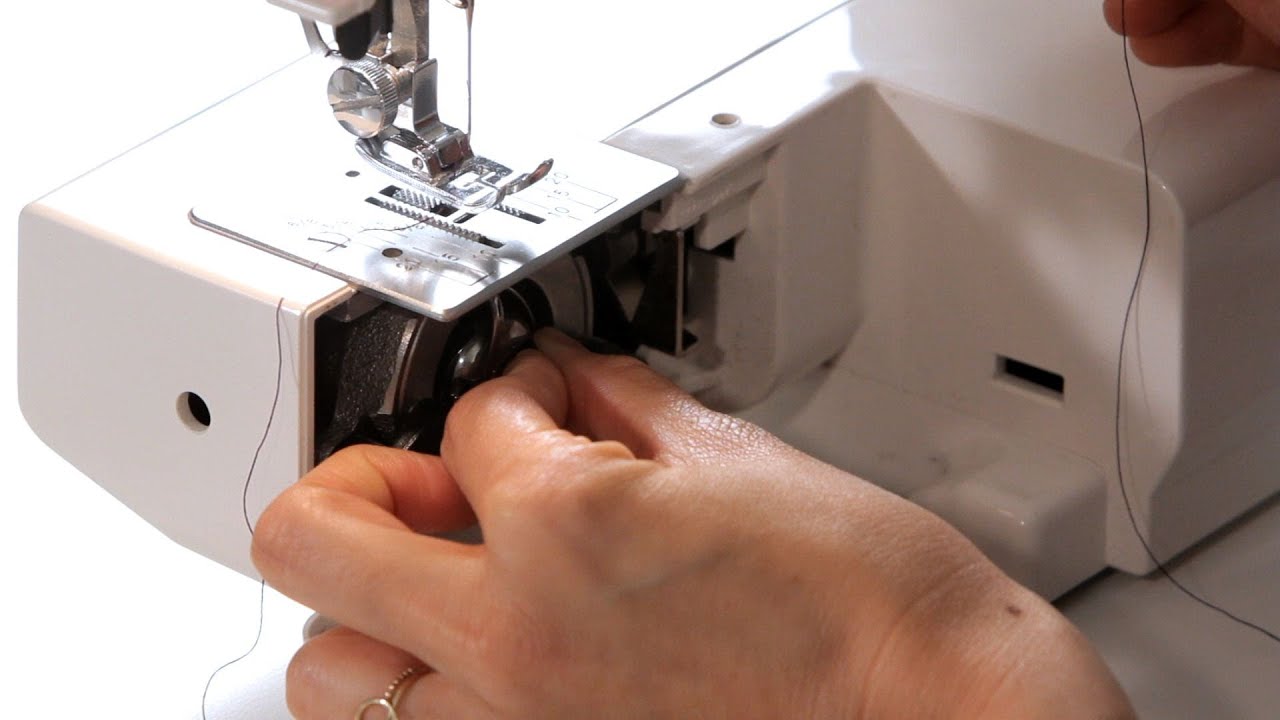
Image Source: i.ytimg.com
The Crucial Role of the Bobbin
Your sewing machine works by interlacing two threads: the needle thread, which comes from the spool on top, and the bobbin thread, which comes from the bobbin at the bottom. Together, these threads create a strong and secure stitch. Without a properly placed bobbin, your machine simply won’t sew.
Think of it this way:
- Needle Thread: This is the thread you see on top of your fabric.
- Bobbin Thread: This is the thread that locks the needle thread underneath the fabric.
If either of these threads is missing or not loaded correctly, you’ll end up with loose loops, skipped stitches, or a complete inability to sew.
Preparing to Load the Bobbin: Winding a Bobbin
Before you can put a bobbin into your machine, you often need to wind it. This means transferring thread from a spool onto the empty bobbin. While some new machines come with pre-wound bobbins, you’ll likely be doing this yourself.
Steps for Winding a Bobbin
Every sewing machine has a bobbin winder, which is a special mechanism designed for this task. The exact location and operation might vary slightly between models, but the general process is similar.
- Place a Spool of Thread: Locate the spool pin on your sewing machine. This is usually a vertical rod. Place your new spool of thread onto the spool pin. Some machines have a second spool pin for this purpose.
- Thread the Bobbin Winder:
- Find the bobbin winder spindle. It’s usually a small, horizontal spindle.
- Bring the end of your thread from the spool.
- There’s a small guide or hook near the bobbin winder spindle. Guide the thread through this.
- Now, thread the thread through one of the small holes in the bobbin itself.
- Gently pull the thread through the hole until a few inches hang out.
- Engage the Bobbin Winder: Most machines have a way to disengage the sewing mechanism and engage the bobbin winder. This is often a lever or a switch. You’ll typically push the bobbin winder spindle to the right or left to engage it.
- Start Winding: Hold the tail of the thread firmly against the bobbin. You might need to press the foot pedal gently to start the winding.
- Cut the Tail: Once you’ve wound a few times, carefully snip the excess thread tail that you were holding.
- Continue Winding: Continue to wind the bobbin using the foot pedal. Keep an even tension on the thread.
- Stop Winding: Most bobbin winders have an automatic shut-off when the bobbin is full. If yours doesn’t, watch the bobbin closely and stop winding before it overflows or the thread bunches up unevenly. Overfilling can cause problems.
- Disengage and Cut: Once the bobbin is wound, disengage the bobbin winder (usually by moving the spindle back to its original position). Cut the thread from the spool. Remove the full bobbin.
Tips for Winding:
- Use the correct thread: Make sure the thread you’re using to wind the bobbin matches the thread you’ll use for your project.
- Wind evenly: Uneven winding can affect bobbin tension.
- Don’t overfill: Too much thread can cause issues.
Loading the Bobbin: Finding the Bobbin Housing
Now that you have a wound bobbin, it’s time to load it into your machine. Sewing machines typically have two main types of bobbin systems:
- Front-Loading (Drop-in Bobbin): The bobbin case is usually a clear plastic cover located under the needle plate. The bobbin drops into this case.
- Top-Loading (with a Bobbin Case): The bobbin is placed into a removable bobbin case, which then slots into a bobbin housing area, often at the front or side of the machine.
The steps for each are slightly different.
Loading a Front-Loading (Drop-in) Bobbin
This is the more common system on modern machines.
Steps:
- Remove the Needle Plate/Cover: Lift the needle plate or the cover that protects the bobbin area. This might lift off, slide off, or be held by a small latch.
- Identify the Bobbin Case: You’ll see a round, often clear, plastic or metal piece where the bobbin sits.
- Place the Bobbin:
- Locate the notch or slot on the edge of the bobbin.
- Make sure the thread is coming off the bobbin in the correct direction. For most drop-in systems, the thread should be unwinding counter-clockwise. This is crucial!
- Align the notch on the bobbin with the small post or clip in the bobbin case.
- Gently drop the bobbin into the case.
- Thread the Bobbin Case:
- Find the slit or guide on the side of the bobbin case where the thread should go.
- Pull the thread through this slit, drawing a few inches of bobbin thread through.
- There might be a small cut-out or tension spring to guide the thread. Make sure the thread is seated correctly in this.
- Replace the Needle Plate/Cover: Put the needle plate or cover back on securely.
- Bring Up the Bobbin Thread:
- Hold the end of the needle thread loosely with your left hand.
- Turn the machine’s handwheel towards you (usually a clockwise motion). This brings the needle down and then up again, catching the bobbin thread.
- As the needle rises, it will pull a loop of bobbin thread up through the bobbin area.
- Use your fingers or a seam ripper to pull this loop of bobbin thread up.
- You should now have both the needle thread and the bobbin thread coming up from the bobbin area.
- Place these two threads together, pulling a few inches of each, to the back of the machine, usually under the presser foot.
Common Pitfalls with Drop-in Bobbins:
- Incorrect Bobbin Direction: If the bobbin isn’t spinning in the right direction, your stitches will be wrong.
- Thread Not Seated in the Slit: The thread needs to go through the small slit or spring to create the correct tension.
- Bobbin Not Dropped Correctly: The notch must align with the post.
Loading a Top-Loading Bobbin (with a Removable Bobbin Case)
This system involves a separate bobbin case that you place into the machine.
Steps:
- Remove the Bobbin Case Holder: Locate the bobbin housing area, usually at the front or side. You’ll need to open a small cover to access it. Gently pull out the entire bobbin case and its holder. It looks like a small metal shuttle.
- Place the Bobbin into the Bobbin Case:
- Take your wound bobbin.
- Identify the groove or slit on the bobbin case.
- The thread should be coming off the bobbin clockwise for most top-loading systems. This is the opposite of drop-in bobbins, so pay close attention!
- Place the bobbin into the bobbin case.
- Guide the thread through the slit or groove in the bobbin case. Pull a few inches of thread through.
- Insert the Bobbin Case Holder into the Machine:
- Look for a small projection or hook on the bobbin case holder. This usually needs to align with a corresponding notch or slot in the bobbin housing area of the machine.
- Carefully slide the bobbin case and its holder back into the machine until it clicks or sits securely.
- Bring Up the Bobbin Thread:
- Hold the end of the needle thread loosely with your left hand.
- Turn the machine’s handwheel towards you.
- The needle will go down and then come back up, catching the bobbin thread.
- Pull the loop of bobbin thread up.
- You should now have both threads exiting the needle plate area.
- Pull a few inches of both threads to the back of the machine, under the presser foot.
Key Differences in Top-Loading Systems:
- Removable Bobbin Case: This makes cleaning easier but requires careful reinsertion.
- Thread Direction: Usually clockwise for the bobbin in the case.
The Importance of Bobbin Tension
Bobbin tension is the amount of resistance the bobbin thread encounters as it’s pulled through the fabric. It’s a delicate balance that works with the needle thread tension.
- Too Loose: If the bobbin thread tension is too loose, you’ll see loops of thread on the underside of your fabric, or the stitches might look messy and weak.
- Too Tight: If the bobbin thread tension is too tight, the needle thread might be pulling too much bobbin thread through, causing puckering or a tight stitch. You might also see the bobbin thread breaking.
Adjusting Bobbin Tension
- Front-Loading (Drop-in) Bobbins: These systems have built-in tension. You usually can’t adjust the bobbin tension directly on these. If you suspect a problem, it’s often because the thread isn’t seated correctly in the bobbin case slit, the bobbin is wound unevenly, or there’s lint buildup.
- Top-Loading (with Bobbin Case): The removable bobbin case often has tiny screws that adjust the tension.
- There are usually two screws on the bobbin case.
- The screw that controls the bobbin tension is usually the smaller one.
- To tighten the bobbin tension (make it harder for the thread to pull), turn the screw slightly clockwise.
- To loosen the bobbin tension (make it easier for the thread to pull), turn the screw slightly counter-clockwise.
- Always make very small adjustments and test your stitches after each change.
Testing Your Tension
A simple test can help you determine if your tensions are balanced:
- Set your machine to a straight stitch.
- Use a scrap piece of your project fabric.
- Sew a few stitches without holding the threads.
- Examine the stitches on both the top and bottom of the fabric.
- Ideal: The stitches should look neat and even on both sides, with no loops visible.
- Needle Thread Too Loose (Bobbin Thread Too Tight): You’ll see loops of bobbin thread on the top of the fabric. Tighten the needle thread tension or loosen the bobbin thread tension.
- Needle Thread Too Tight (Bobbin Thread Too Loose): You’ll see loops of needle thread on the bottom of the fabric. Loosen the needle thread tension or tighten the bobbin thread tension.
It’s a give-and-take process between your needle thread and bobbin thread.
Troubleshooting Common Bobbin Issues
Even with careful loading, you might encounter problems. Here are some common issues and how to fix them:
Bobbin Thread Breaking
- Cause: Bobbin thread is too tight, thread is snagged on the bobbin, lint in the bobbin case, wrong thread size, or bobbin is wound unevenly.
- Solution: Check bobbin tension, ensure the bobbin is wound smoothly, clean lint from the bobbin area, use matching thread weights, and re-wind the bobbin.
Skipped Stitches
- Cause: Needle is bent or dull, needle is inserted incorrectly, thread is snagged, or bobbin is not seated properly.
- Solution: Check and replace your needle, ensure the needle is inserted all the way and correctly, check for thread snags, and verify the bobbin is loaded properly.
Puckering Fabric
- Cause: Bobbin thread tension is too tight, or needle thread tension is too loose.
- Solution: Adjust bobbin tension (loosen slightly) or needle thread tension (tighten slightly).
Thread Nesting or Bunching Underneath
- Cause: Bobbin thread is too loose, needle thread is too tight, or the bobbin thread wasn’t pulled up correctly before starting to sew.
- Solution: Check bobbin tension (tighten slightly) or needle thread tension (loosen slightly). Ensure you always bring the bobbin thread up and to the back before sewing.
Bobbin Not Spinning
- Cause: Bobbin is inserted incorrectly, lint blockage, or the bobbin winder is still engaged.
- Solution: Re-insert the bobbin, clean the bobbin area thoroughly, and ensure the bobbin winder mechanism is disengaged.
Essential Sewing Machine Parts Related to the Bobbin
To effectively manage your bobbin, it helps to know the names of the relevant sewing machine parts:
- Bobbin: The small spool holding the bottom thread.
- Bobbin Winder: The mechanism used to fill the bobbin with thread.
- Bobbin Case: The housing where the bobbin sits, often removable or part of a drop-in system.
- Bobbin Housing: The compartment within the machine where the bobbin case is inserted.
- Needle Plate (Throat Plate): The metal plate under the needle that has slots for the thread to pass through and creates the surface you sew on.
- Presser Foot: Holds the fabric in place against the feed dogs.
- Feed Dogs: The small metal teeth that move the fabric under the needle.
- Handwheel: The large wheel on the side of the machine, used to manually move the needle up and down.
A Summary Table of Bobbin Loading
| Feature | Front-Loading (Drop-in) Bobbin | Top-Loading Bobbin (with Case) |
|---|---|---|
| Bobbin Location | Under the needle plate, in a fixed case. | In a removable bobbin case, which slots into the machine. |
| Bobbin Thread Direction | Counter-clockwise | Clockwise (usually) |
| Bobbin Case | Usually integrated, often clear plastic. | Removable metal casing. |
| Tension Adjustment | Generally not adjustable directly; relies on proper threading. | Tiny screws on the bobbin case itself. |
| Ease of Cleaning | Can be harder to access all lint, but the bobbin is visible. | Easier to remove the entire case for thorough cleaning. |
Final Thoughts on Bobbin Mastery
Putting a bobbin into your sewing machine might seem like a small detail, but it’s a foundational skill for any sewer. By taking the time to learn the correct way to wind and load your bobbin, and by paying attention to your thread tensions, you’ll pave the way for frustration-free sewing. Remember to consult your sewing machine’s manual if you’re unsure about specific parts or procedures for your model. Happy sewing!
Frequently Asked Questions (FAQ)
How do I know which way my bobbin thread should unwind?
Most sewing machine manuals will specify the correct direction. However, a general rule of thumb: front-loading (drop-in) bobbins usually unwind counter-clockwise, while top-loading bobbins in a removable case usually unwind clockwise. Always check your manual for certainty.
What if my bobbin thread keeps running out quickly?
This could mean you’re not winding enough thread onto the bobbin. Try winding a little more thread. Alternatively, you might be using too much bobbin thread per stitch if your bobbin tension is too loose or your needle thread tension is too tight, causing the machine to pull excess thread.
Can I use any brand of bobbin with my sewing machine?
It’s best to use bobbins specifically recommended for your sewing machine model. While some generic bobbins might fit, variations in size and quality can affect stitch quality and even damage your machine. Check your manual or the manufacturer’s website for compatibility.
My sewing machine is making a weird noise when I sew. Could it be the bobbin?
Yes, a poorly inserted or improperly wound bobbin, or lint buildup in the bobbin area, can cause unusual noises. Ensure the bobbin is seated correctly and the bobbin case is clean. If the noise persists, it might be another sewing machine part issue.
How often should I clean the bobbin area?
It’s a good practice to clean the bobbin area (where the bobbin sits) every time you change your spool of thread or at least every project. Lint and dust can accumulate quickly and affect performance.