
Creating your own embroidery designs allows you to personalize clothing, home decor, and gifts with a unique touch. But how do you make embroidery designs? You start by translating an idea or existing artwork into a digital format that an embroidery machine can read, a process often referred to as digitizing embroidery. This guide will walk you through the essential steps and tools you need to get started.
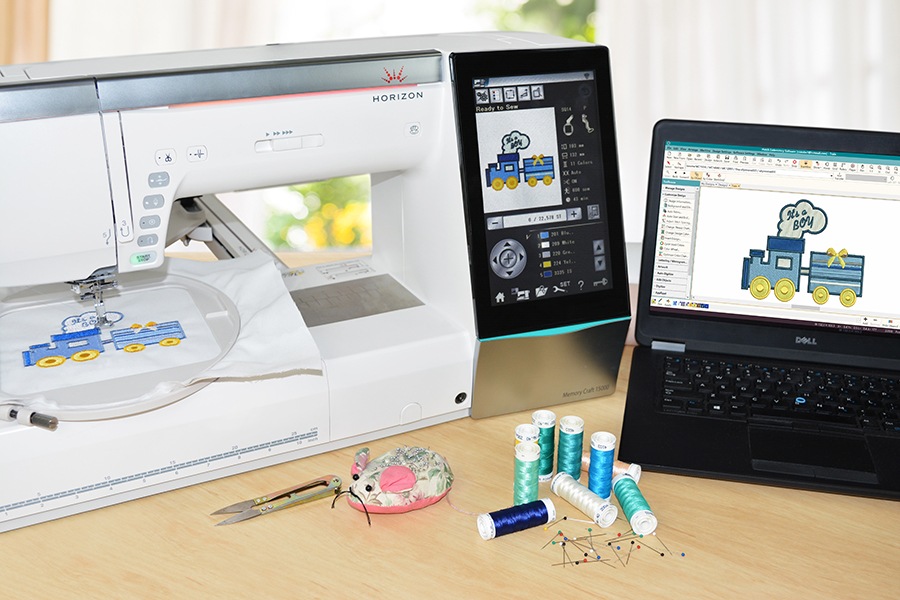
Image Source: blog.hatchembroidery.com
Getting Started: What You Need
Before diving into the design process, gather your tools and resources.
Essential Hardware and Software
- Embroidery Machine: This is the heart of the operation. Modern embroidery machines come with various features, from basic stitch capabilities to advanced automation.
- Computer: You’ll need a computer to run embroidery design software and to transfer your finished designs.
- Embroidery Design Software: This is the crucial tool for translating your artwork into machine-readable stitch files. There are several types, from professional-grade programs to more beginner-friendly options.
- Embroidery Artwork: This is the visual idea you want to stitch. It can be a drawing, a photograph, a graphic design, or even text.
- Embroidery Hoops and Needles: Ensure you have the correct sizes and types for your projects.
- Stabilizers: These provide support to your fabric during stitching.
- Thread: Choose high-quality embroidery thread in your desired colors.
Types of Embroidery Design Software
The software you choose will greatly influence your workflow. Here’s a breakdown:
- Machine Manufacturer Software: Many embroidery machine brands offer their own software. These are often designed to be user-friendly and compatible with their specific machines.
- Entry-Level Software: These programs offer basic editing and resizing capabilities, often allowing you to convert existing artwork into stitches.
- Mid-Range Software: These provide more advanced tools for creating stitch patterns, manipulating existing designs, and even some limited digitizing features.
- Professional-Grade Software: These are the powerhouse programs used by embroidery digitizing services and experienced designers. They offer comprehensive control over stitch types, density, underlay, and more, allowing for complex and intricate designs.
The Design Process: From Idea to Stitch File
The journey of making an embroidery design involves several key stages. Each stage builds upon the last, ensuring your final stitched piece is exactly what you envisioned.
Stage 1: Concept and Artwork Creation
Every great embroidery design begins with a clear idea.
Brainstorming Your Design
- What do you want to stitch? Think about the project, the fabric, and the overall look you want to achieve.
- Consider the complexity. Simple shapes and bold lines often translate better to embroidery for beginners.
- Think about colors. Choose colors that complement each other and the fabric.
Creating Your Embroidery Artwork
Your embroidery artwork can take many forms:
- Hand-Drawn Sketches: Simple drawings can be scanned or photographed.
- Digital Graphics: Images created in programs like Adobe Illustrator, Photoshop, or even free alternatives like Inkscape.
- Photographs: While challenging, photos can be simplified and converted.
- Text: Most software allows you to type and style text for stitching.
Important Note: For best results, your initial artwork should be clear, with well-defined lines and solid shapes. Avoid intricate details or fine gradients at this stage, as these can be difficult to translate into stitches.
Stage 2: Digitizing – Translating Artwork into Stitches
This is where the magic happens. Digitizing embroidery is the process of converting your flat artwork into a series of stitch commands that an embroidery machine can understand.
What is Digitizing?
Digitizing involves telling the embroidery machine where to place each stitch, what type of stitch to use (e.g., satin stitch, fill stitch, running stitch), and in what order. This is not simply “converting” an image; it’s an art form that requires careful planning.
Vector vs. Raster Artwork
- Vector Artwork: Created with mathematical equations, vector graphics (like those from Adobe Illustrator or Inkscape) are scalable without losing quality. They are ideal for vector to embroidery conversion because their clean lines and shapes are easier for digitizing software to interpret.
- Raster Artwork: Made up of pixels (like JPEGs or PNGs from Photoshop), raster images can become pixelated when enlarged. While some software can convert raster images, it often requires more manual cleanup and can lead to less precise stitch results.
Methods of Digitizing
There are two primary methods for digitizing embroidery:
- Manual Digitizing: This is the most precise and often preferred method, especially for complex designs. It involves a skilled digitizer manually drawing stitch areas using specialized embroidery machine software. This allows for complete control over stitch direction, density, and underlay. This method is also known as manual digitizing techniques.
- Automatic Digitizing (Auto-Punch): Some software can automatically convert artwork into stitches. While this can be a quick starting point, it often requires significant manual editing to refine stitch quality, eliminate jumps, and optimize the design. It’s generally better for simpler graphics.
Stage 3: Using Embroidery Design Software
This stage involves using specialized software to perform the digitizing and refine the design.
Popular Embroidery Software Options
- Wilcom EmbroideryStudio: Considered the industry standard, offering unparalleled power and control. It has modules for both beginners and advanced users.
- Hatch Embroidery Software: A popular choice for home-based embroiderers, offering a good balance of features and user-friendliness.
- Embroidery Magic: Another accessible option for creating and editing designs.
- Brother PE-Design: Software specifically designed for Brother embroidery machines, often with intuitive interfaces.
Key Digitizing Features in Software
When exploring embroidery design software tutorial resources, you’ll encounter these key features:
- Stitch Generation Tools: Tools to create different stitch types like fills, satin stitches, and running stitches.
- Object Properties: Controls for stitch density, pull compensation, underlay, and stitch angle.
- Editing Tools: Functions to reshape, resize, move, and delete stitches or objects.
- Font Management: Tools to import and convert TrueType fonts or use built-in embroidery fonts.
- Color Management: Assigning thread colors and managing color changes.
- Export Options: Saving your design in various stitch file formats (e.g., .PES, .JEF, .DST).
Stage 4: Creating Stitch Patterns and Refining the Design
Once your artwork is digitized, the focus shifts to creating stitch patterns that will look good when stitched.
Stitch Types and Their Uses
- Fill Stitches: Used to cover areas with color. Common types include:
- E-Stitch (or Satin Stitch): Creates dense, smooth areas, ideal for lettering and small motifs.
- Tatami Stitch: A series of parallel stitches that fill an area. Good for larger areas and can provide texture.
- Motif Fill: Uses pre-designed patterns to fill an area, adding visual interest.
- Running Stitches: A single line of stitches, good for outlines, details, or a more delicate look.
- Triple Stitch: A back-and-forth stitch that creates a heavier line than a single running stitch.
- Embroidery Artwork: The initial image you want to stitch.
Optimizing for Embroidery
- Density: How close together the stitches are. Too dense, and it can pucker the fabric; too sparse, and you’ll see the fabric through the design.
- Pull Compensation: Embroidery stitches pull fabric towards them. Digitizing software often has features to automatically add slight “pull compensation” to counteract this, ensuring edges meet cleanly.
- Underlay: Additional stitches placed beneath the main stitches to help stabilize the fabric and provide a base for the top stitches. Types include centerline, zigzag, and edge run.
- Stitch Angle: The direction of stitches within a fill area. Changing stitch angles can create different textures and visual effects.
- Underlay: Additional stitches placed beneath the main stitches to help stabilize the fabric and provide a base for the top stitches. Types include centerline, zigzag, and edge run.
- Underlay: Additional stitches placed beneath the main stitches to help stabilize the fabric and provide a base for the top stitches. Types include centerline, zigzag, and edge run.
- Trim Commands: These tell the machine to cut the thread at the end of a color or section, crucial for clean designs with multiple colors.
Stage 5: Stitch File Creation and Export
The final step is saving your design in a format your embroidery machine can read.
Common Stitch File Formats
- .DST (Tajima): A widely compatible format used by many machine brands.
- .PES (Brother): Specific to Brother machines.
- .JEF (Janome): For Janome machines.
- .EXP (Melco): Used by Melco machines.
- .XXX (Singer/Husqvarna Viking): For Singer and Husqvarna Viking machines.
Your embroidery design software will allow you to export your finished design in the appropriate format.
Creating a Custom Embroidery Design: A Step-by-Step Example (Simplified)
Let’s imagine you want to create a simple embroidered flower.
Step 1: Sketch Your Flower
Draw a basic flower shape with a few petals and a center.
Step 2: Prepare Artwork for Digitizing
If you drew it by hand, scan it or take a clear photo. If using digital software, ensure it’s a clean line drawing or a simple shape. You might want to convert your artwork to a vector format if it isn’t already.
Step 3: Import into Embroidery Software
Open your chosen embroidery design software. Most programs have an “Import” or “Open” function. Load your artwork file.
Step 4: Digitizing the Flower (Manual Approach)
- Center: Select a fill stitch (like Tatami or E-stitch) and set your stitch density. Click points around the flower’s center to create a filled shape.
- Petals: For each petal, select a satin stitch. Set the stitch width and density. Click along one edge of the petal and then the other to create the satin stitch fill. Adjust the stitch angle of each petal to follow its natural curve. Ensure the stitches flow smoothly from one petal to the next.
- Outline: For a crisp outline, you might use a running stitch or a triple stitch around the entire flower, or around individual petals if desired.
Step 5: Color and Thread Choices
Assign thread colors to each part of your design (e.g., yellow for the center, red for the petals).
Step 6: Refinement and Optimization
- Check for gaps: Zoom in to ensure there are no small holes where fabric might show through. Adjust stitch angles or density if needed.
- Add Underlay: Apply underlay to areas that might need extra support, especially satin stitches.
- Add Trims: Ensure trim commands are placed between color changes.
Step 7: Save Your Design
Export your stitch file creation in your machine’s compatible format (e.g., .PES).
Advanced Techniques and Considerations
As you become more comfortable, explore these advanced aspects.
Creating Designs from Photos
Converting photos to embroidery is challenging. It typically involves:
- Simplifying the Photo: Reduce the color palette, remove fine details, and increase contrast.
- Manual Digitizing: This is almost always required for good results. You’ll trace the important shapes and use different stitch types to represent shading and form.
- Using Specialized Software Features: Some advanced software has features that aid in photo-to-embroidery conversion, but they still require significant manual input.
Converting Vector to Embroidery
When you have vector to embroidery artwork, the process is often smoother:
- Clean Up Vector: Ensure clean lines and closed shapes.
- Software Conversion: Many digitizing programs can directly import vector files (SVG, AI, EPS).
- Manual Refinement: Even with vector input, you’ll likely need to define stitch types, densities, and angles to achieve the desired look.
When to Use Embroidery Digitizing Services
For complex projects, professional work, or if you simply don’t have the time or software, embroidery digitizing services are an excellent option. They have experienced digitizers who can create high-quality designs from your artwork.
Creating Custom Embroidery Design for Specific Fabrics
Different fabrics require different approaches:
- Stretchy Fabrics (T-shirts): Use more underlay and ensure adequate pull compensation to prevent distortion.
- Thick Fabrics (Denim): May require larger needles and stronger stabilizers.
- Sheer Fabrics (Organza): Use fine needles, minimal stitch density, and a very light stabilizer.
Frequently Asked Questions (FAQ)
Here are answers to common questions beginners have about making embroidery designs:
Q1: What is the easiest way to make an embroidery design?
A1: For absolute beginners, starting with simple built-in fonts or designs in your embroidery machine’s software is easiest. If you have existing artwork, try using user-friendly software that offers some auto-conversion features, but be prepared to do some manual adjustments.
Q2: Can I use any image to create an embroidery design?
A2: Technically, yes, but not all images translate well. Images with high contrast, clear lines, and a limited color palette will yield the best results. Very detailed or photographic images require significant manual work and specialized skills.
Q3: How long does it take to digitize a design?
A3: This varies greatly. A simple text design might take minutes. A moderately complex logo could take an hour or more. A highly intricate or photographic design can take many hours.
Q4: What is the difference between embroidery software and graphic design software?
A4: Graphic design software (like Photoshop or Illustrator) is for creating flat images. Embroidery design software is for converting those images into stitch data that an embroidery machine can sew. Embroidery software understands stitch types, density, and machine commands.
Q5: How do I learn more about digitizing?
A5: Look for an embroidery design software tutorial for the specific program you are using. Many software manufacturers offer online training. Websites like YouTube also have a wealth of free tutorials. Joining online embroidery forums can also be very helpful.
Q6: What does “vector to embroidery” mean?
A6: It refers to the process of converting a vector graphic (made of mathematical lines and curves) into an embroidery design (made of stitches). Vector graphics are often easier to convert because they have clean, scalable edges.
Q7: What is stitch file creation?
A7: This is the final step in the design process where your digitized design is saved in a format that your embroidery machine can read, such as .PES, .DST, or .JEF.
Making your own embroidery designs is a rewarding skill that opens up a world of creative possibilities. By following these steps and practicing with your chosen software, you’ll soon be stitching your own unique creations with confidence.