
Finishing your embroidery project well is just as important as making the stitches. It is how you make sure your hard work lasts. Learning how to finish off embroidery securely means your stitches will not come undone. It keeps the back of your work looking neat. This is key to secure embroidery threads. When you are ending embroidery thread, you need good ways to make it stay put. This involves different embroidery finishing techniques. You will learn how to tie off embroidery stitches and how to weave in embroidery ends. These steps help you hide embroidery thread ends and make secure stitches on back.
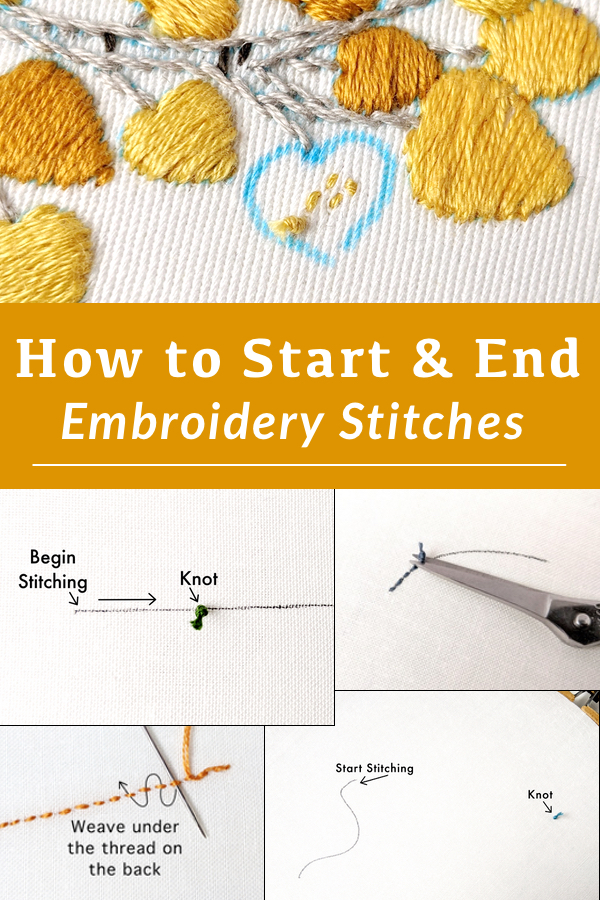
Image Source: www.wanderingthreadsembroidery.com
Why Good Finishing Matters
Your embroidery needs to hold up. Stitches can loosen over time. They can catch on things. Poorly finished threads can unravel. Your beautiful design can fall apart. A good finish keeps everything in place. It makes your work strong and durable. It also makes the back look better. A neat back shows skill. It is part of making a quality piece. Proper finishing protects your stitches. It makes sure your art lasts for years. This is why learning these skills is important.
Essential Finishing Techniques
There are main ways to finish your thread. The goal is always the same. You want to stop the thread from pulling out. You also want it to be invisible from the front. And mostly invisible on the back too. The two main ways are weaving and knotting. Most people use weaving. It is often cleaner and stronger. Knotting is sometimes needed. It depends on where you are in your stitching.
Learning How to Weave Ends
Weaving is the most common method. It is also often the best way. It helps you hide embroidery thread ends. It makes secure embroidery threads without a bulky knot. You run the working thread under stitches you have already made. You do this on the back of your fabric.
Weaving on the Back Explained
Think of the back of your work. You have rows of stitches. You can push your needle under these stitches. You follow the path of the existing thread. This locks your new thread in place. It mixes the new thread with the old ones. This makes it hard for the thread to come loose. It is a key part of back of embroidery finishing.
Steps for Weaving Thread Ends
This is a simple process. It works for most threads.
h5 Get Ready to Finish
Stitch until you almost run out of thread. Leave a tail of thread. Make it long enough to work with. About 2 to 3 inches is good. Turn your work over. Look at the back.
h5 Find Your Path
Look for stitches you made earlier. Find stitches of the same color. Or find stitches that are close by. You will weave under these stitches. Pick an area that is flat and has several stitches close together.
h5 Start the Weave
Put your needle through the fabric. Bring it up right where your thread comes out. Now, slide the needle under some existing stitches. Push it through the loops of thread on the back. Do not go through the fabric itself. Just go under the threads lying on the surface. Go under 3 or 4 stitches.
h5 Pull the Thread
Pull the needle and thread through. Pull it gently. The thread should lie flat against the back of the fabric. It should be hidden under the stitches you went under.
h5 Weave Again (Maybe)
For extra safety, you can weave back the other way. Go under the same stitches again. Or go under different stitches nearby. Weave in the opposite direction. This locks the thread even more. Go under another 3 or 4 stitches.
h5 Trim the Thread
Once you have woven enough, cut the thread. Cut it close to the fabric. Be careful not to cut the fabric. Also, do not cut the stitches you wove under. Cut just the tail of the thread. The end is now hidden and secure.
This weaving method is excellent. It makes secure stitches on back. It is a very popular embroidery finishing technique.
Learning About Small Knots
Sometimes weaving is hard. Maybe you are starting a new thread. You are in a small area. There are no stitches nearby to weave under. In these cases, a small knot might be needed. But use knots with care. Finishing knots embroidery can add bulk. They can sometimes show through on the front. They can also come undone if not done well.
When to Consider a Knot
Knots are often used when starting a new thread. You might need to start in the middle of a color block. There are no old stitches to hide the start. A tiny knot on the back can work. You can also use a knot to end a thread if it is very short. Too short to weave. But try weaving first if you can. Learning how to tie off embroidery stitches properly is key if you use this method.
Steps for Making a Small Knot
Making a small knot is simple. Making a secure small knot is the goal. And making it hidden is also important.
h5 Get Ready to Knot
Stitch until you have about an inch of thread left. Turn your work over.
h5 Make the Knot Loop
Bring your needle close to where the thread comes out. Form a small loop with the thread.
h5 Go Through the Loop
Pass your needle through the loop you made. Do this once. This makes a simple knot. Or do it twice for a stronger knot (like a French knot base).
h5 Pull Tight Gently
Pull the thread gently. Pull the knot down close to the fabric. Make it snug against the last stitch on the back. Do not pull too hard. You do not want to pucker the fabric.
h5 Anchor the Knot (Optional but Recommended)
To make it more secure, make another small stitch. Go down into the fabric right next to the knot. Come up very close by. Wrap the thread around the knot base. Then go back down through the fabric again. This tiny stitch holds the knot down. It adds to the secure embroidery threads.
h5 Trim the Thread
Cut the thread very close to the knot. Be careful not to cut the knot itself. And do not cut the fabric.
Knots are a quick way to tie off embroidery stitches. But they are not always the neatest for back of embroidery finishing. Use them only when necessary.
Combining Methods
You can use both methods. You can tie a tiny knot to start a thread. Then stitch with it. When you finish, you can weave the end in. Or you can weave an end, then add a tiny stitch or knot close to the fabric for extra security. This is another way to make finishing knots embroidery. It helps hide embroidery thread ends very well. It makes ending embroidery thread quite secure.
Step-by-Step Guides
Let’s break down the main methods more simply. This helps you see how to finish off embroidery clearly.
Guide 1: Weaving for Ends
This is the go-to method. Use it whenever possible. It’s great for embroidery finishing techniques.
h5 Step 1: Finish Stitching
Stitch until your thread is short. Stop with your needle on the back of the fabric. Leave a few inches of thread.
h5 Step 2: Turn the Fabric
Flip your hoop or fabric over. Look at the back side.
h5 Step 3: Find Stitches
Find nearby stitches on the back. Look for stitches you made before. They should be in the same color area.
h5 Step 4: Insert Needle
Slide your needle under 3 or 4 stitches. Go under the threads on the back. Do not go through the fabric layers.
h5 Step 5: Pull Thread Through
Gently pull the needle and thread all the way. The thread is now under the stitches.
h5 Step 6: Weave Again (Optional)
For more security, weave back the other way. Go under 3 or 4 stitches in the opposite direction. Make sure you weave under some of the same stitches. This locks the thread.
h5 Step 7: Trim Close
Use small scissors. Cut the thread very close to the fabric. The end is now hidden. It is secured by the weaving. This is how to secure embroidery threads well.
Guide 2: Using a Small Knot to End
Use this when weaving is not practical. Like when the thread is very short.
h5 Step 1: Finish Stitching
Stitch until your thread is very short. Stop with your needle on the back. Leave maybe 1 inch of thread.
h5 Step 2: Make a Loop
With the short thread, make a small loop close to the last stitch on the back.
h5 Step 3: Pass Needle Through Loop
Put your needle through the loop. Pull gently. This makes a simple knot.
h5 Step 4: Pull Knot Tight
Pull the knot down to the fabric. Make it snug against the last stitch. Be careful not to pull too hard.
h5 Step 5: Anchor the Knot (Recommended)
Put your needle down into the fabric right next to the knot. Bring it back up just a tiny bit away. Wrap the thread around the base of the knot once. Then put the needle back down through the same hole or very close. This tiny stitch holds the knot better. It helps tie off embroidery stitches firmly.
h5 Step 6: Trim Close
Cut the thread right at the knot. Use sharp scissors. Make sure you do not cut the knot or the fabric. This finishes ending embroidery thread with a knot.
Guide 3: Starting Thread with a Knot
You might need to start thread in the middle of your work. If there’s nowhere to hide the start.
h5 Step 1: Make a Knot
Tie a small knot at the end of your thread. Make it a simple knot. Do not make it too big.
h5 Step 2: Insert Needle
Push your needle through the fabric from the front to the back. Do this exactly where your stitch starts.
h5 Step 3: Pull Knot to Back
Pull the thread through until the knot is on the back of the fabric. Pull it snug against the back.
h5 Step 4: Start Stitching
Begin making your first stitch. Make sure your first stitch covers the spot where the thread came through. This helps hold the knot.
h5 Step 5: Stitch Over the Start (Important)
Make a few stitches over the area where you started. This helps secure the thread. The stitches you make help trap the start of the thread. This is a form of secure stitches on back for the beginning.
h5 Step 6: Check the Back
Look at the back. Make sure the knot is flat and trapped under your first few stitches. You can make a few small stitches on the back over the knot area if needed to hold it down more.
This method uses a finishing knots embroidery technique to start. Then you secure it further with your first stitches.
Weaving vs. Knotting
Which method is better? Most of the time, weaving is preferred. Here is a simple comparison.
| Feature | Weaving | Knotting |
|---|---|---|
| Security | Very secure if done over enough stitches | Can be secure, but can sometimes loosen |
| Bulk | Adds almost no bulk | Can add a small bump |
| Appearance (Back) | Very neat, blends in | Can be visible, a small bump of thread |
| Appearance (Front) | Invisible | Can sometimes show a tiny bump or shadow |
| Ease | Easy once you know how | Quick and simple |
| When to Use | Most thread endings | Sometimes for starting, or very short ends |
Weaving is generally the best way to hide embroidery thread ends and make secure embroidery threads for finishing. Knotting is useful for starting in some spots or emergencies.
Tips for Secure Finishing
Here are some extra tips to help you finish your embroidery like a pro. These simple ideas can make a big difference in back of embroidery finishing and overall thread security.
Use Enough Thread
Do not stitch until your thread is super short. Leave enough thread to weave it in. About 2-3 inches is a good amount for weaving. Too short makes it hard to finish well.
Weave Under Enough Stitches
Do not just go under one or two stitches. Go under at least 3 or 4. Weaving back the other way under the same stitches makes it even stronger. This is key for secure stitches on back.
Keep the Back Tidy
Try to keep the back of your work as neat as possible as you stitch. Fewer long threads running everywhere mean less mess to weave into. A neat back makes finishing easier. It is part of good embroidery finishing techniques.
Match Thread Color
When weaving or knotting, try to hide the thread under stitches of the same color. This helps the thread blend in perfectly on the back. You can also hide embroidery thread ends under fabric if the color matches well enough.
Pull Gently
When pulling thread through stitches or tightening a knot, pull gently. Do not pull too hard. Pulling too hard can pucker the fabric. It can also distort your stitches on the front.
Check Your Work
After you finish a thread, turn your work over. Look at the back. Does the thread look secure? Is it hidden? Is the knot flat if you used one? Checking helps you catch problems early.
Practice Different Methods
Try both weaving and knotting. See which you prefer. Understand when each method works best. Practicing helps you master these embroidery finishing techniques. Learning how to finish off embroidery well takes a little practice.
Secure Starts Too
Remember to secure the start of your thread too. You can start by holding the thread tail on the back and stitching over it. Or you can use a small knot as described earlier. Securing starts is just as important as ending embroidery thread.
Finishing Specific Stitches
Most stitches can be finished using the weaving method on the back.
* Cross Stitch: Weave under the back of the little ‘x’ shapes. Go under several legs of the crosses.
* Backstitch: Weave under the back of the backstitches. Go under the straight lines on the back.
* Satin Stitch: This can be tricky. Try to weave under the long satin stitches on the back. Go through the loops near the edges. Or weave under stitches of the same color nearby.
* French Knots: For ending, weave the thread under nearby stitches. For starting, a tiny knot on the back can work if there are no stitches to hide the start under.
The core idea is the same: find stitches on the back to hide and secure your thread end under. This helps make secure embroidery threads no matter the stitch type.
Comparing Weaving and Knotting Visually
Here is a simple look at the difference.
h5 Weaving Example
Imagine rows of stitches on the back. Your needle goes under the threads that make up these stitches.
Fabric —— Stitch thread -> ====== stitch back Your thread -> ——-> (weaving under the ===== lines)
This shows the needle going under the existing horizontal threads on the back.
h5 Knotting Example
Your last stitch is made. The thread comes out. You tie a knot right there.
Fabric —— Stitch back Your thread tail | o <- Knot here
This shows the thread ending at the last stitch, with a knot tied at that point on the back.
Weaving spreads the thread end out, blending it in. Knotting makes a small bump.
Troubleshooting Finishing Problems
What happens if things go wrong?
h5 Thread Too Short to Weave
You stitched too long. Your thread is very short. It’s hard to get the needle under stitches.
* Solution: Try to use a smaller needle. If it’s still too short, you might have to use a tiny knot right at the last stitch. Anchor it well with a tiny stitch if possible. This is one time finishing knots embroidery might be the only option.
h5 Knot is Bulky or Shows Through
Your knot is too big. Or it is in a bad spot. It makes a bump you can see from the front.
* Solution: Next time, try harder to weave. If you must use a knot, make it smaller. Tie the knot closer to the fabric without pulling too tight. Anchor it well so it stays flat. Try to place it where there are other stitches on the back to cushion it.
h5 Thread End Came Loose
Your finishing did not hold. The thread is coming out.
* Solution: Re-thread your needle if the tail is long enough. Weave it in again. Weave under more stitches this time. Or weave back and forth. If the tail is too short, you may need to carefully tie a small knot near the fabric on the back and anchor it. You need to make secure embroidery threads.
h5 Back is Messy, Hard to Weave
Lots of threads are running everywhere on the back. It is hard to find a clean path to weave.
* Solution: Try to improve your back neatness as you stitch. For the current project, find the neatest areas. Weave under the main lines of thread on the back of stitches, not just random loose threads. Take your time to find the best path. Aim for better back of embroidery finishing on your next project.
Learning how to finish off embroidery includes knowing how to fix these common issues.
Advanced Finishing Considerations
Beyond just securing the thread ends, think about the finished piece.
h5 Washing Embroidery
Will you wash your finished piece? If so, very secure finishing is a must. Water and movement can loosen threads. Weaving in ends properly is usually more secure against washing than simple knots. Good secure stitches on back help your work survive washing.
h5 Different Fabrics
Finishing on different fabrics can feel different.
* Loose Weaves: Fabrics like linen can have bigger gaps. Weave under many threads of the fabric itself, not just the stitch threads. Make sure you catch the fabric threads.
* Tight Weaves: Fabrics like cotton can be dense. It might be harder to slide under stitch threads. Use a sharp needle. Be patient.
* Canvas/Aida: It is often easy to weave under the ‘bars’ on the back of these fabrics or under the back of the cross stitches.
Adjust your weaving technique slightly for the fabric. The goal remains to hide embroidery thread ends securely.
h5 Finishing for Framing or Items
If your embroidery will be framed, the back might not show. But security is still needed to prevent unraveling. If your embroidery is on an item that will be used or washed (like a bag or clothing), security is even more critical. Weaving is strongly recommended for items that will see wear. Mastering embroidery finishing techniques is vital for making durable items.
Final Thoughts on Finishing
Finishing embroidery threads is not the most exciting part. But it is one of the most important. It is the final step that protects your work. It makes sure your stitches stay exactly where you put them. Taking the time to properly secure embroidery threads makes a huge difference. It shows care and craftsmanship.
Whether you choose to weave in embroidery ends or use finishing knots embroidery (carefully!), make sure the threads are secure. Practice the techniques. Find what works best for you and your project. A well-finished piece is a lasting piece. By mastering how to finish off embroidery, you make sure your beautiful creations can be enjoyed for years to come. Ending embroidery thread well is the perfect final touch. Focus on back of embroidery finishing to create secure stitches on back that you can be proud of.
Frequently Asked Questions (FAQ)
h5 How long should the thread tail be for weaving?
About 2 to 3 inches is good. This gives you enough thread to work with. It lets you weave under several stitches easily.
h5 Can I use a knot for every thread end?
You can, but it is not the best practice. Knots can come undone. They can also create bumps on the back. Weaving is usually neater and stronger for hiding embroidery thread ends.
h5 How many stitches should I weave under?
Try to weave under at least 3 or 4 stitches. Weaving back in the other direction under the same stitches adds more security. The more stitches you go under, the stronger the finish.
h5 Does finishing make the back messy?
Proper finishing, especially weaving, should make the back neat. The thread end blends in under existing stitches. Poor finishing, like big knots or loose ends, makes the back messy. Back of embroidery finishing done well looks clean.
h5 What if I cannot find stitches to weave under?
This can happen when starting a new color in a small area. If there are no nearby stitches of the same color, you might need to use a tiny knot to start. Or make a few tiny anchoring stitches through the fabric on the back. Then stitch over them on the front. For ending, try to weave under any close stitches or even just through the fabric threads on the back if they match the thread color closely.
h5 Should I use glue to finish threads?
Avoid using glue. Glue can make the fabric stiff. It can yellow over time. It is not a standard embroidery finishing technique. Weaving or knotting is much better for secure embroidery threads.
h5 Is it okay if the back of my embroidery isn’t perfect?
Yes, it is okay. Many embroiderers do not have perfect backs. What matters most is that the threads are secure. The stitches should not come undone. A neat back is a bonus, but secure stitches on back are essential.
h5 How is ending embroidery thread different from starting?
Both need to be secure. Starting methods often involve holding the thread tail under your first few stitches or using a small knot on the back. Ending methods involve weaving the working thread end under existing stitches or using a small knot near the last stitch. Different techniques ensure secure embroidery threads at both the beginning and the end.
h5 Are these embroidery finishing techniques good for all types of thread?
Yes, these methods work for most standard embroidery threads like stranded cotton, perle cotton, and silks. The key is to weave enough of the thread tail to hold it or make a small, secure knot.
h5 Can finishing knots embroidery be totally invisible?
A very tiny, flat knot might be hard to see. But weaving is better if you want a truly invisible finish on the back. Weaving hides the thread under other threads. A knot always adds a bit of material in one spot.