
What is a sewing machine needle threader? It’s a clever little helper that pushes the thread through the tiny eye of your sewing machine needle. This makes a task that can be tricky for many sewers much easier!
Sewing by hand is a time-honored skill, but let’s be honest, threading a sewing machine needle can be a real challenge. The eye of the needle is so small, and getting that strand of thread through it perfectly can feel like a delicate operation. Thankfully, most modern sewing machines come equipped with a built-in sewing machine needle threader. This handy gadget can save you a lot of frustration and time.
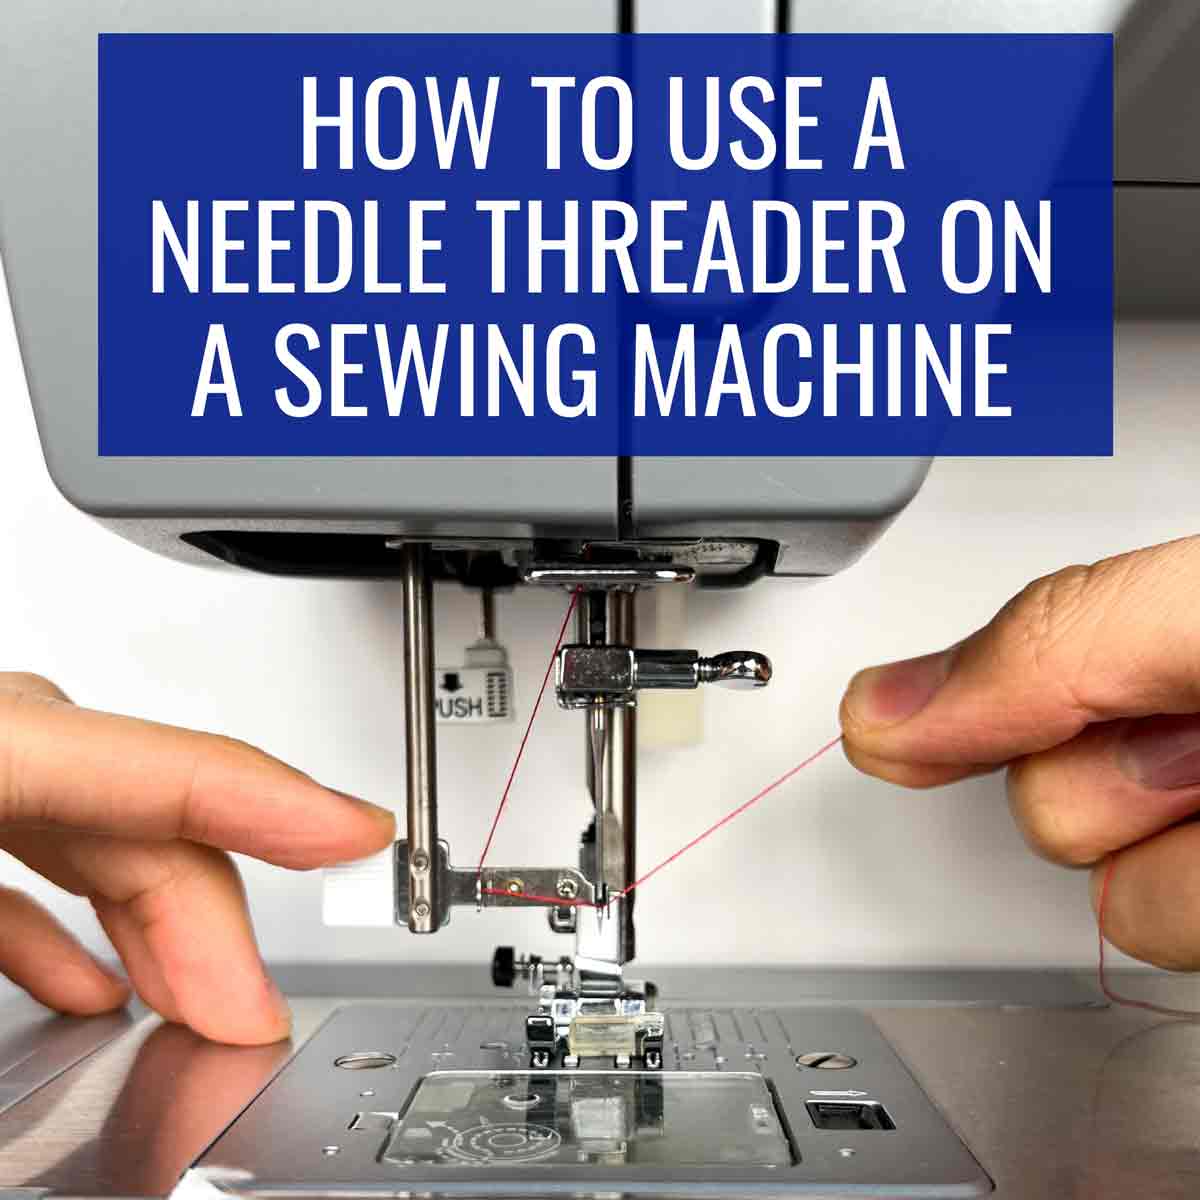
Image Source: mindymakes.com
The Magic of the Sewing Machine Needle Threader
Have you ever squinted, wiggled, and blown on a thread, only to have it stubbornly refuse to go through the needle’s eye? You’re not alone. Many sewers, from beginners to the experienced, find needle threading a bit fiddly. That’s where the sewing machine needle threader shines. It’s designed to make this precise task as effortless as possible.
Types of Sewing Machine Needle Threaders
While the goal is the same, sewing machines have a few different designs for their automatic needle threader sewing machine features:
- The Hook System: This is the most common type. A small metal or plastic hook swings out from the machine, positioned directly behind the needle eye. You lay the thread into a groove on the threader, then press a lever. The hook moves forward, pushing the thread through the needle eye.
- The Wire Loop System: Some machines use a thin, flexible wire loop. You position this loop in front of the needle eye, guide the thread through the loop, and then pull the loop back through the needle eye, dragging the thread with it.
- The Needle Plate System: Less common, these systems might involve a slightly different mechanism integrated into the needle plate area.
Regardless of the specific design, the principle is the same: to guide the thread through the needle eye with mechanical assistance.
Why Use Your Sewing Machine Needle Threader?
- Saves Time: It’s much faster than manual threading.
- Reduces Frustration: No more squinting or missed attempts.
- Improves Accuracy: Ensures the thread goes through cleanly.
- Accessible for All: Great for those with vision issues or dexterity challenges.
How to Use Your Sewing Machine Needle Threader: A Step-by-Step Guide
Using your sewing machine needle threader is generally straightforward, but following the correct steps ensures success. Here’s a detailed breakdown:
Step 1: Prepare Your Machine and Thread
- Select the Correct Needle: Make sure you have the right needle size and type for your fabric and thread. A dull or bent needle can make threading difficult, even with a threader.
- Position the Needle: Raise the presser foot. Turn the handwheel towards you to bring the sewing machine needle to its highest position. This is crucial for the threader mechanism to work correctly.
- Cut the Thread: Cut the thread tail at a slight angle. A clean, sharp cut helps the thread slide easily. Avoid fraying the end.
- Bring the Thread to the Front: Drape the thread over the thread guides and tension discs as you normally would when threading your machine.
Step 2: Engage the Needle Threader
This is where the magic happens, and it varies slightly depending on your machine’s design.
- Locate the Threader Lever: Most machines have a small lever, often made of plastic, located near the needle.
- Position the Threader:
- Hook System: The small hook will be visible near the needle. Some machines require you to push the lever all the way down until it locks or clicks into place. This action brings the hook forward, usually in front of the needle eye.
- Wire Loop System: Gently push the mechanism forward so the wire loop extends and aligns with the needle eye.
- Place the Thread:
- Hook System: Lay the thread end into the designated groove or slot on the threader. Ensure it sits snugly. The groove is designed to hold the thread firmly in place as the hook moves.
- Wire Loop System: Guide the end of the thread through the wire loop.
Step 3: Activate the Threader Mechanism
- Press the Lever: Gently but firmly press the threader lever. You should see the hook (or wire loop) swing forward, passing through the eye of the needle.
- The Thread Passes Through: The hook, with the thread held in its groove, will move back, pulling a small loop of thread through the needle eye.
Step 4: Secure the Thread
- Catch the Loop: Once the hook retracts, it will leave a small loop of thread through the needle eye.
- Pull the Thread Through: Use your fingers or the thread cutter (if available) to gently pull this loop completely free. You should now have a usable tail of thread extending from the needle.
Step 5: Bring Up the Bobbin Thread
- Hold the Top Thread: With one hand, hold the newly threaded top thread tail.
- Turn the Handwheel: Slowly turn the handwheel towards you to lower the needle. As the needle goes down and comes back up, it will catch the bobbin thread and pull it up to the surface.
- Retrieve Bobbin Thread: Use your fingers or tweezers to pull the bobbin thread loop up to the surface, alongside the top thread.
- Position Threads: Place both thread tails behind the presser foot and needle, ready for your first stitch.
Troubleshooting: When Your Sewing Machine Needle Threader Not Working
It’s frustrating when your sewing machine needle threader isn’t cooperating. Here are common reasons why it might not be working and how to fix them:
Common Issues and Solutions
- Needle Position Incorrect:
- Problem: The needle is not in its highest position.
- Solution: Always ensure the presser foot is up and the needle is at its absolute highest point before attempting to thread. Turn the handwheel towards you if needed.
- Thread Not Placed Correctly:
- Problem: The thread is not in the groove or slot on the threader, or it’s positioned incorrectly.
- Solution: Carefully re-read the section on placing the thread. Ensure the thread end is snug in the designated channel. Sometimes, a slight twist or re-angling of the thread can help.
- Frayed Thread End:
- Problem: The end of the thread is fuzzy or frayed, preventing it from entering the threader mechanism.
- Solution: Cut the thread again with sharp scissors, making a clean, angled cut. Avoid using worn-out thread.
- Wrong Threader Mechanism Engaged:
- Problem: For machines with multiple threading options, the wrong one might be selected.
- Solution: Double-check your machine’s manual to ensure you’re engaging the correct lever or button for the needle threader.
- Threader Bent or Damaged:
- Problem: The hook or wire loop might be slightly bent, twisted, or broken. This can happen from forceful use or accidents.
- Solution: Carefully inspect the threader. If it’s bent, you might be able to gently straighten it with needle-nose pliers, but be very delicate. If it’s broken, you’ll likely need a sewing machine needle threader replacement.
- Lint and Debris Buildup:
- Problem: Lint from thread and fabric can accumulate in the threader mechanism, obstructing its movement.
- Solution: Use a small brush (like a clean makeup brush or the brush that came with your machine) to gently clean around the needle and the threader mechanism. Compressed air can also help blow away debris.
- Machine Malfunction:
- Problem: In rare cases, there might be an internal issue with the sewing machine’s threading mechanism.
- Solution: If you’ve tried everything else and the threader still won’t work, it’s time to consult your sewing machine manual or contact a qualified sewing machine repair technician.
When Manual Threading is the Only Option
Sometimes, despite your best efforts, the automatic needle threader sewing machine feature might just not work for a particular thread, needle, or machine. In these instances, knowing how to thread a sewing machine needle manually is a valuable skill.
How to Thread a Sewing Machine Needle Manually
- Position the Needle: Ensure the needle is at its highest point and the presser foot is up.
- Thread the Machine: Follow your machine’s normal threading path, guiding the thread through all the guides and tension discs.
- Cut the Thread: Cut the thread end cleanly at an angle.
- Hold the Thread: Hold the thread taut with one hand, a few inches from the needle.
- Guide the Thread: With your other hand, carefully guide the thread end towards the eye of the needle.
- Use Magnification (Optional): If vision is a challenge, a magnifying glass can be a great help.
- Patience is Key: Gently push the thread through the eye. If it doesn’t go in, try re-cutting the thread or slightly adjusting your grip.
- Pull a Tail: Once through, pull about 4-6 inches of thread to create a tail.
- Bring Up Bobbin Thread: As described in Step 5 above.
Alternatives and Enhancements: The Best Sewing Machine Needle Threader Options
While most modern machines have built-in threaders, some sewers prefer different solutions, or their machine might lack this feature.
Simple Needle Threader Sewing Aids
For older machines or as an alternative, there are several “simple needle threader sewing” tools available:
- Handheld Needle Threaders: These are small, portable devices. You typically place the needle of your sewing machine (or even a hand sewing needle) into a slot. Then, you place the thread into another slot, and a mechanism pushes the thread through the needle eye. They are generally inexpensive and effective.
- Universal Needle Threading Devices: These are often more robust than simple handheld threaders and can be used with a wider range of needle sizes and types. Some even attach to the sewing machine itself for easier operation.
Sewing Machine Needle Threader Adapter
Some sewing machine manufacturers offer a “sewing machine needle threader adapter” that can be purchased separately. These might be designed to work with specific machine models or to offer an enhanced threading experience compared to the built-in version. It’s worth checking if your machine brand offers such an accessory.
The Best Sewing Machine Needle Threader
What constitutes the “best” sewing machine needle threader is subjective and depends on your machine and personal preference. However, universally praised features include:
- Durability: Made from sturdy materials that don’t bend or break easily.
- Ease of Use: Intuitive design with clear steps for operation.
- Reliability: Consistently works with different thread types and needle sizes.
- Compatibility: Works seamlessly with your specific sewing machine model.
If your built-in threader is giving you trouble, exploring a well-reviewed handheld threader or a specific sewing machine needle threader tool designed for your brand can be a great investment.
Maintaining Your Sewing Machine Needle Threader
Proper care ensures your sewing machine needle threader continues to function smoothly.
Cleaning and Lubrication
- Regular Cleaning: As mentioned in the troubleshooting section, lint and dust are the primary enemies of your threader. Use a small brush and compressed air regularly.
- Avoid Over-Lubrication: While lubrication is important for sewing machines, excessive oil on the threader mechanism can attract more lint and dust, making the problem worse. Use lubricant sparingly and only if recommended by your machine’s manual.
When to Consider a Sewing Machine Needle Threader Replacement
If your sewing machine needle threader tool is bent, broken, or significantly worn out, it’s time for a replacement.
- Check Your Manual: Your sewing machine manual will usually specify the part number for replacement threader components.
- Contact the Manufacturer or Dealer: They can help you source the correct sewing machine needle threader replacement part.
- Aftermarket Parts: Be cautious with aftermarket parts. While sometimes cheaper, they may not be as precisely manufactured as genuine parts and could cause further issues.
Sewing Machine Needle Threader Bypass
In some rare instances, a sewer might look for a “sewing machine needle threader bypass” if the mechanism is causing consistent problems or if they simply prefer manual threading. This usually involves disengaging or removing the automatic threader mechanism altogether. However, this is generally not recommended unless you are experienced and comfortable disassembling parts of your machine, as it could void warranties or cause other operational problems. It’s always better to try and fix the existing mechanism or use an external tool.
Sewing Machine Needle Threader Guide: Key Takeaways
To recap and solidify your knowledge:
- Preparation is Crucial: Always ensure the presser foot is up and the needle is at its highest position.
- Clean Thread is Key: A clean, angled thread end is essential for successful threading.
- Follow the Groove: Make sure the thread is properly seated in the threader’s designated channel.
- Gentle Pressure: Apply steady, gentle pressure when activating the threader lever.
- Troubleshoot Systematically: If it’s not working, check the needle position, thread condition, and for lint buildup.
- Manual is an Option: Knowing how to thread manually is a backup skill.
- Consider Alternatives: Handheld threaders or specific tools can be excellent aids.
- Maintenance Matters: Keep the threader clean to ensure its longevity.
Frequently Asked Questions (FAQ)
Q1: Can I use my sewing machine needle threader with all needle sizes?
A1: Most built-in needle threaders are designed for standard needle sizes (like 70/10 to 90/14). Very large or very small needles, or specialty needles, might be more challenging for the automatic threader. Always check your machine’s manual for specific compatibility.
Q2: Why does my threader sometimes catch the thread but not pull it through?
A2: This often happens if the thread is not fully seated in the groove of the threader, or if the thread end is slightly frayed. Try re-cutting the thread and carefully repositioning it in the threader.
Q3: Is it better to use the automatic needle threader or thread manually?
A3: For most people, the automatic needle threader is quicker and easier. However, if you find it unreliable for a specific thread or needle, or if you have excellent vision and dexterity, manual threading can be just as effective. It’s good to be proficient at both!
Q4: What if the plastic part of my needle threader breaks?
A4: If the plastic lever or hook breaks, you will likely need a sewing machine needle threader replacement part specific to your machine model. Contact your sewing machine dealer or the manufacturer for assistance.
Q5: How often should I clean my sewing machine needle threader?
A5: It’s a good practice to clean the area around your needle and the threader mechanism every few sewing sessions, or whenever you change your needle. This prevents lint buildup from causing issues.
By mastering how to use your sewing machine needle threader, you can make your sewing experience smoother and more enjoyable. Happy stitching!