
Yes, you can easily thread a Brother sewing machine! Many people find threading a new sewing machine intimidating, but with a clear, step-by-step guide, even complete beginners can master the process. This article will walk you through Brother sewing machine threading from start to finish, ensuring you’re ready to create beautiful projects in no time. We’ll cover everything from the upper thread setup to the lower thread setup, including sewing machine bobbin winding and how to get your needle ready.
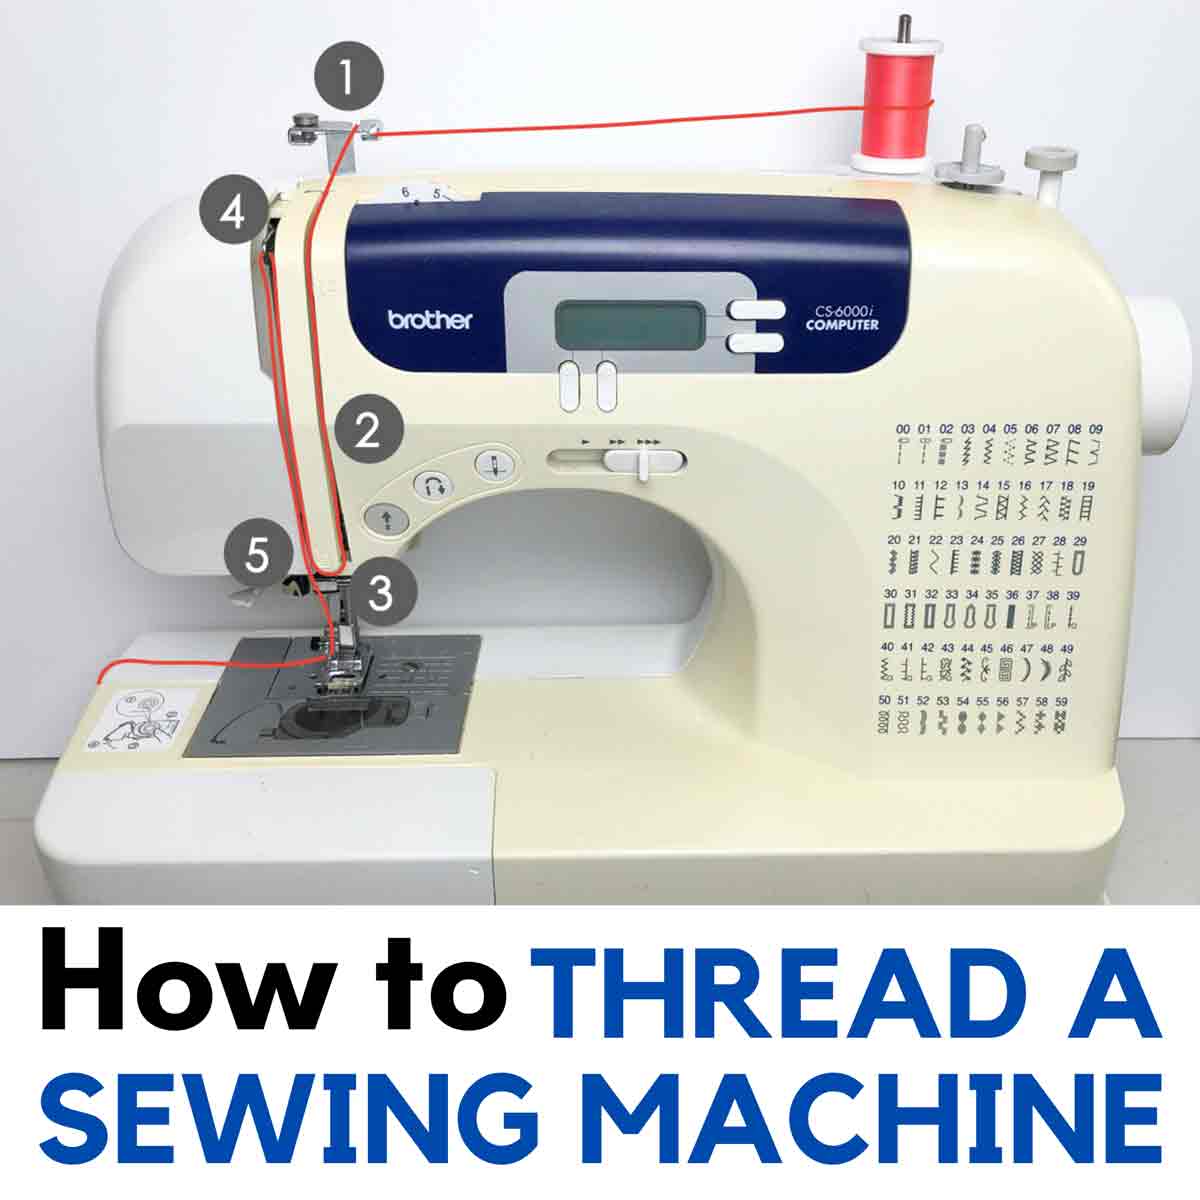
Image Source: mindymakes.com
Getting Started: What You Need
Before we dive into Brother sewing machine threading, let’s gather the essentials. You’ll need:
- Your Brother Sewing Machine: Make sure it’s plugged in and turned on.
- Thread: Choose a good quality all-purpose thread. It’s wise to have a few colors on hand, especially when learning to avoid mistakes and for creative choices. We’ll discuss changing thread color later.
- A Bobbin: Your machine came with one, but having a few extras is always helpful for different thread colors or types.
- Your Brother Sewing Machine Manual: While this guide is comprehensive, your specific model’s manual (often called the threading manual) is your ultimate reference. Keep it handy!
- Scissors: To snip your thread.
- A Sewing Project: Even a small scrap of fabric to test your stitches.
Step 1: Preparing the Bobbin for Sewing
The first part of Brother sewing machine threading involves preparing the bobbin, which provides the thread from underneath your fabric. This is often the most overlooked step, but getting it right is crucial for smooth stitching.
Sewing Machine Bobbin Winding
Most Brother sewing machines have an automatic bobbin winder. Here’s how to use it:
- Place a Bobbin on the Bobbin Winder Spindle: You’ll usually find a small spindle on the top or side of your machine. Push the bobbin onto this spindle.
- Guide the Thread: Take the end of your thread from the spool. Guide it through the bobbin winder’s tension disc (there’s a small slot or guide specifically for this). Then, loop the thread around the bobbin several times, going counter-clockwise.
- Trim the Tail: Snip the short thread tail close to the bobbin so it doesn’t get caught.
- Engage the Bobbin Winder: Push the bobbin winder spindle to the right or left, depending on your model, to engage it.
- Start Winding: Gently press the foot pedal. The bobbin will start to wind. Watch it closely. Most machines will stop automatically when the bobbin is full, or you can stop it yourself by lifting your foot off the pedal.
- Stop Winding: Once the bobbin is wound evenly, stop the machine. Disengage the bobbin winder by pushing it back to its original position.
- Cut the Thread: Cut the thread to remove the wound bobbin.
Tip: Wind bobbins with the same type and weight of thread you plan to use in the needle. This helps ensure consistent stitch quality.
Inserting the Wound Bobbin
Now that you have a wound bobbin, it’s time to place it in its housing. The method varies slightly between models, so consult your threading manual if you’re unsure.
Top-Loading Bobbin Cases (Common on Newer Brother Machines)
- Remove the Bobbin Cover: Lift off the clear plastic cover above the needle area.
- Place the Bobbin: Hold the bobbin with the thread tail hanging down. Place it into the bobbin case.
- Guide the Thread: Look for a small slit or notch in the bobbin case. Guide the thread through this slit. This is crucial for the bobbin tension to work correctly.
- Pull the Thread: Pull the thread so it goes under the tension spring. You should feel a slight resistance.
- Replace the Cover: Put the clear plastic bobbin cover back on.
Front-Loading Bobbin Cases (Common on Older Brother Machines)
- Open the Bobbin Cover: Usually, there’s a small hinged cover on the front of the machine. Open it.
- Remove the Bobbin Case: The bobbin case is a separate unit that you lift out.
- Insert the Bobbin: Hold the bobbin with the thread tail hanging down and to the left. Place it into the bobbin case.
- Guide the Thread: Guide the thread through the slit in the bobbin case, under the tension spring. You should feel slight resistance.
- Reinsert the Bobbin Case: Put the bobbin case back into its holder in the machine. It will usually click into place.
- Close the Cover: Close the front bobbin cover.
Step 2: The Upper Thread Setup
The upper thread setup is where you guide the main thread from the spool through a series of guides, tension discs, and finally to the needle. This is where most beginners have questions.
Threading the Spool Pin
- Place the Spool: Put your spool of thread onto the spool pin. Most Brother machines have a horizontal spool pin, but some might have a vertical one. Ensure the spool is secure and the thread is unwinding smoothly.
- Follow the Thread Path: Your machine has a numbered or indicated thread path marked on it. Follow these numbers or arrows very carefully.
Guiding the Thread Through the Tension Discs
- First Guide: Take the thread from the spool and guide it to the first thread guide, usually a small metal loop at the top.
- Around the Tension Discs: This is a critical step. The thread needs to pass between the two tension discs. Look for a small gap. Guide the thread down into this gap, then back up and out. You should feel a slight pull or resistance when the thread is correctly in the tension discs. Don’t skip this part!
- Thread Take-Up Lever: Continue following the thread path down. You will see a metal lever that moves up and down when the machine is running. This is the thread take-up lever. Guide the thread through the eye of this lever. It’s usually a hook shape.
Bringing the Thread Down to the Needle
- Continue Downward Path: After the take-up lever, continue guiding the thread downwards. There will be more thread guides along the way. Follow them precisely.
- Lower Thread Guide: You’ll encounter a guide that directs the thread towards the needle clamp area.
- Needle Clamp Guide: Finally, there’s usually a guide located very close to the needle itself. Lead the thread into this guide.
Threading the Needle
This is often the trickiest part for new sewers. Many Brother machines have a built-in needle threader to make this simple.
Using the Built-in Needle Threader (If Available)
Most modern Brother sewing machines come with a fantastic automatic needle threader.
- Raise the Presser Foot: Always make sure the presser foot is in the up position before threading the needle. This disengages the upper tension.
- Lower the Threader Lever: Locate the needle threader lever. It’s usually a small arm with a hook on the end. Gently pull this lever down and towards you until it hooks onto the needle eye.
- Place the Thread: Drape the thread over the threader hook, so the thread passes through the hook’s eye.
- Release the Lever: Gently release the threader lever. The hook will snap back, pulling a small loop of thread through the needle’s eye.
- Pull the Loop: Grab the loop of thread that has passed through the needle eye and pull it through. You now have your thread threaded!
Manual Needle Threading (If No Automatic Threader)
If your machine doesn’t have an automatic needle threader, or if you prefer to thread manually:
- Raise the Presser Foot: Again, ensure the presser foot is up.
- Cut Thread End: Use sharp scissors to cut the thread end at a clean, sharp angle. This makes it easier to push through the needle eye.
- Hold the Needle: Use one hand to hold the sewing machine needle steady.
- Position the Thread: With your other hand, bring the thread towards the needle eye. The eye of the needle should be facing you.
- Push the Thread Through: Carefully push the angled thread end through the eye of the needle. You might need to hold the thread taut.
- Pull a Tail: Once a small amount of thread is through the needle eye, pull it through to create a tail of about 4-6 inches.
Step 3: Bringing Up the Bobbin Thread
Now that the upper thread is in place and the bobbin is wound and inserted, you need to bring the bobbin thread up to meet the upper thread. This creates the stitch.
- Hold Both Threads: Take the tail of the upper thread in one hand. With your other hand, gently pull the bobbin thread so a loop appears from the bobbin case.
- Catch the Bobbin Thread: Use your finger or a seam ripper to catch this loop of bobbin thread.
- Raise the Needle: Turn the machine’s handwheel towards you (counter-clockwise) to raise the needle. As the needle goes up, it will catch the bobbin thread loop and pull it up through the needle plate.
- Secure Both Threads: You should now have both the upper thread and the bobbin thread coming up through the needle plate.
- Place Threads Under Presser Foot: Guide both thread tails under the presser foot and towards the back of the machine. Leave a tail of about 4-6 inches for both threads.
Troubleshooting Common Threading Issues
Even with the best threading demonstration, you might encounter a few snags. Here are common problems and solutions:
Thread Breakage
- Cause: Sharp edges on the needle, incorrect thread path, old or damaged thread, too much tension, or a burr on the needle plate or bobbin case.
- Solution: Ensure you followed the thread path exactly. Check that the needle is inserted correctly and isn’t bent or damaged. Use good quality thread. Make sure the thread is properly seated in the tension discs.
Skipped Stitches
- Cause: Incorrect needle size for the fabric, needle inserted incorrectly, damaged needle, or the bobbin thread isn’t properly seated in the tension spring.
- Solution: Ensure you’re using the correct needle size for your fabric. Double-check that the needle is inserted all the way and the flat side is facing the correct direction as per your threading manual. Re-thread the bobbin and ensure the thread is going under the tension spring.
Uneven Stitches or Loopy Stitches
- Cause: Incorrect threading of either the upper or bobbin thread, tension set too high or too low, or the presser foot is not lowered.
- Solution: Re-thread both the upper and bobbin threads meticulously. Ensure the presser foot is down before sewing. Adjust the tension dials slightly. If stitches are loopy on top, the bobbin tension might be too high. If loops are underneath, the upper tension might be too high.
Changing Thread Color
When you need to change your thread color, the process is very similar to threading the machine initially.
- Raise Presser Foot: Always raise the presser foot first.
- Snip Upper Thread: Cut the old thread coming from the spool.
- Remove Old Bobbin: Remove the old bobbin from its case.
- Wind New Bobbin: Wind a new bobbin with your desired color using the sewing machine bobbin winding procedure.
- Insert New Bobbin: Insert the new bobbin into the bobbin case.
- Re-thread Upper Thread: Re-thread the upper thread, following the entire thread path from the spool pin, through the tension discs, take-up lever, and finally threading the needle.
- Bring Up Bobbin Thread: Bring up the bobbin thread by turning the handwheel.
- Start Sewing: You are now ready to sew with your new color!
Frequently Asked Questions About Brother Sewing Machine Threading
Here are some common questions new sewers have about threading their Brother sewing machine.
Q1: Why does my Brother sewing machine keep breaking the thread?
A1: Thread breakage is often due to an incorrectly threaded needle, a dull or bent needle, or the thread not being properly seated in the tension discs. Always ensure the presser foot is up when threading and that the thread goes through every guide, especially the tension discs and the take-up lever.
Q2: Can I use any type of thread on my Brother sewing machine?
A2: While you can use most good quality all-purpose polyester threads, it’s best to match the thread weight and type to your fabric. Heavy fabrics might require thicker threads, and delicate fabrics might need finer threads. Always ensure your bobbin thread matches your needle thread for best results.
Q3: My stitches are uneven. What’s wrong with my Brother sewing machine threading?
A3: Uneven stitches usually point to a tension issue or incorrect threading. Double-check that both the upper thread and bobbin thread are threaded correctly. Ensure the presser foot is down. You might need to adjust the upper tension dial slightly.
Q4: Do I need to re-thread my Brother sewing machine every time I change the bobbin?
A4: Yes, you need to re-thread the upper thread every time you change the bobbin, and in fact, you should re-thread the upper thread whenever you change your spool of thread, even if it’s the same color. This ensures the thread is properly engaged with the machine’s tension system.
Q5: What is the thread path on my Brother sewing machine?
A5: The thread path refers to the route the thread takes from the spool, through various guides, tension discs, the take-up lever, and finally to the needle. Your Brother sewing machine has specific guides and numbers marked on the machine to show you this exact path. Always follow these marked guides precisely.
Q6: How do I know if my Brother sewing machine bobbin winding is done correctly?
A6: A correctly wound bobbin will have thread wound evenly, without lumps or gaps. It should be taut but not so tight that it’s difficult to pull. The thread should unwind smoothly from the bobbin. If it’s wound too loosely or unevenly, it can cause stitching problems.
Q7: Can I sew without the presser foot down on my Brother sewing machine?
A7: No, you should never sew with the presser foot up. The presser foot holds the fabric in place and interacts with the tension system. Sewing without it down will result in loose, uneven stitches and can cause thread breakage or jams.
Q8: My Brother sewing machine keeps jamming. Is it because of the threading?
A8: Threading issues are a very common cause of jams. Ensure both threads are properly threaded, the bobbin is inserted correctly, and the needle is inserted all the way and is not bent. Also, make sure you are not trying to sew over pins without removing them first.
Q9: What is stitch selection and how does it relate to threading?
A9: Stitch selection refers to choosing the type of stitch (e.g., straight stitch, zigzag) and its length and width using the machine’s controls. While stitch selection doesn’t directly affect the initial threading process, choosing the wrong stitch for your fabric can sometimes lead to thread tension issues or skipped stitches, which might make you think there’s a threading problem. Always select the appropriate stitch for your fabric type and project.
Q10: Where can I find a threading demonstration for my specific Brother sewing machine model?
A10: The best place for a threading demonstration is your Brother sewing machine’s threading manual. Many Brother models also have instructional videos available on the Brother website or on YouTube. Searching for your specific model number (e.g., “Brother CS10 threading”) will yield helpful visual guides.
Conclusion: Your Sewing Journey Awaits!
Threading a Brother sewing machine might seem daunting at first, but by following these steps carefully and referencing your threading manual, you’ll soon find it to be a simple and quick process. Remember to focus on the correct thread path, proper sewing machine bobbin winding, and precise upper thread setup and lower thread setup. With practice, you’ll be able to change thread colors with ease and get to the fun part: creating! Happy sewing!