
Image Source: oliverands.com
Easy Steps: How Do You Embroider With A Sewing Machine?
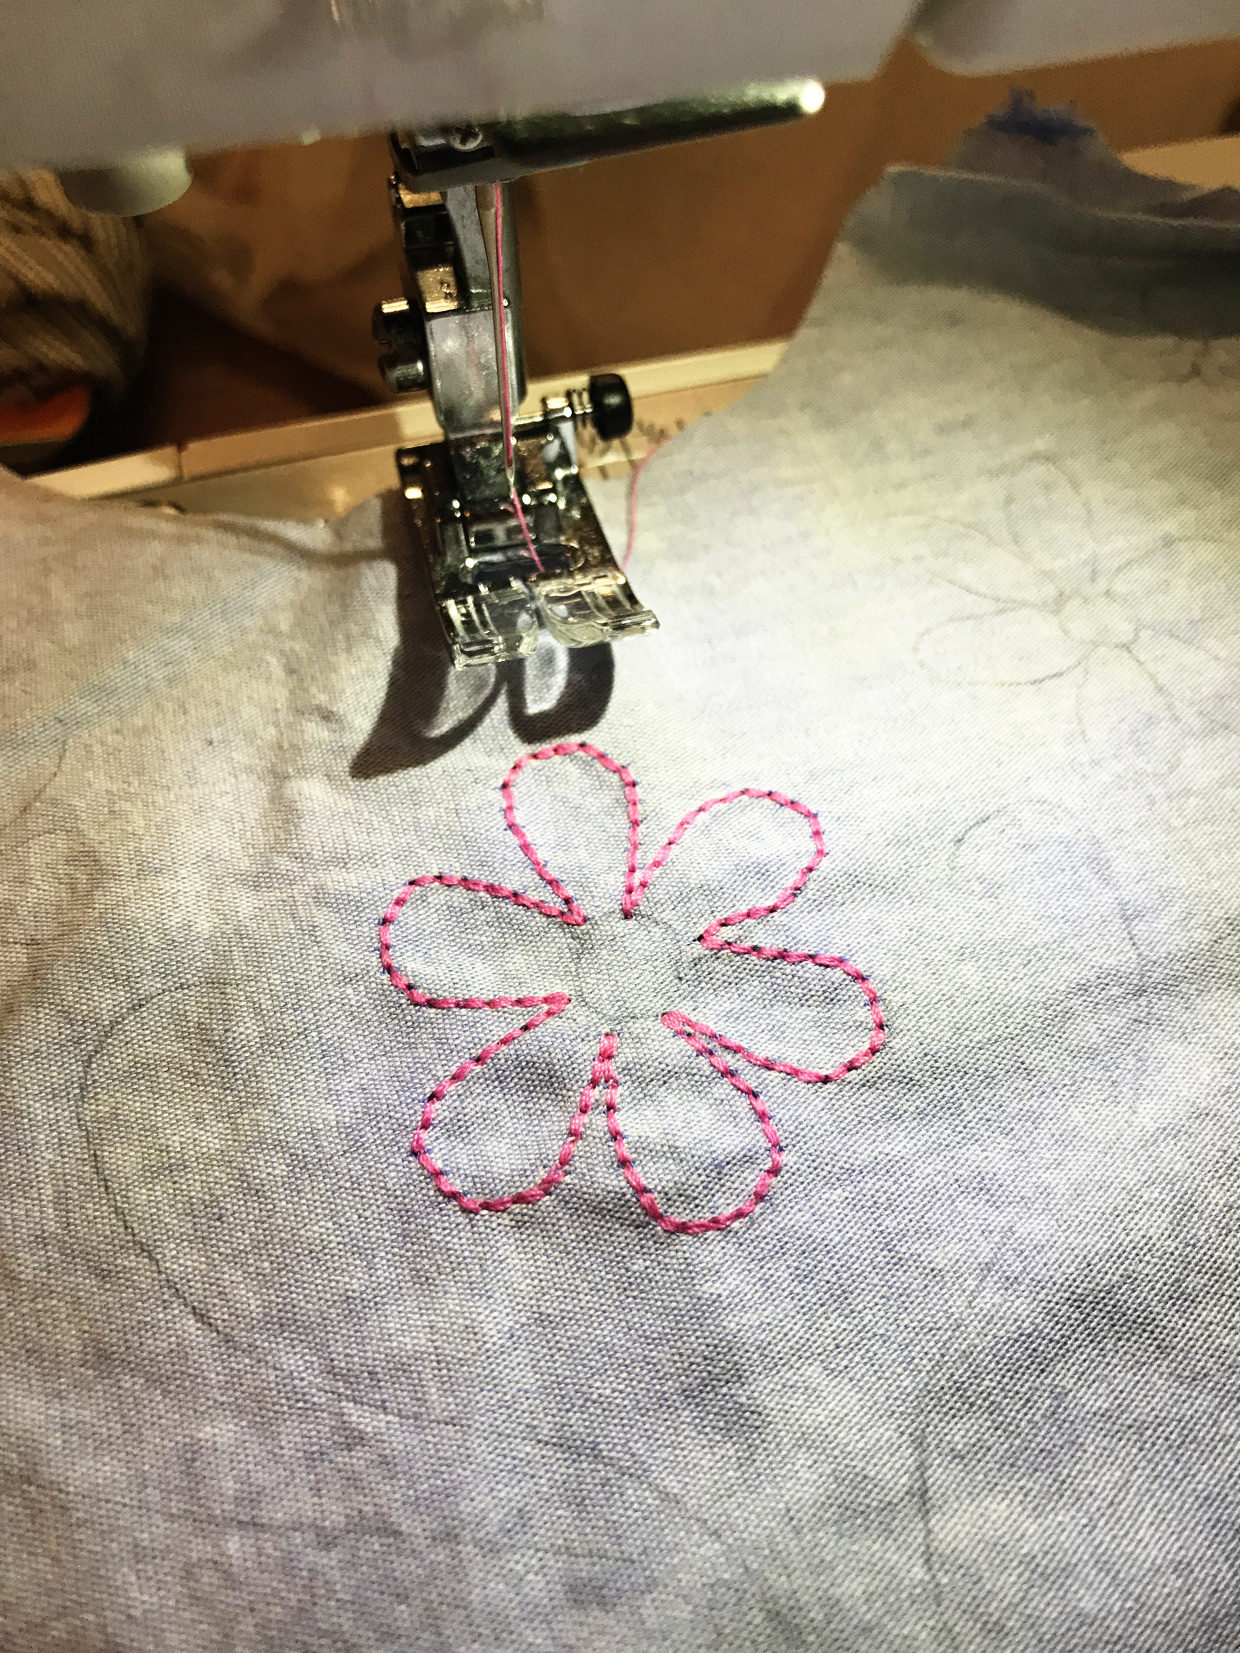
Yes, you can embroider with a regular sewing machine, but it requires a specific technique called free-motion embroidery. While dedicated embroidery machines are designed for this purpose, a standard sewing machine can be adapted. This guide will walk you through the process, covering everything from the essential tools to advanced tips.
Getting Started: What You Need for Sewing Machine Embroidery
Embroidery with a sewing machine opens up a world of creative possibilities, transforming plain fabric into personalized art. Whether you’re adding a name to a baby blanket or creating a unique design on a tote bag, this skill is achievable with the right tools and knowledge. Let’s dive into what you’ll need to begin your embroidery journey.
The Essential Toolkit for Embroidery
To embark on your embroidery adventure with a sewing machine, you’ll need a few key items. These are the building blocks for successful stitching and beautiful results.
- Your Sewing Machine: A reliable sewing machine is your primary tool. While some are better suited than others, most modern machines can be adapted for embroidery.
- Embroidery Hoop: This is crucial for keeping your fabric taut and preventing puckering. Hoops come in various sizes and materials.
- Embroidery Needles: Special needles designed for embroidery are vital. They have a larger eye and a sharper point.
- Embroidery Thread: This thread is stronger and comes in a wider range of colors and finishes than standard sewing thread.
- Stabilizer: This material is placed under or on top of your fabric to support stitches and prevent stretching.
- Seam Ripper: An essential for correcting any mistakes.
- Fabric Shears: Sharp scissors are needed for precise cutting.
- Paper and Pen: For sketching out designs or noting down steps.
- Optional: Embroidery Machine Software: If you’re using a computerized machine that can accept embroidery designs, you might need software to manage and transfer these designs.
Mastering the Basics: Sewing Machine Embroidery Basics
Embroidery with a sewing machine isn’t just about selecting a decorative stitch. It involves a specific technique that gives you control over the needle’s movement, allowing for freehand design creation. This is known as free-motion embroidery.
Preparing Your Sewing Machine for Embroidery
Before you can start stitching, you need to prepare your sewing machine. This involves a few key adjustments to enable free-motion capabilities.
- Lower the Feed Dogs: This is the most critical step. The feed dogs are the little teeth under your presser foot that usually move the fabric forward. For embroidery, you need to disengage them so they don’t advance the fabric. Most machines have a lever or a plate to cover the feed dogs. Consult your sewing machine manual to find out how to do this on your model.
- Change the Presser Foot: You’ll need to switch to a special free-motion or darning foot. This foot has a rounded shape and often a spring mechanism that lifts the foot slightly. This allows the fabric to move freely under the needle without being pushed by the foot.
- Select the Straight Stitch: Even though you’re drawing with your needle, you’ll typically use the straight stitch setting on your machine. The control comes from your hands moving the fabric, not the machine’s feed dogs.
Understanding the Embroidery Hoop Use
The embroidery hoop is your anchor, ensuring your fabric stays flat and stable throughout the stitching process. Proper hoop use prevents your design from becoming distorted.
- Choosing the Right Hoop Size: Select a hoop that is large enough to accommodate your entire design, with a little extra space around the edges. Hoops that are too small can lead to puckering, while hoops that are too large might not hold the fabric as tautly.
- Hooping the Fabric:
- Separate the two parts of your embroidery hoop.
- Place the inner hoop on a flat surface.
- Lay your fabric over the inner hoop.
- Place the outer hoop over the fabric and inner hoop.
- Press down firmly on the outer hoop, working your way around to secure the fabric.
- The fabric should be taut, like a drum. You can test this by gently tapping the fabric; it should feel tight and smooth.
- Trim any excess fabric from around the hoop if it gets in the way, but be careful not to cut too close to the design area.
Selecting the Right Embroidery Thread Types
Embroidery thread is specifically designed to withstand the stresses of embroidery stitches and to provide beautiful, vibrant results. Using the correct thread makes a significant difference.
- Rayon Embroidery Thread: This is the most common type. It’s shiny, strong, and comes in a vast array of colors. It’s a good choice for beginners.
- Polyester Embroidery Thread: This thread is even stronger than rayon and is more resistant to fading and damage from washing and sunlight. It has a slightly less sheen than rayon.
- Cotton Embroidery Thread: Often used for more traditional or vintage-looking embroidery. It has a matte finish and is less shiny.
- Metallic Embroidery Thread: Adds sparkle and texture to designs. It can be a bit trickier to work with and may require a special needle.
Choosing the Best Sewing Machines for Embroidery
While many sewing machines can be adapted for free-motion embroidery, some are particularly well-suited due to their features and build quality.
- Machines with Drop Feed Dogs: This is the most important feature for free-motion embroidery. Ensure your machine has a mechanism to lower the feed dogs.
- Machines with a Larger Throat Space: A larger space between the needle and the machine body (the throat) makes it easier to maneuver larger projects.
- Machines with a Powerful Motor: Embroidery involves many stitches, so a robust motor will prevent overheating and ensure consistent stitch quality.
- Machines with Adjustable Speed Control: Being able to slow down the machine is helpful for detailed work and beginners.
Some popular brands known for their versatile sewing machines that can handle free-motion embroidery include Janome, Brother, Singer, and Pfaff. Always check the machine’s specifications and user reviews to ensure it meets your needs.
Transitioning to Advanced Techniques: Free-Motion Sewing Machine Embroidery
Once you’ve got the basics down, you can start exploring the creative freedom of free-motion sewing machine embroidery. This is where you become the artist, guiding the fabric to create your designs.
The Art of Free-Motion Stitching
Free-motion embroidery is all about control and movement. Your hands guide the fabric, and the sewing machine, with its feed dogs lowered, stitches whatever shape you create.
- Practice Strokes: Before tackling a full design, practice drawing simple shapes like circles, squares, and loops. Get a feel for how much pressure to apply to the foot pedal and how to move the fabric smoothly.
- Controlling Speed: Start slowly. Use the foot pedal to control the machine’s speed. A slower speed gives you more control, especially when you’re learning. As you gain confidence, you can increase the speed slightly.
- Moving the Fabric: Use both hands to gently guide the fabric in the hoop. Think of it as drawing on paper with a pen. Your hands are doing the work, not the machine itself.
- Stabilizing Your Fabric: Even with a hoop, adding stabilizer is essential for free-motion.
- Cut-away Stabilizer: This is a firm material that stays permanently behind the stitching. It’s good for stable fabrics.
- Tear-away Stabilizer: This stabilizer is removed by tearing it away after stitching. It’s suitable for medium-weight fabrics.
- Water-soluble Stabilizer: This type dissolves in water, leaving no residue. It’s great for delicate fabrics or when you want a clean finish on the back.
- Heavyweight stabilizers provide more support for denser stitching.
Understanding Embroidery Machine Needles
The type of needle you use is critical for achieving smooth stitches and preventing thread breakage. Embroidery machine needles are designed differently from standard sewing needles.
| Needle Type | Characteristics | Best Use |
|---|---|---|
| Universal Needle | All-purpose needle, suitable for various fabrics and threads. | Basic sewing and light embroidery. |
| Embroidery Needle | Has a larger eye to accommodate thicker embroidery thread and a sharper point. | For embroidery with rayon, polyester, and metallic threads. |
| Topstitch Needle | Features a larger eye and a longer scarf to help prevent skipped stitches. | Recommended for embroidery thread and for topstitching. |
| Sharp/Microtex Needle | Very sharp point, designed for precise piercing. | Dense embroidery, quilting, or very fine fabrics. |
| Metallic Needle | Has a larger eye and a smoother coating to prevent snagging metallic thread. | For metallic or specialty threads. |
It’s also important to change your needle regularly. A dull or bent needle can cause skipped stitches, thread breaks, and fabric damage. Aim to change your needle after approximately 8-10 hours of embroidery work.
Embroidery Thread Types: A Deeper Dive
The choice of embroidery thread can dramatically alter the look and feel of your finished project. Here’s a closer look at popular types:
- Rayon: Offers excellent sheen and is available in thousands of colors. It’s a great all-around choice for vibrant designs. However, it’s not as strong as polyester and can be more prone to breaking if the machine tension is too tight.
- Polyester: Known for its strength and durability. It’s resistant to UV rays and washing, making it ideal for items that will be frequently used or exposed to the elements. It has a good sheen, though typically less than rayon.
- Cotton: Provides a soft, matte finish. It’s often used for heirloom embroidery, baby items, or when a vintage look is desired. It’s not as strong as synthetic threads and can fade over time.
- Silk: A luxurious option with a beautiful luster and soft drape. It’s delicate and often more expensive, best suited for high-end projects.
- Metallic: Adds a glamorous sparkle. These threads are often coated with metal and can be a bit challenging to work with. They require specific needles and careful tension settings.
- Variegated/Rainbow: These threads change color along their length, creating a beautiful, multi-tonal effect within a single design.
Thread Weight: Embroidery threads are also measured by weight or “weight number.” A lower number indicates a thicker thread.
* 40wt: The standard for most machine embroidery.
* 30wt: A slightly thicker thread that can give bolder designs and may require a larger needle.
* 60wt: A very fine thread, often used for fine detail work or as bobbin thread.
Digitizing Embroidery Designs
For those with computerized sewing machines that can accept embroidery designs, understanding digitizing embroidery designs is key. Digitizing is the process of converting an image (like a JPG or PNG) into a stitch file (like DST, EXP, or PES) that an embroidery machine can read.
- What is Digitizing? It’s essentially translating a digital image into a series of stitch commands. This involves mapping out stitch types, stitch density, thread colors, and stitch direction.
- Professional Digitizing Services: You can hire professional digitizers to convert your artwork into embroidery files.
- Embroidery Software: You can also purchase embroidery software that allows you to create or edit designs yourself. Popular software options include Embrilliance, Wilcom, and Brother’s PE-Design. These programs can range from basic monogramming tools to complex design studios.
- Creating Designs from Scratch: Many software programs allow you to draw or stitch manually within the software, then convert your work into stitch files.
Advanced Tips and Tricks for Better Embroidery
Once you’re comfortable with the basics, try these tips to elevate your embroidery skills.
Stabilizer Usage: Beyond the Basics
Stabilizer is not just a backing; it’s an integral part of a successful embroidery project.
- Temporary vs. Permanent: Cut-away is permanent, tear-away is temporary and removed, and water-soluble disappears. Choose based on fabric type and desired outcome.
- Hoop-Tech vs. Sticky-Back Stabilizer: For very small items or delicate fabrics that are hard to hoop, sticky-back stabilizer (like Sticky-Tear or Sticky-Away) can be used. You hoop the stabilizer, then peel off the backing paper and stick your fabric onto it.
- Layering Stabilizers: For fabrics that stretch a lot (like knits), you might need to use a combination of stabilizers – for instance, a layer of cut-away underneath and a piece of tear-away or water-soluble on top.
- Temporary Adhesive Spray: A spray adhesive can help hold your stabilizer to the fabric and also attach a second layer of stabilizer if needed, providing extra support.
Thread Tension and Bobbin Thread
Proper thread tension is crucial for clean, consistent stitches.
- Check Your Machine Manual: Each machine has its own tension settings. Refer to your manual for guidance.
- Test Swatches: Always test your tension on a scrap of the same fabric you’ll be using for your project.
- Signs of Incorrect Tension:
- Too Loose Top Thread: The bobbin thread will show on the top of the fabric.
- Too Tight Top Thread: The top thread will break easily, or the stitches will look puckered and uneven.
- Bobbin Thread Showing on Top: This usually means your top thread tension is too loose or your bobbin thread tension is too tight.
- Bobbin Thread: Use a good quality bobbin thread, usually a 60wt cotton or polyester. It’s thinner than top thread and less likely to show through your design.
Maintaining Your Embroidery Machine
Regular embroidery machine maintenance will ensure your machine runs smoothly and prolongs its lifespan.
- Cleanliness is Key: Dust and lint are embroidery enemies. After each use, clean around the needle plate, bobbin case, and feed dogs with a small brush.
- Oil Your Machine: Follow your manual’s instructions for oiling. Most machines require oiling in specific points to keep moving parts lubricated.
- Change Needles Regularly: As mentioned, a sharp needle is vital. Change it after every few projects or as soon as you notice any issues.
- Check the Bobbin Case: Ensure the bobbin case is clean and free of lint. If it’s damaged, it might need replacing.
- Thread Path: Make sure the thread path is clear and free of any lint or debris.
- Professional Servicing: Consider having your machine professionally serviced annually, especially if you use it frequently for embroidery.
Troubleshooting Common Embroidery Issues
Even experienced embroiderers encounter problems. Here are solutions to some common issues:
- Skipped Stitches:
- Cause: Dull or bent needle, incorrect needle size for thread, thread snagging, machine needs cleaning/oiling.
- Solution: Change the needle, use the correct needle for your thread type, ensure smooth thread feeding, clean and oil your machine.
- Thread Breaking:
- Cause: Wrong needle, dull needle, incorrect tension, thread snagging, knotting in thread.
- Solution: Use the correct needle, change frequently, adjust tension, ensure smooth thread path, check bobbin winding.
- Puckering:
- Cause: Fabric not hooped tightly enough, insufficient stabilizer, wrong stabilizer type, thread tension too tight.
- Solution: Re-hoop fabric to be very taut, use adequate stabilizer, check and adjust thread tension.
- Bird’s Nesting (Lint Buildup Underneath):
- Cause: Thread tension too loose, lint buildup in the bobbin area or throat plate, needle not inserted correctly.
- Solution: Tighten top thread tension, clean the bobbin area thoroughly, ensure the needle is correctly inserted and seated.
Embroidery Machine Types: A Quick Overview
While we’ve focused on using a standard sewing machine for embroidery, it’s helpful to know the different categories of embroidery machines available.
- Sewing Machines with Embroidery Capabilities: These are your standard sewing machines that can be adapted for free-motion embroidery as described above.
- Embroidery-Only Machines: These machines are dedicated solely to embroidery. They often have larger embroidery areas, more built-in designs, and advanced features for design management.
- Combination Sewing and Embroidery Machines: These are advanced machines that can perform both regular sewing tasks and intricate embroidery. They are a significant investment but offer the most versatility. These machines often come with sophisticated software for editing and creating designs.
When considering an upgrade or a new machine purchase, look for features relevant to embroidery such as stitch count per minute, hoop size options, automatic thread cutters, and the ability to import designs from USB drives. The best sewing machines for embroidery are often those designed with dedicated embroidery features.
Frequently Asked Questions (FAQ)
Q1: Can I really embroider intricate designs with just a regular sewing machine?
A1: Yes, you can! The technique is called free-motion embroidery, where you lower the feed dogs and use your hands to move the fabric under the needle. It takes practice, but you can create beautiful, freehand designs.
Q2: What is the most important step when preparing my sewing machine for embroidery?
A2: The most crucial step is lowering the feed dogs. This stops the machine from automatically moving the fabric, allowing you to guide it manually for embroidery.
Q3: Do I need special thread for machine embroidery?
A3: While you can use regular sewing thread for very simple decorative stitches, for true free-motion embroidery and more detailed designs, it’s highly recommended to use embroidery thread. It’s stronger, has more sheen, and comes in a wider variety of colors.
Q4: How do I keep my fabric from looking messy or puckered during embroidery?
A4: Using an embroidery hoop to keep the fabric taut and applying a suitable stabilizer underneath or on top of the fabric are essential for preventing puckering and ensuring clean stitches.
Q5: What’s the difference between embroidery machine software and regular design software like Photoshop?
A5: Embroidery machine software is specifically designed to create or convert images into stitch files that embroidery machines can read. It deals with stitch types, density, and thread colors, whereas design software like Photoshop focuses on pixel-based images and graphic design elements.
Q6: How often should I change the needle in my sewing machine when embroidering?
A6: It’s a good practice to change your embroidery needle after about 8-10 hours of continuous embroidery work, or as soon as you notice signs of damage like bending or dulling, or issues like skipped stitches.
By following these steps and practicing regularly, you’ll soon be creating stunning embroidered pieces with your sewing machine. Happy stitching!