
Making friendship bracelets is a fun and easy way to create small, colorful gifts for friends and family. So, how to start friendship bracelet making? You just need some colorful strings and a little practice! Anyone can learn how to make these pretty bracelets, even if you are just beginning. You will learn easy friendship bracelet designs in this guide. We will walk you through each step, from picking your string to tying the final knot. Get ready to make some beautiful homemade woven bracelets!
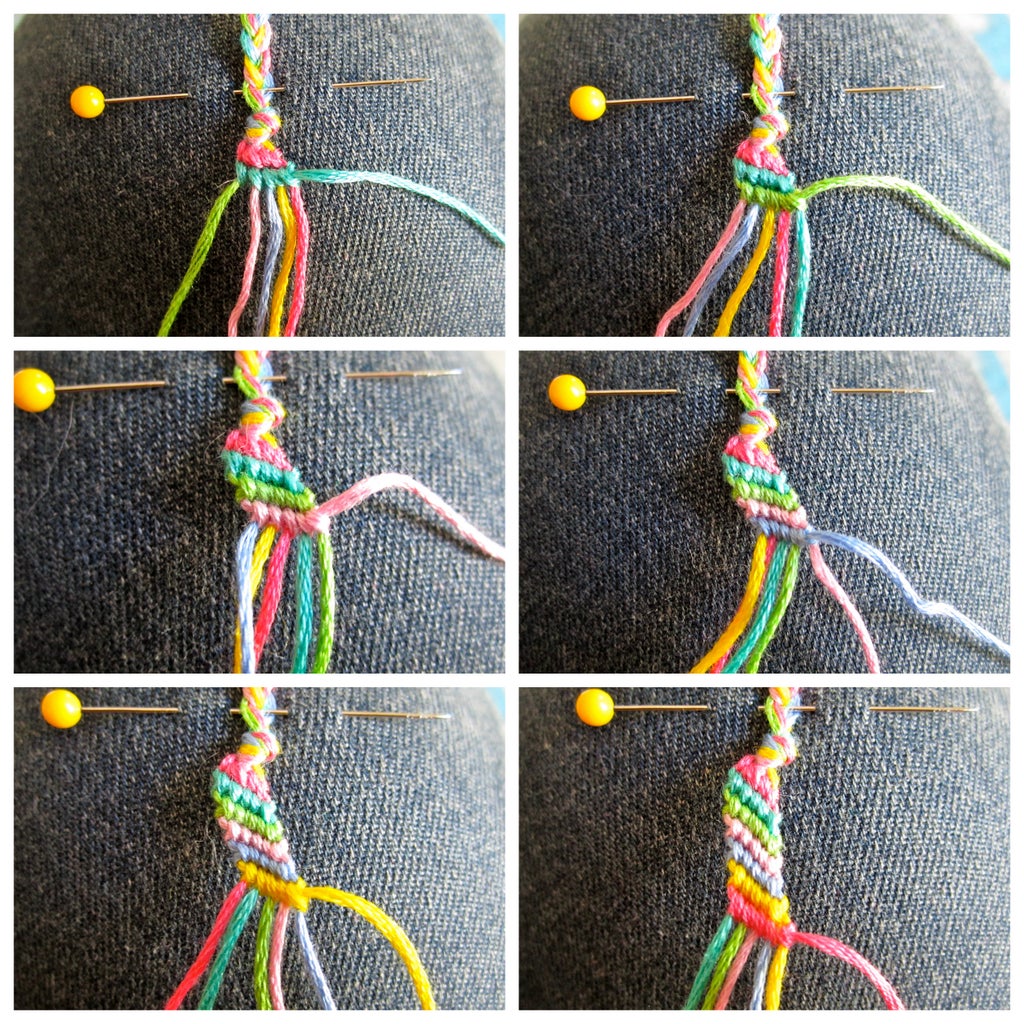
Image Source: content.instructables.com
The Appeal of Friendship Bracelets
Friendship bracelets are more than just pretty jewelry. They are a sign of friendship, often given as gifts. People have made them for a long time. Giving a handmade bracelet shows you care. It is a creative and personal way to connect with others. These bracelets are also a popular part of summer camp bracelet crafts. They are great for all ages.
A Brief Look at Bracelet History
People have worn bracelets for thousands of years. Early ones were made from things like shells, bones, and plants. Over time, people started using fabric and string. Friendship bracelets, as we know them today, became very popular in the 1970s. They were a sign of peace and love. Today, they are still a beloved craft for many.
Why Make Your Own?
Making your own bracelets is very rewarding.
* Personal Touch: You pick the colors and patterns. This makes each bracelet special.
* Mindful Craft: The act of tying knots can be calming. It helps you relax.
* Budget-Friendly: Materials are cheap and easy to find.
* Skill Building: You learn new knotting skills. These skills can be used for other crafts too.
* Thoughtful Gifts: Handmade gifts are always special.
Getting Started: What You Need
Before you dive into a knotted floss bracelet tutorial, gather your supplies. Luckily, you do not need much to start.
Choosing Your Embroidery Floss
Embroidery floss is the best choice for friendship bracelets. It is colorful, strong, and easy to work with.
- Material: It is usually made from cotton. This makes it soft and easy to knot.
- Strands: Each skein of floss has six thin strands twisted together. For most bracelets, you will use all six strands. Sometimes, you might separate them for finer work.
- Colors: Floss comes in hundreds of colors. This lets you make endless embroidery thread bracelet patterns. Pick colors that you love or that mean something special.
Table: Popular Embroidery Floss Brands
| Brand Name | Features | Price Range |
|---|---|---|
| DMC | Wide color range, high quality | Low to Mid |
| Anchor | Smooth, good for detailed work | Low to Mid |
| CXC | Budget-friendly, good for beginners | Very Low |
| Jo-Ann’s Brand | Basic colors, good for practice | Low |
Essential Tools for Bracelet Making
You need only a few tools. These help keep your work neat and tidy.
- Sharp Scissors: You need these to cut your floss. Good scissors make clean cuts.
- Measuring Tape or Ruler: This helps you cut your strings to the right length.
- Clipboard or Safety Pin: These are key for holding your strings. You need to keep them still while you tie knots.
- Clipboard: Clamp your strings to the board. This is very stable.
- Safety Pin: Pin your strings to a pillow, your jeans, or a cushion. This is good for travel.
- Tape: Use strong tape to stick your strings to a table. This also works well.
Preparing Your Strings
Getting your strings ready is the first physical step. This is how to start friendship bracelet making properly.
- Choose Your Colors: Pick 2 to 10 colors. Odd numbers often work best for many easy friendship bracelet designs.
- Cut Your Lengths: A good rule of thumb is to cut each string about 60 inches (150 cm) long. This might seem long, but knots use up a lot of string. It is better to have too much than too little.
- For thicker bracelets, you might need more.
- For very short bracelets, less is okay.
- Gather Strings: Hold all your cut strings together.
- Tie a Loop: Fold the strings in half. Tie an overhand knot about 2 to 3 inches (5-7.5 cm) from the folded end. This makes a loop. This loop will be part of the clasp for your bracelet. Or, you can just tie an overhand knot at one end if you want simple tie-on ends.
- Secure Your Work: Use your clipboard, safety pin, or tape to hold the loop firmly. Make sure your strings hang down freely. Now you are ready to learn the knots!
Learning the Essential Knots: Your Knot Guide
The heart of friendship bracelets lies in simple knots. There are four basic knots. Mastering these will open up many embroidery thread bracelet patterns. This is your friendship bracelet knot guide.
Key Principles of Knotting
- Work String and Base String: In most knots, one string (the “work string”) wraps around another string (the “base string”).
- Consistency: Try to make all your knots the same tightness. This makes your bracelet look even.
- Direction: Pay close attention to the direction of your knots. A small change in direction creates a different knot.
The Four Basic Knots
Each basic knot is made of two half-knots. You will always tie two half-knots to make one full, secure knot.
1. The Forward Knot (F)
This knot moves your work string to the right.
* Step 1 (First half-knot): Take your work string (let’s say string A). Lay it over your base string (string B). Make a “4” shape.
* Step 2: Bring string A under string B and up through the loop of the “4” shape.
* Step 3: Pull string A up and to the right. Slide the knot firmly up to the top.
* Step 4 (Second half-knot): Do steps 1-3 again with the same two strings. This makes one full forward knot. String A will now be to the right of string B.
2. The Backward Knot (B)
This knot moves your work string to the left. It is the opposite of the forward knot.
* Step 1 (First half-knot): Take your work string (string A). Lay it over your base string (string B). Make a backward “4” shape (like a “P”).
* Step 2: Bring string A under string B and up through the loop of the backward “4” shape.
* Step 3: Pull string A up and to the left. Slide the knot firmly up to the top.
* Step 4 (Second half-knot): Do steps 1-3 again with the same two strings. This makes one full backward knot. String A will now be to the left of string B.
3. The Forward-Backward Knot (FB)
This knot keeps your work string in the same place. It is used to change the color of a vertical line.
* Step 1: Make one forward half-knot.
* Step 2: Make one backward half-knot with the same strings.
* Result: The work string ends up in the same place as it started.
4. The Backward-Forward Knot (BF)
This knot also keeps your work string in the same place. It is the opposite of the FB knot.
* Step 1: Make one backward half-knot.
* Step 2: Make one forward half-knot with the same strings.
* Result: The work string ends up in the same place as it started.
Table: Knot Summary
| Knot Type | Symbol | Direction of Work String | How Many Half-Knots | Purpose |
|---|---|---|---|---|
| Forward Knot | F | Right | 2 | Moves color right |
| Backward Knot | B | Left | 2 | Moves color left |
| Forward-Backward Knot | FB | Stays in place | 2 | Changes vertical color, keeps string in line |
| Backward-Forward Knot | BF | Stays in place | 2 | Changes vertical color, keeps string in line |
Practice these knots with two strings until they feel natural. This strong foundation will help you with any DIY string bracelet instructions.
Your First Bracelets: Simple Designs
Now that you know the knots, let’s make some easy friendship bracelet designs. These are perfect for beginners and will help you get comfortable with the process.
1. The Candy Stripe Bracelet
This is one of the simplest and most satisfying bracelets to make. It creates diagonal stripes.
h4 Selecting Strings for Candy Stripe
- Pick at least 3 colors. You can use as many as you like.
- Cut each string about 60 inches (150 cm) long.
- Tie an overhand knot to make a loop at one end. Secure it.
h4 Step-by-Step Candy Stripe Tutorial
- Arrange Your Strings: Lay your strings out in the order you want your colors to appear. For example, if you have red, orange, yellow, green, blue, lay them out like that. This order will repeat across your bracelet.
- Start Knotting:
- Take the first string on the far left (let’s say red). This is your work string.
- Make two Forward Knots (F) around the string next to it (orange). The red string will now be to the right of the orange string.
- Take the same red string. Make two Forward Knots (F) around the next string (yellow). The red string will move further right.
- Continue making two Forward Knots around each string in the row until your red string reaches the far right side.
- New Row: Once the first string reaches the right, it is done with that row. It will stay on the far right for now.
- Repeat: Now, take the new string on the far left (which was originally your second string, orange in our example).
- Use this orange string as your work string.
- Make two Forward Knots around each string to its right, moving it all the way across to the right side, just like you did with the red string.
- Keep Going: Continue this pattern. Each time a string reaches the far right, a new string becomes the leftmost string. This new string then works its way across the row.
- Forming Stripes: You will see diagonal stripes form as you work. Each string creates a diagonal line of its own color.
- Finish: Keep knotting until your bracelet is long enough to fit your wrist.
h4 Tips for a Neat Candy Stripe
- Tight Knots: Pull each knot firmly up to the top. This keeps your rows straight.
- Consistent Tension: Try to pull each knot with the same amount of force.
- Order Matters: Always keep your strings in order. Do not mix them up.
2. The Chevron Bracelet
The Chevron bracelet makes a “V” shape pattern. It is a bit more complex than the candy stripe but still great for beginners.
h4 Selecting Strings for Chevron
- You need an even number of strings, usually 4, 6, or 8.
- Cut each string about 60 inches (150 cm) long.
- Tie an overhand knot to make a loop at one end. Secure it.
h4 Step-by-Step Chevron Tutorial
- Arrange Your Strings: Lay your strings out so that the colors are mirrored from the center.
- Example for 6 strings: Red, Orange, Yellow | Yellow, Orange, Red
- The two middle strings should be the same color (or the ones you want at the center of the “V”).
- Working from the Left:
- Take the leftmost string (Red in our example).
- Make two Forward Knots (F) around the string next to it (Orange).
- Make two Forward Knots (F) around the next string (Yellow).
- The red string should now be next to the center.
- Working from the Right:
- Take the rightmost string (Red in our example).
- Make two Backward Knots (B) around the string next to it (Orange).
- Make two Backward Knots (B) around the next string (Yellow).
- The red string should now be next to the center.
- Joining in the Middle: You now have two strings of the same color (Red) in the middle.
- Take the red string that came from the left.
- Make two Forward Knots (F) around the red string that came from the right. This joins the two sides.
- This completes one “V” or chevron shape.
- New Row: Now, take the new leftmost string (Orange).
- Repeat steps 2-4 with the new outermost strings. Work them towards the center.
- Keep Going: Continue this pattern. Each pair of outermost strings will form a “V” shape and meet in the middle.
- Finish: Keep knotting until your bracelet is long enough.
h4 Tips for a Great Chevron
- Symmetry is Key: Always arrange your strings mirrored from the center.
- Even Knots: Make sure your forward and backward knots are equally tight. This helps the “V” shape look neat.
- Meet in the Middle: Do not forget the final knot to join the two sides in the center.
Beyond the Basics: More Designs and Techniques
Once you are comfortable with the Candy Stripe and Chevron, you can try more complex embroidery thread bracelet patterns. These designs use the same basic knots but combine them in new ways. These are still homemade woven bracelets, just with different styles.
1. The Braided Bracelet
While not strictly knotted like the others, braided cord bracelets are a classic friendship bracelet style. They are very easy to make and look great.
h4 Simple Three-Strand Braid
This is the braid you likely learned as a child.
- Materials: You can use 3 strands of floss. Each can be a different color.
- Prepare: Tie an overhand knot at one end. Secure it.
- Braid: Separate the three strings.
- Cross the left string over the middle string.
- Cross the right string over the new middle string.
- Repeat, always crossing the outer string over the middle string.
- Finish: Braid until it is long enough. Tie an overhand knot to secure the end.
h4 Four-Strand Flat Braid (Square Braid)
This creates a flatter, wider braid.
- Materials: Use 4 strands of floss.
- Prepare: Tie an overhand knot at one end. Secure it.
- Braid: Lay out your four strings: 1 2 3 4.
- Take string 1 (far left). Pass it over string 2, and under string 3. It will end up between 3 and 4.
- Now you have: 2 3 1 4.
- Take string 4 (far right). Pass it over string 1 (the new middle string), and under string 2. It will end up between 2 and 3.
- Now you have: 3 4 2 1. (The order is constantly shifting).
- Repeat the process: take the new far left string, go over the next, under the next. Then take the new far right string, go over the next, under the next.
- Finish: Braid until it is long enough. Tie an overhand knot.
2. The Spiral Staircase Bracelet
This simple knotted floss bracelet tutorial creates a neat spiral shape. It only uses one type of knot!
h4 Getting Ready for Spiral Staircase
- You need two strings. Pick two different colors for a nice effect.
- One string will be the core. The other will be the knotting string.
- Cut the core string about 20-25 inches (50-60 cm) long.
- Cut the knotting string much longer, about 80-100 inches (200-250 cm) long. This string does all the work.
- Tie an overhand knot to make a loop at one end, combining both strings. Secure it.
h4 Step-by-Step Spiral Tutorial
- Identify Strings: Hold your two strings. The shorter one is your “core string.” The longer one is your “work string.”
- Make Forward Knots: Use your work string (the long one). Make two Forward Knots (F) around the core string. Pull them tight.
- Watch it Twist: As you keep making two Forward Knots (F) with the same work string around the core string, you will see the bracelet start to twist. This is normal and creates the spiral.
- Continue: Keep making pairs of Forward Knots. You do not need to change strings or directions. Just keep knotting with the same string around the core.
- Finish: When your bracelet is long enough, tie an overhand knot with both strings at the end.
h4 Tips for a Good Spiral
- Consistent Knots: Make sure each pair of forward knots is equally tight to keep the spiral even.
- No String Swaps: This bracelet only uses one work string around one core string. It’s very simple.
3. Introduction to Patterned Bracelets
Many popular embroidery thread bracelet patterns like hearts, arrows, or diamonds use a mix of all four basic knots. These require careful counting and following charts.
- How they work: These patterns usually have a central design that uses FB or BF knots to change colors in the middle of a row.
- Resources: Look up “friendship bracelet patterns” online. Many websites offer free charts. Each square on a chart shows which string to use and which knot to tie.
- Practice: Start with simpler patterns before trying very complex ones. This helps with your DIY string bracelet instructions journey.
Finishing Your Friendship Bracelet
You have knotted your heart out, and your bracelet is the perfect length. What now? Finishing it neatly is just as important as the knotting itself.
Tying Off the Ends
There are a few ways to secure your bracelet.
-
Simple Tie-On:
- If you started with an overhand knot and no loop: Just tie another overhand knot at the end of your bracelet. Leave about 2-3 inches of loose strings. You can then tie these two ends around your wrist.
- If you started with a loop: Tie an overhand knot at the end of your bracelet, leaving 2-3 inches of loose strings. To wear, push the knot through the loop at the start of your bracelet. Then, use the loose strings to tie a knot around the loop. This makes a secure closure.
-
Braids for Ties:
- After your final knot, split your remaining strings into two groups.
- Braid each group into a simple three-strand braid for about 2-3 inches.
- Tie an overhand knot at the end of each braid.
- These braids can then be tied together to fasten the bracelet. This is popular for summer camp bracelet crafts.
Adding a Button or Loop and Knot Closure
- Button Closure:
- Start with a loop as usual.
- When the bracelet is long enough, tie a sturdy knot.
- Measure the button you want to use. Make sure it can pass through your starting loop.
- Tie an overhand knot about 1 inch from the end of your bracelet. Add the button, then tie another knot to secure it. Trim extra strings.
- Loop and Knot Bar:
- Start with a loop.
- When your bracelet is long enough, take all remaining strings.
- Tie an overhand knot very close to the end of your bracelet. This creates a small knot bar that will fit through your starting loop. Trim excess strings, leaving just enough to tie the knot securely.
Adding Beads (Optional)
You can add beads to your friendship bracelets for extra flair.
- Before Knotting: If the beads have large holes, you can thread them onto your strings before you start knotting. As you work, you can knot around the beads.
- During Knotting: For smaller holes, you might need to use a needle to thread beads onto individual strings as you knot.
- Finishing: You can also string beads onto the loose ends of your bracelet before tying the final knot, then tie a knot to secure them.
Taking Care of Your Homemade Bracelets
Friendship bracelets are meant to be worn, but a little care can make them last longer.
Cleaning Your Bracelet
- Hand Wash: Use mild soap and cool water. Gently rub the bracelet.
- Rinse Well: Make sure all soap is out.
- Air Dry: Lay the bracelet flat on a towel to dry. Do not put it in a dryer, as it might shrink or warp.
- Avoid Bleach: Bleach can ruin the colors and weaken the floss.
Storing Your Bracelets
- Keep Them Separate: If you have many, store them in a way that they do not tangle.
- Cool, Dry Place: This helps prevent mildew or fading.
- Display: Some people hang them on hooks or display them in clear jars.
Tips for Success and More Fun
Making friendship bracelets should be enjoyable. Here are some beginner bracelet making tips to make your journey smoother.
Stay Organized
- Clip Your Work: Always secure your bracelet to a clipboard or other surface. This keeps your strings in order.
- Lay Strings Out: Before starting a row, lay your strings out straight. This helps prevent tangles.
- Bag Your Floss: Keep your extra floss organized by color in a craft box or plastic bags.
Patience is a Virtue
- Take Breaks: If you get frustrated, take a break. Come back with fresh eyes.
- Do Not Rush: Slow and steady makes the best knots.
- Mistakes Happen: If you make a mistake, it is okay. Sometimes you can untie knots. Sometimes you just start over. It is part of learning.
Experiment with Colors and Patterns
- Color Combos: Try different color schemes. Look up color wheels for ideas.
- Pattern Exploration: Once you master the basics, search for more complex embroidery thread bracelet patterns. There are endless designs to try.
- Personalize: Add charms or beads to make your bracelets unique.
Making It a Group Activity
- Friendship Circle: Gather your friends for a bracelet-making session. This is a classic summer camp bracelet crafts activity.
- Gift Making: Make bracelets together as gifts for others.
- Share Skills: Teach each other new knotted floss bracelet tutorial techniques.
Troubleshooting Common Bracelet Problems
Even experienced crafters run into issues. Here are quick fixes for common problems.
Knots Too Loose or Too Tight
- Loose Knots: Pull each half-knot firmly up to the base of the previous knot. Make sure you are pulling the work string, not the base string.
- Too Tight Knots: This is harder to fix. Try to relax your grip. Practice making knots with medium tension. Overly tight knots can make the bracelet stiff and uneven.
Bracelet is Twisting (Except for Spiral)
- This often happens in chevron or candy stripe if your knots are not consistent.
- Make sure you are pulling knots straight up and to the correct side.
- Check that you are doing two half-knots for each full knot.
- Ensure your working string always goes around the base string in the correct direction for F or B knots.
Ends Are Unraveling
- Before Knotting: If you are having trouble with floss unraveling, dip the ends in a tiny bit of clear glue or nail polish. Let it dry before you start.
- During Cutting: Use very sharp scissors to get clean cuts.
Running Out of String
- This is why you cut long strings! If you do run out:
- Tie Off: Tie an overhand knot with the short string.
- Add New String: Take a new, long string of the same color. Lay it next to the old short string and tie the next few knots over both the old short end and the new long string. After a few knots, trim the old short end very close to the bracelet.
- This trick is part of knowing how to start friendship bracelet making like a pro.
Frequently Asked Questions (FAQ)
h4 How long does it take to make a friendship bracelet?
It depends on the design and your skill. Simple designs like the Candy Stripe or Spiral Staircase can take 30 minutes to an hour. More complex patterns can take several hours. Practice makes you faster!
h4 Can I use other types of string besides embroidery floss?
Yes, you can. You can use thin yarn, crochet thread, or even thin paracord for braided cord bracelets. However, embroidery floss is the best for detailed knotted floss bracelet tutorial designs because it is smooth and strong. It holds knots very well.
h4 How long should the strings be?
A general rule for knotted bracelets is 60 inches (150 cm) for each string. If you are a beginner, it is better to have too much string than not enough. For very thick bracelets, you might need more.
h4 What is the best way to secure my bracelet while I am making it?
A clipboard is often the easiest and most stable way to hold your strings. You can also use a safety pin to pin the loop to a pillow, your jeans, or a piece of cardboard. Strong tape on a table also works. Choose what feels most comfortable for you.
h4 Are friendship bracelets waterproof?
Most friendship bracelets made with cotton embroidery floss are water-resistant, not waterproof. They can get wet, but constant exposure to water (like swimming or showering) can make them fade, wear out faster, or even get mildew if not dried properly. It is best to take them off before getting them wet.
h4 Can I add beads to any friendship bracelet pattern?
Adding beads works best with simple patterns like the Spiral Staircase or with basic braids. For intricate embroidery thread bracelet patterns, adding beads can be tricky. It might change the design’s shape. Always check the bead hole size.
h4 What if my string gets tangled?
If your string tangles, gently stop knotting. Lay the bracelet down and carefully untangle the strings. It helps to keep your working area clear and your strings spread out. Using a clipboard can help prevent tangles from the start.
Making friendship bracelets is a rewarding hobby. With these DIY string bracelet instructions and a bit of practice, you will be creating beautiful pieces in no time. Enjoy the process of crafting these small symbols of connection!