
What is embroidery? Embroidery is a fun way to draw pictures with thread. It is like painting, but you use a needle and thread instead of a brush and paint. Can I learn embroidery? Yes, anyone can learn it! You do not need special art skills. It is easy to start. Who is embroidery for? It is for everyone! From kids to adults, new learners to experts, stitching is for you. This guide will show you how to stitch embroidery, step by step. You will learn all the basics. Soon, you will make beautiful thread art.
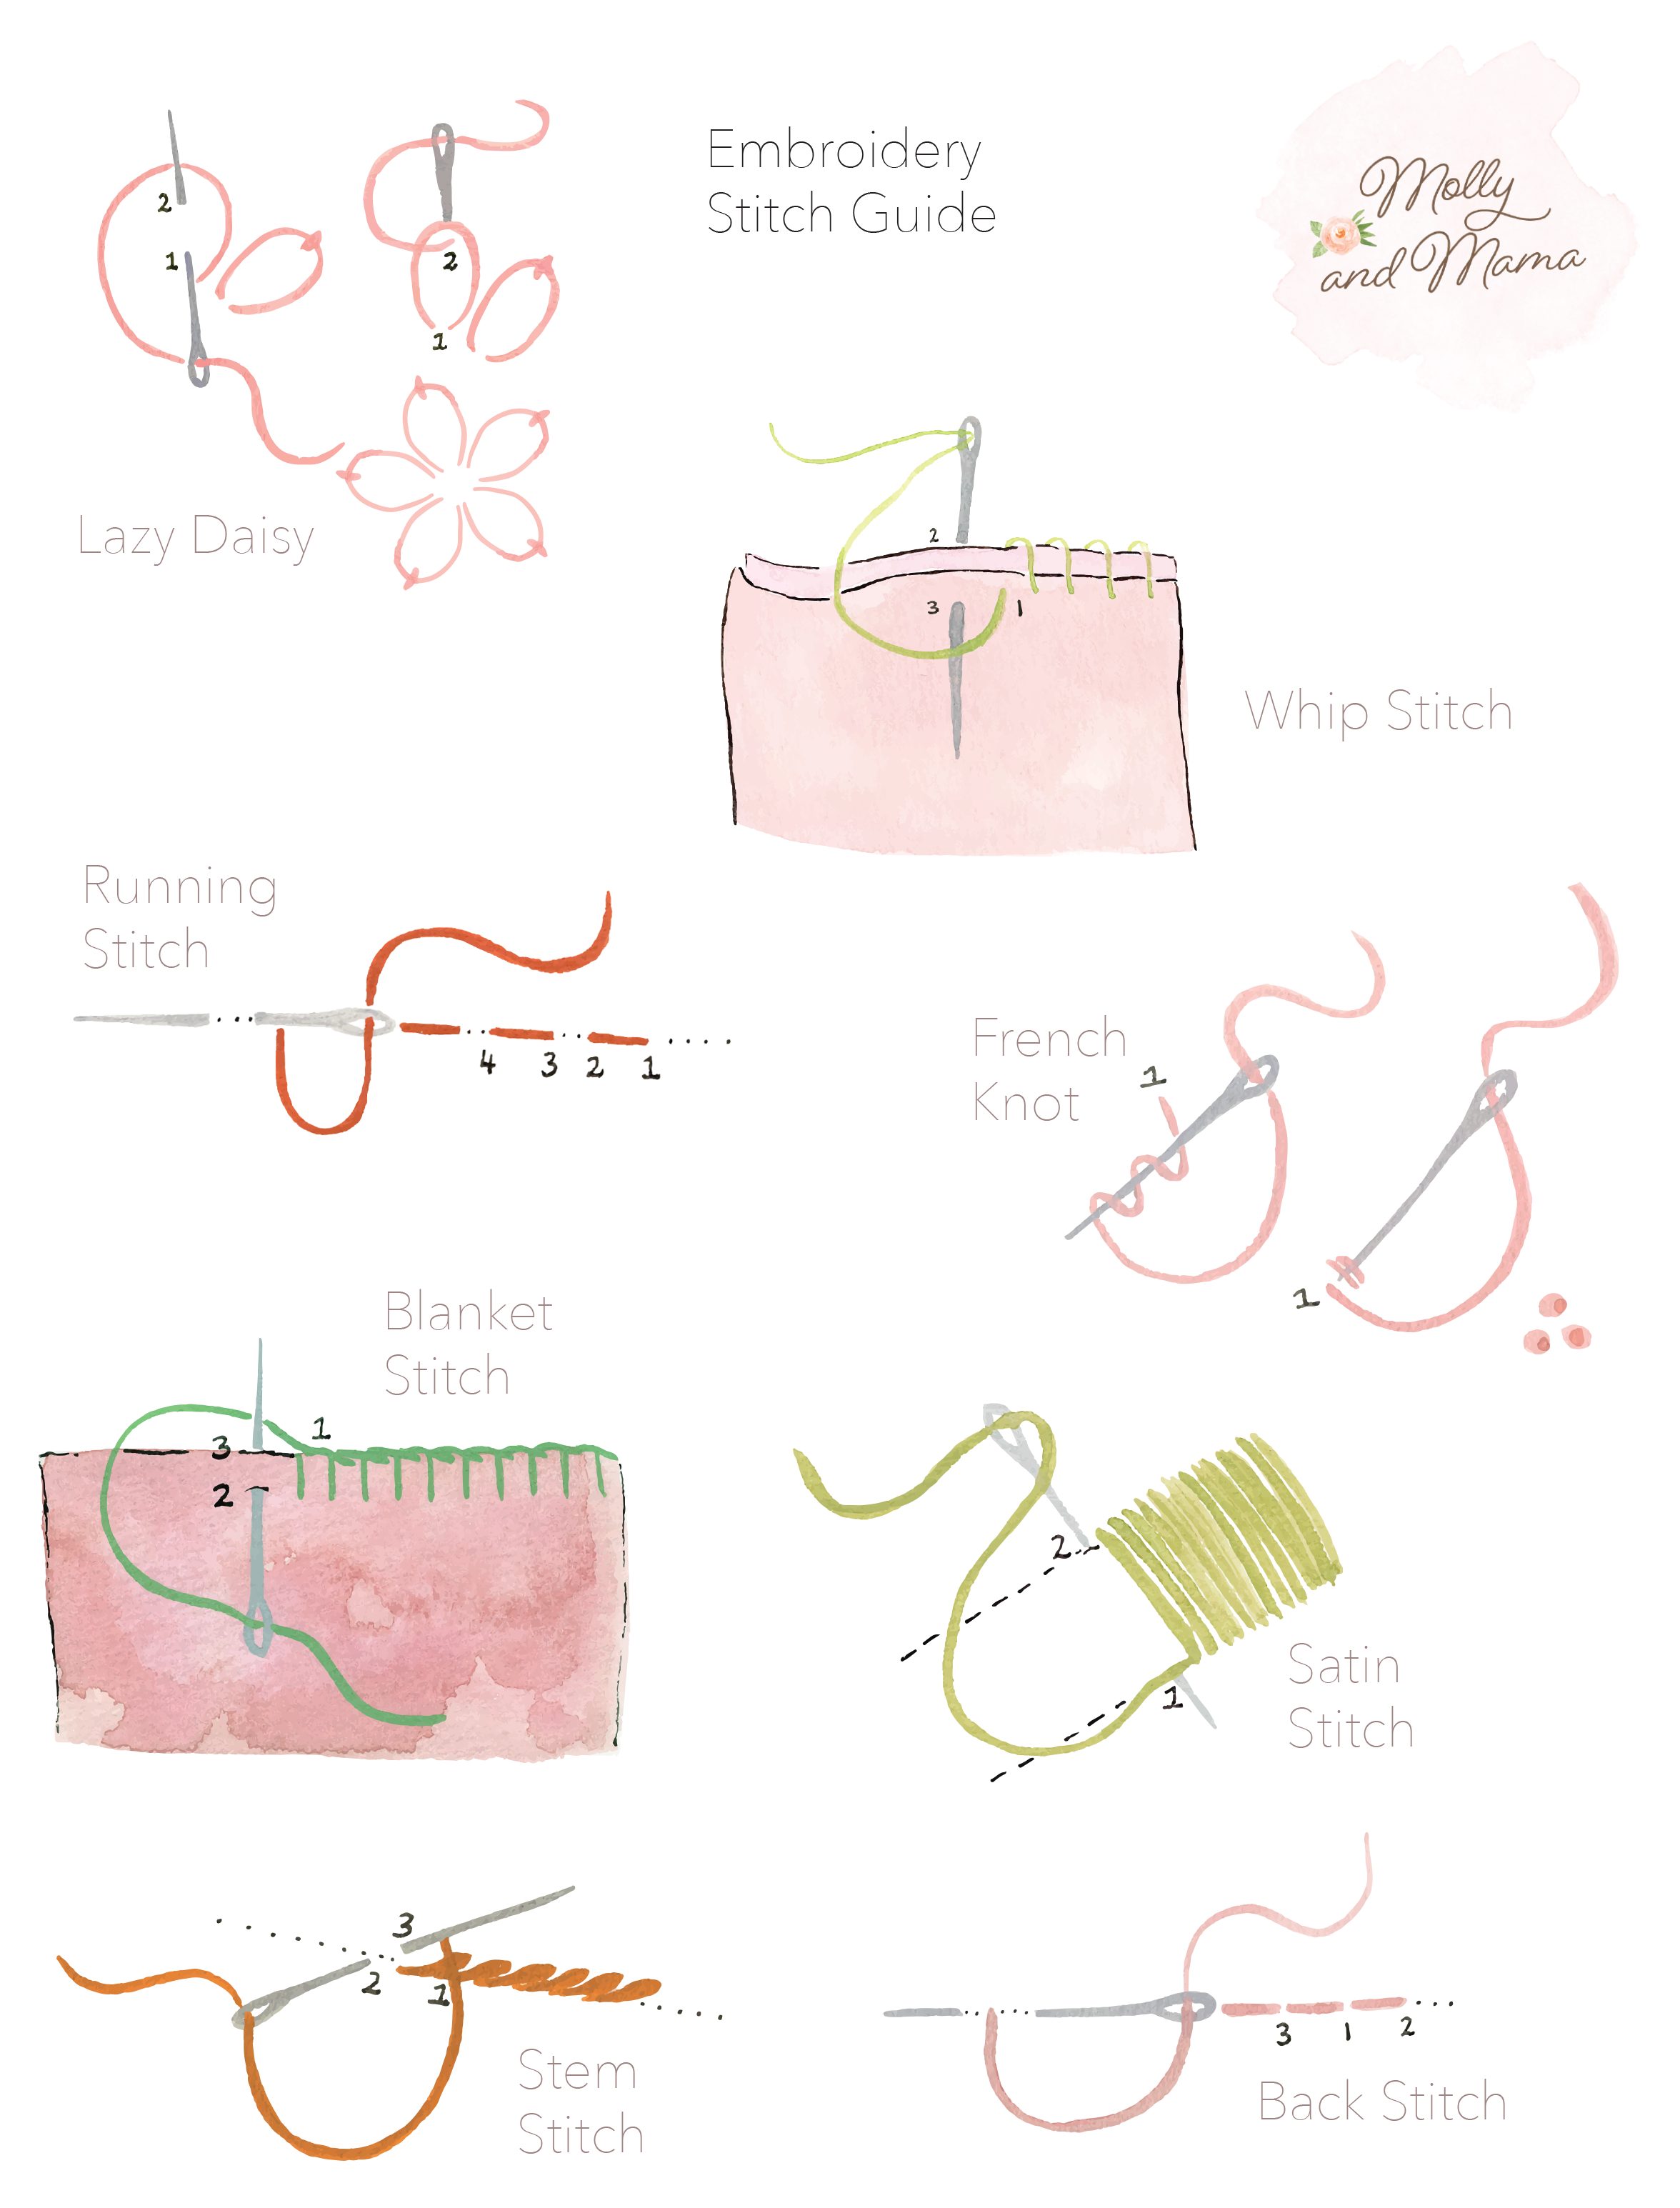
Image Source: b1641835.smushcdn.com
Gathering Your Tools: The Essential Kit
Before you start, you need a few things. Having the right tools makes learning easy. Let’s look at what you need.
Picking Your Fabric: Embroidery Fabric Choices
Fabric is where your art will live. The right fabric makes stitching much easier.
Why Fabric Matters
Fabric holds your stitches. Some fabrics are too loose. Your stitches will not look neat. Some are too tight. Your needle will be hard to push through. We want a fabric that is just right. It should be easy to count threads. It should also hold your stitches firmly.
Common Fabric Types
Many fabrics work well for embroidery. Here are some top picks for you.
- Cotton: This is a very popular choice. It is easy to find. It is not too costly. Cotton fabric is stable. It holds stitches well. It is good for new stitchers. Look for plain cotton. Muslin is a good type of cotton.
- Linen: Linen is also very good. It is strong. It has a nice natural look. Linen can be a bit more costly than cotton. It is great for many designs.
- Aida Cloth: This fabric is special. It has a clear grid pattern. This makes counting squares easy. Aida cloth is perfect for cross-stitch. It also works for other stitches.
- Evenweave Fabric: This fabric has threads that are the same size. They run up and down, and side to side. It is good for projects where you need precise stitches. This is often used for higher-level work.
Choose a fabric that is not too stretchy. A plain, light color is best for new projects. This helps you see your stitches clearly.
| Fabric Type | Good For | Why It Works |
|---|---|---|
| Cotton (plain) | All skill levels | Stable, easy to find, low cost |
| Linen | All skill levels, elegant | Strong, natural look, durable |
| Aida Cloth | Cross-stitch, counted work | Easy to count stitches |
| Evenweave Fabric | Precise, detailed designs | Even threads, good for fine work |
Choosing Your Threads: Embroidery Floss Types
Threads are your “paint.” They come in many colors and types. We call them embroidery floss.
What is Floss?
Embroidery floss is a special thread. It is made for hand stitching. Most floss has six strands twisted together. You can separate these strands. This lets you choose how thick your stitch will be.
Main Types of Floss
There are many kinds of embroidery floss.
- Cotton Floss (DMC or Anchor): This is the most common type. It is made of mercerized cotton. This makes it shiny and strong. Brands like DMC and Anchor are popular. They have hundreds of colors. This floss is easy to use. It gives a nice, smooth look. It is perfect for basic embroidery stitches.
- Pearl Cotton: This floss cannot be separated. It comes in one strand. It has a shiny, twisted look. It is good for outlines. It also makes bold stitches. It comes in different sizes.
- Silk Floss: Silk floss is very shiny. It feels soft. It costs more than cotton. It makes beautiful, fancy stitches.
- Metallic Floss: This floss has a sparkle. It is good for accents. It can be tricky to work with. It tends to fray more easily.
- Wool Floss: This is a thicker, softer floss. It gives a textured look. It is good for larger designs.
For new stitchers, cotton floss (like DMC) is best. It is easy to use. It comes in many colors. You will use it for most of your projects.
| Floss Type | Key Feature | Best For |
|---|---|---|
| Cotton Floss | Many colors, separable | All general embroidery, very versatile |
| Pearl Cotton | Shiny, non-separable | Outlines, bold stitches, texture |
| Silk Floss | Very shiny, soft | Elegant designs, delicate work |
| Metallic Floss | Sparkly | Adding shine, highlights |
| Wool Floss | Thick, textured | Rug hooking, textural designs, bold fills |
Selecting Your Needles: Embroidery Needle Sizes
Needles push the thread through the fabric. Choosing the right needle helps a lot.
Needle Basics
Embroidery needles have a sharp point. This helps them go through fabric easily. They also have an eye. This is the hole where you put the thread. The eye needs to be big enough for your floss.
Picking the Right Size
Needles come in different sizes. The size number tells you about the needle. A higher number means a thinner needle. A lower number means a thicker needle.
- Embroidery Needles (Sharps): These needles have a sharp point. They are good for most fabrics. They come in sizes like 1 to 10. Size 7 or 8 is a good start. These work well with cotton floss.
- Tapestry Needles: These needles have a blunt (not sharp) point. They are used for counted fabrics like Aida. They do not pierce the fabric threads. They go between them. They also have a larger eye.
- Chenille Needles: These are like sharp needles. But they have a larger eye. They are good for thicker threads. They are also good for ribbons.
Match your needle to your fabric and thread. A thin needle is good for fine fabric and one strand of floss. A thicker needle works for thicker fabric and more strands of floss. Using the right needle makes stitching easier on your hands. It also protects your fabric.
| Needle Type | Point Type | Eye Size | Best For |
|---|---|---|---|
| Embroidery Needles | Sharp | Medium | Most fabrics, general hand embroidery |
| Tapestry Needles | Blunt | Large | Counted cross-stitch, Aida, evenweave |
| Chenille Needles | Sharp | Large | Thicker threads, ribbon embroidery |
Using Your Hoop: Embroidery Hoop Usage
An embroidery hoop keeps your fabric tight. This is very important for neat stitches.
Why Hoops Help
Imagine drawing on a crinkled paper. It would be hard, right? An embroidery hoop does the opposite. It makes your fabric flat and taut. This helps your stitches lie smooth. It keeps your fabric from puckering. It also makes it easier to push your needle through.
How to Set Up Your Hoop
Hoops are usually two rings. One ring fits inside the other.
- Loosen the Screw: On the outer ring, there is a small screw. Turn it to loosen the ring.
- Separate the Rings: Take the inner ring out of the outer ring.
- Place Fabric: Lay your fabric over the inner ring. Make sure your design is in the middle.
- Add Outer Ring: Put the outer ring over the fabric and inner ring. Push it down firmly. The fabric should be held tightly between the two rings.
- Tighten the Screw: Pull the fabric gently. Make sure it is drum-tight. There should be no wrinkles. Then, tighten the screw firmly. Do not overtighten. This can stretch your fabric.
Hoops come in wood or plastic. Wood hoops are classic. They hold fabric well. Plastic hoops are also good. They are often cheaper. Choose a hoop size that fits your design. But also pick one that is easy to hold.
Preparing Your Art: Getting Your Design Ready
You have your tools. Now you need a design. You can draw your own or use a pattern. You need to put this design onto your fabric. This is called transferring embroidery patterns.
Putting Designs on Fabric: Transferring Embroidery Patterns
There are many easy ways to get your design onto your fabric.
Simple Ways to Transfer
- Light Box or Window Method: This is super easy. Tape your design to a window. Tape your fabric over the design. The light shines through. You can see the design. Use a water-soluble pen or pencil to trace it. This works best for light fabrics.
- Tracing Paper Method: Draw your design on tracing paper. Pin the tracing paper to your fabric. Stitch through both the paper and fabric. When you are done, gently tear away the paper. This is good for small, simple designs.
- Water-Soluble Pens/Pencils: These pens draw on fabric. The lines wash away with water when you are done. They are great for freehand drawing on fabric. Or use them with a light box.
- Iron-On Transfers: You can buy patterns that you iron onto fabric. Follow the package directions. These are quick. But they might not be reusable. Make sure the heat won’t hurt your fabric.
- Carbon Paper for Fabric: Place carbon paper (made for fabric, not office paper) between your design and fabric. Draw over your design lines. The carbon will transfer the design. Test it first on a scrap. Make sure it will wash out.
Tips for Clear Lines
- Always test your transfer method. Use a scrap piece of your fabric. This makes sure the lines show up. It also checks if they wash out.
- Use light marks. Do not press too hard. Heavy lines can be hard to remove.
- Make sure your fabric is flat. Iron it before you transfer.
Making Stitches: Hand Embroidery Techniques
Now for the fun part: stitching! You will learn some key hand embroidery techniques. These stitches are the building blocks of most embroidery.
Learning Key Stitches: Basic Embroidery Stitches
Let’s start with stitches that are easy to learn. Each stitch makes a different line or shape.
The Running Stitch
This is one of the simplest stitches. It makes a dashed line. It is great for outlines or thin lines.
- Bring Needle Up: Push your needle up from the back of the fabric. It should come up at your starting point. Pull the thread all the way through.
- Go Down: Make a small stitch. Push your needle down into the fabric a short way from where you came up.
- Come Up Again: Move a bit along your line. Bring your needle up again. Keep the space the same.
- Repeat: Keep going down and up. This makes a line of small, even stitches. Leave a small space between each stitch.
The Backstitch
The backstitch makes a solid line. It is perfect for outlines. It is very neat.
- Start: Bring your needle up at point A. This is the start of your line.
- Go Back: Make a stitch forward to point B. This is one step along your line. Push your needle down at B.
- Come Up Ahead: Now, move forward on your line. Bring your needle up at point C. Point C should be the same distance from B as B is from A.
- Go Back to Fill Gap: Push your needle down into point B again. This fills the gap. You are stitching backwards.
- Repeat: Bring needle up at point D. Go down at point C. Keep making stitches this way. Your line will be solid.
The Stem Stitch
The stem stitch makes a ropelike line. It is great for stems of flowers. It also makes nice outlines.
- Come Up: Bring your needle up at point A.
- Make a Bite: Go down at point B. Come up at point C. Point C should be halfway between A and B. It should be just below the line you are making.
- Pull Through: Pull your thread through. Make sure the thread stays on one side of the needle. (Usually below).
- Next Bite: For the next stitch, go down where your last stitch ended (B). Come up halfway along the new stitch.
- Repeat: Keep going. Each stitch should link to the last one. This creates a neat, twisted line.
The Satin Stitch
This stitch fills a shape with smooth color. It makes a very shiny surface. It is often used for leaves or petals.
- Outline (Optional): You can outline your shape first with a backstitch. This helps keep your edges neat.
- Stitch Across: Bring your needle up on one side of your shape.
- Go Down: Push your needle down on the exact opposite side of the shape.
- Come Up Next: Bring your needle up very close to your first stitch. It should be right next to it.
- Repeat: Keep making parallel stitches across the shape. They should lie very close together. There should be no gaps. All stitches should go in the same direction. This makes a smooth, satin-like surface.
The French Knot
The French knot makes small, round dots. It is good for flower centers or eyes. It adds texture.
- Come Up: Bring your needle up at point A.
- Wrap Thread: Hold the thread taut with one hand. With the other hand, wrap the thread around your needle two or three times. (Two wraps for a small knot, three for a bigger one).
- Go Down Near Start: Keeping the thread taut, put your needle back into the fabric. Do not go into the exact same hole. Go very close to it.
- Pull Through: Slowly pull your needle through to the back. Keep the wrapped thread held tight until the last moment. This makes a neat knot on the surface.
The Lazy Daisy
This stitch makes a simple petal or leaf shape. It is a loop stitch.
- Come Up: Bring your needle up at point A (the base of the petal).
- Loop and Go Down: Make a loop with your thread. Hold it with your thumb. Put your needle back into the fabric very close to point A.
- Come Up at Tip: Bring your needle up at point B (the tip of the petal). Make sure the needle goes over the loop you made.
- Catch Loop: Pull the thread through. This will form the loop. Now, make a tiny stitch over the tip of the loop. Push your needle down just over the top of the loop. This holds the loop in place.
- Finish: Bring your needle down to the back. Your petal is done.
Keeping Stitches Neat: Embroidery Tension Tips
Embroidery tension tips are key to beautiful work. Good tension makes your stitches look even. Bad tension can make your fabric pucker or your stitches loose.
What is Tension?
Tension is how tightly you pull your thread. Every time you make a stitch, you pull the thread. The amount of pull is your tension.
How to Keep It Right
- Gentle Pulls: Do not yank your thread. Pull it just enough so the stitch lies flat. It should not pull the fabric.
- Even Pulls: Try to pull each stitch with the same force. This makes all your stitches look the same size.
- Check the Back: Look at the back of your work. It should look neat. If it is messy, your tension might be off.
- Hoop Helps: Make sure your fabric is tight in the hoop. A loose hoop makes it hard to keep good tension.
- One Stitch at a Time: Focus on each stitch. Pull it to the right tension. Then move to the next.
- Beware of Knots: If your thread gets knotted on the back, stop. Undo the knot. Then continue. Knots can mess up your tension.
- Don’t Overload Needle: Use a length of floss that is easy to manage. About 18 inches (45 cm) is a good length. Longer threads can tangle. They can also affect your tension.
Good tension comes with practice. Do not worry if your first stitches are not perfect. Keep trying!
Starting Your Craft: Beginner Embroidery Projects
Now you know some stitches. You have your tools. What should you make first? Here are some beginner embroidery projects. They are simple and fun.
First Projects to Try
Simple Sampler
A sampler is a piece of fabric where you practice stitches. It is a great way to start.
- Get a Square of Fabric: Choose a plain cotton fabric. A 6×6 inch (15×15 cm) square is a good size.
- Draw Lines: Use a ruler and a washable pen. Draw several parallel lines on the fabric. Leave space between them.
- Practice Stitches: Use different colored floss. Stitch a line of running stitch. Then a line of backstitch. Then stem stitch. And so on. Fill your fabric with rows of practice stitches. This helps you learn each one. It also helps you get good embroidery tension tips by practicing.
Name Tag or Monogram
Make something useful and personal! Stitch your name or an initial.
- Choose an Item: A small cloth bag, a napkin, or a piece of clothing.
- Transfer Letter: Draw your initial or name on the fabric. Use a backstitch to outline the letter.
- Fill In: If you want, you can fill the letter with satin stitch. Or use small French knots for texture. This is a nice way to practice basic embroidery stitches.
Small Flower
A simple flower design is lovely.
- Draw a Flower: Draw a small, simple flower. It can be a daisy shape. Or a simple rose.
- Stitch Petals: Use lazy daisy stitch for petals. Or satin stitch for a fuller petal.
- Add Center: Use a French knot for the flower’s center.
- Add Stem: Use a stem stitch for the stem.
These projects are quick. They help you build confidence. You will see how much you learn with each stitch!
Finishing Your Work: Caring for Your Creation
You have finished your stitching! What is next? You need to make sure your art lasts. This is called finishing embroidery.
Completing Your Piece: Finishing Embroidery
Proper finishing makes your embroidery look its best. It also keeps it safe.
Taking Off the Hoop
- Loosen the Screw: Carefully loosen the screw on your embroidery hoop.
- Remove Fabric: Take your fabric out of the hoop. It might have a slight hoop mark. This is normal.
Cleaning Your Work
- Wash Gently: If your fabric has pen marks or is a bit dirty, you can wash it. Use cool water and a mild soap. Do not rub hard. Just gently swish it.
- Rinse Well: Rinse all the soap out.
- Press Dry: Do not wring it. Place your embroidery on a clean towel. Roll the towel up. Press gently. This takes out most of the water.
- Air Dry Flat: Unroll the towel. Lay your embroidery flat on a clean, dry surface. Let it air dry completely.
Ironing
Once dry, iron your embroidery.
- Place Face Down: Put your embroidery face down on a clean, soft towel.
- Use Low Heat: Set your iron to a low to medium heat. Use steam if your fabric can take it.
- Iron from Back: Gently iron the back of your embroidery. The towel protects the stitches. It helps them stay raised. Do not press too hard.
Showing Off Your Art
How you show your embroidery is up to you!
- In the Hoop: Many people keep their finished piece in the hoop. You can paint or wrap the hoop. Add a ribbon to hang it.
- Framed: You can put your embroidery in a picture frame. Make sure to choose a frame that fits your piece.
- Sewn onto Items: Stitch your piece onto a pillow, a bag, or a piece of clothing. This makes it part of a larger item.
Growing Your Skills: Next Steps for Stitchers
You have learned the basics. You have made a project. What is next? Embroidery has endless possibilities.
Playing with Color
Try different colors in your designs. Think about colors that go well together. Use shades of one color for depth. Use bright colors for a bold look.
Adding Layers
Once you are good with basic stitches, try layering them. For example, stitch a background in running stitch. Then stitch a flower on top with satin stitch. This adds richness.
Using Different Floss
Experiment with different embroidery floss types. Try pearl cotton for outlines. Use metallic floss for sparkle. See how different threads change the look of your design.
Remember, practice makes perfect. Keep stitching. Try new designs. Most importantly, have fun with your needle and thread!
Common Questions About Stitching
How do I keep my thread from tangling?
Thread tangling is common. Use shorter lengths of floss. About 18 inches (45 cm) is good. If it starts to twist, let your needle hang. Let it spin freely. This will untwist the thread. You can also use thread conditioner. It is a wax that helps the thread glide.
What if I make a mistake?
Do not worry! Everyone makes mistakes. You can use small scissors or a seam ripper. Gently snip the stitches you want to remove. Pull them out with tweezers. Then, simply stitch again. Embroidery is forgiving.
Can I use a sewing machine for embroidery?
Yes, you can! But this guide is about hand embroidery techniques. Machine embroidery is a different skill. It uses special machines. These machines create designs very fast. Hand embroidery is slower. It gives a handmade, unique feel. Most new learners start with hand embroidery.
How do I store my floss?
Keep your floss neat. You can wrap it around cardboard bobbins. Then put the bobbins in a storage box. This keeps colors tidy. It also stops tangles. Label your bobbins with the color numbers. This makes it easy to find them.
How do I choose the right embroidery needle sizes?
Choose a needle that goes through your fabric easily. It should not leave a big hole. The eye of the needle should be big enough for your thread. If you use one strand of floss, use a thinner needle. If you use six strands, use a thicker needle. A size 7 or 8 embroidery needle is a good starting point for most cotton floss and fabric.