
Image Source: content.instructables.com
Easy: How To Make A Friendship Bracelet With Embroidery Floss
Making a friendship bracelet is a fun hobby. It is also easy to learn. Many people ask, “What is a friendship bracelet?” It is a bracelet made from threads. Friends give them to each other. They show a special bond. “Can I really make one?” Yes, anyone can make one! You just need some string and a little patience. “Who makes friendship bracelets?” People of all ages make them. Kids love them. Adults enjoy them too. They are great for gifts. They are also fun to wear. Let’s learn how to make these simple, pretty bracelets.
Why Make Friendship Bracelets?
Friendship bracelets are more than just pretty things. They carry special meaning. Each knot you tie puts love into the bracelet. Giving one shows you care. It is a sign of lasting friendship. It reminds people of good times. Making them is a calming craft. It helps you relax. It lets you be creative. You can choose many colors. You can make many patterns. They are great for gifts. They are also perfect for yourself.
Gathering Your Craft Floss Supplies
Before you start, you need the right tools. Good tools make crafting easy. You do not need many things. Most items are easy to find.
Essential Materials
- Embroidery Floss: This is the main part. It comes in many colors. Pick colors you like. You can use 3, 6, or more colors. The common size is 6-strand floss.
- Scissors: You need them to cut the floss. Sharp scissors work best.
- Tape or Clip: You need something to hold your work. A clipboard works well. You can also use masking tape. Safety pins can attach it to a pillow or jeans. This holds the strings still.
Helpful Extra Items
- Measuring Tape or Ruler: This helps you cut the right length of floss.
- Beads: You can add beads for extra style. Make sure the hole fits your floss.
- Jewelry Glue: A tiny drop can secure knots. It helps if a knot seems loose.
- Pillow or Cardboard: These can be a good surface to work on. They let you pin your bracelet down.
Before You Start Knotting: Preparations
Good prep makes knotting easier. Take your time with these steps.
Choosing Your Colors
Pick colors that go well together. Think about who the bracelet is for. What colors do they like? You can use bright colors. You can use soft colors. Some patterns look best with high contrast. Others look nice with colors that are close. For your first bracelet, choose just two or three colors. This keeps things simple.
Cutting Your Floss
This is very important. Cut the floss to the right length. If it is too short, you cannot finish. If it is too long, it can tangle. A good rule is to cut each strand about 60 inches long. This is about 150 centimeters. If you are making a very long or thick bracelet, you may need more.
Table: Floss Length Guide
| Bracelet Type | Number of Colors | Floss Length Per Strand (approx.) |
|---|---|---|
| Simple Flat | 2-3 | 60 inches (150 cm) |
| Wider Flat | 4-6 | 60-70 inches (150-175 cm) |
| Chevron | 4-6 (paired) | 70-80 inches (175-200 cm) |
| Braided (thicker) | 6+ | 60 inches (150 cm) |
For many patterns, you fold the floss in half. So, 60 inches becomes 30 inches when folded. This means you need half as many cut strands as final strands. For example, a 6-strand bracelet will use 3 strands of 60-inch floss. Each strand is folded in half. This gives you 6 working strands.
Setting Up Your Work Area
Once cut, line up your strands. Make sure they are even. Tie a simple knot at one end. Leave about 3-4 inches (7-10 cm) of a tail before the knot. This tail will be part of the closure.
Secure this knot. You can tape it to a table. You can clip it to a clipboard. You can pin it to a pillow. Make sure it is firm. It should not move when you pull on the strings. This is your starting point. Now you are ready to learn how to make handmade woven bracelets.
Mastering Beginner Knotting Techniques
All friendship bracelets use simple knots. You only need to learn one or two. Then you can make many patterns. These are great beginner knotting techniques.
The Forward Knot (F or FK)
This knot goes to the right. It is also called a “right-hand knot.”
- Pick Your Strings: Hold two strings. One is your “knotting string.” This is the one you will move. The other is your “base string.” This one stays still.
- Make a “4”: Take your knotting string. Lay it over your base string. It should look like the number “4.”
- Go Under and Through: Push the knotting string under the base string. Then pull it up through the loop of the “4.”
- Pull Tight: Pull the knotting string up and to the right. Make it snug against the top.
- Repeat: Do this exact same step one more time. You need two “4” shapes and two pulls to make one full forward knot. This makes it strong.
Why two knots? One knot can slip. Two knots make a solid, secure knot. This is true for all friendship bracelet knots.
The Backward Knot (B or BK)
This knot goes to the left. It is also called a “left-hand knot.” It is the opposite of the forward knot.
- Pick Your Strings: Again, choose a knotting string and a base string.
- Make a “P”: Take your knotting string. Lay it over your base string. It should look like the letter “P.”
- Go Under and Through: Push the knotting string under the base string. Then pull it up through the loop of the “P.”
- Pull Tight: Pull the knotting string up and to the left. Make it snug against the top.
- Repeat: Do this exact same step one more time. You need two “P” shapes and two pulls for one full backward knot.
The Forward-Backward Knot (FB or FBLK)
This knot creates a straight line of color. It is often used to bring a color across.
- First Half: Make one forward knot. So, make one “4” shape. Pull it tight.
- Second Half: Now, make one backward knot. So, make one “P” shape. Pull it tight.
You have made one full forward-backward knot. The color of the knotting string should now be sitting to the left of the base string.
The Backward-Forward Knot (BF or BFLK)
This knot is also for moving a color. It is the opposite of the forward-backward knot.
- First Half: Make one backward knot. So, make one “P” shape. Pull it tight.
- Second Half: Now, make one forward knot. So, make one “4” shape. Pull it tight.
You have made one full backward-forward knot. The color of the knotting string should now be sitting to the right of the base string.
These four knots are the basics. Master these, and you can make almost any friendship bracelet knot types and patterns.
Friendship Bracelet Knot Types: Common Patterns
Now that you know the basic knots, let’s make patterns! These are some classic DIY string bracelet ideas.
The Flat Stripe Pattern
This is the easiest pattern. It is perfect for beginners.
- Set Up: Use three or more colors. Arrange them in the order you want the stripes to appear. For example, Red, Blue, Green, Yellow.
- Knotting:
- Take the first string (Red). It is your knotting string.
- Make two forward knots on the second string (Blue).
- Then, make two forward knots on the third string (Green).
- Next, make two forward knots on the fourth string (Yellow).
- Your red string is now at the far right.
- New Row: Now, the blue string is the first on the left.
- Take the blue string. Make two forward knots on the green string.
- Make two forward knots on the yellow string.
- Make two forward knots on the red string.
- The blue string is now at the far right.
- Keep Going: Continue this process. Always take the leftmost string. Use it to make two forward knots on every other string. Keep going until that string is on the far right. Then start with the new leftmost string.
This makes neat stripes. The order of colors will repeat. This is a very satisfying pattern for a first bracelet.
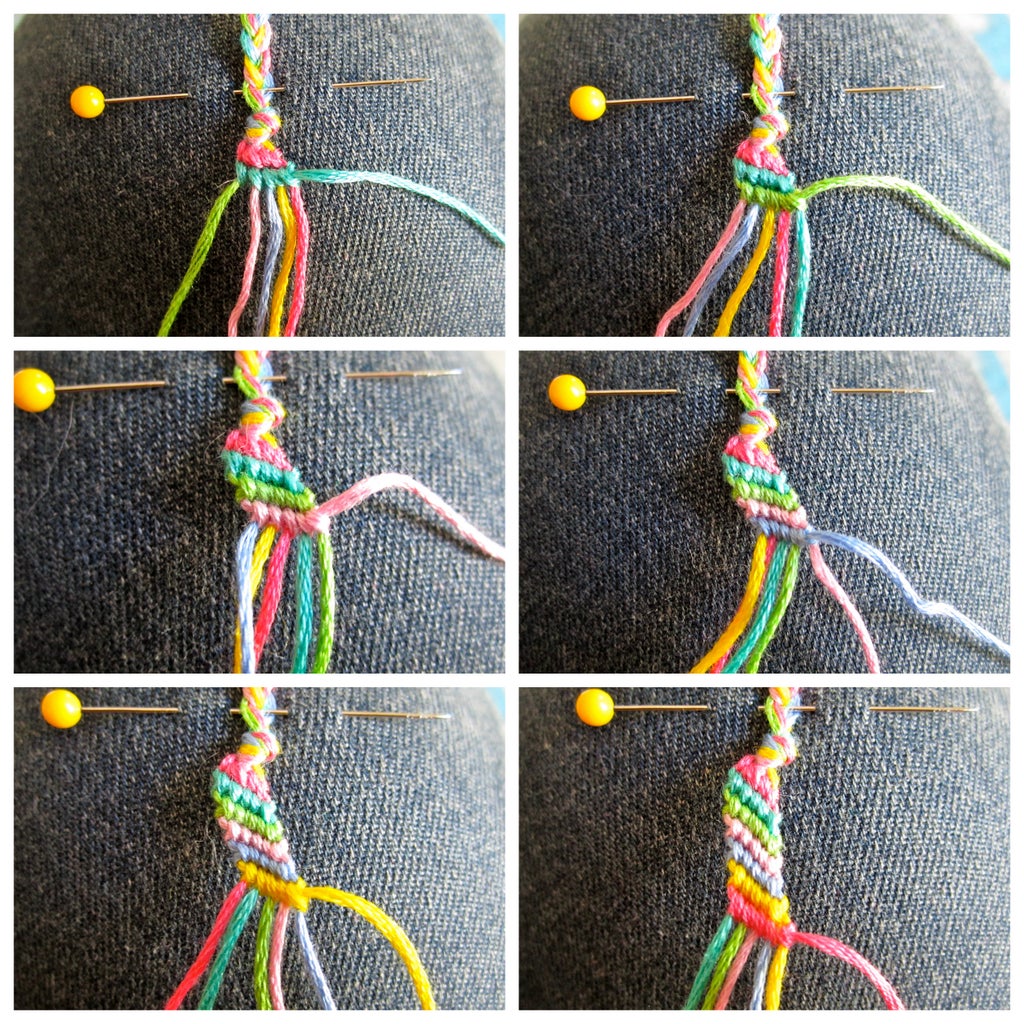
Chevron Friendship Bracelet Tutorial
The chevron pattern is famous. It makes a “V” shape. This is a bit more complex. But it uses the same knots.
- Set Up: You need an even number of strings. Use 4, 6, or 8 strings. Arrange them in a mirrored order.
- Example for 6 strings: Red, Blue, Green, Green, Blue, Red.
- The two middle strings should be the same color.
- Left Side Knots:
- Take the leftmost string (Red).
- Make two forward knots on the string next to it (Blue).
- Then, make two forward knots on the next string (Green).
- Your red string is now in the middle. It is next to the other green string.
- Right Side Knots:
- Take the rightmost string (Red).
- Make two backward knots on the string next to it (Blue).
- Then, make two backward knots on the next string (Green).
- Your red string is now also in the middle. It is next to the first red string.
- The Center Knot:
- You now have the two original red strings in the middle. They are next to each other.
- Take the left red string. Make two forward knots on the right red string. This joins the two sides.
- Or, take the right red string. Make two backward knots on the left red string.
- Either way, the two original red strings are now one solid “V” point.
- New Row: Now the blue strings are on the outside. Repeat steps 2-4 with the blue strings. They will form the next “V.”
Keep repeating these steps. Your bracelet will show clear “V” shapes. This is a very rewarding pattern to learn. It looks very impressive.
Crafting Beyond Basic Patterns: DIY String Bracelet Ideas
Once you master basic knots, a world of macrame bracelet patterns opens up. Macrame uses similar knotting.
The Diagonal Stripe (A bit like the flat stripe, but different setup)
This one creates diagonal lines.
- Set Up: Choose your colors. Arrange them in any order you like. This will be the order they appear in the diagonal stripes.
- Example: Pink, Orange, Yellow, Green, Blue.
- Knotting:
- Take the leftmost string (Pink).
- Make two forward knots on the string next to it (Orange).
- Then, make two forward knots on the next string (Yellow).
- Continue making two forward knots on each string until the pink string reaches the far right.
- New Row: Now, the Orange string is the leftmost string.
- Take the Orange string. Make two forward knots on the Yellow string.
- Continue making two forward knots on each string until the Orange string reaches the far right.
- Repeat: Keep taking the new leftmost string. Use it to make forward knots across all other strings. This creates a neat diagonal pattern.
Candy Stripe Pattern (Very similar to Diagonal, but often specific colors)
This is a classic. It looks like twisted candy canes. It’s the same as the diagonal stripe. The name often refers to specific color choices (like red and white).
- Set Up: Pick two or more colors. The order matters for the stripe sequence.
- Example: Red, White, Red, White, Red, White.
- Knotting: Take the first string (Red). Make two forward knots on the second string (White). Then on the next Red string, and so on. Continue until your knotting string reaches the end.
- Repeat: Take the new leftmost string. Knot it across all others.
This pattern is great for using up small bits of floss.
Spiral Staircase or Twisted Bracelet
This pattern looks like a twisted rope. It uses only one type of knot.
- Set Up: Use two strings. Fold them in half. This gives you four strands. Or use four strands directly. Tie a starting knot.
- Knotting:
- Take the leftmost string. Use it to make two forward knots on every other string, one by one.
- As you knot, the bracelet will start to twist. This is normal. Do not try to force it straight.
- The string you were just knotting with will now be on the far right.
- Repeat: Take the new leftmost string. Repeat the same knotting process.
Keep going. The spiral will become clear. This is a very easy pattern. It looks very neat.
Adding an Adjustable Bracelet Closure
Once your bracelet is long enough, you need to finish it. An adjustable bracelet closure makes it easy to wear. It fits many wrist sizes.
Simple Braided Ties
This is the easiest finish.
- Measure: Make the main bracelet long enough to fit around the wrist. Leave about 3-4 inches (7-10 cm) of unknotted string at both ends.
- Braid: Separate the strings at one end into two or three groups. Braid each group for about 2-3 inches (5-7 cm).
- Knot Ends: Tie a simple overhand knot at the end of each braid.
- Tie On: To wear, simply tie the braided ends together on your wrist. A double knot is best.
Sliding Knot Closure (Macrame Style)
This finish is common in macrame bracelet patterns. It looks professional.
- Prepare Bracelet Ends: Once your main bracelet is done, tie a simple overhand knot at each end. Leave a short tail after each knot (about 1-2 inches). This stops the main knotting.
- Overlap Ends: Lay the two finished ends of your bracelet on top of each other. They should overlap by about 1.5-2 inches (4-5 cm).
- Cut New Floss: Cut a new piece of floss, about 10-12 inches (25-30 cm) long. This will be your knotting string for the closure.
- Start Square Knot:
- Slide this new string under the two overlapping bracelet ends. Position it so there is an equal length of string on both sides.
- Take the left side of the new string. Lay it over the two bracelet ends. It should form a “P” shape.
- Take the right side of the new string. Lay it over the tail of the left string.
- Then, push the right string under the two bracelet ends.
- Pull the right string up through the loop created by the left string.
- Pull both sides gently to tighten. This makes half of a square knot.
- Complete Square Knot:
- Now, take the right side of the new string. Lay it over the two bracelet ends. It should form a “4” shape.
- Take the left side of the new string. Lay it over the tail of the right string.
- Then, push the left string under the two bracelet ends.
- Pull the left string up through the loop created by the right string.
- Pull both sides gently to tighten. This finishes one full square knot.
- Repeat: Make 3-5 more square knots. This creates a small bar of knots. This bar will slide along the bracelet ends.
- Trim and Secure: When you have enough knots, tie a simple knot on each end of the new string close to the square knot bar. Add a tiny drop of jewelry glue to secure them. Let it dry. Trim the excess new string close to these knots.
This sliding knot lets you pull the ends of the bracelet to make it tighter or looser. It is a very popular closure for handmade woven bracelets.
Tips for Perfect Handmade Woven Bracelets
- Keep Tension Even: Try to pull each knot with the same amount of force. This makes the bracelet look neat. If you pull too hard or too soft, the knots will be uneven.
- Stay Organized: Keep your non-working strings neat. You can use clips or separate them. Tangled strings are frustrating.
- Work in Good Light: Good light helps you see your knots clearly.
- Take Breaks: If your hands hurt or you get tired, take a break.
- Practice: Your first bracelet might not be perfect. That is okay! Each one you make will get better. Practice is key to all embroidery thread crafts for kids and adults.
- Don’t Give Up: Knotting can be tricky at first. Stick with it. You will get the hang of it.
Embroidery Thread Crafts for Kids and Summer Camp Craft Projects
Friendship bracelets are perfect for kids. They are also great for groups. Think about summer camp craft projects.
Benefits for Kids
- Fine Motor Skills: Knotting helps small hands get stronger. It improves hand-eye coordination.
- Patience: Kids learn to be patient. They see how small steps lead to a finished item.
- Creativity: They get to pick colors. They make something unique.
- Social Skills: Making bracelets for friends teaches giving. Sharing skills is fun too.
- Quiet Activity: It is a calm activity. It can be a nice break from active play.
Tips for Kids’ Crafts
- Pre-Cut Floss: Cut the floss ahead of time for younger kids. This saves time. It also helps with frustration.
- Simple Patterns: Start with the flat stripe. Or the spiral pattern. These are very easy.
- Use a Clipboard: A clipboard holds the strings firmly. This makes knotting much easier for little hands.
- Help with Knots: Show them slowly. Guide their hands if needed. “Make a 4. Pull it up.”
- Celebrate Efforts: Praise their work! Even if it’s not perfect, they tried hard.
- Theme Days: Use craft floss supplies to match holidays or events. Red and green for Christmas. Orange and black for Halloween.
For summer camp craft projects, set up a station. Have many colors of floss. Show one pattern. Let kids choose. It can be a popular activity.
Troubleshooting Common Bracelet Problems
Sometimes things go wrong. Here are fixes for common issues.
Uneven Knots
- Problem: Some knots are tight, some are loose. The bracelet looks bumpy.
- Fix: Practice keeping an even tension. Pull each knot with the same gentle strength. Do not tug too hard. Do not let it sag.
Tangled Strings
- Problem: Your strings are a mess. They are knotted where they should not be.
- Fix: Use shorter strings if possible (but long enough to finish). Keep non-working strings separate. You can wrap them around cardboard. Or use clothes pegs to hold them. Work in a tidy space. If a tangle starts, stop. Gently untangle it right away.
Bracelet Curls
- Problem: The bracelet wants to twist or curl up.
- Fix: This is normal for some patterns. The spiral knot always curls. For flat patterns, curling can mean uneven tension. Try to keep your base string very straight. Make sure the knotting string pulls the knot straight up and tight. Sometimes, wetting the finished bracelet and letting it dry flat helps.
Not Enough Length
- Problem: You ran out of string before the bracelet is long enough.
- Fix: This means you cut your initial strings too short. For next time, cut them longer. For the current one, you can try adding string. Use a tiny bit of glue or tie a small, secure knot to add more length. Hide the knot on the back. It is often easier to start fresh with new, longer strings.
Care and Keeping of Your Friendship Bracelets
Your handmade woven bracelets can last a long time. They do need a little care.
- Washing: Friendship bracelets can get wet. You can wear them in the shower or swimming. Over time, colors might fade a little. If they get dirty, gently wash them with mild soap and water. Rinse well. Pat them dry with a towel. Let them air dry completely.
- Storage: When not wearing them, store them flat. Keep them out of direct sunlight for long times. This helps keep colors bright.
- Untangling: If they get tangled with other jewelry, carefully untangle them. Do not pull hard.
Frequently Asked Questions (FAQ)
Q1: How many strings do I need for a friendship bracelet?
A1: You can use as few as 2 strings for a simple twisted bracelet. Most patterns use 4, 6, or 8 strings. The chevron needs an even number. The more strings you use, the wider the bracelet will be.
Q2: What is the best type of string for friendship bracelets?
A2: Embroidery floss is the best. It is strong. It comes in many colors. It does not stretch much. It is easy to find. It is also cheap. You can find it with all your craft floss supplies.
Q3: Can I use different types of knots together?
A3: Yes! Many advanced patterns mix knots. You can use forward and backward knots in one bracelet. This makes complex designs. Start with basics first.
Q4: How long does it take to make a friendship bracelet?
A4: It depends on the pattern. It also depends on how fast you knot. A simple flat stripe bracelet might take 30-60 minutes. A complex chevron can take several hours. Practice makes you faster.
Q5: Can I add beads to my friendship bracelet?
A5: Yes, you can! Thread a bead onto one of your working strings. Then continue knotting as usual. Make sure the bead hole is big enough for your floss. This is a fun way to create DIY string bracelet ideas.
Q6: My bracelet keeps twisting. Is that normal?
A6: For some patterns, like the spiral staircase, twisting is normal. For flat patterns, twisting usually means uneven knot tension. Try to keep your base string straight. Make sure your knots are snug and even.
Q7: Can I make friendship bracelets for boys?
A7: Absolutely! Friendship bracelets are for everyone. Boys often like darker colors or simpler patterns. Black, gray, blue, or green are popular choices. The meaning of friendship is universal.
Creating Lasting Connections
Making friendship bracelets is a timeless craft. It combines simple skills with heartfelt meaning. From selecting your craft floss supplies to mastering beginner knotting techniques, each step is a joy. Whether you are creating a chevron friendship bracelet tutorial masterpiece or a simple stripe, the act of making is rewarding. These handmade woven bracelets are more than just string. They are symbols of care. They are perfect summer camp craft projects. They teach patience. They foster creativity. So grab some floss. Start knotting today. Make beautiful gifts for your friends. Make them for yourself. Enjoy the simple fun of this wonderful craft!