
Image Source: stitchedmodern.com
Avoid Mistakes: How To Wash Embroidery Like A Pro
Yes, you can wash embroidery, but you must do it with care. Learning how to wash embroidery correctly keeps your stitches looking bright and fresh. The key is using gentle methods to protect the threads and fabric. Whether it’s a jacket, a hoop art piece, or a blanket, proper washing makes sure your beautiful needlework lasts a long time.
Getting Ready To Wash
Before you put your embroidered item near water, you need to do a few things. This helps you avoid problems. Washing embroidered clothing needs thought first. Don’t just toss it in the machine.
Check the Label
Look at the tag on the clothing or fabric. What does it say about washing?
Does it say “Dry Clean Only”? If yes, you might need a pro cleaner.
Does it say “Hand Wash”? Then, you must hand wash it.
Does it say “Machine Wash Gentle”? Then, machine washing might be okay.
Always follow the fabric’s care tag first. Embroidery adds another layer to care.
Look at the Stitches
How does the embroidery look? Is it old? Are the threads loose?
Tight, new stitches are often stronger. Old, worn stitches need extra care.
High-quality thread holds up better than cheap thread.
Test the Colors
Color run is a big problem. Preventing embroidery color bleed is very important. Some threads can lose color when wet. This color can stain the fabric around the stitches.
How to test for color bleed:
* Get a small piece of white cloth or paper towel.
* Wet a small, hidden part of the embroidery thread. Maybe a stitch on the back, or in a seam.
* Press the white cloth or paper towel onto the wet thread.
* Wait a few seconds.
* Lift the cloth. Do you see color on the white cloth?
If you see color, the thread might bleed. You must be extra careful. Use cold water only. Wash it alone, not with other clothes. Maybe only hand wash it very quickly. If the color bleeds a lot, you might not want to wash it at all. Or you might accept that the color might change a little.
Choose Your Washing Method
Based on the tag, the stitches, and the color test, decide how to wash.
Hand washing is the safest way. It gives you the most control.
Machine washing is faster. But it can be harder on the embroidery.
Hand Washing Embroidery
This is the best way for caring for hand embroidery. It’s gentle. It lets you protect the stitches. Hand washing embroidery keeps delicate items safe.
What You Need
- A clean sink, basin, or tub.
- Cool or lukewarm water. Never hot water. Hot water can shrink fabric or make colors run.
- A gentle detergent. More on this later.
- Clean towels.
Step-by-Step Hand Wash
Follow these steps to how to clean embroidered fabric by hand.
Step 1: Fill the Basin
Fill your clean sink or basin with cool or lukewarm water. Do not use hot water.
Step 2: Add Detergent
Add a small amount of gentle detergent to the water. Swish it around. Make sure the detergent is spread out in the water. You don’t need a lot. Too much soap is hard to rinse out.
Step 3: Put the Item In
Place your embroidered item in the soapy water. Push it down gently so it gets fully wet.
Step 4: Wash Gently
Let the item soak for a short time. Five to ten minutes is usually enough.
Gently move the item in the water. You can softly squeeze it.
Do not rub the embroidery hard. Do not scrub the stitches. Rubbing can pull stitches. It can make the threads fuzzy. It can damage the design.
Just let the water and soap do the work. If there are small spots, you can try gently dabbing them. Use a soft cloth.
Step 5: Rinse
Lift the item out of the soapy water.
Drain the dirty water.
Fill the basin again with clean, cool water.
Put the item back in the clean water.
Gently squeeze it to push the soapy water out.
Repeat this rinsing step. Change the water until all the soap is gone.
You will know the soap is gone when you don’t see bubbles anymore. The water should be clear.
Step 6: Remove Water
Lift the item out of the final rinse water. Do not wring or twist it.
Wringing can damage the stitches and the fabric shape.
Gently squeeze out some of the water.
Lay the item flat on a thick, clean towel.
Roll the towel up with the embroidered item inside.
Press gently on the rolled towel. The towel will soak up the water.
Unroll the towel.
Your item is now clean and has less water in it. It is ready to dry.
Machine Washing Embroidery
Sometimes, machine washing is okay. Especially for items you use a lot. Like embroidered t-shirts or jeans. But you need machine washing embroidery tips to do it right. It is riskier than hand washing.
Is Machine Washing Okay?
Check the care tag first. If it says machine wash, then it might be okay.
Look at the embroidery design. Is it simple and flat? Or does it have beads, sequins, or long, loose stitches?
Simple, flat designs handle the machine better. Designs with extras or delicate stitches should be hand washed.
Check the thread color for bleeding, as described before. If colors bleed, machine washing is probably a bad idea.
How To Machine Wash Safely
If you decide to use the machine, follow these steps. This helps protect your washing embroidered clothing.
Step 1: Turn the Item Inside Out
This is a simple but important step. Turning the item inside out protects the front of the embroidery. It stops stitches from rubbing on the inside of the machine drum. It stops stitches from catching on other clothes.
Step 2: Use a Mesh Laundry Bag
Put the embroidered item inside a mesh laundry bag.
This bag gives another layer of protection. It keeps the item from getting tossed around too much. It stops it from tangling with other clothes. It is very good for items with openwork or delicate parts.
Step 3: Wash with Similar Items
Wash the embroidered item with clothes that are like it.
Wash colors together to avoid color bleed onto the fabric.
Wash delicate items together. Don’t wash embroidery with heavy things like jeans or towels unless they are also in a protective bag.
Step 4: Choose the Right Settings
Use the ‘gentle’ or ‘delicate’ cycle on your washing machine. This cycle uses less agitation.
Use cold water. Cold water helps prevent color bleed. It is also better for many fabrics. Never use hot water.
Use a slow spin speed, if you can choose it. A fast spin can put stress on the stitches and fabric.
Step 5: Use the Right Detergent
Use a mild detergent. Just a little bit is enough.
Avoid harsh chemicals like bleach. Bleach can damage threads and fabric colors. Best detergent for embroidery is one that is gentle and pH neutral. Look for detergents made for delicate clothes.
After the wash cycle finishes, take the item out right away. Don’t leave it sitting wet in the machine.
Preventing Common Problems
Knowing how to wash helps, but knowing how to stop problems before they happen is key.
Stopping Color Run
We talked about testing for color bleed. If threads might bleed, always use cold water. Use a very gentle soap, or maybe no soap for a quick rinse. Wash the item alone the first few times. Special color catcher sheets added to the wash might help in a machine, but test first.
Fixing Stains Before Washing
What if your embroidered item has a spot or stain? Removing stains from embroidery needs care.
Do not rub the stain hard. This can damage the embroidery stitches around the stain. It can also push the stain deeper into the fabric.
Deal with the stain before washing the whole item if you can.
Find out what caused the stain. Different stains need different ways to clean them.
For most stains (like food), gently dab the spot. Use a clean cloth and cool water. You can add a tiny bit of gentle soap to the cloth.
Dab, don’t rub. Work from the outside of the stain towards the center. This stops the stain from spreading.
Rinse the spot with clean water.
If the stain is still there, you might need a special stain remover. Use stain removers very carefully on embroidery. Test the stain remover on a hidden spot of the fabric and the thread first. Some stain removers can change thread color or hurt the fabric.
Put the stain remover only on the stain itself. Follow the product directions. Rinse well.
Only wash the whole item after you have tried to remove the stain. Washing a stained item can sometimes set the stain, making it harder to remove later.
Drying Embroidered Items
Drying embroidered items correctly is as important as washing them right. Wrong drying can pull stitches, change the item’s shape, or make colors run.
Best Ways to Dry
Method 1: Air Drying Flat
This is the safest way.
After gently pressing water out with a towel (as in the hand wash steps), lay the embroidered item flat.
Put it on a clean, dry towel or a mesh drying rack.
Shape the item nicely as you lay it down. Make sure the fabric is smooth.
Let it air dry fully.
Keep it away from direct sunlight or strong heat sources. Sunlight can fade colors. Heat can shrink fabric or damage threads.
Method 2: Hanging to Dry (Sometimes)
Some embroidered items, like t-shirts or sturdy jackets, can be hung to dry.
Use a sturdy hanger.
Make sure the weight of the wet fabric does not pull the item out of shape. Heavy, wet items can stretch.
If the embroidery is heavy, hanging might make the fabric sag around the stitches. Flat drying is often better for designs that cover a large area or are dense.
What Not To Do
- Do not use a machine dryer. The heat and tumbling in a dryer are very bad for embroidery. It can:
- Shrink the fabric.
- Cause threads to pull, snag, or break.
- Make colors fade or bleed badly.
- Damage delicate stitches or added beads/sequins.
- Make the fabric around the embroidery pucker badly.
- Do not wring or twist the item to remove water. This distorts the fabric and can break stitches.
Air drying takes longer, but it protects your work. Be patient.
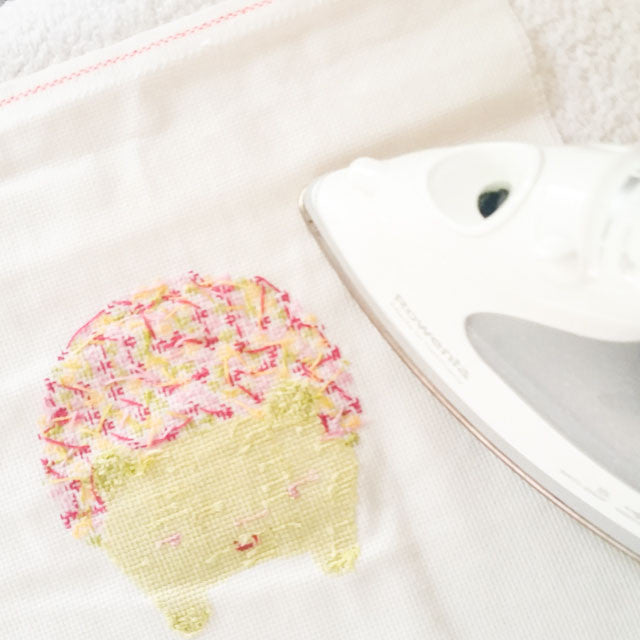
Ironing Embroidery
After washing and drying, your embroidered item might look wrinkled. Ironing embroidery needs care to keep the stitches looking raised and nice. Ironing directly on the stitches can flatten them or even melt certain threads.
How To Iron Safely
Step 1: Get Ready
You need an ironing board and an iron.
You also need a clean, thick towel. A terry cloth towel works well. It needs to be bigger than the embroidery design.
Step 2: Dampen the Item (Optional)
The item should be slightly damp or use the steam setting on your iron. Too dry makes ironing harder.
Step 3: Set Up
Lay the thick towel flat on the ironing board.
Place the embroidered item face down on the towel.
The embroidery should press into the towel. This is very important. The loops and stitches have space to go into the towel instead of getting squashed flat by the iron.
Step 4: Choose Iron Heat
Set your iron to the correct heat for the fabric the embroidery is on. For example, cotton needs higher heat than silk. Start with a lower heat setting if you are unsure. You can increase it if needed.
If your thread is not cotton or silk (like rayon or metallic), use a low heat setting. High heat can melt these threads.
Step 5: Iron from the Back
Place the iron gently on the back of the fabric, over the embroidery design.
Move the iron gently over the area. Do not press down hard.
Ironing from the back means the heat goes through the fabric first, protecting the stitches on the front.
Use steam if your iron has it and the fabric can handle steam. Steam helps remove wrinkles.
Step 6: Check and Repeat If Needed
Carefully lift the item and check the front.
Are the wrinkles gone? Does the embroidery still look raised?
If needed, place it face down again on the towel and iron from the back a little more.
What Not To Do
- Do not iron directly on the front of the embroidery. This will flatten the stitches.
- Do not use high heat if you don’t know the thread type.
- Do not slide the iron back and forth roughly over the embroidery area. Lift and place the iron gently.
For very delicate or highly textured embroidery, you might avoid ironing the embroidered area completely. You can just iron the fabric around the design. Or use a handheld steamer on the back, keeping it a little distance away.
Choosing The Right Detergent
The best detergent for embroidery is one that is mild and gentle.
What To Look For
- Mild or Gentle Formula: Look for detergents labeled for ‘delicates’ or ‘sensitive skin’. These have fewer harsh chemicals.
- pH Neutral: Detergents that are pH neutral are less likely to damage fibers or affect colors.
- Free of harsh brighteners or bleach: These can strip color from embroidery threads.
- Liquid over Powder: Liquid detergents often dissolve better in cool or lukewarm water. Powder can sometimes leave small bits behind.
Examples
- Baby laundry detergents
- Detergents made for wool or silk
- Specialty detergents for delicates
You only need a small amount. Too much soap creates lots of bubbles and is hard to rinse out fully. Soap left in the fabric can attract dirt later.
General Care Tips
Beyond washing, good habits help keep your embroidered items nice. This is part of caring for hand embroidery long term.
- Handle with clean hands: Dirt and oils from your hands can transfer to the fabric and threads.
- Store properly:
- Fold clothing gently. Don’t let heavy folds press hard on the embroidery for a long time.
- For hoop art or framed pieces, keep them out of direct sunlight. Sunlight causes fading.
- Store textiles in acid-free tissue paper if putting them away for a long time. Avoid plastic bags, which can trap moisture.
- Clean spills right away: Blot spills gently. Don’t let stains sit.
- Avoid spraying perfumes or hairspray directly onto embroidered clothing near the design. The chemicals can harm the threads over time.
- Dust framed pieces gently with a soft brush or cloth.
Treating your embroidered items with care in everyday life helps reduce the need for washing. And when you do need to wash, the process is easier if the item isn’t heavily soiled.
Summing It Up
Washing embroidery doesn’t have to be scary. The main idea is to be gentle.
Always check the item first – look at the tag, the stitches, and test colors.
Hand washing is usually the safest way to how to clean embroidered fabric. Use cool water and gentle soap.
If machine washing, turn the item inside out, use a mesh bag, select the delicate cycle and cold water.
Use a mild, gentle detergent – the best detergent for embroidery.
Always air dry embroidered items flat. Drying embroidered items in a machine dryer can cause damage.
When ironing embroidery, do it face down on a towel using medium heat from the back.
Deal with stains carefully by dabbing, not rubbing, before washing the whole item. Removing stains from embroidery is best done early and gently.
Follow these steps, and your washing embroidered clothing will help keep your beautiful stitches looking great for years. Caring for hand embroidery means being mindful every step of the way.
Questions People Ask
Here are answers to common questions about washing embroidery.
h5 Can I use bleach on embroidery?
No, you should not use bleach on embroidery. Bleach is a harsh chemical. It can strip the color from embroidery threads. It can also weaken or damage the fabric and the threads themselves. Stick to mild, bleach-free detergents.
h5 What if my embroidery threads start to look fuzzy after washing?
Fuzziness often happens from rubbing or agitation. This is why hand washing is best, and using a gentle cycle and mesh bag in the machine is important. If your embroidery is already fuzzy, you can try gently trimming only the very loose fibers with small, sharp scissors. Be very careful not to cut the actual stitches. Preventing fuzziness during washing is easier than fixing it later.
h5 How often should I wash embroidered items?
Only wash embroidered items when they really need it. Too much washing, even gentle washing, can wear down the threads over time. For clothing, wash when it’s dirty or smells. For decorative items like hoop art, you might only need to clean them very rarely, perhaps just dusting or very light spot cleaning if needed.
h5 My grandmother’s old embroidery has yellow spots. Can I wash it to remove them?
Old stains, especially yellowing from age or improper storage, can be very hard to remove. Washing might help a little, but it could also make old, delicate threads break. For valuable or antique pieces, it is best to talk to a textile conservation expert. They know special methods to clean old fabrics safely. Washing old items yourself carries risk.
h5 Can I wash cross-stitch or needlepoint?
Yes, the same general rules apply to washing cross-stitch and needlepoint. Use cool water, gentle detergent, and hand wash or use a very gentle machine cycle in a bag. Rinse well, roll in a towel to remove water, and air dry flat. Ironing is usually done face down on a towel. Always test a hidden thread for colorfastness first.
h5 What is colorfast thread?
Colorfast thread means the dye in the thread is stable. It means the color should not bleed or run when the thread gets wet. High-quality embroidery threads are usually colorfast, but it’s always a good idea to test, especially with bright or dark colors, or if you don’t know the thread brand. Testing helps with preventing embroidery color bleed.
h5 Can I iron embroidery that is on velvet or other tricky fabrics?
Ironing velvet with embroidery is difficult because pressing velvet flattens its pile. For velvet and similar fabrics, avoid pressing the iron directly on the fabric at all. Use a lot of steam, holding the iron slightly above the back of the item while it’s on a towel. Or use a garment steamer. Test a hidden area first. Very delicate or textured fabrics might be best cleaned by a professional.
These tips should help you feel confident about keeping your embroidered pieces clean and beautiful for a long time. Gentle care is key!