
Embroidery needs help to look good. This help comes from stabilizer. Think of stabilizer as a support system for your fabric. It goes behind your fabric while you stitch. This helps stop your fabric from stretching or getting messed up by the stitches. It makes your stitches look smooth and neat. This guide tells you all about using different Types of embroidery stabilizers.
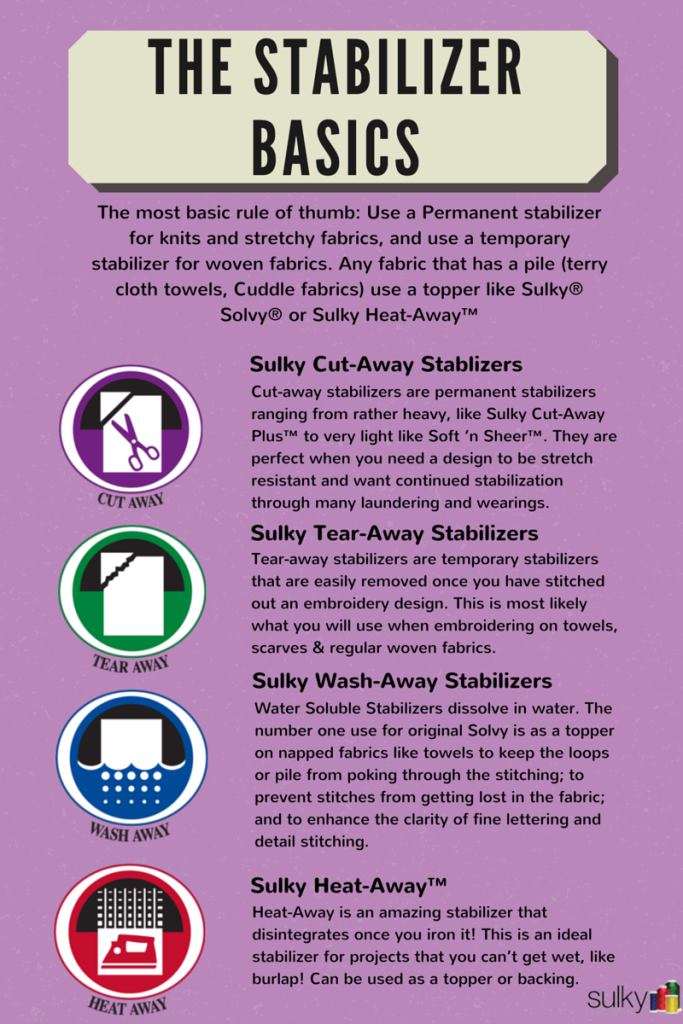
Image Source: blog.sulky.com
Getting a Grip on Stabilizer
Why do you need stabilizer? Fabric is soft. Needles push through it many times. Thread pulls on it. Without support, the fabric moves. It bunches up. Stitches sink in. Or they pull the fabric out of shape. Stabilizer, also called Embroidery backing material, gives the fabric firmness. It holds the fabric flat and steady. This lets the stitches sit nicely on top. It’s a key part of getting good results in embroidery, whether you use a machine or stitch by hand.
Types of Embroidery Stabilizers
There are several main kinds of stabilizer. Each one works best for certain projects. Choosing the right one is important. It depends on your fabric, your design, and how you stitch.
Let’s look at the main Types of embroidery stabilizers:
- Tear Away Stabilizer
- Cut Away Stabilizer
- Wash Away Stabilizer (also called Soluble Stabilizer)
- Heat Away Stabilizer
- Topping Stabilizer
Each type works in a different way. You remove them in different ways too. Let’s talk about each one.
Tear Away Embroidery Stabilizer
This type is very common. It is easy to use. You put it behind your fabric. After you finish stitching, you just tear it away.
How Tear Away Stabilizer Works
Tear away stabilizer is made of paper or non-woven material. It is made to tear easily. But it is strong enough to hold the fabric while you stitch. You might find it in different weights. Lighter ones tear more easily. Heavier ones give more support.
When to Use Tear Away
Tear away is good for many projects.
- Stable Fabrics: Use it on fabrics that do not stretch much. Think of quilting cotton, denim, canvas, or broadcloth.
- Light Stitching: It works well for designs with fewer stitches. Designs that are not too dense.
- Projects Where Backing Shows: If the back of your work is seen, tear away is good. You can remove most of it.
Applying Tear Away
You put tear away stabilizer behind your fabric. It goes in the hoop with the fabric. Make sure it is smooth. No wrinkles.
- Cut a piece bigger than your hoop.
- Lay it flat.
- Put your fabric on top.
- Put both in the hoop. Pull them tight but not stretched out of shape.
This is how you apply Embroidery backing material like tear away.
Removing Tear Away
This is the easy part.
- After stitching, take the fabric out of the hoop.
- Hold the stitches down gently with one hand.
- With the other hand, tear the stabilizer away from the stitches.
- Tear slowly and carefully.
- Start near the edge of the design.
- You might use tweezers to pull away small bits stuck under stitches.
Tear Away for Machine or Hand Embroidery
Tear away is great as a Stabilizer for machine embroidery. Machines stitch fast. They put many stitches close together. Tear away holds the fabric steady for this. You can also use it for Stabilizer for hand embroidery. It helps keep hand stitches from pulling the fabric.
Pros and Cons of Tear Away
- Pros: Easy to use, easy to remove, not messy, many weights available, good for machine embroidery.
- Cons: Can sometimes leave small bits stuck around stitches, not good for stretchy fabrics, not good for very dense designs (can make holes).
Cut Away Embroidery Stabilizer
Cut away stabilizer is stronger than tear away. You do not tear it away. You cut it away.
How Cut Away Stabilizer Works
This stabilizer is made of non-woven material that is soft but strong. It does not tear easily. It stays behind the fabric after you stitch. You trim the extra away.
When to Use Cut Away
Cut away is needed for fabrics that move or stretch.
- Stretchy Fabrics: Use it on knits, sweaters, fleece, or t-shirts. It stops the fabric from stretching while stitching. It also stops the fabric from stretching later.
- Dense Designs: It is best for designs with many stitches. Designs that cover a lot of space. This stabilizer gives long-lasting support.
- Fabrics That Need Support: Any fabric that might get pulled out of shape by heavy stitching.
Applying Cut Away
Like tear away, you put cut away behind your fabric. Put it in the hoop with the fabric.
- Cut a piece bigger than your hoop.
- Place it flat.
- Put your fabric on top.
- Put both in the hoop. Hoop them firmly together.
This solid Embroidery backing material gives a lot of support. Some types can be ironed onto the fabric. This is called fusible cut away. It sticks to the fabric for extra hold.
Removing Cut Away
You do not remove all of this stabilizer. You trim away the extra.
- After stitching, take the fabric out of the hoop.
- Lay it flat.
- Use sharp scissors. Cut around the edge of the design.
- Leave about 1/4 to 1/2 inch of stabilizer around the stitches.
- Do not cut too close to the stitches. You could cut the fabric or the threads.
Cut Away for Machine or Hand Embroidery
Cut away is a key Stabilizer for machine embroidery, especially for knits and dense designs. It gives needed support during fast stitching. For Stabilizer for hand embroidery, you can use it on stretchy fabrics. It stops the fabric from pulling or puckering as you stitch.
Pros and Cons of Cut Away
- Pros: Gives strong, lasting support, stops fabric stretch, great for knits and dense designs, keeps stitches smooth.
- Cons: Stays on the back of the fabric (can be seen or felt), harder to remove (needs cutting), not good if you need the back to be very clean.
Wash Away Embroidery Stabilizer
Wash away stabilizer disappears. You dissolve it in water after stitching.
How Wash Away Stabilizer Works
This type is made from material that dissolves in water. It can feel like paper or fabric. It comes in different weights. Some are thin films. Some are thicker and feel more like felt.
When to Use Wash Away
Use wash away when you want no stabilizer left on the fabric.
- Sheer Fabrics: Good for fabrics you can see through. Like organza or voile. You don’t want stabilizer showing.
- Free-Standing Lace: This is a special use. You stitch the design only on the wash away stabilizer. The stabilizer washes away. Only the thread design is left.
- Towels or Loopy Fabrics: Use wash away on top of fabric (as a topping) to keep stitches from sinking into the loops. We will talk more about topping soon.
- Delicate Fabrics: Fabrics that could be harmed by cutting or tearing.
- Any Fabric Where You Want No Trace: If the back must be perfectly clean.
Applying Wash Away
Wash away can go behind the fabric or on top.
- Behind: Cut a piece. Put it behind the fabric in the hoop. Hoop it tightly.
- On Top (Topping): Cut a piece. Put it on top of the fabric in the hoop. Hoop it all together. This is common for textured fabrics.
Some wash away stabilizers are sticky on one side. You can stick them to the fabric. This is useful for items hard to hoop, like collars or cuffs.
Removing Wash Away
This is the fun part. Add water!
- After stitching, take the item out of the hoop.
- Trim away large extra bits of the wash away stabilizer.
- Rinse the embroidered area under water. The stabilizer will get gooey.
- Keep rinsing until it is all gone.
- Check the instructions for your specific stabilizer. Some need warm water. Some need cold. Some need soaking.
- Dry your item flat.
This method of Removing embroidery stabilizer leaves the fabric clean.
Wash Away for Machine or Hand Embroidery
Wash away is great for both. As a Stabilizer for machine embroidery, it is perfect for lace or sheer items. For Stabilizer for hand embroidery, it is good for fine fabrics or when you draw your pattern on the stabilizer itself (like for complex designs on dark fabric). You stitch over the lines, then wash the lines and stabilizer away.
Pros and Cons of Wash Away
- Pros: Leaves no residue, perfect for sheer fabrics and lace, works as a topping, good for fabrics easily damaged.
- Cons: Requires wetting the project (not good for everything), can be sticky, some types are thin and need multiple layers for support, can be more costly.
Heat Away Stabilizer
Heat away stabilizer is less common. It disappears when you iron it.
How Heat Away Stabilizer Works
This stabilizer is made of material that breaks down with heat. You apply heat, and it melts away or shrinks and becomes less visible.
When to Use Heat Away
Use this when you cannot use water and cannot have stabilizer showing.
- Fabrics That Cannot Get Wet: Items that would be ruined by water.
- Where Backing Cannot Show: Like on certain types of appliques or delicate fabrics where cutting is hard and washing is not possible.
- Specific Techniques: Sometimes used for delicate fabrics or precise placements where other methods fail.
Applying Heat Away
It goes behind the fabric. Hoop it all together.
- Cut your piece.
- Put it behind the fabric.
- Hoop tightly.
Removing Heat Away
Apply heat carefully.
- After stitching, take the item out of the hoop.
- Trim away the extra stabilizer.
- Follow the instructions for your product. You will use an iron.
- Usually, you put a pressing cloth over the work.
- Press the iron down briefly. The stabilizer melts or shrinks.
- Be careful not to melt the thread or fabric! Use the right heat setting.
This is another way of Removing embroidery stabilizer.
Heat Away for Machine or Hand Embroidery
It can be a Stabilizer for machine embroidery or Stabilizer for hand embroidery when water is not an option. It gives temporary support during stitching.
Pros and Cons of Heat Away
- Pros: No water needed, good for delicate or non-washable items.
- Cons: Need to be very careful with heat, can be hard to remove completely without harming the project, less common, might leave a slight residue.
Topping Stabilizer (On Top!)
Topping stabilizer is a special case. It does not go behind the fabric. It goes on top.
How Topping Stabilizer Works
Topping is usually a wash away film. Or sometimes a heat away film. You put it on top of textured fabric. The film holds down the fabric texture. It stops stitches from sinking into things like terrycloth loops, fleece pile, or corduroy valleys.
When to Use Topping
Use topping when your fabric has a texture.
- Terrycloth: For towels. Holds down the loops.
- Fleece: Holds down the fluffy pile.
- Corduroy: Keeps stitches out of the lines.
- Knits with a Nap: Fabrics with a soft direction.
- Sometimes on top of felt: To keep stitches from sinking in too much.
Applying Topping
This is different from backing.
- Put your main stabilizer (like cut away or tear away) behind the fabric.
- Hoop the fabric and the backing stabilizer.
- Place the topping film on top of the fabric inside the hoop. Or just smooth it over the hooped area. Some sticky toppings can be pressed down.
- Make sure it covers the whole design area.
This is different from Applying embroidery backing. You use both backing and topping sometimes.
Removing Topping
If it is wash away topping, wash it away.
- Trim away large pieces.
- Rinse with water until it is gone.
If it is heat away topping, heat it away.
- Trim away pieces.
- Carefully press with an iron (use a pressing cloth).
This is another way of Removing embroidery stabilizer.
Topping for Machine or Hand Embroidery
Mostly used for Stabilizer for machine embroidery. Machine stitches are fast and dense. They can sink into fabric easily. Topping helps keep them on top. You can use it for Stabilizer for hand embroidery on textured fabrics too, but it’s less critical than for machine work.
Pros and Cons of Topping
- Pros: Makes stitches stand out on textured fabrics, easy to use, usually washes or heats away completely.
- Cons: Adds an extra step, might need careful removal of small bits.
Choosing Embroidery Stabilizer
So many choices! How do you pick the right one? Choosing embroidery stabilizer depends on a few things.
Look at Your Fabric
This is the first big thing.
- Stretchy Fabrics (knits, fleece): Need cut away. It gives lasting support.
- Stable Fabrics (cotton, denim): Can use tear away. It’s easy to remove.
- Sheer Fabrics (organza): Need wash away. You don’t want anything showing.
- Textured Fabrics (terrycloth): Need backing (like cut away or tear away) and topping (usually wash away film).
- Delicate Fabrics (silk): Might need wash away to avoid cutting or tearing.
Look at Your Design
How many stitches are in your design? How close together are they?
- Light Design (few stitches): Tear away might be enough.
- Dense Design (many stitches): Needs stronger support. Cut away is usually best. It stops the fabric from getting pulled by all the stitches.
Look at Your Stitch Type
Some stitches need more support than others. Satin stitches are dense. Fill stitches cover areas. These need good backing. Outline stitches are lighter.
Look at Your Machine or Hand Method
- Machine Embroidery: Uses fast, dense stitches. Often needs stronger stabilizer like cut away, or tear away on stable fabrics. Topping is key for texture. Sticky stabilizer is good for things hard to hoop.
- Hand Embroidery: Stitches are slower and less pulling. You might use lighter stabilizers. Tear away on cotton. Cut away on knits. Wash away on sheer or for pattern transfer.
Think About the Back of Your Project
Will people see or feel the back?
- Back Will Be Seen (lace, sheer): Use wash away.
- Back Will Be Felt (clothing): Cut away leaves a layer. Tear away is mostly removed. Wash away leaves nothing. Think about comfort.
- Back Will Be Hidden (quilt block lining): Any suitable type is fine.
Here is a simple table to help with Choosing embroidery stabilizer:
| Fabric Type | Design Density | Stabilizer Type | How to Remove | Notes |
|---|---|---|---|---|
| Stable (Cotton) | Light to Medium | Tear Away | Tear | Easy to use, common |
| Stable (Cotton) | Medium to Dense | Tear Away (maybe heavier) | Tear | Watch for tearing holes |
| Stretchy (Knit) | Any | Cut Away | Cut | Stops stretch, gives lasting support |
| Sheer (Organza) | Any | Wash Away | Wash | Leaves no trace |
| Textured (Terry) | Any | Backing + Topping | Backing cut/tear, Topping wash/heat | Keeps stitches on top |
| Free-Standing Lace | Dense | Wash Away | Wash | Design is only thread and stabilizer |
| Delicate (Silk) | Lighter | Wash Away or Light Cut Away | Wash or Careful Cut | Avoids damage from tearing or cutting |
| Items Hard to Hoop | Any | Sticky Wash Away/Tear Away | Wash/Tear | Sticks to fabric for hooping |
This table is a quick guide for Choosing embroidery stabilizer. Always test on a scrap piece first!
Applying Embroidery Backing
Putting the stabilizer on right matters a lot. This is Applying embroidery backing.
Getting the Right Size
Cut your stabilizer piece bigger than your hoop. It needs to be big enough to be held firmly in the hoop with the fabric. For a standard hoop, add about 1-2 inches all around the hoop size.
Hooping Fabric and Stabilizer
Most times, you hoop the fabric and the stabilizer together.
- Place the outer hoop on a flat surface.
- Lay your stabilizer flat over the outer hoop.
- Lay your fabric flat over the stabilizer. Make sure the fabric is right side up.
- Push the inner hoop down inside the outer hoop.
- Pull the fabric and stabilizer taut like a drum. But do not pull the fabric out of shape, especially if it is a knit.
- Tighten the screw on the hoop. The fabric and stabilizer should be tight and smooth. No wrinkles in either layer.
Using Spray Adhesive
Sometimes, you can use temporary spray adhesive. This glues the stabilizer to the fabric before hooping.
- Lay the stabilizer flat.
- Lightly spray one side with temporary spray adhesive. Follow product directions. Use in a place with good air.
- Press the fabric onto the sticky side of the stabilizer. Smooth it out.
- Then hoop the fabric and stabilizer together.
Spray adhesive can help stop fabric from shifting. It is good for small pieces or hard-to-handle fabrics. It also helps when hooping things like shirts or bags.
Floating Stabilizer
Sometimes you cannot hoop the item itself (like a finished bag or a thick coat). In this case, you hoop only the stabilizer.
- Hoop a piece of sticky stabilizer with the sticky side up. Or hoop regular stabilizer and use spray adhesive on top.
- Smooth the item you want to embroider onto the sticky stabilizer inside the hoop. Make sure it is smooth and lined up right.
- This lets you place designs on parts of an item you cannot get into a hoop.
This is a different way of Applying embroidery backing.
Removing Embroidery Stabilizer
After your stitching looks perfect, you need to get rid of the extra stabilizer. This is Removing embroidery stabilizer. How you do it depends on the type you used.
Removing Tear Away
- Take the hoop off the machine.
- Gently loosen the hoop and take the fabric out.
- Lay the fabric flat.
- Hold the stitches down around the edge of the design.
- Carefully tear the stabilizer away from the stitches. Tear slowly.
- Move around the design, tearing away sections.
- For small bits stuck under stitches, use tweezers. Be gentle. Don’t pull thread loops.
Removing Cut Away
- Take the hoop off the machine.
- Loosen the hoop and take the fabric out.
- Lay the fabric flat.
- Use sharp scissors.
- Trim the stabilizer about 1/4 to 1/2 inch away from the stitching line.
- Be careful not to cut the fabric or the embroidery threads.
- Some people like special curved scissors for trimming stabilizer. They help you get close without cutting the fabric.
Removing Wash Away (Backing)
- Take the hoop off the machine.
- Loosen the hoop and take the fabric out.
- Trim away large extra pieces of the dry wash away stabilizer.
- Check the stabilizer package for instructions.
- Rinse the embroidered area under running water. Or soak it in a bowl.
- Use the water temperature the package says (cool, warm, hot).
- Rub gently if needed to help it dissolve.
- Keep rinsing or soaking until the stabilizer is completely gone. No slippery or stiff feeling.
- Rinse well with clean water.
- Squeeze out extra water gently. Do not wring.
- Lay flat on a towel to dry. Or hang if the item allows.
Removing Wash Away (Topping)
- Remove from hoop.
- Gently tear away as much of the film as you can from around the design.
- Rinse the embroidered area with water. The remaining film will dissolve.
- Use water temperature as directed.
- Dry the item. The stitches should now be sitting cleanly on top of the fabric texture.
Removing Heat Away (Backing or Topping)
- Remove from hoop.
- Trim away extra stabilizer.
- Place a pressing cloth over the embroidery.
- Follow product directions for heat settings and time.
- Briefly press the area with a warm iron over the pressing cloth.
- The stabilizer should shrink or melt away.
- Be very careful not to use too much heat or press too long. This can damage thread or fabric.
Properly Removing embroidery stabilizer is the last step to making your embroidery look great.
Other Kinds of Stabilizer
There are a few other types you might see.
Sticky Stabilizers
These have glue on one side. They can be tear away or wash away. They are good for fabrics you can’t hoop easily. Like velvet (hooping velvet can leave marks). Or for putting designs on cuffs or pockets.
Mesh Stabilizers (No Show)
These are very light cut away stabilizers. They are soft and see-through. They are used on light fabrics or knits where you don’t want a stiff backing. They still give support but are less noticeable on the back. People use them on t-shirts often.
Fusible Stabilizers
These have a heat-sensitive glue on one side. You iron them onto the fabric before stitching. They come in tear away or cut away. Ironing them on makes the fabric and stabilizer act like one layer. This gives extra stability and helps prevent fabric shift.
Tips for Using Stabilizer
- Always Test: Before you stitch your project, stitch a test design on a scrap of the same fabric with the same stabilizer. See how it looks. Check the back. This saves you from mistakes on your real project.
- Use Enough: Don’t be afraid to use enough stabilizer. Too little is a common problem. If your fabric is stretchy or your design is dense, use a heavier weight or multiple layers of lighter weight stabilizer.
- Smooth is Key: Make sure both fabric and stabilizer are smooth in the hoop. Wrinkles mean stitches will be uneven.
- Match Stabilizer to Needle: Heavy stabilizer might need a stronger needle. Make sure your needle is sharp and the right size for your fabric and stabilizer layers.
- Consider Both Backing and Topping: Remember that backing supports behind the fabric. Topping supports on top. You need backing for almost every project. You need topping only for textured fabrics or sometimes very thin fabrics.
Troubleshooting Common Problems
- Fabric Puckering: The fabric is pulled tight around the stitching. This often means you did not use enough stabilizer. Or the stabilizer was too light. Or you hooped the fabric too tightly. Use a stronger stabilizer. Or use more layers. Or try a fusible type. Make sure fabric isn’t stretched when hooping.
- Stitches Sinking: Stitches disappear into the fabric nap. This happens on towels, fleece, etc. You need topping stabilizer!
- Stabilizer Not Removing Cleanly: If tear away leaves too many bits, try a cleaner tear away. Or try cutting closer with sharp scissors if you can. If wash away is sticky, you might need warmer water or more rinsing.
- Needle Breaking: Too many layers or too thick a stabilizer/fabric combo for your needle. Try a stronger needle (like a titanium needle) or a larger size.
Learning how to use different stabilizers makes a big difference in your embroidery. It helps you get professional-looking results on many different fabrics. Take time to pick the right Embroidery backing material for each project. Test it out. Soon, Choosing embroidery stabilizer will be easy!
Frequently Asked Questions (FAQ)
Q: Can I use one stabilizer for everything?
A: No, not really. Different fabrics and designs need different support. Using the wrong type can ruin your project. Cotton might be okay with tear away, but a t-shirt needs cut away. Lace needs wash away. It is best to have a few types on hand.
Q: How do I know what weight of stabilizer to use?
A: Stabilizer weights are often light, medium, or heavy. Lighter weights are for lighter fabrics and less dense designs. Heavier weights are for heavier fabrics, stretchy fabrics, and dense designs. Check the product label or ask the seller. When in doubt, go slightly heavier than too light. Or use two layers of a lighter weight.
Q: Is stabilizer needed for hand embroidery?
A: Yes, often it is. While machine embroidery creates more stress on the fabric, hand embroidery can still pull and distort fabric. Stabilizer helps keep your fabric smooth and prevents puckering, especially on finer or stretchier fabrics, or for designs with dense areas like satin stitch.
Q: Can I reuse stabilizer?
A: No. Once stabilizer has been stitched through, it has holes and its strength is gone. You trim or remove the used part. You can save larger unused scraps for smaller projects or test stitches.
Q: What is the difference between backing and topping?
A: Backing goes behind the fabric to support it during stitching. Topping goes on top of textured fabric to keep stitches from sinking in. You almost always use backing. You use topping only when needed for fabric texture.
Q: My tear away stabilizer is making holes in my fabric when I tear it. What is wrong?
A: This might mean your design is too dense for that type or weight of tear away. The stitches are too close together. When you tear, it pulls on the fabric points between stitches. Try a cut away stabilizer instead. It gives more support and doesn’t require tearing from dense stitching. Or try a “clean tear” variety if available.
Q: The wash away stabilizer feels sticky even after washing. What should I do?
A: You might need more rinsing. Or try warmer water if the package allows. Some wash away types need a lot of rinsing to get all the residue out. Make sure you are using the right type for your project; some are stickier than others before washing.
Q: Where do I buy stabilizers?
A: You can find stabilizers at fabric stores, craft stores, and online shops that sell embroidery supplies. They come in rolls, by the yard, or in pre-cut sheets.
Using the right stabilizer is a simple step that makes a huge difference in how your finished embroidery looks. Take the time to learn about the different types and when to use them. Happy stitching!