
A messy sewing room can feel overwhelming. Finding what you need takes time. This guide shows you how to make your sewing space neat and easy to use. It helps you find things fast so you can enjoy sewing more. You can organize your sewing room simply with the right steps.
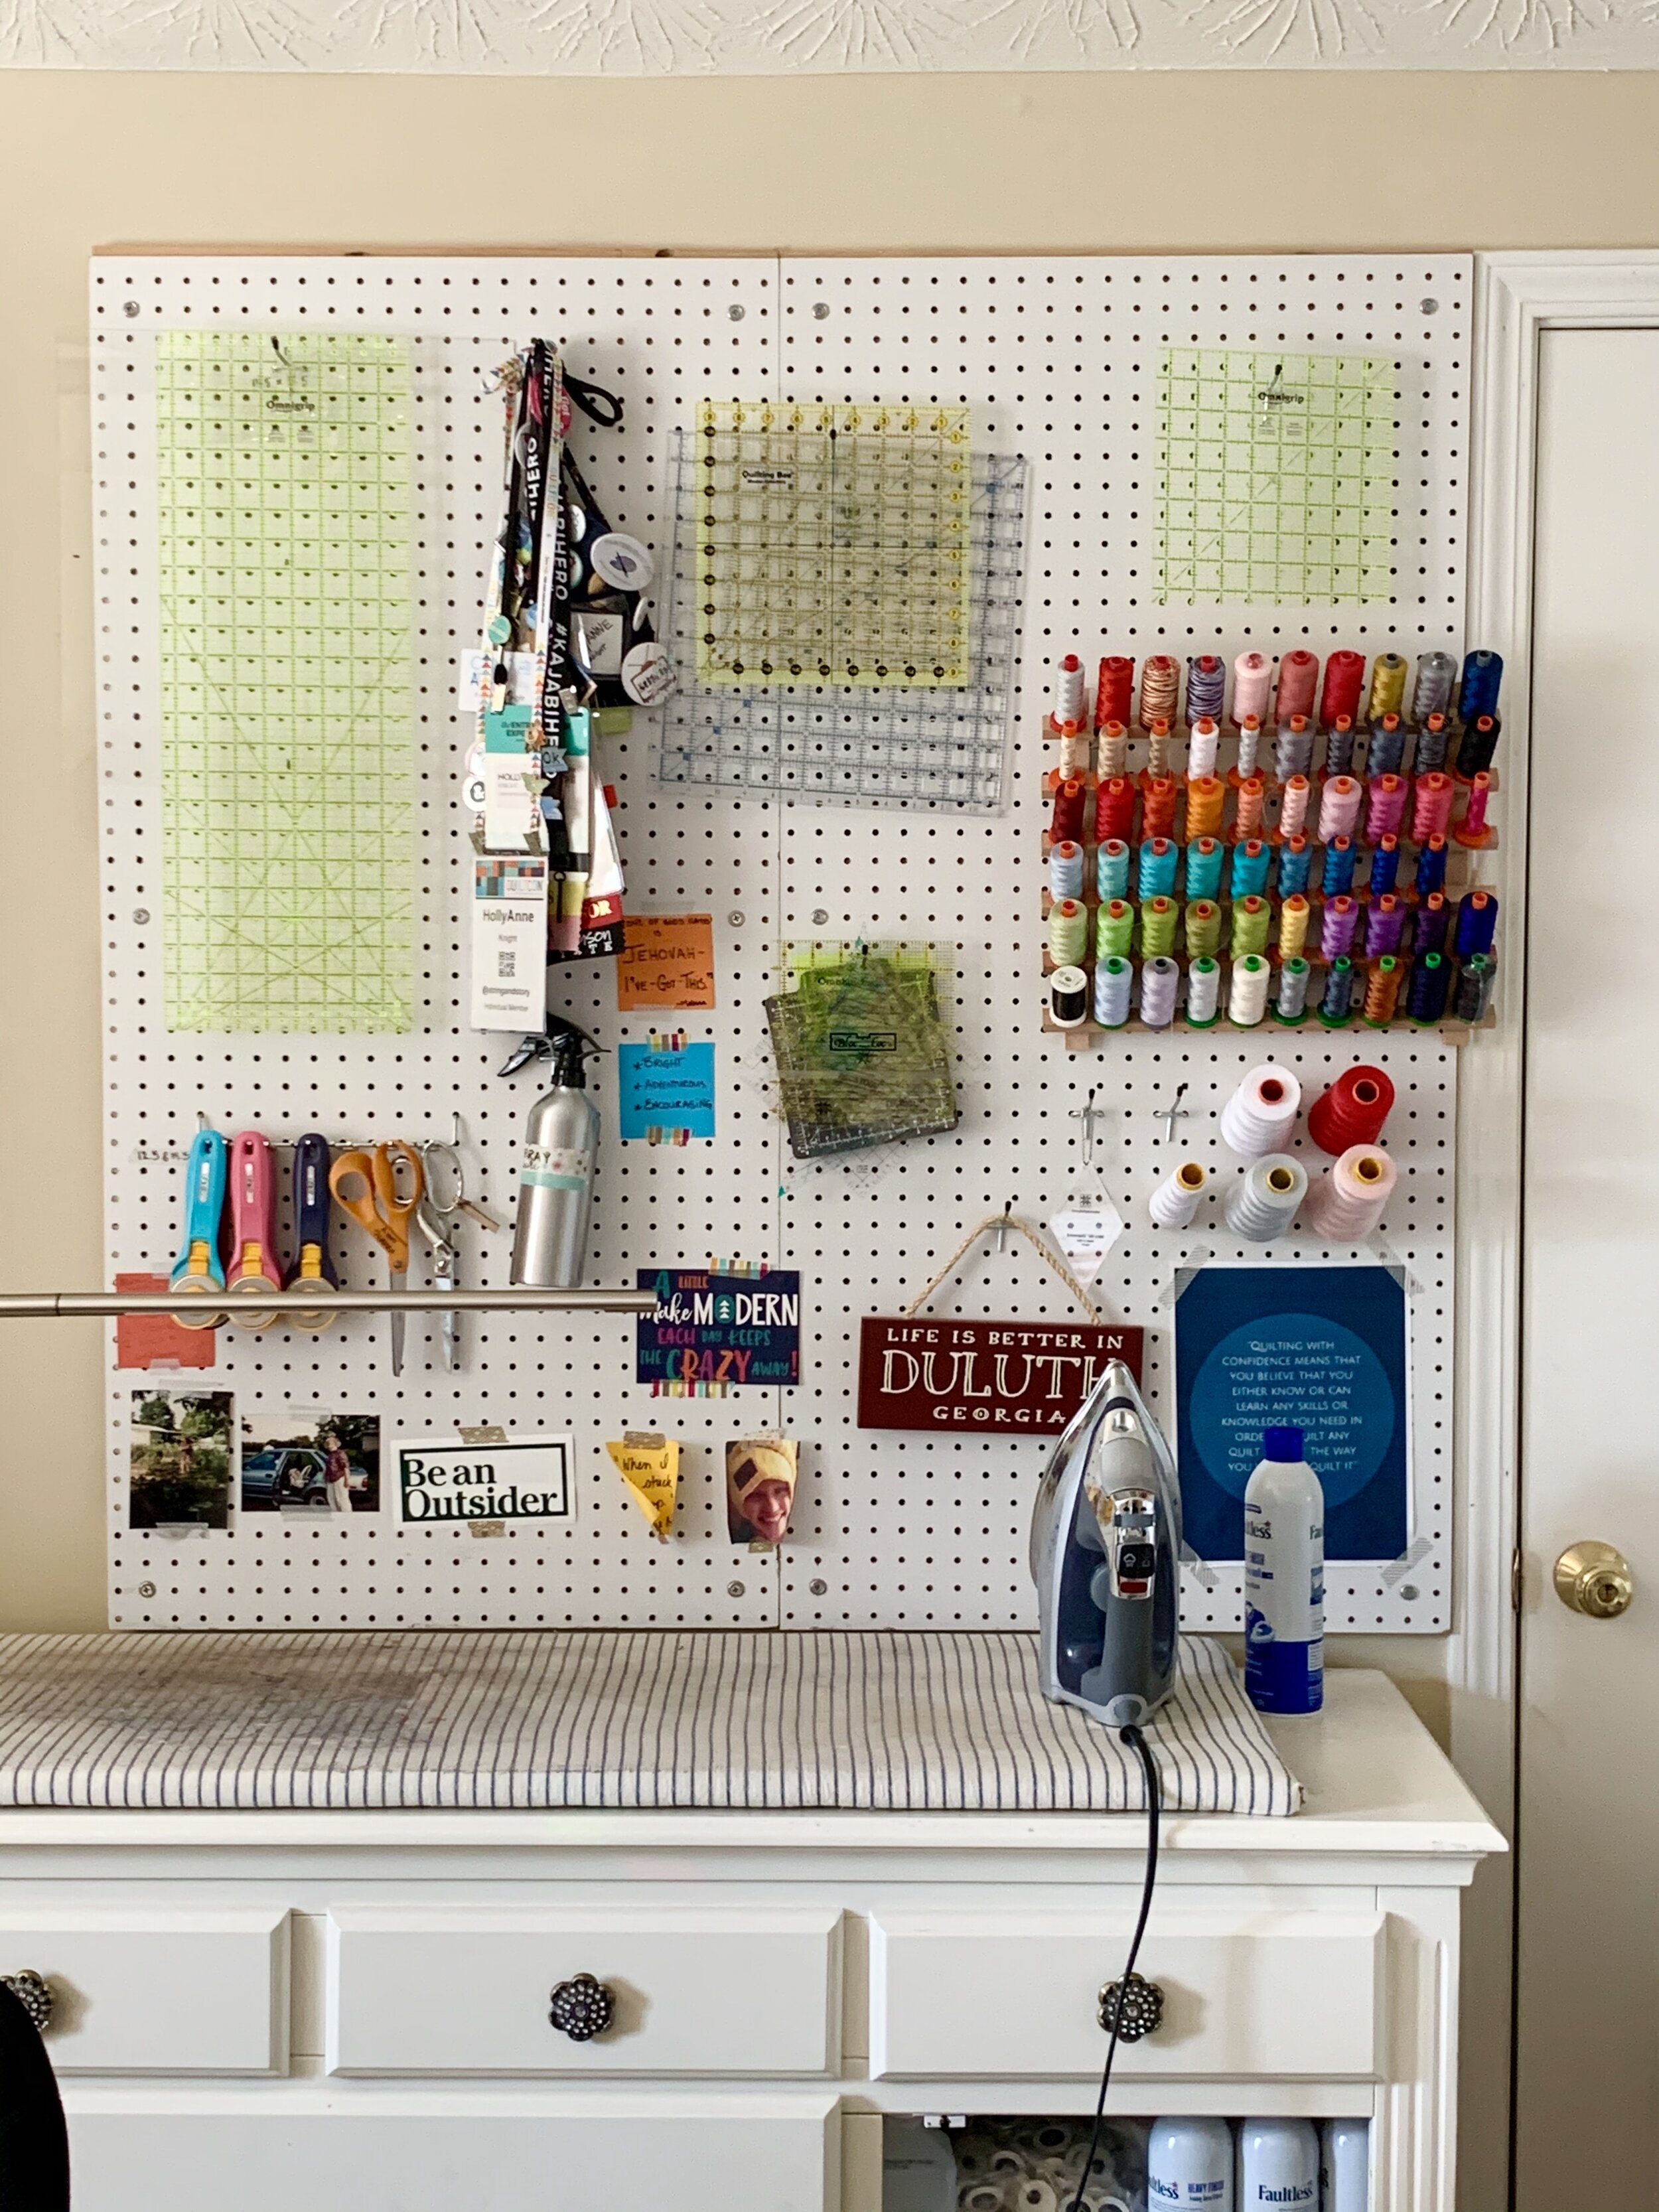
Image Source: images.squarespace-cdn.com
Start with a Clean Slate
The first step to a simple sewing room is to clear out what you don’t need. This is like hitting a reset button. It gives you a fresh start.
Why Tidy Up First?
Think about trying to arrange things when there’s too much stuff. It’s hard! Tidying first makes everything else easier. It helps you see what you really have and how much space you need. It’s the base for good sewing room storage ideas.
The Tidy-Up Process
Don’t try to do it all at once if you have a lot of stuff. You can break it down into smaller tasks. Maybe focus on one area or one type of item each day or week. This makes it feel less big. This is part of decluttering sewing supplies.
What to Keep, Donate, or Toss
Go through everything. Touch each item. Ask yourself:
* Do I use this?
* Do I love this?
* Do I plan to use this soon?
* Is it broken or old?
Be honest with yourself.
* Keep: Items you use often, love, or need for planned projects.
* Donate/Give Away: Fabric you won’t use, tools you have duplicates of, patterns you know you’ll never make. Someone else might love these!
* Toss: Broken items, dried-out glue, rusty needles, tiny scraps that are too small for anything.
Sorting Categories
As you go through things, put similar items together. Use boxes, bags, or just piles on the floor for now.
* Fabrics
* Threads
* Patterns
* Tools (scissors, rulers, rotary cutters)
* Small bits (buttons, zippers, trim, elastic) – these are sewing notions storage items
* Works in Progress (WIPs)
* Things to Mend or Finish
* Things to Donate/Toss
This sorting gives you a clear picture of what you have in each group.
Create Work Zones
Once you know what you have, think about how you use your space. Setting up different areas for different tasks makes your workflow smooth. This is part of planning your sewing room furniture layout.
Why Zone?
Zones help you keep related items together. This means less walking around to find what you need for each step of sewing. It makes your space more useful.
Common Sewing Zones
Most sewing projects follow a path. You find a pattern and fabric, cut the fabric, sew it, and iron it. Your zones can follow this path.
* Cutting Zone: This needs a large, flat surface. A table or a cutting mat on the floor works. Keep rulers, rotary cutters, and scissors here.
* Sewing Machine Zone: Your machine needs a stable spot. Make sure there’s space around it for fabric. Keep common tools like seam rippers, small scissors, and extra bobbins close by.
* Ironing Zone: An ironing board and iron. Place it near your sewing machine zone if possible. You iron often while sewing.
* Storage Zone: Where you keep less-used supplies, extra fabric, and notions. Shelves, drawers, or cabinets work well here.
Even in a small room, you can have zones. Your cutting table might also be your desk. Your ironing board might fold away. The idea is to group things by task.
Find Smart Homes for Everything
Now that you’ve tidied and thought about zones, it’s time to put things away. This is where good sewing room storage ideas come in. The goal is to make it easy to find things and easy to put them back.
Tackle Your Fabric Stash
Fabric can take up a lot of space! Storing it well is key for fabric storage solutions.
Folding vs. Wrapping
- Folding: This works for smaller pieces or cottons that fold neatly. Fold fabric into consistent rectangles. Store these on shelves or in drawers. Folding lets you stack fabric.
- Wrapping: This is great for larger pieces or fabrics that wrinkle easily. Wrap fabric around boards (like comic book boards or magazine boards). Stand these boards up on shelves. This lets you see the fabric edge (the selvedge) and easily pull one piece out without messing up others.
Shelves, Bins, and Drawers
- Shelves: Open shelves are great for folded or wrapped fabric. You can see what you have.
- Clear Bins: Put folded fabric into clear bins on shelves. You can label the bins by fabric type or color.
- Drawers: Fabric in drawers stays dust-free. Roll fabric or fold it and file it vertically so you can see each piece.
Conquer Your Thread Collection
Thread organization can be tricky. Spools roll away! But there are simple ways to keep them neat.
Spool Racks
- Wall Mounts: These racks go on the wall. Spools sit on pegs. You can see all your colors at once. This saves drawer space.
- Tabletop Racks: These sit on your desk. Good for threads you use often.
Boxes and Bins
- Clear Storage Boxes: Boxes with dividers keep spools from rolling. You can stack these boxes.
- Thread Savers: Small plastic clips or rings keep the thread tail from unraveling. Put spools in bins or drawers with savers.
Wall Mounts
Beyond racks, you can use pegboards (more on that later) or even simple shelves with a dowel rod to hold spools. Keep frequently used thread colors near your machine.
Tame Your Notions
Sewing notions storage is about keeping small things organized. Buttons, zippers, pins, needles, elastic – they are all small and get lost easily.
Small Containers
- Jars: Clean food jars or small craft jars are great for buttons, snaps, or beads.
- Plastic Boxes: Small, clear boxes with snap lids work for zippers, elastic, or trim. Stack them or put them in drawers.
- Hardware Organizers: These plastic boxes with many small drawers are perfect for different types of pins, needles, or machine feet.
Drawer Dividers
Use dividers in drawers to keep notions separate. You can buy plastic dividers or make your own with small boxes or cardboard.
Pegboards
A pegboard on the wall is a super tool for sewing notions storage.
* Use hooks for scissors, rulers, and rotary cutters.
* Use small baskets or cups on pegs for pins, clips, or chalk.
* Hang thread racks.
* Put magnetic strips on the pegboard for metal items like pins or bobbins.
Pegboards keep things off your workspace and visible.
Corral Your Patterns
Organizing sewing patterns helps you find the right project fast. Patterns can be paper envelopes, PDF printouts, or magazines.
Filing Systems
- Filing Cabinets: Use hanging folders in a filing cabinet or a filing box. Put each pattern envelope in a folder. You can file by garment type (dresses, tops, pants), season, or designer.
- Magazine Holders: Stand pattern envelopes up in magazine holders on a shelf.
Binders and Folders
- Binders: If you print PDF patterns, put them in clear page protectors in binders. Use dividers for categories.
- Folders: For paper patterns, you can also use large folders. Store these folders in drawers or on shelves.
Keep your pattern system simple so you will actually use it.
General Sewing Room Storage Ideas
Think outside the box for storage throughout your space.
Wall Storage
Walls are gold!
* Shelves: Install shelves high up for less used items.
* Pegboards: As mentioned, great for tools and notions.
* Door Organizers: Hang clear shoe organizers on the back of the door for thread, small fabric scraps, or notions.
Rolling Carts
Carts with drawers or shelves are very useful.
* Use them for works in progress.
* Keep current project supplies on the cart.
* Roll it between your sewing machine and ironing board.
Under-Table Storage
Don’t forget the space under your tables.
* Put storage bins underneath.
* Use rolling drawers or cabinets.
Using Vertical Space
Always look up! Can you add shelves? Can you hang things? Using vertical space is one of the best craft room organization tips, especially in small areas.
Arrange Your Furniture Wisely
The sewing room furniture layout affects how well your space works. Think about how you move when you sew.
Think About Flow
Arrange your main pieces of furniture so you can move easily from one zone to the next (cutting to sewing to ironing). Avoid putting furniture where it blocks pathways or makes the room feel crowded.
Essential Furniture
- Cutting Table: Needs to be a comfortable height so you don’t strain your back. If space is tight, a folding table or one on wheels can be stored away.
- Sewing Desk/Table: Needs to be sturdy and the right height for your machine and chair. Make sure there’s room for fabric.
- Ironing Station: A full-size board or a smaller tabletop board. Place it conveniently.
Think about lighting too! Position furniture to use natural light from windows. Add lamps where needed.
Tips for Small Sewing Rooms
Small spaces need smart thinking. Small sewing room organization is all about using every inch.
Maximizing Every Inch
- Go Vertical: Use walls and doors as much as possible for storage. Shelves up high, pegboards, door organizers.
- Use Corners: Corner shelves or small corner desks can fit into unused space.
- Think Slim: Choose narrow storage units or desks if they fit better.
Multi-Use Furniture
- A cutting table that folds down from the wall.
- An ottoman with storage inside.
- A desk that also holds your sewing machine when not in use.
Door and Wall Space
These are often forgotten.
* Hang rulers on the wall.
* Attach magnetic strips for pins and needles.
* Use hanging bags for scraps.
Every bit of space counts in a small room. Good small sewing room organization makes a huge difference.
Keep Your Space Tidy
Organizing is not a one-time job. Keeping it tidy makes your sewing time more enjoyable.
Daily Habits
Spend a few minutes after sewing to put things away.
* Put scissors back in their spot.
* Wind up thread tails.
* Put fabric scraps in the scrap bin.
* Clear your main workspace.
These small steps prevent mess from building up.
Regular Check-Ins
Once a month or every few months, do a quick check.
* Go through your “to be organized” pile if you have one.
* Tidy up a specific area, like your thread or notions drawer.
* Do a small declutter if needed.
Regular tidying keeps your system working.
Organize Your Entire Craft Space
Many people who sew also do other crafts. The ideas here work for any craft space.
Apply These Ideas to Any Craft
Whether you paint, knit, scrapbook, or make jewelry, the same steps help you organize craft space:
1. Tidy Up: Get rid of things you don’t need or use.
2. Zone: Create areas for different activities (painting area, cutting area, etc.).
3. Storage: Use smart storage for your supplies. (Yarn in bins, paint in jars, paper in folders).
4. Layout: Arrange furniture and storage for easy movement.
5. Maintain: Put things away as you work.
Good craft room organization tips make any creative hobby easier and more fun.
Getting your sewing room organized simply takes some time and effort at first. But the result is a space that helps you be more creative and happy. You will save time looking for supplies. You will have more space to work. You will feel calmer and more ready to sew.
Start with tidying up. Then create zones. Find smart homes for your supplies using sewing room storage ideas that work for you. Arrange your furniture well. Keep it tidy a little bit each day. These steps will turn a messy room into a calm, useful creative space.
Frequently Asked Questions (FAQ)
Q: How often should I organize my sewing room?
A: A big organization might happen once a year or when your room feels messy. But regular tidying is key. Spend 5-10 minutes putting things away after each sewing session. Do a quick clean-up of one area every few weeks.
Q: What if I don’t have a whole room for sewing?
A: Many people use part of a room, a corner, or even a closet. Focus on portable storage like rolling carts or boxes. Use vertical space on walls or doors. A folding table or a desk with a leaf can give you workspace when you need it and save space otherwise. The same organizing steps still apply, just on a smaller scale. Small sewing room organization is about using smart solutions in limited areas.
Q: I have too much fabric. How do I deal with it all?
A: This is common! Start by decluttering – get rid of scraps too small to use or fabrics you really don’t like anymore. Then, use fabric storage solutions like folding or wrapping on boards to make it neat. Store it where you can see it, maybe sorted by color or type. Don’t feel bad selling or donating fabric you won’t use.
Q: Is it expensive to buy storage containers?
A: It doesn’t have to be! Look for low-cost options. Reuse jars, boxes, or containers you already have. Check dollar stores or discount stores for basic bins. Pegboards and simple shelves are quite affordable. You can organize a lot using items you already own or find cheaply.
Q: How do I store works in progress (WIPs)?
A: Keep WIPs together. Use a project bag, box, or bin for each project. Put the pattern, fabric, thread, and notions needed for that project in its container. This keeps everything together and makes it easy to grab when you want to work on it. Store these project bins on a shelf or in a rolling cart.