
Do you want your sewing machine to work its best? Do you wonder how to keep it running smooth? Cleaning your sewing machine is the answer. Cleaning is a simple way to make your machine work like new. It helps your machine last a long time. This guide shows you how to clean your sewing machine step by step. It is a simple DIY sewing machine cleaning guide for anyone.
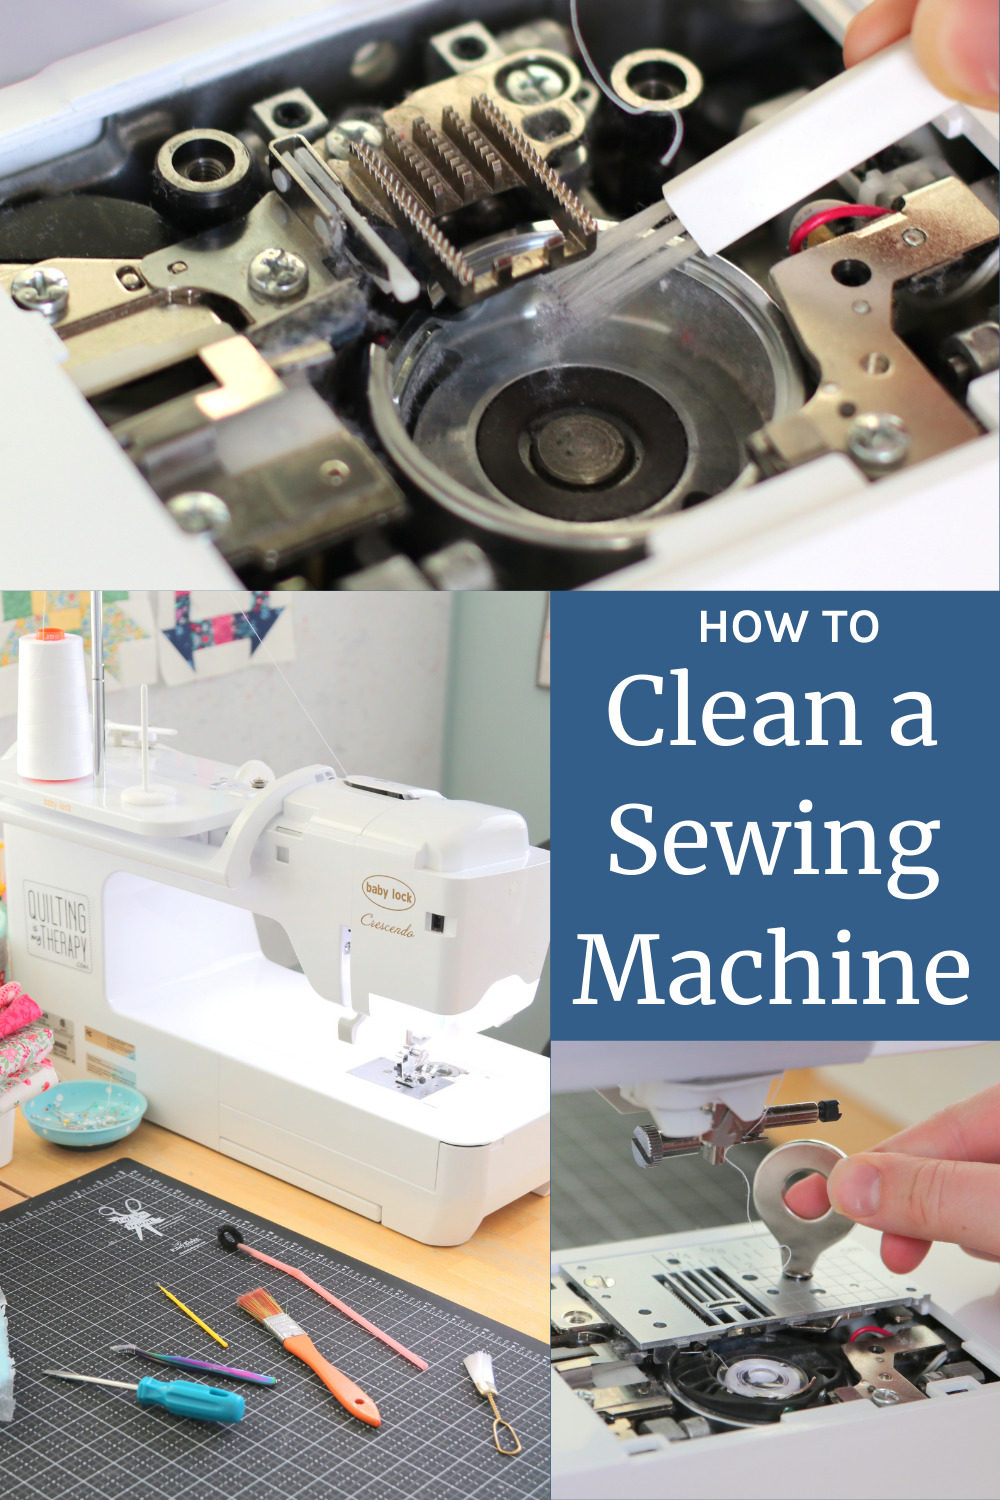
Image Source: www.diaryofaquilter.com
Why Cleaning Your Sewing Machine Matters
Your sewing machine works hard. Fabric fibers, dust, and old oil get inside. This dirt builds up. It gets into the moving parts. This makes the machine run slow. It can skip stitches. It can even break down.
Regular sewing machine maintenance stops these problems. It keeps the parts moving freely. It makes sure your stitches look good. A clean machine is a happy machine. It works better. It lasts longer.
Think about how much dust is in your house. Now think about tiny fabric pieces. They fly everywhere when you sew. These tiny bits go into your machine. They mix with oil. They make a sticky mess. This mess stops your machine from working right.
Cleaning sewing machine lint is very important. Lint is the biggest problem. It comes from your fabric. It looks like soft fluff. But it packs tight inside the machine. It acts like a brake on the moving parts.
Old oil can also cause trouble. It gets thick and sticky. It does not help parts move. It makes them stick. Cleaning helps remove old oil. Then you can add new, fresh oil. This helps the parts glide.
What You Need to Clean Your Machine
You need a few simple things. These are your sewing machine cleaning tools.
- A small brush. Most machines come with one. It is soft. It gets dust out.
- A small screwdriver. You need this to take off parts. Check your machine manual. It tells you what size.
- Tweezers. These help pull out tight clumps of lint.
- Lint-free cloth. Old cotton t-shirts work well. Use them to wipe parts.
- Sewing machine oil. Use only oil made for sewing machines. Other oils can harm your machine.
- Maybe a small vacuum cleaner. A mini one or a hose on a regular one. Be careful not to suck up small screws!
- Good light. A bright lamp helps you see inside.
Here is a simple list of your tools:
| Tool Name | What it Does |
|---|---|
| Small brush | Gets dust and lint out easily. |
| Small screwdriver | Takes off metal covers and plates. |
| Tweezers | Grabs tiny bits of lint. |
| Lint-free cloth | Wipes parts clean. |
| Sewing machine oil | Makes parts move smoothly. |
| Small vacuum | Sucks up loose dust. |
| Bright light | Helps you see hidden dirt. |
Getting Ready to Clean
Safety comes first. Always turn off your machine. Pull the plug out of the wall. Do this before you do anything else. You do not want the machine to start while your fingers are inside.
Clear a space to work. Put down some paper or an old cloth. This catches the dirt.
Take off the needle and the presser foot. This gives you more room to work. It also keeps you safe. Put them in a safe place. You do not want to lose them.
Now you are ready for DIY sewing machine cleaning.
Removing the Needle Plate
The needle plate is the flat metal piece. The needle goes down through it. It is usually held on by screws. Or it might snap into place.
Remove sewing machine needle plate. Use your small screwdriver. Unscrew the screws. Keep the screws safe. Put them in a cup or on a magnetic dish.
Lift off the needle plate. Now you can see underneath it.
Cleaning Under the Needle Plate
This area gets very dirty. You will see lots of lint and dust here. This is where the feed dogs are.
Use your small brush. Brush away all the dust and lint. Brush gently. Get into the corners.
Use tweezers to pull out any packed lint. Look for fuzz around the feed dogs.
Use the small vacuum if you have one. Hold the hose close. Suck up the loose dirt. Be careful not to suck up screws.
Wipe the needle plate itself. Use your lint-free cloth. Make it shiny again.
This step is key for cleaning sewing machine lint and sewing machine dust removal.
Cleaning the Feed Dogs
The feed dogs are the little teeth. They move the fabric along as you sew. If they are full of lint, they cannot grip the fabric well. This makes stitches uneven.
You cleaned around the feed dogs when you took off the needle plate. Look at them closely. Are there bits of thread or lint stuck between the teeth?
Use your brush to clean them. Brush forwards and backwards. Brush side to side. Get all the dirt out. Tweezers can help pull out stubborn bits.
Making sure you how to clean sewing machine feed dogs correctly helps fabric move right.
Cleaning the Bobbin Area
This is another spot that gets very dirty. It is where the bobbin spins. Lint loves to gather here.
First, take out the bobbin. Lift it out.
Now, you need to clean sewing machine bobbin case. Or maybe the area where the bobbin case sits. This part is different on different machines.
- Top-loading bobbin: The bobbin drops in from the top. You will see a clear plastic cover. Open or slide it off. Lift out the bobbin. There might be a metal or plastic bobbin case too. Take that out if you can. You will see a round area. This area gets full of lint. Use your brush. Clean out all the lint.
- Front-loading bobbin: The bobbin goes into a metal case. This case slides into a part in the front of the machine. Open the door on the front. Pull out the bobbin case. Take the bobbin out of the case. Now you have the case and the area it came out of. Clean the bobbin case with your brush and cloth. Clean the area inside the machine where the case sits. This area has moving parts. Be gentle with your brush.
Look at the hook area. This is where the top thread meets the bobbin thread. This area needs to be very clean. Use your brush. Get all the lint out.
This step is super important for cleaning sewing machine lint and keeping stitches good.
More Dust Removal
Now clean the rest of the machine. Use your brush for tight spots. Use your lint-free cloth for the outside.
Brush around the needle bar. Brush around the presser foot holder. Brush any open areas you can see.
Use your cloth to wipe down the machine body. Get off dust and fingerprints.
This is general sewing machine dust removal. It keeps the whole machine looking and working better.
Time to Oil the Machine
Not all machines need oil. Some new machines are “self-oiling.” Check your machine manual. It tells you if and where to oil.
If your machine needs oil, use only sewing machine oil. It is light and clear. It does not have things in it that can harm the machine. Never use cooking oil, WD-40, or other thick oils. They will gum up your machine.
Oiling sewing machine parts helps them move smoothly. It reduces friction. This makes the machine run quieter. It makes the motor work less hard.
Look at your manual. It shows you the oiling points. These are usually spots where metal parts rub together.
Common oiling points are:
- In the bobbin area. After cleaning, put a drop or two of oil here.
- Around the hook. The part that spins around the bobbin area.
- Sometimes there are small holes on the machine body. Put a drop of oil in these holes.
- Inside the machine if your manual shows you. You might need to take off a cover.
Use just one drop of oil on each point. Do not use too much. Too much oil attracts more lint and dust. It makes a mess. One small drop is enough to lubricate sewing machine parts.
Putting It All Back
You have cleaned and maybe oiled. Now put your machine back together.
Put the bobbin case back in. Put the bobbin in the case (if it is a front-loader). Or just put the bobbin back in the top if it is a top-loader.
Put the needle plate back on. Line it up right. Put the screws back in. Tighten them gently. Do not overtighten.
Put the presser foot back on. Put in a new needle. It is a good time for a fresh needle.
Test Your Machine
Plug your machine back in. Do not thread it yet.
Lower the presser foot. Sew on a scrap piece of fabric first. Sew some lines. Sew some curves.
Listen to the sound. Does it sound smoother? It should run quieter.
Look at the stitches. Are they even? Do they look good?
If you oiled the machine, sew on a scrap piece of fabric for a minute first. This helps work the oil into the parts. It also catches any extra oil. You do not want oil on your good fabric. Sew on the scrap until no oil marks appear.
How Often to Clean Your Machine
How often you clean depends on how much you sew.
- Sew often (every day or week): Clean the bobbin area and under the needle plate every project or every few days. Do a deeper clean once a month.
- Sew sometimes (a few times a month): Clean the bobbin area and under the needle plate every few projects. Do a deeper clean every 2-3 months.
- Sew rarely (once a month or less): Clean before you start a new project. Do a deeper clean every 6 months.
If you sew with fuzzy fabrics (like fleece) or use lots of thread that sheds lint, clean more often.
Think of this as your sewing machine maintenance schedule. Keeping it clean stops problems before they start. It makes DIY sewing machine cleaning a quick job.
A Simple Cleaning Schedule
Here is a possible schedule. Adjust it for how you sew.
| Task | How Often (if you sew often) | How Often (if you sew sometimes) | How Often (if you sew rarely) |
|---|---|---|---|
| Clean bobbin area/under needle plate | Every project/few days | Every few projects | Before each project |
| Deep clean (all steps) | Monthly | Every 2-3 months | Every 6 months |
| Oil machine (if needed) | Check manual, usually with deep clean | Check manual | Check manual |
| Wipe down outside | Weekly | Monthly | As needed |
This simple plan helps with regular sewing machine dust removal and lint control.
What if Your Machine Still Acts Up?
You cleaned everything. You oiled it. But it still does not work right.
- Check your needle: Is it new? Is it the right type for your fabric? Is it put in correctly? A bent or dull needle causes many problems.
- Check your thread: Is it good quality? Is it threaded right? Old or cheap thread can break or shed lots of lint.
- Check bobbin threading: Is the bobbin wound smoothly? Is it put in the case or machine correctly?
- Check tension: Make sure the tension is set right for your fabric and thread.
Sometimes cleaning is not enough. Parts can get worn out or break.
When to Ask for Help
If your machine has a major problem, you might need a pro.
Take it to a sewing machine repair shop if:
* It makes a strange noise.
* Parts seem loose or broken.
* It keeps skipping stitches even with a new needle and good thread.
* It jams often.
* You cannot figure out what is wrong.
A professional can check the timing and fix things you cannot see. They can also give your machine a very deep clean and service.
Benefits of a Clean Machine
Cleaning your machine pays off. A clean machine gives you:
- Peak performance: It runs smoothly and powerfully.
- Better stitches: Stitches are even and strong.
- Fewer problems: Less skipping, breaking threads, or jamming.
- Longer machine life: Parts wear out slower when they are clean and oiled.
- Happier sewing: Sewing is fun when your machine works well.
Regular sewing machine maintenance, like cleaning and oiling, is an investment. It keeps your machine working for years. It makes every sewing project easier and more enjoyable.
More Tips for Keeping Your Machine Clean
- Keep your machine covered when you are not using it. This keeps dust out.
- Use good quality thread. Cheap thread makes more lint.
- Clean after sewing fuzzy fabrics right away.
- Do not sew over pins. Pins can damage parts.
Following these simple steps for DIY sewing machine cleaning will help you enjoy sewing more. Your machine will thank you!
Frequently Asked Questions (FAQ)
h4: How often should I clean my sewing machine?
It depends on how much you sew. Clean the main areas (bobbin, under needle plate) often, maybe after each big project. Do a deeper clean less often, like monthly or every few months.
h4: What kind of oil should I use?
Only use oil made for sewing machines. It is light and will not harm the machine. Never use other oils like cooking oil or thick machine oil.
h4: Do all sewing machines need oiling?
No. Some newer machines are made not to need oiling. Check your machine’s manual. It will tell you if and where to oil.
h4: Can I use compressed air to clean?
Be careful with compressed air. It can blow lint deeper inside the machine. It is better to brush and vacuum the lint out. If you use it, blow away from the machine’s insides.
h4: What if I lost my machine’s brush?
You can buy small soft brushes. A soft paint brush or makeup brush can work too. Just make sure it is clean and soft.
h4: Is it okay if I miss a cleaning sometimes?
Missing one cleaning is probably fine. But letting dirt build up for a long time can cause problems. Try to follow a regular cleaning plan.
h4: How do I know where to oil my specific machine?
Check the manual that came with your machine. It has pictures showing the exact oiling points for your model.
h4: My machine is very old. Can I still clean it myself?
Yes, most older machines are easier to clean and oil. The same steps apply. Be gentle with old plastic parts. If it has not been cleaned in years, you might find a lot of dirt. A professional clean might be a good idea first.
h4: I broke a screw when taking off the needle plate. What do I do?
Stop cleaning. You will need to get a replacement screw. Check your manual for the screw size. You might find one at a sewing machine shop or hardware store. Be careful not to lose screws next time. Put them somewhere safe.
h4: Can I wash the bobbin case?
Usually, no. The bobbin case is metal. It can rust or get damaged. Just brush the lint off it. Do not put it in water.
Keeping your sewing machine clean is a simple habit. It makes a big difference. It helps your machine work well for many years. Happy sewing!