
How do you thread a Brother sewing machine? Threading your Brother sewing machine means setting up both the lower thread (the bobbin) and the upper thread (from the spool). It is a simple process once you know the steps. You put the filled bobbin in its spot under the needle plate. Then, you guide the top thread from the spool through a path of guides and parts on the machine down to the needle. Following the pictures in your specific Brother sewing machine manual guide helps a lot. Doing it right stops problems like broken threads or messy stitches.
Learning to thread your Brother sewing machine correctly is a big step in sewing well. When the machine is threaded right, the top thread and the bobbin thread work together perfectly. This makes nice, even stitches. If the threading is wrong, you can have lots of problems. Threads might break, stitches might skip, or your sewing might look tangled on the back. Taking a few minutes to thread carefully saves you time and trouble later. Let us go through the easy steps to get your machine ready to sew.
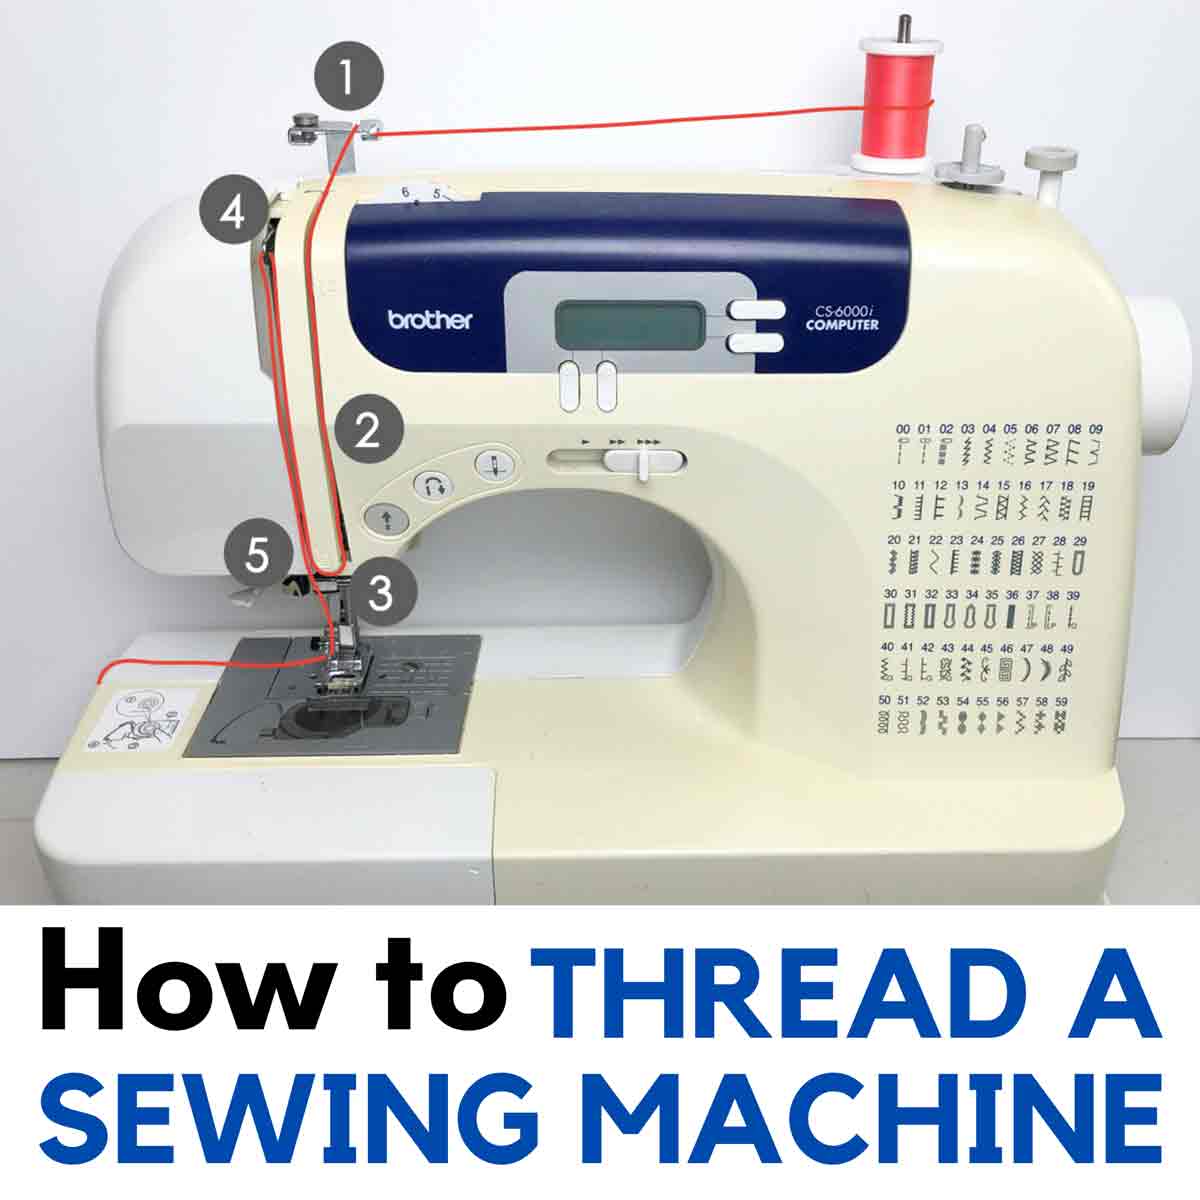
Image Source: mindymakes.com
Getting Ready to Thread Your Machine
Before you even touch the thread, do a few quick things. This makes threading easier and helps your machine work better.
Safety First: Power Off
Always turn off your sewing machine before threading it. Or, even better, unplug it from the wall. This keeps you safe. You do not want the needle to suddenly move while your fingers are near it.
Gather Your Supplies
You will need a spool of thread. You also need a filled bobbin. Make sure the thread on the bobbin matches the thread on the spool. Using the same type and weight of thread works best.
Lift the Presser Foot
Use the lever on the back or side of the machine to lift the presser foot. Lifting the foot opens up the tension discs. This lets the thread sit correctly in them. This is a very important step for getting the right thread tension adjustment brother.
Put the Needle in the Highest Spot
Turn the handwheel on the side of your machine. Turn it towards you. Watch the needle go up and down. Stop turning when the needle is as high as it can go. The take-up lever also needs to be at its highest spot. This helps the thread go through its path smoothly.
Threading the Lower Part: The Bobbin
The lower thread comes from the bobbin. Brother machines usually have a drop-in bobbin (horizontal) or a bobbin case (vertical). Let’s cover how to get the bobbin ready and put it in. This is part of the lower bobbin threading brother process.
Filling Your Bobbin
First, you need a bobbin filled with thread. This is called Brother sewing machine bobbin winding.
Get a Bobbin
Use the bobbins that came with your Brother machine. Or buy ones that are made for your specific model. Using the wrong bobbin can cause big problems.
Place the Spool
Put your spool of thread on the spool pin at the top of your machine. If you have a horizontal pin, put a cap on the end to keep the spool on.
Route the Thread
Look for a special guide for bobbin winding. It is usually near the spool pin. Follow the line or number marked on the machine. Wrap the thread around this guide. This gives the thread a little pull needed for smooth winding.
Put Thread on the Bobbin
Take the end of the thread. Put it through the small hole on the bobbin. Go from the inside of the bobbin to the outside.
Place the Bobbin
Put the bobbin onto the bobbin winder spindle. This spindle is usually on the top or front of the machine. Push it firmly onto the spindle.
Lock the Winder
Slide the bobbin winder spindle to the side. It should click into the winding position. Some machines might have a picture showing which way to slide it.
Hold the Thread End
Hold the tail of the thread sticking out of the bobbin hole. Keep a gentle hold on it.
Start Winding
Push the foot control or the start/stop button. The bobbin will start to spin and fill with thread. Let it spin a few times. Stop and cut off the small thread tail you were holding.
Keep Winding
Start the machine again. Let the bobbin fill. Do not overfill it. Most machines stop winding automatically when the bobbin is full.
Finish Winding
Once the bobbin stops or is full, stop the machine. Slide the bobbin winder spindle back to its resting spot. Take the filled bobbin off the spindle. Cut the thread connecting it to the spool.
Now you have a filled bobbin ready to go into the machine.
Inserting the Bobbin
Putting the bobbin into the machine is the next step for the lower bobbin threading brother. This is called inserting bobbin case brother if your machine uses one. Many newer Brother machines have a drop-in bobbin system. This is much easier.
For Drop-In Bobbins (Horizontal Bobbin)
This system is very common on modern Brother machines.
- Open the Cover: Slide the clear plastic cover off the bobbin area near the needle plate.
- Insert the Bobbin: Put the filled bobbin into the bobbin case. Make sure the thread unwinds in the correct direction. There is usually a picture showing this. For most Brother machines, the thread should come off the bobbin in a way that makes it look like the letter “P” or “Q” when you look at the bobbin from the top. Follow the picture!
- Guide the Thread: Find the small slot or channel marked on the machine near the bobbin. Pull the bobbin thread through this slot.
- Follow the Path: Keep pulling the thread gently. Guide it through the marked path. There might be one or two turns or clicks you need to pass through. This sets the bobbin thread tension.
- Leave a Tail: Pull out about 6 inches of bobbin thread. Let it rest over the needle plate.
- Close the Cover: Slide the clear plastic cover back into place.
For Bobbin Case Bobbins (Vertical Bobbin)
Older or some heavier-duty Brother machines use a separate bobbin case.
- Open the Door: Open the cover or door on the front of the machine, below the needle.
- Put Bobbin in Case: Take the filled bobbin. Place it inside the bobbin case. Make sure the thread unwinds in the correct direction. There is a slot on the side of the case. Pull the thread through this slot.
- Pull Under Spring: Gently pull the thread further. It needs to go under the small tension spring on the bobbin case. You should feel a little pull. This sets the bobbin thread tension.
- Hold the Case: Hold the bobbin case by its latch. Let the bobbin hang inside.
- Insert the Case: Push the bobbin case into the hook area inside the machine. It should click or snap into place.
- Close the Door: Close the cover or door.
- Leave a Tail: The thread should be hanging out from the bobbin case area. Leave a tail about 6 inches long.
No matter which type you have, successfully inserting bobbin case brother or the drop-in bobbin is key to good lower bobbin threading brother.
Threading the Upper Part: The Spool to the Needle
Now let us thread the top part of the machine. This involves guiding the thread from the spool through several points down to the needle. This follows the upper thread path brother.
Placing the Spool
Put your spool of thread on the spool pin at the top of your machine. If your machine has both vertical and horizontal pins, use the one shown in your manual for regular sewing. For a horizontal pin, put the cap on to hold the spool.
Following the Thread Path
Look at your machine. There are numbers or lines showing you the path the thread should follow. Most Brother machines have a marked path. This path ensures the thread goes through all the right guides and the tension system.
- First Guide: Find the first thread guide. It is usually a hook or loop near the spool pin. Bring the thread through it.
- Entering the Channel: The thread then goes down into a channel on the front of the machine. Follow the numbers or arrows. Pull the thread down firmly.
- Going Around: At the bottom of the channel, the thread usually needs to make a U-turn. Guide the thread up the other side of the channel.
- Finding the Take-Up Lever: As you guide the thread up, you will come to the Brother sewing machine take-up lever. This is the arm that moves up and down as the machine sews. It has a hole or hook in it. Make sure this lever is at its highest point (you did this earlier by turning the handwheel).
- Threading the Take-Up Lever: Put the thread through the hole or hook in the take-up lever. This is a very important step! If you miss this, your machine will not make stitches correctly, and you will likely have skipped stitches troubleshooting brother problems.
- Going Down Again: From the take-up lever, the thread goes back down the front of the machine.
- Lower Guides: Guide the thread through any lower guides. These are usually hooks or loops right above the needle area. There might be one or two. One is often directly above the needle clamp.
- The Needle Clamp Guide: There is often a final guide built into the needle clamp area. This small hook helps keep the thread right before it goes into the needle. Make sure the thread is behind this hook.
Threading the Needle
The final step in the upper thread path brother is putting the thread through the needle’s eye.
Manual Needle Threading
If your machine does not have a built-in helper:
- Cut the End: Cut the end of your thread clean with sharp scissors. A frayed end is hard to push through the needle.
- Wet or Stiffen: You can lick the end of the thread or use a special liquid to make it stiff. This helps.
- Push Through Eye: Hold the thread end straight. Push it through the eye of the needle. Needles for sewing machines have the eye near the point. Make sure the needle is facing the correct way (the flat side of the needle shaft is usually to the back).
- Pull Through: Once the thread is through, pull a few inches of thread through the eye.
Using the Needle Threading Guide Brother (Built-in Threader)
Many Brother machines have a handy built-in needle threader. This small device helps push the thread through the needle’s eye. Steps vary a little by machine model, so check your Brother sewing machine manual guide. But here are the general steps:
- Lower the Threader: Lower the needle threader lever or button. A small hook will usually swing down.
- Guide the Thread: Place the thread in front of the needle. Guide it through any small hooks on the threader device itself.
- Engage the Hook: Position the threader hook so it goes through the eye of the needle from the back.
- Catch the Thread: Place the thread across the front of the needle, right in front of the small hook that is now through the eye.
- Lift the Threader: Slowly raise the needle threader lever. The small hook should pull a loop of thread through the back of the needle’s eye.
- Pull the Loop: Pull the loop of thread through to the back. Pull out several inches of thread.
Whether you thread by hand or use the needle threading guide brother, pull about 6 inches of thread through the needle. Let this thread tail rest under the presser foot.
Bringing Up the Bobbin Thread
You have threaded the top and the bottom. Now you need to bring the lower bobbin threading brother thread up through the needle plate. This creates the stitch when you start sewing.
- Hold Top Thread: Hold the tail of the upper thread (the one coming out of the needle) gently with your left hand.
- Turn Handwheel: Turn the handwheel on the side of the machine slowly towards you.
- Lower and Raise Needle: Watch the needle go down into the bobbin area. As you keep turning the handwheel towards you, the needle will come back up.
- Catch the Loop: As the needle rises, it will catch the bobbin thread and bring up a loop of it.
- Pull the Loop: Use your fingers or the tip of scissors or tweezers to grab this loop of bobbin thread.
- Pull Out Tail: Pull the loop gently. This will bring the end of the bobbin thread up through the needle plate hole.
- Place Both Threads: Now you have both the top thread and the bobbin thread tails on top of the needle plate. Pull both threads together and slide them under the presser foot, towards the back of the machine.
Now your machine is correctly threaded and ready to sew!
Checking Your Threading
It is a good idea to do a quick check before you start sewing your project.
- Is the spool turning freely?
- Is the thread going through all the guides, including the take-up lever?
- Is the thread sitting down between the tension discs?
- Is the bobbin in correctly, with the thread coming out the right way?
- Have you brought the bobbin thread up?
- Are both thread tails (top and bottom) pulled under the presser foot and towards the back?
If yes to all, you are likely good to go.
Grasping Thread Tension
Correct thread tension is vital for nice stitches. It means the top thread and the bobbin thread pull evenly and meet in the middle of the fabric layers. Thread tension adjustment brother is usually done with a dial or buttons on your machine.
- Too Tight Top Tension: Loops on the bottom of the fabric.
- Too Loose Top Tension: Loops on the top of the fabric.
- Too Tight Bobbin Tension: Machine might be hard to turn, fabric might pucker.
- Too Loose Bobbin Tension: Loops on the top of the fabric (looks similar to loose top tension, but the problem is the bobbin).
Most of the time, you only need to adjust the top tension using the machine’s dial. The bobbin tension is set at the factory and rarely needs changing. If you have tension problems, first check your threading again! Wrong threading is the most common cause of tension issues. Make sure the thread is really seated down in the tension discs with the presser foot up when you threaded.
Troubleshooting Common Threading Problems
Even when you follow the steps, problems can happen. Here are some common issues and how correct threading helps fix them.
Sewing Machine Thread Breaks Brother
Thread breaking is frustrating. It stops you from sewing.
- Check Threading: Is the upper thread path brother clear? Is it going through all the guides, including the take-up lever? Is the thread caught anywhere?
- Check Bobbin: Is the bobbin thread caught? Is the bobbin winding loose or uneven? Is it the right type of bobbin?
- Check Needle: Is the needle bent, dull, or the wrong size for your thread and fabric? A bad needle is a major cause of thread breaks. Replace it!
- Check Tension: Is the thread tension adjustment brother set too high (too tight)?
- Check Spool: Is the thread catching on the spool itself or the spool pin? Is the thread old or poor quality?
- Check Speed: Are you sewing too fast for the thread or fabric?
Correct threading is the first thing to check when thread breaks happen.
Skipped Stitches Troubleshooting Brother
Skipped stitches mean your machine is missing stitches, leaving gaps in your seam.
- Check Threading: Did you miss threading the Brother sewing machine take-up lever? This is a very common cause of skipped stitches. Is the upper thread path brother correct? Is the lower bobbin threading brother right?
- Check Needle: Is the needle put in correctly (flat side to the back on most Brother machines)? Is it bent or dull? Is it the right type of needle for your fabric (e.g., ballpoint for knits, sharp for woven)? A wrong or bad needle is the most common cause of skipped stitches.
- Check Bobbin: Is the bobbin in correctly and threaded through its tension path?
- Check Fabric: Is the fabric being fed smoothly?
If you have skipped stitches troubleshooting brother, always re-thread both the top and the bobbin. Then put in a new needle. This fixes most skipping problems.
The Importance of Your Brother Sewing Machine Manual Guide
Every Brother sewing machine model is a little different. The pictures and exact path for threading might vary. Your Brother sewing machine manual guide is your best friend.
- It shows the exact upper thread path brother for your machine.
- It shows the correct way for inserting bobbin case brother or the drop-in bobbin.
- It explains the Brother sewing machine bobbin winding for your model.
- It details how to use the needle threading guide brother if you have one.
- It helps with thread tension adjustment brother for your specific machine.
- It has tips for skipped stitches troubleshooting brother and sewing machine thread breaks brother unique to your model.
Keep your manual handy. Refer to it often, especially when you are new or if you have a problem. You can often find a digital copy online if you lost the paper one. Just search for your Brother model number and “manual.”
Comprehending Machine Parts Used in Threading
It helps to know the names of the parts you are using.
- Spool Pin: Holds the spool of thread.
- Thread Guides: Small hooks or loops that keep the thread on the right path.
- Tension Discs: Metal plates that squeeze the thread to control how much pull it has.
- Take-Up Lever: An arm that moves up and down, pulling thread from the spool and feeding it to the needle.
- Needle Clamp Guide: A guide right above the needle.
- Needle: The part that goes through the fabric to make the stitch.
- Needle Plate: The metal plate under the needle with a hole or slot for the needle.
- Bobbin Winder Spindle: Where you put the bobbin to fill it.
- Bobbin: Holds the lower thread.
- Bobbin Case: (For some machines) holds the bobbin.
- Handwheel: On the side, used to manually move the needle up and down.
Knowing these parts helps you follow the threading path shown in your Brother sewing machine manual guide.
Keeping Your Machine Clean
A clean machine works better and threads easier. Lint and thread bits can build up in the bobbin area and the tension discs. This can mess up your thread tension and cause problems like sewing machine thread breaks brother. Use a small brush (often comes with the machine) to clean the bobbin area regularly. Check your manual for how to clean your specific model.
Conclusion: Easy Steps for Great Sewing
Threading your Brother sewing machine does not have to be hard. By following the steps for both the lower bobbin threading brother and the upper thread path brother, you set yourself up for success. Remember to always start with the machine off. Wind your bobbin right (Brother sewing machine bobbin winding). Put the bobbin in correctly (inserting bobbin case brother or drop-in). Follow the numbered path for the top thread, making sure to go through the Brother sewing machine take-up lever and the final needle guides. Use the needle threading guide brother if you have one, or thread the needle carefully.
If you run into issues like skipped stitches troubleshooting brother or sewing machine thread breaks brother, the first and best thing to do is re-thread the entire machine, top and bottom. Also, check your needle. Correct thread tension adjustment brother comes from proper threading.
Always keep your Brother sewing machine manual guide nearby. It has the exact steps for your specific machine. With a little practice, threading will become quick and easy, letting you focus on the fun part: sewing!
Frequently Asked Questions (FAQ)
Why is my Brother sewing machine skipping stitches?
Skipped stitches often happen because of the needle or threading. Check if the needle is new, put in the right way, and right for your fabric. Make sure you threaded the top thread correctly, especially through the take-up lever. Also, check the lower bobbin threading brother. Re-threading the whole machine and changing the needle fixes skipped stitches troubleshooting brother most times.
How should the thread come off the bobbin in a Brother machine?
For most drop-in bobbin Brother machines, the thread should come off in a way that looks like the letter “P” or “Q” when you look down at the bobbin in its spot. There is usually a picture right on the machine plate showing the correct direction. Following this is key to good lower bobbin threading brother.
Where is the take-up lever on my Brother sewing machine?
The Brother sewing machine take-up lever is an arm that moves up and down on the front of the machine. The upper thread path brother always goes through a hole or hook in this lever. You must make sure it is at its highest point when you start threading and that the thread goes through it.
How do I adjust thread tension on my Brother sewing machine?
Thread tension adjustment brother is usually done with a dial or buttons that control the top thread tension. There are numbers, and you turn the dial to a higher number to make the tension tighter or a lower number to make it looser. Bobbin tension is rarely adjusted. Before changing tension, make sure your machine is threaded correctly, as wrong threading is the main cause of tension problems.
My thread keeps breaking. What should I check?
Sewing machine thread breaks brother can be caused by many things. Check your threading first; make sure it is correct and smooth. Check the needle; is it bent, dull, or wrong for your thread/fabric? Check your thread quality. Is the thread catching on the spool? Is the tension too tight? Is the machine clean, especially the bobbin area?
Do I need to use a bobbin case on my Brother machine?
It depends on your model. Many newer Brother machines use a drop-in bobbin system and do not have a separate bobbin case. The bobbin just drops into a spot under a clear cover. Older or some heavy-duty models use a separate metal or plastic bobbin case that you insert into the machine. Check your Brother sewing machine manual guide to know which type your machine has.
Can I wind a bobbin without a sewing machine?
Yes, there are small, separate bobbin winding machines you can buy. But your Brother sewing machine already has a built-in Brother sewing machine bobbin winding function, which is the most common way to do it.
How do I use the built-in needle threader on my Brother machine?
The needle threading guide brother is a great help. Steps vary slightly by model, so check your manual. Generally, you lower the threader lever, guide the thread through hooks on the threader itself, position the threader hook through the needle eye, place the thread across the hook, and then raise the lever to pull a loop through the needle.
What if I lost my Brother sewing machine manual guide?
Do not worry! You can usually find a free digital copy (PDF) online. Go to the Brother support website or search on Google for “[Your Brother Model Number] manual PDF.”
Why does the thread loop up on the bottom of my fabric?
Loops on the bottom of your fabric usually mean the top thread tension is too loose or the top thread is not correctly threaded, especially not seated correctly in the tension discs. Re-thread the top of your machine completely, making sure the presser foot is up when you thread it so the thread sits right in the tension area. If that doesn’t fix it, slightly increase the top thread tension using the tension dial.