
Do you need a simple guide on how to thread a Brother sewing machine? This guide will show you exactly how to thread your Brother sewing machine quickly and correctly. We will cover every step, from winding the bobbin to getting the thread through the needle. Knowing how to thread your machine right is the first step to good sewing. Let’s get started!
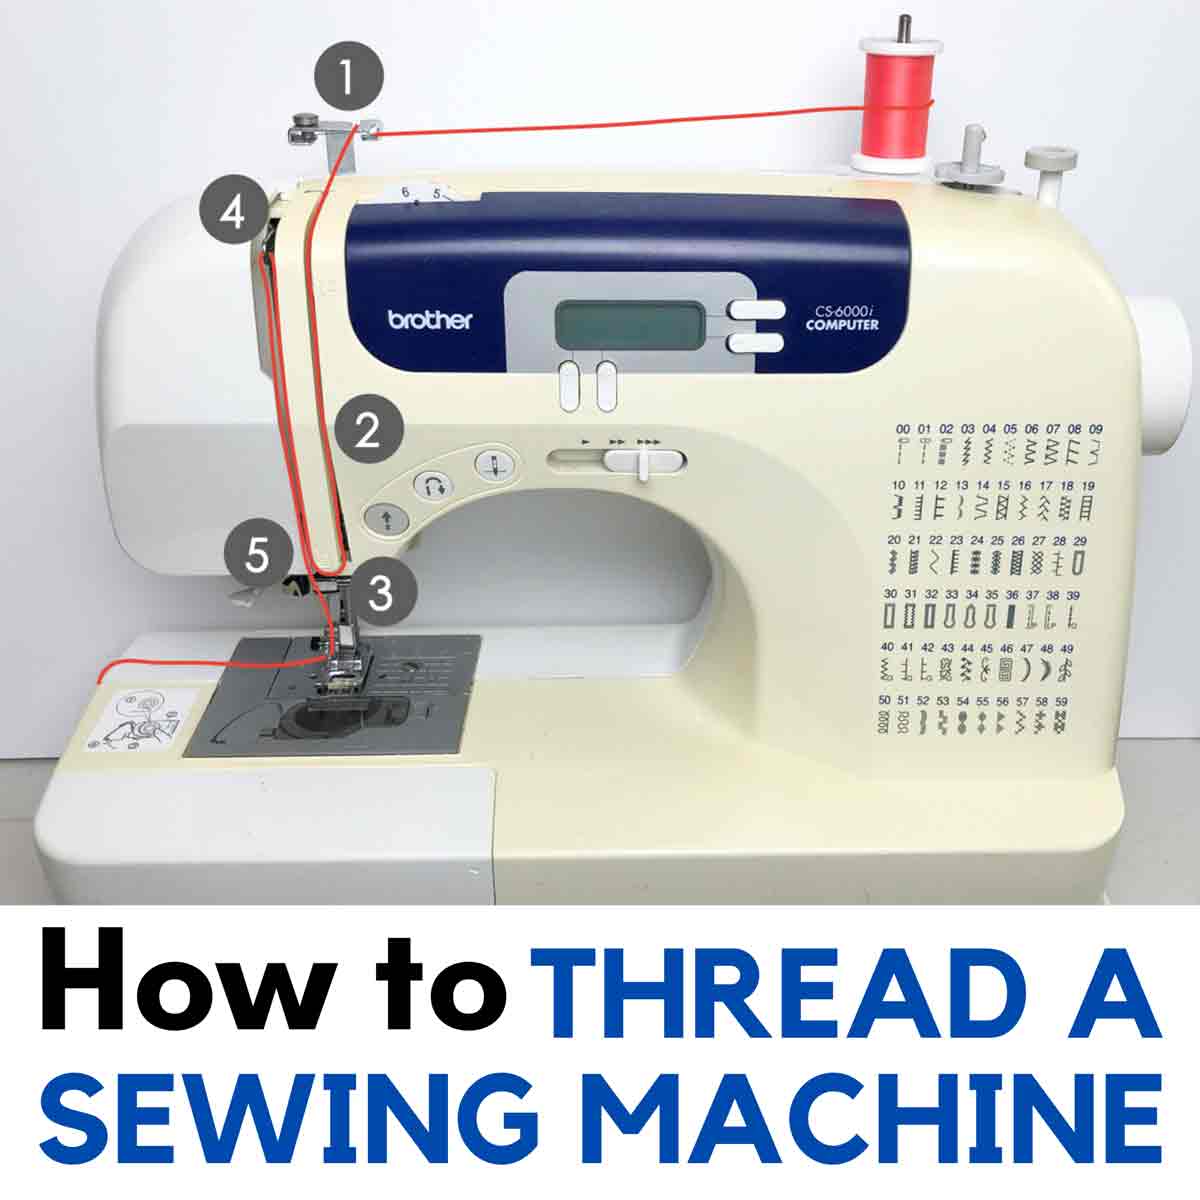
Image Source: mindymakes.com
Getting Ready to Thread Your Machine
Before you start threading, make sure you have everything ready. A little bit of prep work saves you trouble later.
Things You Will Need
- Your Brother sewing machine.
- Good quality sewing thread.
- An empty bobbin for your machine model.
- Fabric scraps for testing the stitch.
Safety First!
Always turn off your sewing machine before you start threading. Unplug it from the wall. This keeps you safe while your hands are near the needle and moving parts. Lower the presser foot lever. This opens up the tension discs, which is important for correct threading.
Winding Your Brother Sewing Machine Bobbin
The bobbin holds the lower thread. It sits under the needle plate. Before you can sew, your bobbin needs thread on it. This is called winding the bobbin.
What is a Bobbin?
The bobbin is a small spool. It holds the thread that makes the bottom part of your stitch. Your Brother sewing machine needs a bobbin made for it. Using the wrong bobbin can cause problems.
Step-by-Step Bobbin Winding
Winding a bobbin is easy. Most Brother machines have a bobbin winder right on top.
- Put Thread on the Spool Pin: Place your spool of thread onto the spool pin at the top of the machine. Some machines have one pin, some have two. Use the one that stands up. If your spool has a little cut in the end (a slit), make sure the thread comes off the spool so it doesn’t catch on the slit.
- Bring Thread to the Winder: Find the thread guide closest to the spool pin. Pull the thread through this guide. It might be a metal hook or a plastic piece.
- Wrap Thread Around Tension Disc: Look for a small disc or plate near the bobbin winder post. This is the bobbin winding tension disc. Wrap the thread around this disc. This makes sure the thread is tight as it winds onto the bobbin. Your Brother sewing machine threading guide in the manual will show this path clearly.
- Put Bobbin on the Winder Post: Place an empty bobbin onto the bobbin winder post. The post is usually a small metal stick that sticks up.
- Put Thread on the Bobbin: Take the end of the thread and put it through one of the small holes on the edge of the empty bobbin. Push the thread through from the inside to the outside.
- Hold the Thread End: Hold the end of the thread that you just pushed through the hole. Keep it held for a few seconds when you start winding.
- Push the Winder Post: Push the bobbin winder post towards the right. This moves the post and bobbin into the winding position. It often clicks into place. This also stops the sewing needle from moving while you wind.
- Press the Foot Pedal: Gently press down on the foot pedal. The bobbin will start to spin and wind thread. Keep holding that thread end for the first few turns. Once some thread is on the bobbin, you can let go.
- Fill the Bobbin: Let the bobbin wind until it is full. Do not overfill it. Most Brother machines have a stopper. When the bobbin is full, it will push against the stopper, and the winder will stop spinning or slow down a lot.
- Stop Winding: Let go of the foot pedal.
- Push the Winder Post Back: Push the bobbin winder post back to the left. It should click out of the winding position.
- Cut the Thread: Use the small thread cutter often found near the winder post or grab scissors to cut the thread connecting the spool to the bobbin.
- Take Bobbin Off: Remove the full bobbin from the post. It is now ready to use as your Brother sewing machine bobbin (lower thread).
Tips for Winding Bobbins
- Wind bobbins with the same type and weight of thread you are using for the top.
- Do not wind too fast at the very start.
- If the thread is winding loose, check if it is wrapped around the bobbin winding tension disc.
- Wind enough thread so you don’t run out in the middle of sewing.
Threading the Lower Thread (Inserting the Bobbin)
Now that you have a wound bobbin, you need to put it into the machine. This is threading the lower thread Brother. Brother machines usually have a drop-in bobbin system, which is very easy.
Finding the Bobbin Area
The bobbin goes under the needle plate. This is the flat metal piece your fabric sits on while sewing. Look for a plastic cover in front of the needle area on the flatbed part of the machine.
Step-by-Step Bobbin Insertion
- Open the Bobbin Cover: Slide the plastic cover towards you or to the side, depending on your model. It should pop open or slide off easily.
- Get Your Bobbin Ready: Take your newly wound bobbin. Look at the thread direction. For most Brother top drop-in bobbins, you want the thread to come off the bobbin towards the left side. Imagine the bobbin is a clock face. The thread should be coming off counter-clockwise (going left).
- Drop the Bobbin In: Place the bobbin into its case. It should sit flat.
- Follow the Thread Path: Look inside the bobbin area. You will see a little slot or channel marked with arrows or numbers (like 1). Pull the thread from the bobbin and guide it into this slot.
- Pull Through the Channel: Continue pulling the thread along the marked path. It might go through another slot (marked 2). The goal is to bring the thread tail out towards the front or side of the machine, leaving about 4-6 inches of thread hanging out. The sewing machine thread path diagram for the bobbin is very simple.
- Close the Cover: Slide the plastic bobbin cover back into place. It should click shut.
Your lower thread is now set! Do not worry about the long thread tail for now. We will deal with that after threading the upper thread.
Threading the Upper Thread Brother
This is the main threading process. The upper thread comes from the spool on top of the machine and goes down through several guides before reaching the needle. Following the steps correctly is key for good stitches. This is a big part of the Brother sewing machine threading guide.
Parts of a Brother Sewing Machine Involved in Upper Threading
Knowing the names of the parts helps you follow the steps.
- Spool Pin: Where you put the spool of thread.
- Thread Guides: Small hooks, clips, or slots that hold the thread in place along the path.
- Tension Discs: Two curved plates that squeeze the thread. This creates tension needed for stitches.
- Take-Up Lever: A part that moves up and down as you sew. The thread must go through a hole or eye in this lever. It helps feed thread to the needle.
- Needle Clamp Guide: A small guide or hook right above the needle.
- Needle Eye: The hole in the needle the thread goes through.
Step-by-Step Upper Threading
Brother machines usually have numbered points or a clear diagram printed on the machine to show the threading path. Follow these numbers.
- Place the Spool: Put your spool of thread on the spool pin on top of the machine. Use the spool cap if your machine has one; choose the right size cap for your spool.
- Guide 1 (Often on Top): Find the first thread guide. It might be a hook or a clip above the spool pin. Pull the thread and slide it into this guide. This is usually marked with the number ‘1’.
- Guide 2 (Often Down the Side): Follow the path down the side of the machine. There is usually a channel or slot. Pull the thread and guide it down this path. This part is often marked with ‘2’. You will feel the thread go between the tension discs here. Make sure the presser foot is up when you do this, so the tension discs are open.
- Guide 3 (Around the Bottom): At the bottom of the channel you just came down, the path will turn. It often goes around a U-shape or a corner. Guide the thread around this point. This is often marked with ‘3’.
- Guide 4 (Up to the Take-Up Lever): From the bottom, the path goes straight up. Pull the thread up along this channel. This is marked with ‘4’.
- Guide 5 (Through the Take-Up Lever): You will reach the take-up lever. This is the part that moves up and down. Make sure the take-up lever is at its highest point. You might need to turn the handwheel (the big wheel on the side of the machine) towards you to bring it up. Thread the take-up lever by putting the thread through the hole or eye in it. This is marked with ‘5’.
- Guide 6 (Down Again): From the take-up lever, the path goes straight down again. Follow the channel down. This is marked with ‘6’.
- Guide 7 (Above the Needle): You are almost at the needle. There is usually a small hook or guide right above where the needle goes into the machine. This is the needle clamp guide. Make sure the thread goes into this guide. It helps keep the thread from tangling as it goes into the needle. This is often marked with ‘7’.
Following this sewing machine thread path diagram on your machine is very important. Missing a guide or threading out of order can cause big problems.
Threading Sewing Machine Needle Brother
The final step for the upper thread is getting it through the eye of the needle. Brother machines often have a built-in needle threader.
Using the Automatic Needle Threader
Most modern Brother machines have this handy tool. It makes threading the needle very fast and easy.
- Lower the Needle: Turn the handwheel towards you to bring the needle to its highest point, then just slightly down. The eye of the needle needs to be in the right spot for the threader to work.
- Lower the Presser Foot: Lower the presser foot. This helps the needle stay steady.
- Lower the Threader: Pull the needle threader lever down gently. It will swing around in front of the needle.
- Pass Thread in Front: Guide the thread from the last guide (Guide 7) and pass it behind the hook or wire on the needle threader tool. There might be a small slot on the threader arm to place the thread in.
- Engage the Threader: Gently push the threader lever back a little more (usually upwards). A small wire or hook on the threader will go through the eye of the needle from the back to the front.
- Hook the Thread: The thread you put behind the threader should now be caught by the small hook going through the needle eye. There might be a small guide or hook on the threader arm to help pull the thread slightly.
- Pull a Loop: With the thread hooked, slowly release the needle threader lever. It will pull a small loop of thread through the needle eye to the front.
- Pull Thread Tail: Use your fingers or tweezers to grab the loop of thread that came through the needle. Pull it completely through, leaving a thread tail about 4-6 inches long hanging from the needle.
Threading the Needle by Hand
If your machine does not have an automatic threader, or you prefer to do it by hand:
- Cut the Thread End: Cut the end of the thread cleanly with sharp scissors. A clean cut makes it easier to push through the small eye.
- Wet the Thread (Optional): You can slightly wet the end of the thread with saliva or water to stiffen it.
- Hold the Thread: Hold the thread tail between your fingers very close to the end.
- Push Through the Eye: Push the end of the thread through the eye of the needle from the front to the back. The needle has a flat side on the back; the eye is usually largest and easiest to access from the front.
- Pull Through: Once the end is through, pull about 4-6 inches of thread through the eye.
Bringing Up the Lower Thread
You have threaded the upper thread and the lower thread (bobbin) is in place. Now you need to bring the bobbin thread up through the needle plate hole so both threads are on top, ready to sew.
Step-by-Step Process
- Hold Upper Thread: Hold the end of the upper thread (the one coming out of the needle) gently with your left hand.
- Turn Handwheel: Use your right hand to slowly turn the handwheel on the side of the machine towards you.
- Needle Goes Down: Watch the needle go down into the needle plate hole.
- Needle Comes Up: Keep turning the handwheel. The needle will come back up. As it comes up, it will catch the bobbin thread and pull a loop of it up through the hole in the needle plate.
- Catch the Loop: As the loop of bobbin thread appears on the needle plate, stop turning the handwheel. Use your fingers or tweezers to grab this loop.
- Pull the Bobbin Thread: Gently pull the loop to bring the end of the bobbin thread fully up through the hole. You should now have two thread tails (upper and lower) on top of the needle plate.
Final Thread Placement
Now that both thread tails are on top, slide them under the presser foot and towards the back of the machine. Leave about 4-6 inches hanging there. Your machine is now fully threaded and ready to sew!
Setting Sewing Machine Tension
Getting the thread tension right is vital for neat stitches. Tension controls how tightly the upper and lower threads pull against each other.
What is Tension?
Tension is the pull on the thread as it feeds through the machine. Your Brother sewing machine has tension controls for both the upper and lower thread. The upper tension is the one you adjust most often. It’s usually a dial with numbers on the front of the machine. The bobbin tension is set in the bobbin case and rarely needs changing.
Why Tension Matters
- Too tight upper tension: Pulls the bobbin thread to the top. You see loops on the top of the fabric.
- Too loose upper tension: Pulls the upper thread to the bottom. You see loops on the bottom of the fabric.
- Correct tension: The upper and lower threads lock together neatly within the layers of fabric. The stitch looks the same on both sides.
Adjusting Tension
- Do a Test Stitch: Always test on a scrap piece of the same fabric you plan to sew. Sew a short seam.
- Look at the Stitch: Check the stitches on both the top and bottom of the fabric.
- Adjust the Dial:
- If you see bobbin thread loops on the top, the upper tension is too tight. Turn the upper tension dial to a lower number.
- If you see upper thread loops on the bottom, the upper tension is too loose. Turn the upper tension dial to a higher number.
- Test Again: Sew another test seam after adjusting. Keep adjusting the dial and testing until the stitch looks balanced.
Important Notes on Tension
- The correct tension setting depends on the fabric, thread, needle, and stitch type. It often needs small adjustments for each project.
- Make sure you threaded the machine correctly! Most “tension problems” are actually threading problems. The thread must be correctly seated between the tension discs when the presser foot is down (after threading).
- The bobbin tension is set at the factory. Only change it if you know it is wrong or if instructed by your manual.
Common Sewing Machine Threading Problems
Even with a good guide, threading can go wrong. Here are some common issues and how to fix them. Knowing these helps you troubleshoot quickly.
Table of Common Problems and Fixes
| Problem | Possible Cause | How to Fix |
|---|---|---|
| Thread breaks often (upper) | Incorrect threading (missed guide, wrong path) | Re-thread the entire upper thread path carefully, following the numbers. Make sure presser foot is up while threading. |
| Thread not in take-up lever | Make sure the take-up lever is at the highest point and thread goes through the eye. | |
| Upper tension too tight | Lower the upper tension dial number. | |
| Wrong needle size or type for thread/fabric | Use the correct needle. Replace bent or dull needles. | |
| Poor quality thread | Use good quality thread that is not old or brittle. | |
| Thread breaks often (lower) | Bobbin wound unevenly or too full | Re-wind the bobbin smoothly. Do not overfill. |
| Thread caught on bobbin spool | Check the end of the bobbin thread spool for snags or knots. | |
| Bobbin case dirty or damaged | Clean the bobbin area. Check the bobbin case for scratches or burrs. | |
| Loops on top of fabric | Upper tension too tight | Lower the upper tension dial number. |
| Bobbin tension too loose (less common) | Check bobbin threading path. If problem persists, might need bobbin tension adjustment (consult manual). | |
| Loops on bottom of fabric | Upper tension too loose | Raise the upper tension dial number. |
| Upper thread not correctly in tension discs | Re-thread upper path with the presser foot UP. Ensure thread is seated deeply in tension discs. | |
| Thread not in take-up lever | Check step 6 of upper threading. Ensure thread goes through take-up lever eye. | |
| Skipped Stitches | Needle bent, dull, or wrong type | Replace needle with a new, correct type/size needle. |
| Needle inserted incorrectly | Ensure the flat side of the needle is facing the back (for most Brother machines). Insert all the way up. | |
| Incorrect threading (upper or lower) | Re-thread both upper and lower paths completely and carefully. | |
| Machine Jams/Thread birds’ nest | Starting to sew with presser foot up | ALWAYS lower the presser foot before starting to sew. |
| Not holding thread tails at start | Hold upper and lower thread tails for the first few stitches. | |
| Incorrect threading (upper or lower) | Re-thread both paths carefully. |
Why Re-threading Helps
Many problems seem like a machine issue, but they are caused by small threading mistakes. A little loop missed, thread popping out of a guide, or not getting thread fully into the tension discs can mess up everything. If you have a stitch problem, the first thing to try is often to completely remove both threads and re-thread the machine from the start, following each step carefully.
Knowing About Your Brother Sewing Machine
Taking a moment to look at the parts of a Brother sewing machine involved in threading can help you understand the process better. Your machine’s manual has a detailed diagram showing all the parts.
Key Threading Parts Again
- Spool Pin: The stand for your thread spool. Some have a horizontal pin with a cap.
- Thread Guides: Metal or plastic pieces guiding the thread’s path. Think of them as traffic cops for the thread.
- Upper Tension Assembly: Where the tension discs are. This controls the pull on the top thread.
- Take-Up Lever: The arm that moves up and down, pulling thread from the spool and feeding it to the needle.
- Needle Bar: The rod that holds the needle. Has a guide right above the needle.
- Needle: The sharp tool that pushes thread through fabric. Has an eye at the end.
- Needle Plate: The metal plate under the needle, with a hole for the needle and often markings for seams.
- Bobbin Winder: The post and guides used to put thread onto the bobbin.
- Bobbin Area: Under the needle plate, where the bobbin sits. Includes the bobbin case or holder.
Each part plays a role in making sure the thread goes from the spool and bobbin to form a perfect stitch in the fabric.
Deciphering Your Manual’s Threading Diagram
Your Brother sewing machine threading guide in the manual is your best friend. It shows the exact path for your specific machine model.
What to Look For
- Numbered Steps: Most diagrams use numbers to show the order of threading. Follow these numbers strictly.
- Arrows: Arrows show the direction the thread should go.
- Symbols: Some symbols might show where the thread should go around a post or through a slot.
- Upper vs. Lower: Diagrams usually show the upper thread path and then the bobbin path separately.
Keep your manual handy. If you get stuck, look at the picture. It’s designed to make threading clear for your machine.
Learning About Needles and Thread
Using the right needle and thread is part of successful threading and sewing.
Needles
Needles come in different sizes and types.
- Size: Numbers like 80/12 or 90/14. Higher numbers mean thicker needles, used for heavier fabrics or thicker threads.
- Type: Universal (for woven fabrics), Ballpoint (for knits), Denim, Microtex (for fine fabrics), etc.
- Insertion: Needles have a flat side on the shank (the top part that goes into the machine). This flat side almost always faces the back on Brother machines. The needle must be pushed all the way up into the needle bar before tightening the screw.
A bent or dull needle can cause skipped stitches and thread breaks. Change your needle often, maybe after every project or every 8-10 hours of sewing.
Thread
Good thread is important. Cheap thread can break easily, create a lot of lint (which clogs your machine), and cause stitch problems.
- Use good quality polyester or cotton thread.
- Match thread weight to needle size and fabric type. Most all-purpose sewing uses a size 80/12 or 90/14 needle with standard weight thread.
- Use the same type and weight of thread in the bobbin as on top, unless your project specifically says otherwise (rare).
Fathoming Common Sewing Issues Related to Threading
Many sewing problems that look like machine trouble actually come from not threading correctly.
Problems Linked to Bad Threading
- Stitches that bunch up: Often caused by the upper thread not being correctly in the tension discs or take-up lever. The machine isn’t pulling the thread correctly.
- Loops on top or bottom: Almost always a tension problem, which is often a threading problem (thread not seated in tension discs).
- Machine sounds noisy or clunks: Sometimes caused by the bobbin area being threaded wrong, or the bobbin thread catching.
- Thread shredding: Can happen if the thread is catching on a missed guide, a rough spot in the thread path, or if the tension is too tight.
By following the threading steps exactly, you prevent most of these headaches.
Caring for Your Machine
Keeping your Brother machine clean helps with smooth threading and sewing. Lint and thread bits can build up in the tension discs and bobbin area.
Quick Cleaning Tips
- Bobbin Area: Open the bobbin cover. Use a small brush (often came with your machine) to sweep out lint from around the bobbin case area. Do not use canned air, as it can push lint deeper into the machine.
- Thread Path: Gently pull a piece of thread through the upper thread path (with presser foot up and tension loose) to help clear minor dust.
Regular cleaning, as shown in your Brother sewing machine threading guide manual under maintenance, keeps your machine running smoothly.
Frequently Asked Questions (FAQ)
Here are answers to common questions about threading Brother sewing machines.
Q: Why does my thread keep breaking when I sew?
A: This is a common issue! Most often, it is due to incorrect upper threading. Check that the thread is going through all the guides and is correctly seated in the tension discs with the presser foot down. Other reasons include a dull or bent needle, using the wrong size needle for the thread or fabric, or using poor quality thread.
Q: My stitches are looping on the bottom of the fabric. What is wrong?
A: Loops on the bottom usually mean the upper thread tension is too loose. However, the most likely cause is the upper thread is not properly seated in the tension discs. Re-thread the upper thread with the presser foot lifted. This opens the discs. Then lower the foot before sewing. If that doesn’t fix it, slightly increase the upper tension dial number.
Q: My stitches are looping on the top of the fabric. What is wrong?
A: Loops on the top usually mean the upper thread tension is too tight. Lower the upper tension dial number. Less often, it could mean the bobbin thread tension is too loose, but do not adjust bobbin tension unless you are sure and know how.
Q: How do I know if my needle is in correctly?
A: For most Brother machines, the needle has a flat side at the top (the shank). This flat side should face towards the back of the machine when you insert it. Push the needle all the way up into the needle bar before tightening the screw that holds it.
Q: Can I use any bobbin in my Brother machine?
A: No. You should only use bobbins made for your specific Brother sewing machine model. Using the wrong size or type of bobbin (metal vs. plastic) can cause stitch problems, jams, or even damage your machine’s bobbin case. Check your manual for the correct bobbin type.
Q: Do I need to hold the thread tails when I start sewing?
A: Yes, it is a good idea to hold both the upper and lower thread tails for the first few stitches. Hold them gently towards the back or side of the machine. This helps prevent the thread from tangling or creating a “birds’ nest” underneath the fabric at the start of your seam.
Q: My automatic needle threader is not working. What should I do?
A: Make sure the needle is at the correct height; turn the handwheel to bring the needle all the way up, then maybe just a tiny bit down. Ensure the presser foot is lowered. Check your manual for the exact position. The needle might also be slightly bent or not inserted correctly, preventing the threader’s hook from going through the eye. If it still doesn’t work, you can always thread the needle by hand.
In Summary
Threading your Brother sewing machine might seem like many steps at first. But if you follow the Brother sewing machine threading guide, either on your machine or in the manual, step by step, it becomes quick and easy.
Remember the main points:
- Always unplug the machine before threading.
- Wind your bobbin smoothly.
- Insert the bobbin correctly, following the path.
- Thread the upper thread in the right order, making sure it goes through all guides and the take-up lever. Ensure the presser foot is UP while threading the upper thread path down the front.
- Thread the needle from front to back.
- Bring up the bobbin thread by turning the handwheel.
- Test your stitch and adjust tension if needed (after confirming correct threading).
Knowing how to thread correctly prevents most common sewing problems. Happy sewing with your Brother machine!