
So, how to sharpen dull sewing needles? You can make them sharp again using simple tools. What is the best way to sharpen needles? Many people like using an emery pincushion, but other simple methods work too. Sharpening dull needles helps them slide through fabric easily. This makes your sewing better and faster. Let’s learn how to keep your needles ready for any sewing job.
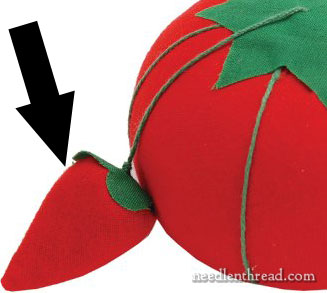
Image Source: www.needlenthread.com
Why Sewing Needles Get Dull
Sewing needles work hard. They push through many layers of fabric. Fabric fibers rub against the needle tip. Over time, this rubbing wears down the point. The tip gets blunt. It might also get small bends or burrs.
Think of cutting with a dull knife. It’s hard work. It snags. It doesn’t cut clean. A dull needle is the same for fabric. It doesn’t pierce the fabric smoothly. It pushes fibers apart instead of going between them.
This can damage your fabric. It can also strain your sewing machine or your hand if hand sewing. Sharpening machine needles and hand needles is important for good sewing. It is a key part of sewing needle care and maintenance.
Signs of a Dull Sewing Needle
How can you tell if your needle needs sharpening? There are clear signs. Identifying a dull sewing needle is the first step to fixing it.
Here are things to look for:
- Hard to Push: The needle doesn’t slide into fabric easily. You have to force it.
- Snags or Pulls: The needle catches on threads in the fabric. It might pull loops or threads.
- Skipped Stitches: On a machine, a dull needle can skip stitches because it doesn’t pierce the fabric right.
- Audible Pop: Sometimes, you hear a pop or snap as the needle struggles through tight fabric.
- Bent Tip: Look closely at the needle point. Is it bent or misshapen?
- Rough Feel: Gently run the needle tip away from your finger (be very careful!). Does it feel smooth or rough? A rough tip is dull or damaged.
- Doesn’t Make a Clean Hole: When you push it through fabric, does it leave a messy hole instead of a neat one?
Seeing these signs means it’s time for needle point restoration. Sharpening can often fix these problems.
Simple Ways to Sharpen Needles
You don’t need fancy tools for DIY needle sharpening. Many common items can help make a dull needle sharp again. The idea is using abrasive material for needles. This material rubs away the dull part of the tip. It helps bring back the fine point.
Let’s look at some popular methods.
Using an Emery Pincushion
This is a classic tool for Emery pincushion sharpening. Many pincushions have a small section shaped like a strawberry or tomato. This part is filled with emery. Emery is a hard, grainy mineral. It works like fine sandpaper.
Here’s how to use it:
- Find the emery section of your pincushion. It’s usually heavier than the fabric part.
- Take your dull needle.
- Push the needle point into the emery section.
- Push the needle all the way in.
- Pull the needle out.
- Repeat this several times. Push it in and pull it out.
- Each time, the emery rubs against the needle point. It files away tiny bits of metal. This action reshapes the tip.
- Test the needle on a scrap of fabric. Does it feel sharper?
- If not, push it in and out a few more times.
Using an emery pincushion is easy and fast. It’s great for giving a needle a quick sharpen while you are working. It helps with needle point restoration right there at your sewing space. It’s one common way for how to sharpen dull sewing needles.
Using Fine Grit Sandpaper
Sandpaper is another good abrasive material for needles. You need very fine grit sandpaper. Look for grits of 400 or higher. Higher numbers mean finer grit. Finer grit gives a smoother finish.
Here’s how to use sandpaper:
- Get a small piece of fine grit sandpaper.
- Fold the sandpaper. This makes it easier to hold and creates a surface to rub against.
- Hold the sandpaper in one hand.
- Hold the needle in the other hand.
- Place the needle tip against the gritty side of the sandpaper.
- Rub the needle tip gently back and forth on the sandpaper.
- Turn the needle as you rub. You want to shape the tip evenly on all sides. Imagine you are trying to make a perfect cone shape again.
- Rub for maybe 10-15 seconds.
- Be gentle. Don’t press too hard. Let the grit do the work.
- Test the needle on some fabric. Is it sharp now?
- Repeat if needed.
This method offers good control. You can really focus on the tip. It’s a great DIY needle sharpening technique.
Using a Sharpening Stone or Honing Steel
These tools are often used for knives. But you can use them for needles too. You’ll need a fine grit stone or a honing steel (the metal rod).
Using a Sharpening Stone:
- Choose a very fine grit stone. A ceramic stone is good.
- Place the stone on a stable surface.
- Hold the needle at a low angle against the stone. Imagine the angle of the original needle tip.
- Gently push the needle along the stone, away from you. Keep the low angle.
- Lift the needle and repeat the push.
- Turn the needle slightly after each pass. Work your way around the tip.
- Do this many times, turning the needle bit by bit.
- The goal is to reshape the tip evenly.
- Test the needle. Sharpen more if needed.
Using a Honing Steel:
- Hold the steel with the tip pointing up.
- Hold the needle at a low angle against the steel near the handle.
- Draw the needle down the steel towards the tip. Keep the low angle.
- Lift and repeat.
- Turn the needle slightly and do more passes.
- Work around the tip until it feels sharper.
These methods require a bit more practice to keep the right angle. But they are very effective for needle point restoration.
Other DIY Materials
You can use other things you might have around the house. Anything slightly rough can work as an abrasive material for needles.
- Fine Steel Wool: Rub the needle tip gently inside a wad of fine steel wool. The tiny metal fibers act as an abrasive.
- Denim Fabric: Rub the needle point firmly on the edge of an old pair of denim jeans. The tight weave and dye can help polish and sharpen the tip slightly. This is more for polishing than major sharpening.
- Ceramic Mug Bottom: The unglazed ring on the bottom of a ceramic mug or plate is rough. You can rub the needle tip on this part. It works like a fine stone.
These DIY methods are good for quick touch-ups. They show how easy DIY needle sharpening can be.
Sharpening Machine Needles
Can you sharpen machine needles? Yes, you can. The same methods work for machine needles as for hand needles. Emery pincushions, sandpaper, or stones can be used.
However, some people choose not to sharpen machine needles often. Machine needles spin very fast. A perfectly sharp and smooth point is needed. If you don’t sharpen it evenly, it can affect stitch quality or even damage the machine.
Many machine sewers just replace needles often. Machine needles are not very expensive. Replacing them guarantees a perfect point every time. This is often seen as the best way to ensure smooth sewing with a machine.
If you do sharpen machine needles, be extra careful. Make sure the tip is sharp and smooth. Check it closely before putting it back in the machine.
Using an emery pincushion is perhaps the easiest way for sharpening machine needles. You can just poke the needle into the emery part a few times before you start sewing.
Step-by-Step Sharpening with Emery
Let’s go through the emery pincushion method in detail. This is a very popular way for how to sharpen dull sewing needles.
Step 1: Check Your Pincushion
- Look at your pincushion. Does it have a separate, small, heavier part? This is likely the emery section.
- If your pincushion is just fabric and stuffing, you might need a different method or a new pincushion with emery.
Step 2: Identify the Dull Needle
- Test your needles on a scrap of fabric.
- Or look closely at the tips for signs of dullness (bent, rough, blunt).
- Pick the needles that need sharpening.
Step 3: Insert Needle into Emery
- Hold the emery section firmly.
- Push the point of the dull needle into the emery material. Push it in almost all the way, or until the eye of the needle is close to the surface.
Step 4: Pull Needle Out
- Pull the needle straight out of the emery.
Step 5: Repeat Several Times
- Push the needle back in. Pull it out.
- Do this 10-20 times for a single needle. The emery works slowly, removing very small bits of metal each time.
- Turn the needle a little between sets of pushes if you like. This can help ensure even sharpening.
Step 6: Test the Needle
- Take the needle and try pushing it through a piece of scrap fabric.
- Does it slide through easily now? Does it make a clean hole?
- Does it feel smooth when you push it?
Step 7: Sharpen More if Needed
- If the needle still feels dull, repeat Steps 3-6.
- Sometimes a very dull needle needs more work.
- However, remember that needles can only be sharpened so much. If the tip is badly bent or broken, sharpening might not fix it. It might be time to replace it.
This process is simple and requires little skill. It’s why Emery pincushion sharpening is a favorite for many sewers. It’s a simple way of needle point restoration.
Taking Care of Your Needles
Proper sewing needle care and maintenance can greatly extend needle life. Sharpening is one part of this care. But other things help keep needles in good shape.
Here are some tips:
- Store Needles Right: Keep needles in a pincushion or needle case. Don’t leave them loose where they can get bent or lost. A magnetic needle holder is also great.
- Keep Them Dry: Moisture causes rust. Rust ruins needles. Store them in a dry place. Some needle cases have a small amount of absorbent material to help with this. An emery pincushion also helps absorb moisture.
- Clean Needles: Fabric fibers, thread bits, and even oils from your hands can build up on needles. This build-up can make them drag through fabric. Wipe your needle clean with a soft cloth now and then. Alcohol wipes can also be used carefully to remove residue.
- Use the Right Needle: Use the correct needle type and size for your fabric. Using a needle that is too small or too fine for heavy fabric can cause it to bend or break easily. Using one that is too large for delicate fabric can damage the fabric.
- Avoid Pinning Over Seams: When pinning fabric, try not to push pins through thick seam allowances or multiple layers where possible. This makes the pins and needles work harder and dull faster.
- Don’t Bend Needles: Try not to bend needles when sewing. Pulling fabric too hard while the needle is down in a machine, or forcing a hand needle through tough spots can bend or break it.
Following these steps helps prevent needles from getting dull too fast. This reduces the need for sharpening and helps in extending needle life.
When to Replace a Needle
Sharpening is great for restoring a slightly dull point. But it can’t fix every problem. Sometimes, a needle is beyond repair. Knowing when to replace a needle is just as important as knowing how to sharpen it.
Replace a needle if:
- The Tip is Broken: If the very tip is snapped off, sharpening won’t bring it back.
- It’s Severely Bent: A bent needle can cause skipped stitches or even hit the needle plate on a machine. Sharpening won’t straighten it.
- It’s Rusted: Rust damages the smooth surface of the needle. This makes it drag and can damage fabric. Sharpening won’t remove rust properly.
- It Snags Fabric Even After Sharpening: If you’ve sharpened it and it still catches on fabric, there might be damage higher up the shaft or the tip is too far gone.
- It Makes a Loud Noise in the Machine: A dull or damaged machine needle can make loud noises as it hits the bobbin case or needle plate. Stop immediately and replace the needle.
Replacing needles regularly, especially machine needles, is a good habit. Machine needles are cheap and replacing them often (e.g., after every project, or every 8-10 hours of sewing) ensures the best stitch quality and protects your machine.
For hand sewing needles, you can sharpen them more often. They don’t undergo the same high speed stress as machine needles. Sharpening hand needles is a great way to extend needle life.
The Best Way to Sharpen Needles
Is there one single “best way” to sharpen needles? It depends on what you need.
- For quick touch-ups while sewing: Using an emery pincushion is often the best way. It’s convenient and fast.
- For a slightly more focused sharpen: Fine grit sandpaper gives you control to work the tip.
- For serious needle point restoration: A very fine sharpening stone can reshape a tip well, but requires practice.
Many sewers use an emery pincushion for routine sharpening. It’s easy, requires no extra setup, and is designed for this job. It’s a simple and effective abrasive material for needles.
Sharpening helps make needles work like new again for a while. It saves money by extending needle life. It also improves the quality of your sewing.
Extending Needle Life Even More
Beyond sharpening and basic care, other things can help your needles last longer.
- Change Machine Needles Regularly: This cannot be stressed enough for machine sewing. It’s the number one way to prevent issues caused by dull needles.
- Use Needle Threaders Carefully: Some needle threaders can nick the eye or shaft of a needle if used roughly or if they aren’t aligned well.
- Check Bobbin Case and Plate: Sometimes, burrs or rough spots on your sewing machine’s bobbin case or needle plate can damage the needle point as it passes. If needles keep getting damaged quickly, check these parts. You might need to polish them or have your machine serviced.
- Store Different Needle Types Separately: If you use many types (universal, jersey, microtex, etc.), store them in marked containers. This prevents using the wrong needle for the fabric, which can dull or damage it faster.
- Consider Needle Material: Some specialty needles made from harder materials might stay sharp longer. However, they can also be more brittle.
These extra steps, combined with sharpening and care, contribute significantly to extending needle life. They help you get the most out of your needles before they need replacing.
The Practice of Sharpening
DIY needle sharpening is not hard. It just takes a little practice. The key is gentle, consistent pressure. You don’t need to force the needle into the abrasive material. Let the material do the work of wearing down the metal.
When using sandpaper or a stone, keeping a consistent angle is helpful. Imagine you are trying to recreate the original angle of the needle point. This creates a sharp, centered tip. If you sharpen unevenly, the tip will be lopsided and might not pierce fabric well.
Emery pincushion sharpening is less about angle. It’s more about just pushing the needle in and out. The emery material surrounds the tip and works on all sides at once. This makes it very easy.
After sharpening, always test the needle. Feel the tip gently (away from your skin!). Push it through a fabric scrap. This tells you if your sharpening worked.
Needle point restoration is a skill that improves with practice. The more you do it, the better you’ll get at feeling when a needle is sharp and knowing how much sharpening it needs.
Benefits of Sharpening
Why bother sharpening needles? There are good reasons.
- Smoother Sewing: A sharp needle glides through fabric. This makes hand sewing easier on your hands. It makes machine sewing sound smoother and work better.
- Better Stitch Quality: A sharp needle makes clean holes. This leads to neater stitches. It reduces skipped stitches on a machine.
- Less Fabric Damage: Dull needles can snag, pull, or tear fabric fibers. A sharp needle passes between fibers without harming them.
- Extends Needle Life: Sharpening brings dull needles back to life. You don’t have to throw them away as often. This saves money.
- Protects Your Machine: Forcing a dull needle through fabric puts stress on your sewing machine’s motor, feed dogs, and needle bar. A sharp needle reduces this stress.
Sharpening is a simple but effective part of sewing needle care and maintenance. It helps you sew better and makes your supplies last longer.
Summary of Sharpening Methods
Here is a quick look at the main ways to sharpen needles:
| Method | Tool Needed | How it Works | Pros | Cons |
|---|---|---|---|---|
| Emery Pincushion | Emery-filled cushion | Push needle in and out of emery. | Very easy, quick, absorbs moisture. | Less control over tip shape. |
| Fine Sandpaper | Fine grit sandpaper | Rub needle tip on paper, turning needle. | Good control, widely available. | Requires practice for even shape. |
| Sharpening Stone | Fine grit stone | Push needle along stone at a low angle. | Can reshape tip well. | Requires practice to keep angle, special stone. |
| Honing Steel | Honing steel rod | Draw needle down steel at a low angle. | Quick touch-up. | Requires practice to keep angle. |
| Other DIY Materials | Steel wool, denim, etc. | Rub needle tip on the material. | Uses common household items. | Less effective than emery or sandpaper. |
All these methods use abrasive material for needles to restore the point. Pick the one that feels easiest or most convenient for you.
FAQ: Questions About Sharpening Needles
Q: Can you really sharpen any sewing needle?
Yes, most metal sewing needles for hand sewing or machine sewing can be sharpened. Needles with special coatings or very fine tips (like some embroidery needles) might not sharpen as well or might be better just replaced when dull.
Q: How often should I sharpen my needles?
There’s no fixed rule. Sharpen a hand needle when it starts to feel hard to push through fabric or snags. Sharpen a machine needle if you see skipped stitches or hear unusual noise (though replacing is often easier for machine needles). A quick poke into an emery pincushion before starting a sewing session is a good habit.
Q: Does sharpening damage the needle?
If done gently and correctly, sharpening restores the point. Over-sharpening or using too coarse an abrasive can remove too much metal or weaken the tip. Stick to fine abrasives and gentle methods.
Q: Is it better to sharpen or just buy new needles?
For hand sewing needles, sharpening is often worth it to extend their life. For machine needles, especially if you sew often or with difficult fabrics, replacing them regularly is usually the best practice for performance and machine health. Sharpening machine needles is possible for light use or emergencies.
Q: What is emery made of?
Emery is a hard rock. It is made mostly of the mineral corundum. It also has other minerals like magnetite. Because it is so hard, it works well as an abrasive.
Q: Can I use regular sand for sharpening?
Regular sand grains are usually too coarse and uneven for sharpening fine needle points. Emery or very fine grit sandpaper (like 400 grit or higher) are much better choices.
Sharpening sewing needles is a simple skill. It helps you keep your tools in good shape. It makes sewing more fun and your projects look better. Give it a try! Your needles will thank you.