
Putting a new needle in your sewing machine is simple when you know how. How to insert sewing machine needle correctly? You loosen a small screw, take the old needle out, put the new one in the right way (making sure the flat side of sewing machine needle faces the back on most machines), push it all the way up, and then tighten the screw. This guide will walk you through the process step-by-step, making sewing machine needle replacement easy for everyone.
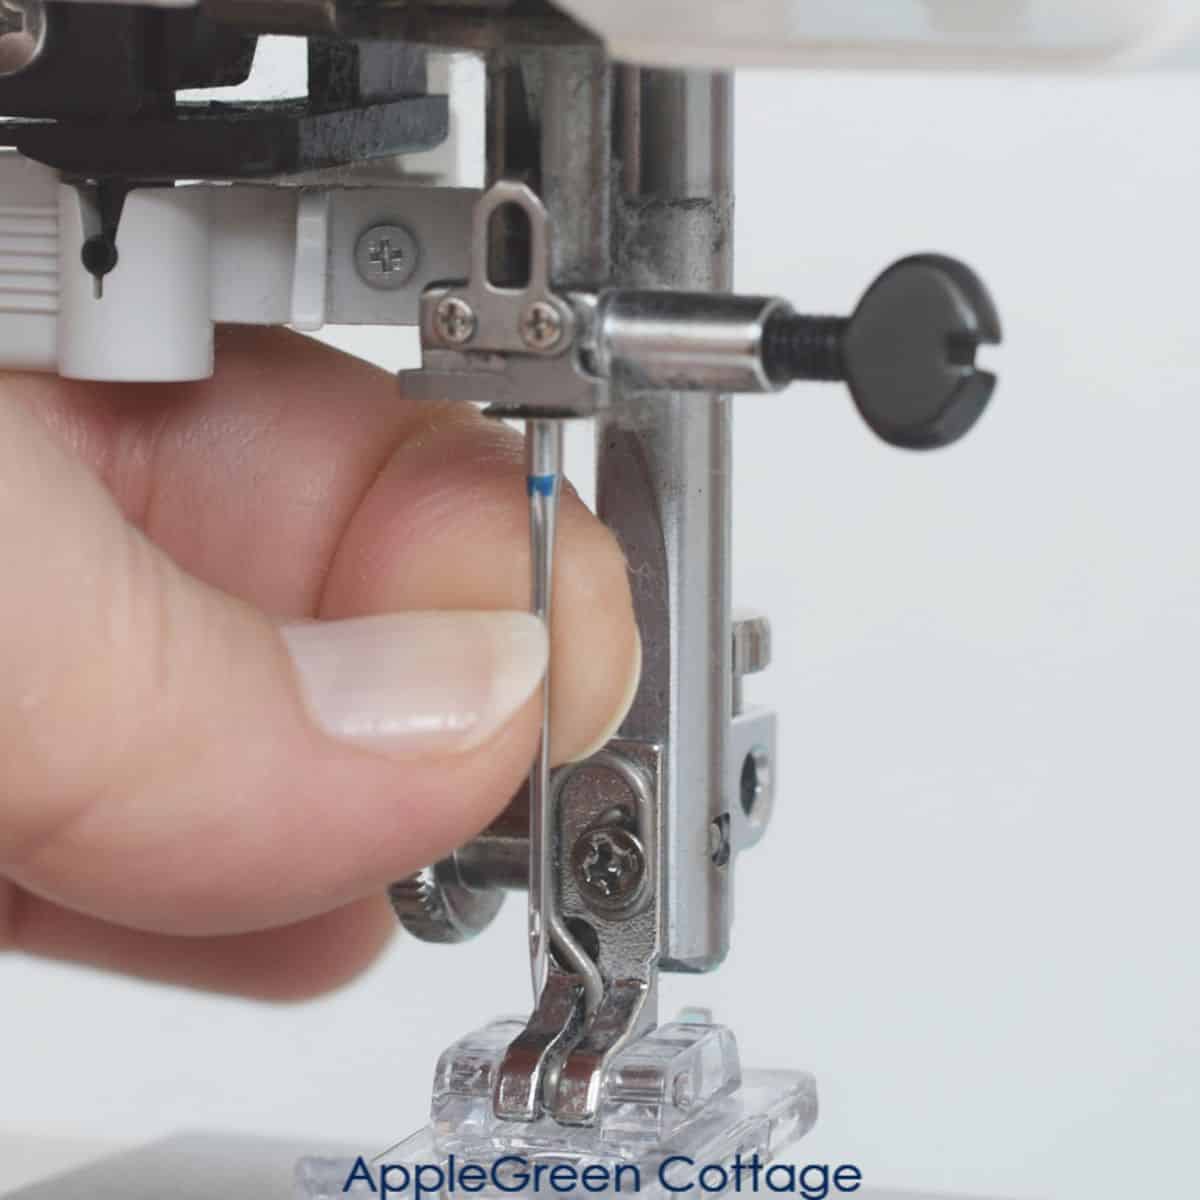
Image Source: www.applegreencottage.com
Why You Need a New Needle
Why would you need to change the needle on your sewing machine? Needles are tough, but they don’t last forever. Think of them like tiny tools that push through fabric thousands of times. Over time, they get dull or even bend a little.
Grasping Needle Wear
A dull needle can cause problems. It might snag your fabric or skip stitches. A bent needle can hit the bobbin case, break, or damage your machine. Sewing machine needle replacement is a common job for anyone who sews. It keeps your stitches looking good and your machine running smoothly. Knowing how to change sewing machine needle is a basic skill every sewer should learn.
Signs You Need a New Needle
- Skipped stitches: The needle might not be catching the bobbin thread right.
- Thread breaking: A rough or dull needle can fray and snap your thread.
- Fabric snags: The needle point isn’t smooth anymore and pulls threads in the fabric.
- Loud noise: A bent needle can hit parts inside the machine.
- Needle looks bent or broken: Sometimes you can just see it’s not straight or has a chipped tip.
Changing the needle often, even if it doesn’t look bad, is a good habit. Many sewers change their needle after every project or after several hours of sewing. This makes sure your stitches are always the best they can be.
Getting Ready for the Change
Before you start replacing your sewing machine needle, it’s good to get everything ready. This makes the job quick and easy.
What You Will Need
You don’t need many tools for sewing machine needle replacement.
- A new sewing machine needle: Make sure it’s the right type and size for your fabric and machine. We’ll talk more about this later.
- A small screwdriver: Most machines come with one. It fits the needle clamp screw.
- Tweezers (optional): These can help grab a small or broken needle.
- A piece of fabric scrap: You’ll use this to test your stitches after the change.
- Your machine’s manual: It might have specific instructions for your model, especially about the flat side of sewing machine needle direction.
Make sure your machine is turned OFF and unplugged. Safety first! You don’t want the machine to start stitching while your fingers are near the needle.
Finding the Needle Area
Your sewing machine needle sits in a special spot. It’s easy to find.
Locating the Needle Clamp
Look at the front of your sewing machine, just above where the needle goes into the fabric. You will see a metal bar that the needle fits into. This is the needle bar. At the bottom of the needle bar is the needle clamp. This clamp holds the needle in place. On the side of the needle clamp, there is a small screw. This is the needle clamp screw.
You need to loosen this screw to take the old needle out and tighten it to put the new one in. Knowing where this screw is is key to inserting sewing machine needle correctly.
Taking Out the Old Needle
Now it’s time to remove the needle that’s in the machine.
Releasing the Needle Clamp Screw
Use your small screwdriver to loosen the needle clamp screw. Turn the screw to the left (counter-clockwise). You don’t need to take the screw all the way out, just loosen it enough so the needle can drop down.
H4: Holding the Needle Safe
As you loosen the screw, hold the old needle with your other hand. Needles are small and can easily fall into the machine or onto the floor. If it falls into the machine, it can be hard to get out. If it falls on the floor, it’s a safety risk. Keep a firm but gentle hold on the needle as you loosen the screw.
H4: Pulling the Old Needle Out
Once the screw is loose enough, you can pull the old needle straight down and out of the needle clamp. Be careful not to bend it if you plan to keep it as a spare (though it’s usually best to just throw dull needles away).
H4: Disposing of the Old Needle
Put the old needle in a safe place right away. A small jar, a pincushion, or a special needle disposal container are good options. Don’t just toss it in the trash where it could poke someone.
This step is the first part of replacing sewing machine needle tutorial. Removing the old one correctly makes putting the new one in much easier.
Picking the Right New Needle
Choosing the right needle is just as important as putting it in correctly. Using the wrong needle can cause problems even if it’s inserted perfectly.
Different Needle Types
Sewing machine needles come in different types for different fabrics and threads.
- Universal: Good for many woven and knit fabrics. A basic, all-around needle.
- Ballpoint/Jersey: Has a rounded tip that pushes knit fibers apart instead of cutting them. Great for t-shirt fabric, knits.
- Stretch: Similar to ballpoint but designed for very stretchy fabrics like Lycra or spandex.
- Denim/Jeans: Has a very strong, sharp point to push through thick, tough fabrics like denim or canvas.
- Microtex/Sharp: Has a very fine, sharp point for delicate fabrics like silk or for precise topstitching.
- Quilting: Designed to go through multiple layers of fabric and batting smoothly.
- Leather: Has a wedge-shaped point to cut through leather.
H4: Needle Sizes
Needles also come in different sizes. The size number tells you how thick the needle is. Sizes usually range from 60/8 to 110/18.
- Smaller numbers (e.g., 60/8, 70/10): These are thin needles for fine, lightweight fabrics like silk or chiffon.
- Medium numbers (e.g., 80/12, 90/14): These are common sizes for medium-weight fabrics like cotton or linen.
- Larger numbers (e.g., 100/16, 110/18): These are thick needles for heavy fabrics like denim, canvas, or upholstery.
Your fabric choice helps you pick the needle type and size. If you’re sewing medium-weight cotton, an 80/12 or 90/14 Universal needle is probably a good choice. If you’re sewing stretchy knit, use a Ballpoint or Stretch needle. Always check your machine manual for recommended needle types and sizes for different fabrics. Using the right needle is part of getting correct needle orientation right for your project.
The Key Step: Finding the Flat Side
This is the most important part of inserting sewing machine needle correctly. Sewing machine needles are not perfectly round at the top. They have one side that is flat.
Locating the Flat Side
Look closely at the metal shank (the top part) of the new needle. One side will be round, and the other will be flat. You can feel it with your finger or just look at it closely.
Why the Flat Side Matters
The flat side of sewing machine needle tells you exactly how the needle must fit into your machine. On almost all home sewing machines, the flat side of sewing machine needle must face towards the BACK of the machine. This is the correct needle orientation.
Why is this so important? Inside your machine, there’s a part called the bobbin hook. This hook needs to grab the thread loop that the needle makes as it goes down and up. The position of the needle determines where this loop forms. If the flat side is facing the wrong way (like towards the front or side), the loop will not form in the right place, or the hook will not be able to grab it. This leads to skipped stitches, broken thread, or even damage to your machine’s timing. Ensuring needle is fully seated AND has the correct needle orientation (flat side facing back) is critical for the machine to work properly.
So, before you put the new needle into the machine, always find the flat side. Remember: Flat Side to the Back!
Putting the New Needle In
Now that you have your new needle and know about the flat side, you can insert it into the machine. This is the core of how to insert sewing machine needle correctly.
Holding the New Needle
Hold the new needle by the shank (the top part). Make sure you can clearly see or feel the flat side. Remember, this flat side needs to face the back of your sewing machine.
Lining It Up
Look at the needle clamp again. There is a slot or opening where the needle fits. The round side of the needle shank should face you (the front), and the flat side of sewing machine needle should be lined up to go towards the back.
Pushing the Needle Up Fully
Slide the new needle up into the slot in the needle clamp. Push it up as far as it will go. This is a very important step called ensuring needle is fully seated. The needle shank has a specific length, and it needs to be pushed all the way up into the clamp until it stops. If the needle is not pushed all the way up, it will be hanging too low. This changes the timing with the bobbin hook, causing problems like skipped stitches or the needle hitting the bobbin case. Push it firmly until it stops moving upwards.
H4: Checking the Flat Side Again
As you push the needle up, double-check that the flat side is still facing the back of the machine. Sometimes it can twist a little as you push it in. A quick check ensures correct needle orientation. This step confirms the sewing machine needle flat side direction is right.
Making It Secure: Tightening the Screw
Once the new needle is fully seated and facing the right way, you need to tighten the needle clamp screw to hold it firmly in place.
Using the Screwdriver
Use your small screwdriver to turn the needle clamp screw to the right (clockwise). As you tighten it, hold the needle in place with your other hand so it doesn’t drop or twist.
How Tight is Tight Enough?
Tighten the screw until it is snug. The needle should be held firmly and not wobble or slide down. However, be careful not to overtighten it. The screw is small, and you could strip the threads or even break the screw or the needle clamp if you use too much force. Just turn it until you feel firm resistance and the needle is secure. Tightening sewing machine needle clamp correctly is the final step in securing the needle.
This completes the process of replacing sewing machine needle tutorial. The needle is now in place, ready to sew.
Final Checks and First Stitches
You’ve put the new needle in. Before you start your project, do a few simple checks.
Check Alignment
Look at the needle from the front. Does it look straight? Is it pointing directly down towards the needle plate hole? If it looks crooked, the flat side might not be facing exactly backward, or it might not be fully seated. Go back and re-do the insertion steps if needed, focusing on ensuring needle is fully seated and checking correct needle orientation.
Manual Stitch Test
Lower the presser foot. Turn the handwheel (the large wheel on the side of your machine) slowly by hand. Watch the needle go down into the needle plate hole. Does it go smoothly? Does it seem to hit anything? Turn the handwheel through a full stitch cycle.
H4: Test on Scrap Fabric
Get a small piece of the fabric you will be sewing. Thread your machine with both top and bobbin thread. Sew a few lines of straight stitches on the scrap fabric.
- Check the stitches: Do they look even and neat on both the top and bottom? Are there any skipped stitches?
- Listen to the machine: Does it sound smooth, or are there clunks or strange noises?
If the stitches look good and the machine sounds normal, you did it right! Inserting sewing machine needle correctly makes a big difference in stitch quality.
Fixing Problems After Needle Change
Sometimes, even if you think you followed the steps perfectly, you might run into issues after sewing machine needle replacement. Don’t worry, these are often easy to fix.
Problem: Skipped Stitches
This is very common if the needle isn’t in right.
* Check Needle Orientation: Is the flat side of sewing machine needle facing the back? If it’s turned even a little, it can cause skips. Re-insert the needle, making sure the flat side is exactly towards the back. Correct needle orientation is key.
* Check If Fully Seated: Did you push the needle all the way up until it stopped? If it’s not fully seated, it’s hanging too low. Loosen the needle clamp screw, push the needle all the way up, and tighten the screw again, ensuring needle is fully seated.
* Check Needle Type/Size: Is the needle right for the fabric? A Universal needle on a stretchy knit might skip. Try a Ballpoint or Stretch needle.
Problem: Thread Breaking
- Needle is Dull or Bent: Even a new needle can be faulty. Try a different new needle.
- Incorrect Threading: Re-thread the machine from the start, making sure the thread is correctly in all guides and has good tension.
- Needle is Too Small: Using too thin a needle with thick thread can cause the thread to break.
- Needle is Inserted Wrong: If the needle is twisted or not fully seated, it can stress the thread. Re-insert correctly.
Problem: Needle Breaks
- Bent Needle: If the needle was already bent or became bent hitting something (like pins or the presser foot), it will break. Always remove pins before sewing over them!
- Incorrect Needle Type/Size: Trying to sew thick layers or tough fabric with too thin a needle can cause it to break.
- Needle Not Fully Seated: If it’s not all the way up, it might hit the bobbin area. Ensure needle is fully seated.
- Needle Clamp Screw Too Loose: If the screw isn’t tight enough (tightening sewing machine needle clamp), the needle can move or wobble and break.
Most problems after changing the needle come back to correct needle orientation, ensuring needle is fully seated, or choosing the wrong needle for the job. Go back to the insertion steps and double-check everything carefully.
How Often Should You Change Your Needle?
There’s no exact rule for how often to change your needle, but here are some good guidelines.
Suggested Change Times
- After every project: If you sew often, this is a simple rule to follow. Start each new project with a fresh needle.
- After 8-10 hours of sewing: If you work on very large projects or production sewing, change the needle based on sewing time. The point gets dull from pushing through fabric.
- When starting a new fabric type: Especially when switching from light to heavy fabric, or woven to knit. Use the right needle for the fabric.
- If you hear a strange noise or have skipped stitches: These are signs the needle might be the problem.
- If you hit a pin: Even hitting one pin can bend or dull the needle tip enough to cause problems. Change it right away.
Changing your needle often prevents many headaches. It’s a small cost for much better sewing results and a happier machine. Replacing sewing machine needle tutorial steps are quick once you’ve done them a few times, so making it a habit is easy.
Caring for Your Needles
Proper care keeps your needles in good shape before and after you use them.
Storing New Needles
New needles come in little cases. Keep them in these cases to protect the points and keep them organized by type and size. Store them in a dry place.
Storing Used Needles (Optional)
Some people keep needles that are still good but not “new sharp” for things like basting or sewing on paper. If you do this, store them separately from your new needles and mark them clearly (e.g., “used 80/12”). Remember the flat side of sewing machine needle rule applies whenever you use them again.
Disposing of Old Needles Safely
As mentioned earlier, put old, dull, or bent needles in a safe container before throwing them away. An empty plastic bottle with a lid, a metal tin, or a special needle disposal case works well. This protects you and others from getting poked.
Step-by-Step Summary: Replacing Your Sewing Machine Needle
Here is a quick list of the steps for replacing your sewing machine needle:
Your Quick Guide
- Turn off and unplug your sewing machine.
- Gather your small screwdriver and new needle (the right type and size).
- Hold the old needle gently.
- Use the screwdriver to loosen the needle clamp screw by turning it left (counter-clockwise). You only need to loosen it enough for the needle to come out.
- Pull the old needle straight down and out. Put it in a safe spot for disposal.
- Pick up the new needle. Find the flat side of sewing machine needle shank.
- On most machines, the flat side must face the back. The round side faces the front. This is correct needle orientation.
- Push the new needle straight up into the needle clamp slot as far as it will go. Ensure needle is fully seated by pushing it until it stops.
- While holding the needle in place, use the screwdriver to tighten the needle clamp screw by turning it right (clockwise). Tightening sewing machine needle clamp securely holds the needle.
- Tighten until snug, but do not overtighten.
- Do a quick check: Is the needle straight? Is the flat side still facing the back?
- Turn the handwheel slowly to make sure the needle moves smoothly.
- Sew a few stitches on scrap fabric to test.
This simple process makes sewing machine needle replacement quick and ensures you are inserting sewing machine needle correctly every time. Following this replacing sewing machine needle tutorial helps keep your machine happy and your stitches beautiful.
Table of Common Needle Types and Uses
Here is a simple table to help you pick the right needle:
H4: Needle Selection Guide
| Needle Type | Shank Type | Best For… | Fabric Examples | Common Sizes | Special Tip/Feature | Key Point for Insertion |
|---|---|---|---|---|---|---|
| Universal | Flat | General sewing, wovens & stable knits | Cotton, Linen, Rayon, Poplin | 70/10, 80/12, 90/14 | Slight ball point | Flat side to back |
| Ballpoint/Jersey | Flat | Knit fabrics, prevents skipped stitches | T-shirt fabric, Cotton jersey, Fleece | 70/10, 80/12, 90/14 | Rounded point pushes fibers apart | Flat side to back |
| Stretch | Flat | Very stretchy fabrics | Lycra, Spandex, Swimwear, Activewear | 75/11, 90/14 | Special eye and scarf prevent skips | Flat side to back |
| Denim/Jeans | Flat | Thick, tough fabrics, multiple layers | Denim, Canvas, Corduroy, Upholstery | 90/14, 100/16, 110/18 | Very sharp, strong point | Flat side to back |
| Microtex/Sharp | Flat | Very fine fabrics, precise stitches, topstitching | Silk, Microfiber, Satin, Polyester, Oilcloth | 60/8, 70/10, 80/12 | Very sharp, fine point | Flat side to back |
| Quilting | Flat | Sewing through multiple layers and batting | Quilt tops, batting, backing | 75/11, 90/14 | Reinforced shank, special taper | Flat side to back |
| Leather | Flat | Leather, vinyl, non-woven heavy materials | Leather garments, Bags, Belts | 90/14, 100/16, 110/18 | Wedge/cutting point | Flat side to back |
Note: Always double-check your machine manual for specific needle recommendations and confirmation that the flat side of sewing machine needle faces the back on your model.
Frequently Asked Questions About Needles
Here are answers to some common questions about sewing machine needles and their replacement.
What happens if I put the needle in backwards?
If you put the needle in backwards (round side to the back, flat side to the front), the machine will likely not sew correctly. It will skip stitches, break thread, or make loops on the fabric. On some machines, a backwards needle can even hit the bobbin hook and damage the machine’s timing or break parts. Correct needle orientation (flat side facing the back on most machines) is crucial.
Why won’t my new needle go in all the way?
Make sure you are pushing it straight up into the needle clamp slot. Also, check that the needle clamp screw is loose enough. If the screw is still too tight, it won’t open enough for the needle shank to fit fully. Ensure needle is fully seated means pushing it up until the very top of the shank hits the inside of the needle bar.
My needle is stuck! What do I do?
If you’ve loosened the needle clamp screw and the needle won’t come out, try wiggling it gently while pulling down. Tweezers can sometimes help grab it if it’s stuck high up. If the needle is broken, it might be harder. Try to get the remaining piece out carefully with tweezers. If a large piece is inside the machine, you might need to open the bobbin area or even get help from a repair person. Always hold the needle when loosening the screw to prevent it from falling inside.
Does the needle type matter for my machine?
Yes! Using the correct needle type and size is very important. Modern home sewing machines are designed to use needles with a flat shank (the top part). Industrial machines might use needles with a round shank. Always make sure you are using flat shank needles meant for home sewing machines. Using the wrong shank type can cause serious damage to your machine.
How do I know which is the “front” and “back” of my machine for needle direction?
The “front” of your machine is usually the side where the needle is threaded and where you sit. The “back” is the side away from you, often towards the machine’s column. On almost all home machines, the flat side of sewing machine needle points towards the back. The groove on the front of the needle (where the thread sits) faces the front.
Can I use the same needle for everything?
A Universal needle is good for many basic sewing tasks. However, using specialized needles like Ballpoint for knits or Denim for jeans will give you much better results and fewer problems (like skipped stitches or broken needles) when working with those specific fabrics.
What is the “scarf” on a sewing machine needle?
The “scarf” is a small indentation on the back side of the needle shank, just above the eye. This little dip allows the bobbin hook to get very close to the needle to grab the thread loop. The scarf is on the same side as the flat side of sewing machine needle shank. Ensuring correct needle orientation (flat side/scarf to the back) is what lets the bobbin hook do its job properly.
Conclusion
Changing your sewing machine needle correctly is a simple but essential skill for anyone who sews. It helps prevent common problems like skipped stitches, broken thread, and fabric snags, leading to neater, stronger stitches and a smoother sewing experience. Remember the key steps: loosen the needle clamp screw, remove the old needle safely, find the flat side of sewing machine needle shank, push the new needle all the way up with the flat side facing the back (ensuring needle is fully seated), and tighten the needle clamp screw (tightening sewing machine needle clamp securely). Making regular sewing machine needle replacement a habit, using the correct needle for your fabric, and paying attention to the correct needle orientation will make your sewing life much easier and more enjoyable. Consider this your easy guide on how to change sewing machine needle and inserting sewing machine needle correctly for beautiful results every time.