
To sew leather on a sewing machine today, you need the right tools and techniques. It’s not as hard as you might think, but it does require special machine settings, needles, thread, and knowing a few tricks to handle this unique material. You can absolutely sew leather on a sewing machine, even a home machine, but you’ll need to make sure it’s powerful enough and set up correctly.
Sewing leather is different from sewing fabric. Leather doesn’t heal after a needle goes through it. This means every stitch leaves a permanent hole. You need to get it right the first time. Also, leather can stick to your machine foot and feed dogs, making it hard to move smoothly.
This guide will show you how to pick the right gear, set up your machine, and handle leather so you can sew it like a pro.
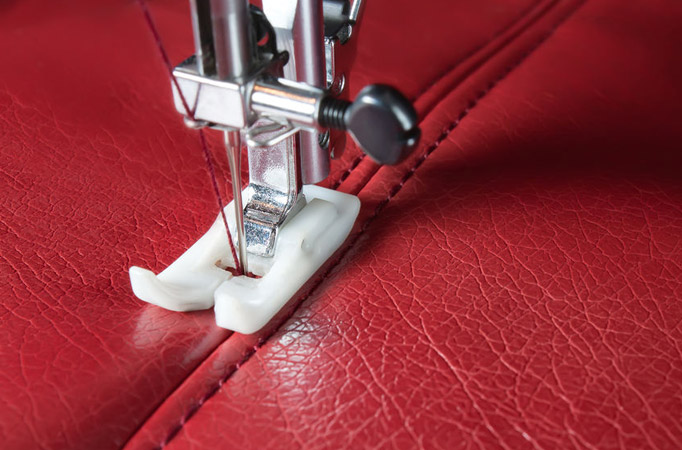
Image Source: www.gursewingmachines.com
Key Tools for Leather Sewing
Sewing leather asks for more from your sewing machine and tools than sewing cotton or silk. Using the right tools makes the job much easier and gives you better results.
Choosing the Right Machine
You can’t just grab any sewing machine and expect it to handle thick leather. A standard home machine might work for very thin or soft leather, but it can struggle, skip stitches, or even break if you try to sew thicker hides.
For serious leatherwork, a heavy duty sewing machine is best. These machines have more power in the motor and stronger internal parts. They are built to push thick needles through tough materials. Look for machines described as “heavy duty,” “industrial,” or specifically designed for materials like denim, canvas, and leather.
Even with a heavy-duty machine, knowing its limits is important. Don’t try to sew multiple layers of extremely thick leather if your machine isn’t made for it.
The Importance of Needles
Needles are super important when sewing leather. You cannot use regular sewing machine needles. They will struggle, break, and won’t make clean holes.
You need leather sewing machine needles. These needles have a special tip, often called a “wedge” or “chisel” point. This point isn’t round; it’s shaped like a small blade. It cuts through the leather instead of pushing the fibers apart. This cutting action makes a clean hole for the thread and helps the needle pass through thick layers more easily.
Using a leather needle prevents skipped stitches and reduces strain on your machine.
Picking the Correct Needle Size
Just like with fabric, the needle size for leather depends on the leather’s thickness. A thicker leather needs a larger, stronger needle.
Needle sizes usually follow a numbering system (like 90/14, 100/16, 110/18, 120/19, etc.). The higher the number, the thicker the needle.
- For very thin, garment-weight leather or faux leather, you might use a size 90/14 or 100/16 leather needle.
- For medium-weight leather used in bags or wallets, sizes 110/18 or 120/19 are more common.
- For really thick or multiple layers of leather, you might even need a size 130/21 or larger, if your machine can handle it.
Using a needle that is too small for the leather will cause it to bend or break. Using a needle that is too large can make unnecessarily big holes that weaken the leather. Always test on a scrap piece first. Change your needle often, perhaps after every project or every few hours of sewing, as the sharp point can dull quickly when cutting through leather.
Helpful Presser Feet
Leather doesn’t slide under a standard metal presser foot easily. It grips and sticks. This makes it hard for the machine to feed the leather through smoothly, leading to uneven stitches.
One of the best tools for sewing leather is a walking foot attachment. This foot has its own set of feed dogs (the little teeth that pull the fabric) on top, which move along with the machine’s built-in feed dogs. It grips the top layer of leather and moves it at the same pace as the bottom layer. This helps prevent slipping, sticking, and uneven stitches, especially when sewing multiple layers or longer seams.
Other helpful feet include:
* Teflon Foot: This foot is coated with a slippery material (Teflon or plastic) that helps it glide over sticky surfaces like leather or faux leather. It’s a good alternative if you don’t have a walking foot, especially for thinner leathers or sewing faux leather.
* Roller Foot: This foot has little rollers on the bottom instead of a flat surface. These rollers move over the leather, reducing friction and helping the material feed smoothly.
Selecting the Right Thread
The thread you use is just as important as the needle. Thin, weak thread can break easily when sewing leather, and it won’t be strong enough to hold your project together.
You need a strong thread for sewing leather. Polyester or nylon threads are good choices. These threads are durable, resistant to rot, and strong enough to handle the stress placed on leather seams.
Thread size matters too. Thicker leather usually requires thicker thread for strength and appearance. Common sizes for leather include T70 (Tex 70), T90 (Tex 90), or even T135 (Tex 135) for heavier work. Check your machine’s manual to see what thread sizes it can handle. A machine designed for heavy materials can typically handle thicker threads.
Bonded nylon or bonded polyester threads are often preferred. The bonding agent helps the thread glide smoothly through the leather layers without twisting or fraying.
Do not use cotton thread for leather projects, as it can rot over time.
Other Useful Supplies
Beyond the machine essentials, a few other items make sewing leather easier:
* Leather clips: Leather pins leave permanent holes. Use clips (like binder clips or specialized leather clips) to hold pieces together before sewing.
* Leather cement or double-sided tape: A thin line of leather cement or special tape can hold edges together temporarily before sewing, replacing the need for clips along straight seams.
* Rotary cutter and mat: A sharp rotary cutter is often better than scissors for cutting straight lines in leather cleanly.
* Sharp craft knife or utility knife: Useful for detail cutting.
* Mallet and hole punch: For making clean holes for rivets, snaps, or decorative stitches.
* Edge creaser, beveler, and burnisher: Tools for finishing the raw edges of leather for a professional look.
* Rubber mallet: Useful for flattening seams after sewing.
Preparing Your Leather
Before you start sewing, preparing the leather properly is key. This includes choosing the right type and getting it ready to cut and sew.
Grasping Leather Types
Not all leather is created equal, especially for machine sewing. The leather types for sewing vary greatly in thickness, flexibility, and finish.
- Garment Leather: Thin, soft, and pliable (0.5 mm to 1 mm thick). Easiest to sew on a home machine. Used for clothing, soft bags.
- Upholstery Leather: A bit thicker and more durable than garment leather (around 1 mm to 1.6 mm). Used for furniture, bags. Can often be sewn on a heavy-duty home machine.
- Veg-Tan Leather: Often thicker and stiffer when new, but can be molded and tooled. Thickness varies widely (from 1.6 mm up to several mm). Thicker weights usually require a true industrial machine or hand sewing. Used for belts, wallets, structured bags.
- Chrome-Tan Leather: Softer and more flexible than veg-tan, often used for bags, jackets, and gloves. Thickness varies.
- Faux Leather (Vinyl, Pleather): Not real leather, but designed to look like it. Can be tricky to sew because it is non-porous and sticky. Requires similar techniques and tools (walking foot, Teflon foot, leather needle) but can often be sewn on a standard machine as it’s usually thinner. Sewing faux leather has its own small differences, mainly related to its synthetic nature and tendency to stick.
Always choose leather that is suitable for your project and your machine’s capability. Thicker is not always better if your machine can’t handle it.
Marking and Cutting
Unlike fabric, you can’t use pens that bleed or disappear easily on leather. Pencil or specialized silver/white leather marking pens work well on the back (suede) side. For the grain (smooth) side, an awl can make light scratches that won’t show permanently.
Cutting must be precise, as mistakes are permanent. Use a sharp rotary cutter or craft knife against a metal ruler for straight lines. For curves, sharp leather shears or a craft knife work well. Cut carefully; clean edges are important.
Preparing Edges
For some projects, you might want to thin (skive) the edges of the leather where seams overlap. This reduces bulk and makes it easier for your machine to sew, especially when sewing thick leather or multiple layers. You can use a skiving knife or a specialized skiving tool. Be careful, it’s easy to cut too much.
Some projects leave edges raw, while others are finished by folding, painting (edge paint), or burnishing. This depends on the desired look and the leather type.
Setting Up Your Machine
Getting your sewing machine ready for leather is crucial. It involves changing the needle and thread and adjusting settings like tension and stitch length.
Installing the Right Needle and Thread
- Change Needle: Always start with a new leather sewing machine needle of the correct needle size for leather based on your material thickness. Insert it correctly according to your machine’s manual.
- Thread Up: Use your chosen strong thread for sewing leather. Thread your machine completely, including the bobbin. Make sure the thread is seated properly in all the tension discs and guides. Thicker threads might require loosening tension discs slightly or ensuring they pass through larger guides if your machine has them.
Adjusting Machine Tension
Machine tension for leather needs careful adjustment. Leather is tough, and the holes are permanent. You need balanced tension so the stitches look good on both sides and the thread doesn’t break.
The general goal is for the knot of the stitch to sit within the layers of leather, not pulled too tight on one side or too loose on the other.
- Start with your machine’s default tension setting for heavier fabrics.
- Sew a test line on a scrap of the same leather you’ll use for your project.
- Check both sides of the stitching.
- If the bobbin thread is lying flat on the bottom and the top thread looks like straight lines with no loops, your top tension might be too tight. Loosen the top tension dial.
- If the top thread is lying flat on the top and the bobbin thread has loops or messy stitches on the bottom, your bobbin tension might be too tight, or your top tension too loose. Adjust the top tension first by tightening it. If that doesn’t work, you might need to slightly adjust the bobbin tension screw (a tiny turn makes a big difference!), but try top tension first.
- Keep testing and adjusting until the stitches look balanced.
Thicker threads require less tension than thinner threads because they fill the hole more. If you’re using a very thick thread, you might need to significantly loosen your top tension.
Setting the Stitch Length
The stitch length for leather should be longer than what you’d use for fabric. Short stitches in leather place too many holes close together. This can weaken the leather and cause it to tear along the seam.
- Do not use very short stitches. Aim for a stitch length of 3 mm to 4 mm (about 8 to 6 stitches per inch) for most projects.
- For thicker leather or decorative stitches, you might even go up to 5 mm or 6 mm.
- Test different stitch lengths on scraps to see what looks best and provides enough strength without weakening the leather.
The Sewing Process
With your machine set up and leather prepared, you’re ready to sew. Take your time, as stitches are permanent.
Starting the Seam
Place your prepared leather pieces under the presser foot. If you are using a walking foot attachment, make sure it’s engaged properly.
* Lower the needle into the starting point by hand first, using the handwheel. This lets you see exactly where the first permanent hole will be made.
* Hold the thread tails behind the foot.
* Begin sewing slowly.
Sewing Smoothly
Leather needs a steady hand and consistent speed. Don’t pull or push the leather forcefully. Your walking foot or Teflon foot and the machine’s feed dogs should move the leather through. Guide it gently.
- Go slowly: This gives you more control and reduces the chance of mistakes.
- Maintain a consistent pace: Jerky starts and stops can lead to uneven stitches.
- Use clips or glue: Remove clips just before they go under the foot. If using cement or tape, ensure it’s fully dry.
Backstitching or Locking Stitches
Regular backstitching at the start and end of a seam can create a messy tangle of thread on leather, and putting many holes in the same spot can weaken it.
A better way to secure stitches on leather is to use a locking stitch function on your machine (if it has one) or to leave long thread tails and tie them off by hand after sewing. Alternatively, sew forward a few stitches, then sew backward just a few stitches, then continue forward. Keep this backstitch section short (only 2-3 stitches).
Handling Corners and Curves
- Corners: Sew up to the corner point. Stop with the needle down in the leather. Lift the presser foot. Pivot the leather smoothly. Lower the presser foot and continue sewing.
- Curves: Sew slowly around curves, gently guiding the leather. The walking foot helps significantly here. You may need to stop with the needle down, lift the foot, and adjust the leather slightly on tight curves.
Sewing Thick Leather
Sewing thick leather or multiple layers presents the biggest challenge. Even with a heavy duty sewing machine, a large needle size for leather, and strong thread for sewing leather, it requires careful handling.
- Skive edges: As mentioned, reducing bulk where seams overlap is crucial.
- Use a rubber mallet: After sewing a seam, gently mallet the stitches down. This flattens the seam, embedding the thread slightly into the leather, making it look neater and potentially reducing the strain on the stitches.
- Check machine capability: Be realistic about what your machine can sew. If it sounds like it’s straining heavily, stop. You might need to hand-sew those sections or use a different construction method (like rivets).
- Increase stitch length: Longer stitches are less likely to weaken the leather when sewing through significant thickness.
- Adjust machine tension for leather: Thicker layers and thread might require looser top tension.
- Test on scraps: Always, always test on scrap pieces that mimic the exact layers and thickness you will be sewing.
Sewing Faux Leather
Sewing faux leather is often easier in terms of piercing, but it has its own quirks.
* Sticking: Faux leather sticks badly to metal feet and machine beds. A walking foot or Teflon foot is almost essential. You might also need to place tissue paper or painter’s tape under the leather to help it slide, tearing it away carefully after sewing.
* Pins are out: Just like real leather, pins leave permanent holes. Use clips.
* Do not iron: Faux leather is plastic. It will melt. Press seams gently with fingers or a rubber mallet.
* Needles: Use a leather needle or a microtex needle. Leather needles cut the material, which works well for the plastic surface. Microtex needles have a very sharp point that pierces cleanly. Test both on a scrap.
* Stitch length: Still use a medium to long stitch length (around 3mm) to avoid perforating the material too much, which could cause it to tear along the seam later.
* Backstitching: Use locking stitches or tie off threads by hand rather than backstitching repeatedly.
Troubleshooting Common Issues
Even with the right tools, you might run into problems. Here’s how to fix some common ones:
| Problem | Possible Cause | Solution |
|---|---|---|
| Skipped Stitches | Incorrect needle, dull needle, incorrect tension | Change to a new leather sewing machine needle. Check machine tension for leather. Ensure needle is inserted correctly. |
| Thread Breaking | Thread too weak/thin, tension too tight, needle size wrong, burr on needle/machine | Use stronger, thicker thread for sewing leather. Loosen machine tension for leather. Use correct needle size for leather. Check for burrs on needle/hook area. |
| Uneven Stitches/Feeding | Leather sticking, no walking foot, incorrect tension | Use a walking foot attachment or Teflon foot. Adjust machine tension for leather. Ensure leather is not being pulled/pushed. |
| Needle Breaking | Needle too small for thickness, bent needle, forcing leather | Use correct needle size for leather for sewing thick leather. Do not force leather through. Ensure needle is not hitting anything. |
| Stitches Look Loose | Tension too loose, thread too thin | Tighten machine tension for leather. Use thicker thread for sewing leather. |
| Holes Too Big | Needle size too large | Use a smaller needle size for leather if the leather thickness allows. |
| Leather Tearing at Seam | Stitch length too short, holes too close together | Use a longer stitch length for leather. Don’t backstitch too much. |
Completing Your Leather Project
Once the sewing is done, the final touches make a big difference.
* Trim threads: Leave tails long enough to tie off if you didn’t backstitch. Tie securely and trim. For backstitched seams, trim threads neatly.
* Flatten seams: Mallet seams flat if needed.
* Finish edges: Depending on your project, you might leave edges raw, apply edge paint, or burnish them smooth.
* Clean the leather: Wipe away any marks.
Gaining Skill with Practice
Sewing leather takes practice. Start with simple projects using thinner, inexpensive leather or faux leather. As you gain confidence, move on to thicker materials and more complex designs. Each type of leather and each machine will behave slightly differently. Test, test, test on scraps before sewing your final piece.
Projects for Beginners
- Simple coasters
- Small pouches
- Key fobs
- Basic wallets (using thinner leather)
Projects for More Experience
- Tote bags
- Clutches
- Belts
- Structured wallets
Remember that patience is key. Leather is less forgiving than fabric, but the results of well-sewn leather goods are beautiful and durable.
Interpreting Machine Manuals
Your machine’s manual is your best friend. It will tell you:
* What needle size for leather (or general heavy materials) it can handle.
* What thread for sewing leather sizes are okay.
* How to adjust machine tension for leather and heavy fabrics.
* How to attach and use accessories like a walking foot attachment.
Refer to it often, especially if you are using a standard home machine and trying to push its limits with thicker materials.
Fathoming the Cost
Sewing leather can be more expensive than fabric sewing because the materials and specialized tools cost more.
* Good quality leather can be pricey.
* Heavy duty sewing machine are a bigger investment.
* Specialized needles, feet, and threads add up.
However, the items you make are often more durable and can last a lifetime, which can make it a worthwhile investment for your craft or business.
Deciphering Faux Leather Specifics
While similar, sewing faux leather has unique points:
* It doesn’t breathe like real leather.
* It can tear more easily if stitched too close together.
* It is usually cheaper than real leather.
* It is often easier for standard machines to sew because it’s thinner and has a fabric backing.
* Edge finishing is different; you can’t burnish it. Edges are often left raw, folded, or bound.
When working with faux leather, always test on a scrap to see how it handles stitching, tension, and presser feet.
Table of Common Leather Types and Suitability
| Leather Type | Typical Thickness (mm) | Flexibility | Machine Suitability (with right tools) | Common Uses |
|---|---|---|---|---|
| Garment | 0.5 – 1.0 | Very Flexible | Most home machines | Clothing, soft bags, lining |
| Upholstery | 1.0 – 1.6 | Flexible | Heavy-duty home machines | Furniture, bags, wallets |
| Chrome-Tan (Bag) | 1.5 – 2.5 | Moderate | Heavy-duty home machines, light industrial | Bags, straps, wallets |
| Veg-Tan (Tooling) | 1.5 – 4.0+ | Stiff (softens) | Industrial, heavy-duty industrial | Belts, structured bags, wallets, sculpting |
| Faux Leather (Vinyl) | 0.5 – 1.5 | Varies | Most home machines (use right foot/needle) | Bags, upholstery, accessories |
Note: This table is a general guide. Specific leather hides can vary.
Frequently Asked Questions
Q: Can I sew leather on a regular home sewing machine?
A: You can sew some types of leather on a regular home machine, but it must be thin (garment or thin upholstery weight) or faux leather. You absolutely need the right needle (leather sewing machine needle), strong thread (thread for sewing leather), and preferably a walking foot attachment. A regular machine will struggle with sewing thick leather.
Q: What is the best needle for sewing leather?
A: A leather sewing machine needle with a wedge or chisel point is specifically designed to cut through leather cleanly.
Q: What size needle should I use for leather?
A: The needle size for leather depends on the leather’s thickness. Use larger needles (like 110/18, 120/19, or 130/21) for thicker leather and smaller needles (like 90/14 or 100/16) for thinner leather or sewing faux leather.
Q: What kind of thread works best for leather?
A: Strong synthetic threads like bonded polyester or bonded nylon are best (thread for sewing leather). They are durable and resist rot.
Q: Why is my machine skipping stitches on leather?
A: Skipped stitches are often caused by using the wrong needle (not a leather sewing machine needle), a dull needle, or improper machine tension for leather.
Q: How do I stop leather from sticking to my machine?
A: Use a walking foot attachment or a Teflon presser foot. You can also place tissue paper or painter’s tape under the leather and sew through it.
Q: What stitch length should I use for leather?
A: Use a longer stitch length for leather, typically 3 mm to 4 mm or even longer for thicker pieces. Short stitches can weaken the leather.
Q: How do I handle thick leather?
A: Sewing thick leather requires a heavy duty sewing machine, a large needle size for leather, strong thread for sewing leather, and a walking foot attachment. Skive edges to reduce bulk, use a longer stitch length for leather, and test extensively on scraps.
Q: Is sewing faux leather the same as real leather?
A: Sewing faux leather is similar in that you need special tools (walking foot, Teflon foot, leather or microtex needle) to prevent sticking and permanent holes. However, faux leather is synthetic, doesn’t breathe, melts with heat, and often has different edge finishing needs compared to real leather.
Sewing leather by machine is a rewarding skill. With the right tools, settings, and patience, you can create beautiful, lasting items.