
Okay, let’s learn how to read a sewing pattern! Learning to read a sewing pattern is like getting a map for your sewing project. It tells you what pieces to cut out, where to put them on the fabric, and how to sew them together step-by-step. This guide will walk you through the basics of understanding sewing patterns, from the envelope to the instructions inside. We will cover essential steps like reading pattern envelope information, identifying pattern pieces, understanding pattern markings, including the grainline marking sewing, pattern notches and dots, choosing pattern size, and understanding how pattern layout on fabric works. We will also explain sewing pattern instructions. This post provides basic sewing pattern reading skills you need to start your sewing journey.
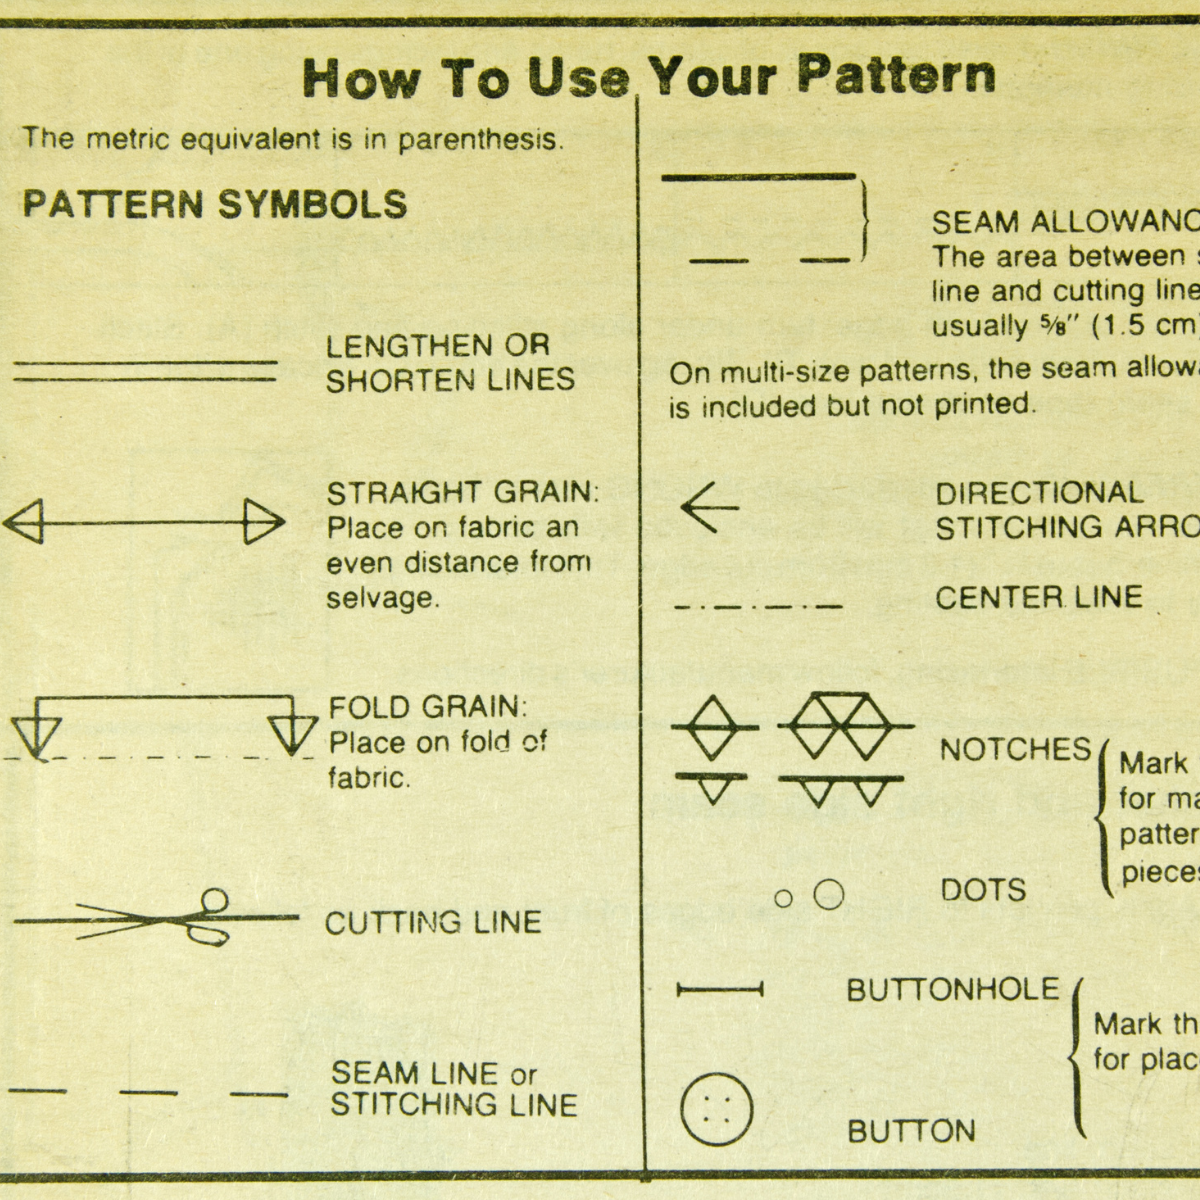
Image Source: letslearntosew.com
What’s Inside a Sewing Pattern?
When you buy a sewing pattern, it usually comes in an envelope. This envelope and what’s inside are packed with information you need.
Inside the envelope, you will find:
- Tissue Paper Pieces: These are the actual pattern shapes for each part of your garment or project (like a sleeve, a pant leg, or a collar). They are usually printed on thin tissue paper.
- Instruction Sheet: This is a booklet or large sheet of paper with step-by-step instructions and often diagrams showing how to sew the pieces together.
Both the envelope and the pieces inside have important markings and information. Reading pattern envelope details is the first step.
Reading the Pattern Envelope
The envelope gives you a lot of key information before you even open it. It’s like the book cover and summary.
h4 Looking at the Front of the Envelope
The front usually shows:
- Pictures or drawings of the finished project. This shows you what it will look like.
- Different styles or “views” you can make from this one pattern.
- The pattern number.
- The size range included in the envelope (like Sizes 8-16).
h4 Checking the Back of the Envelope
The back is full of important details. You need to read this carefully.
- More Pictures/Drawings: Different views are often shown again.
- Description: A small paragraph describing the project.
- Body Measurements and Sizing Chart: This is very important for choosing pattern size. It lists body measurements (bust, waist, hip) that match each size. Pattern sizes are different from ready-to-wear clothing sizes! Always use your body measurements to pick your pattern size. We’ll talk more about this later.
- Fabric Suggestions: This tells you what kinds of fabric work best for this pattern. Using the wrong fabric can change how the final project looks and fits.
- Fabric Yardage Requirements: This tells you how much fabric you need for each view and size, often listed for different fabric widths (like 45 inches or 60 inches). It also tells you if you need extra fabric for ‘naps’ or one-way designs.
- Notions List: Notions are all the other things you need besides fabric. This can include zippers, buttons, elastic, thread, interfacing, trim, etc. The list tells you exactly what you need and how much.
- Difficulty Level: This is often shown as a rating (like Easy, Beginner, Intermediate, Advanced). Start with Easy or Beginner patterns.
Choosing Your Pattern Size
This is a critical step for getting a good fit. Remember, pattern sizes are not the same as the sizes you buy in stores.
h4 How to Pick the Right Size
- Take Your Body Measurements: Use a soft tape measure.
- Bust: Measure around the fullest part of your bust.
- Waist: Measure around the narrowest part of your torso.
- Hips: Measure around the fullest part of your hips.
- (For pants or skirts, you might also need hip measurement).
- (For children’s patterns, you might need height).
- Look at the Sizing Chart: Find the chart on the back of the pattern envelope.
- Compare Your Measurements: See which size your body measurements match best.
- Choose Based on Key Measurement: For tops and dresses, the bust measurement is usually the most important for choosing the size. For skirts and pants, the hip measurement is usually key.
- What if Measurements Don’t Match? Your measurements might fall into different sizes. For beginners, it’s often easiest to choose the size based on your most important measurement (bust for tops/dresses, hip for bottoms). You might need to make small adjustments later, but picking the closest size is the first step. If you are between sizes, choosing the larger size and taking it in is often easier than making a smaller size bigger.
Picking the correct pattern size based on your actual body measurements is key to a good sewing result.
Identifying Pattern Pieces
Inside the envelope are the tissue paper pieces. These are the shapes you will cut out of your fabric.
h4 Finding Your Pieces
- Each pattern piece is usually numbered or lettered (like “Piece 1 – Front Bodice,” “Piece A – Sleeve”).
- The instruction sheet will tell you which pieces you need for the specific “view” (style) and size you are making.
- Lay out the tissue paper carefully. It’s thin and wrinkles easily. You might even need to gently iron it on a low setting without steam to flatten it out.
- Find the pieces listed for your project view and size. Set aside the pieces you don’t need.
Knowing how to find and identify pattern pieces for your chosen project is the next step after reading the envelope.
Deciphering Pattern Markings and Symbols
The tissue paper pattern pieces have many lines, symbols, and words printed on them. These are pattern markings and symbols. They give you vital information about how to cut and sew the fabric. Learning sewing pattern symbols meaning is fundamental to reading patterns.
h4 Grasping Common Symbols
Understanding pattern markings is crucial. Here are some common ones and what they mean:
| Symbol | What it Looks Like | What it Means | Why It’s Used |
|---|---|---|---|
| Grainline | A long line with arrows at both ends. Sometimes it says “Grainline” or “Straight Grain”. | This line must be placed exactly parallel to the selvedge (the edge of the fabric that doesn’t fray). | Ensures your garment hangs correctly and doesn’t twist. It follows the direction of the threads in the fabric. |
| Place on Fold | A double arrowed line that looks like a bracket [—-]. Often says “Place on Fold”. | This edge of the pattern piece must be placed exactly on the fold of the fabric. | Creates a mirrored piece when the fabric is unfolded (e.g., the front of a shirt). Avoids a seam line there. |
| Cutting Line | The outermost solid line for your chosen size. Usually has a number next to it. | This is the line you cut along when cutting out your fabric piece. | Tells you where to cut for the specific size you are making. |
| Stitching Line | Often a dashed or dotted line inside the cutting line. | This line shows where you will sew the seam. It’s usually 5/8 inch (1.5 cm) inside the cutting line. | Shows the seam allowance (the fabric between the stitching line and the cutting line). Helps with accurate sewing. |
| Notches | Small diamonds, triangles, or lines extending outwards from the cutting line edge. | These are matching points. They help you know which edges to sew together and where to align pieces. | You match notches on different pieces to ensure they fit correctly and are joined in the right place. |
| Dots/Circles | Small solid circles or dots. Sometimes triangles or squares. | These are also matching or placement points. They can show where to place pockets, darts, zippers, etc. | Helps you accurately position other pattern pieces or sewing details. |
| Dart Markings | Lines forming a triangle or diamond shape. Often have dots or circles at the points. | Shows where you will sew a dart (a stitched fold that shapes the fabric to the body). | Tells you the size and location of darts needed for shaping. |
| Button/Buttonhole | Marks showing where buttons should go and the size/location of buttonholes. | Tells you where to sew buttons and create buttonholes. | Ensures button closures are placed correctly. |
| Lengthen/Shorten | A double line across the pattern piece. Often says “Lengthen or Shorten Here”. | Shows where you can add or remove length from the pattern piece if you need to adjust the fit. | Allows you to customize the pattern length for your height or preference. |
| Fold Line | A line indicating where a piece should be folded during construction (not fabric fold). | Shows where a fold is created in the fabric piece itself as part of the sewing process. | Helps create hems, facings, or other folded fabric details. |
Knowing these sewing pattern symbols meaning will make the pattern much less mysterious.
Preparing Your Pattern Pieces
Once you have identified your pieces and understand the markings, you need to get the pattern ready to use on fabric.
h4 Cutting the Tissue Paper Pieces
- Find the cutting line for the size you chose based on your body measurements.
- Carefully cut along this line for each pattern piece you need.
- Cut the notches outwards or snip inwards slightly within the seam allowance. Don’t cut into the stitching line! Beginners often find cutting outwards easier.
Laying Out Pattern Pieces on Fabric
This step is crucial for cutting correctly and using your fabric efficiently. This is your pattern layout on fabric.
h4 Getting Fabric Ready
- Pre-wash Fabric: Always wash and dry your fabric the way you plan to wash the final garment. Fabric can shrink! Doing this first prevents your finished project from shrinking later.
- Press Fabric: Iron your fabric smooth to remove wrinkles.
- Find the Selvedge and Grain:
- The selvedge is the finished edge of the fabric that runs along the length. It won’t fray.
- The fabric grain is the direction of the threads. The ‘straight grain’ runs parallel to the selvedge.
h4 Placing Pieces Correctly
- The instruction sheet will show you different “layout diagrams.” Find the diagram for your chosen view, size, and fabric width (45″ or 60″).
- These diagrams show you how to arrange all the pattern pieces on your fabric.
- Follow the diagram exactly. It’s designed to save fabric and ensure pieces are on the correct grain.
- Grainline is Key: For each pattern piece with a grainline marking sewing line, use a ruler or tape measure to make sure that line is exactly the same distance from the selvedge along its whole length. This aligns the pattern piece with the fabric’s straight grain. This step is very important for how your finished garment will hang and fit.
- Place on Fold: Pieces marked “Place on Fold” must have that edge right on a fold of the fabric.
- With Nap/Without Nap: Some layouts are marked “With Nap” or “Without Nap.” ‘Nap’ refers to fabrics with a pile or direction (like velvet or corduroy) or a one-way print. All pieces must be laid out going the same direction for these fabrics. Layouts “Without Nap” allow you to place pieces in either direction to save fabric. Follow the diagram for your fabric type.
- Pinning: Once pieces are correctly placed, pin them securely to the fabric, placing pins within the cutting line (in the seam allowance) so they don’t distort the cutting edge.
Getting the pattern layout on fabric right, especially matching the grainline marking sewing, is a critical step you shouldn’t rush.
Cutting Your Fabric
With the pattern pieces pinned, you are ready to cut.
h4 How to Cut
- Use fabric scissors or a rotary cutter and mat. Keep fabric scissors just for fabric!
- Cut carefully and smoothly around the cutting line of each pattern piece.
- When you reach the notches, cut around them (making them stick out) or snip inwards just a tiny bit into the seam allowance. Be careful not to cut past the stitching line. Cutting outwards is usually safer for beginners.
Once all pieces are cut, remove the tissue pattern carefully from the fabric. You can transfer some markings (like darts or dots) to the fabric now using tailor’s chalk, fabric pens, or tailor’s tacks.
Interpreting the Sewing Instructions
The instruction sheet tells you how to sew the fabric pieces together step-by-step. Sewing pattern instructions explained clearly are your guide through the construction process.
h4 Following the Steps
- Read Through First: Before you start sewing, read all the instructions from beginning to end. This gives you an overview of the project and helps you understand the order of operations.
- Find Your View and Size: Make sure you are reading the instructions for the specific view and size you chose.
- Step-by-Step: The instructions are numbered. Complete step 1 before moving to step 2, and so on.
- Look at Diagrams: Pattern instructions almost always include diagrams for each step. Look at the diagram alongside the written text. It helps you visualize what the step is asking you to do. Diagrams often show which pieces are being joined and where markings (like notches and dots) should match up.
- Glossary: Most pattern instructions have a glossary that explains sewing terms (like “right sides together,” “baste,” “finish seams”). Refer to this if you see a word you don’t know.
- Follow Markings: The instructions will tell you to “match notches” or “align dots.” This is where those pattern notches and dots you cut or marked become essential! They tell you precisely where to join pieces.
Deciphering the sewing instructions, along with looking at the diagrams and using your pattern markings (pattern notches and dots), guides you through assembling your project piece by piece.
Basic Sewing Pattern Reading Flow: A Summary
Let’s quickly recap the basic sewing pattern reading process:
- Start with the Envelope: Read the back to see fabric needs, notions, sizes, and difficulty. (Reading pattern envelope)
- Choose Your Size: Measure yourself and compare to the chart. (Choosing pattern size)
- Find Pieces & Instructions: Open the envelope, find the tissue pieces and instruction sheet for your view/size. (Identifying pattern pieces, Sewing pattern instructions explained)
- Learn the Symbols: Understand what the lines, dots, notches, and especially the grainline mean on the tissue pieces. (Sewing pattern symbols meaning, Understanding pattern markings, Grainline marking sewing, Pattern notches and dots)
- Cut Pattern Pieces: Cut the tissue paper pieces for your size along the cutting line.
- Prep Fabric: Wash, dry, and press your fabric. Find the selvedge and grain.
- Layout on Fabric: Use the layout diagram to place pattern pieces correctly on the fabric, paying close attention to the grainline and fold lines. Pin them down. (Pattern layout on fabric, Grainline marking sewing)
- Cut Fabric: Carefully cut around the pinned pattern pieces.
- Sew Step-by-Step: Follow the instruction sheet, using the diagrams and matching your markings (notches, dots) as you sew. (Sewing pattern instructions explained, Pattern notches and dots)
This is the basic sewing pattern reading flow for most projects. It takes practice, but following these steps will get you started.
Tips for Beginning Pattern Readers
- Start Simple: Pick a pattern rated “Easy” or “Beginner.” Things like simple skirts, pajama pants, tote bags, or basic tops are great first projects.
- Read Everything First: Before you even pick up scissors, read the entire pattern envelope and instruction sheet. Look at all the pattern pieces. This helps you understand the whole project before you start.
- Don’t Be Afraid of Markings: Those symbols and lines are there to help you! Take your time understanding what they mean. Make a cheat sheet if needed.
- Cut Carefully: Precision in cutting leads to easier sewing.
- Transfer Key Markings: Make sure you transfer markings like darts, dots, and buttonholes from the pattern piece to your fabric before you unpin the pattern.
- Ask for Help: Sewing communities online or in local shops are full of people happy to help beginners. Don’t be afraid to ask questions if you get stuck.
- Be Patient: Reading patterns and sewing takes practice. Your first project might not be perfect, and that’s okay! Learn from it and try again.
Frequently Asked Questions (FAQ)
h4 What does “right sides together” mean?
This is a common term in sewing instructions. Fabric has a “right side” (the pretty side you want to show) and a “wrong side” (the back). “Right sides together” means you place the two fabric pieces on top of each other so their pretty sides are facing each other, ready to be sewn on the wrong side.
h4 Do I have to cut out all sizes on the pattern tissue?
No! The tissue pattern usually has lines for several sizes printed on top of each other. You only cut along the line for the specific size you chose based on your measurements. This leaves the other sizes intact if you need them later.
h4 What is “seam allowance”?
Seam allowance is the area between the cutting line (where you cut) and the stitching line (where you sew). Most patterns use a 5/8 inch (1.5 cm) seam allowance, but check the pattern’s instructions to be sure. You sew on the stitching line, not the cutting line.
h4 My pattern pieces are wrinkled. What should I do?
You can gently press the tissue pattern pieces with a dry iron on a very low heat setting. Use a pressing cloth if you are worried about the ink. Be careful not to distort the shape.
h4 What if I mess up cutting the fabric?
Don’t panic! For small errors, you might be able to adjust slightly. For bigger errors on a piece, you might need to recut that one piece if you have enough fabric left. This is why buying a little extra fabric (maybe an eighth or quarter of a yard) can be a good idea for beginners.
h4 Can I use a different fabric than the pattern suggests?
You can, but be aware it might change how the garment looks or fits. The pattern suggestions are usually for fabrics that have the right weight and drape for the design. Using a stiff fabric for a flowy dress pattern, for example, wouldn’t work well. Check resources online or fabric store staff for help choosing substitute fabrics.
Conclusion
Reading a sewing pattern can seem confusing at first glance with all the lines and symbols. But just like reading a map, once you understand the language and follow the key, it becomes a powerful tool. You’ve now taken the first step in learning basic sewing pattern reading, from the reading pattern envelope basics to understanding pattern markings like the crucial grainline marking sewing, pattern notches and dots, and interpreting sewing pattern instructions explained clearly.
Take your time, go step by step, and don’t be afraid to refer back to this guide or your pattern’s glossary. With a little practice, you’ll be reading patterns and creating your own handmade projects! Happy sewing!