
Taking out embroidery stitches can seem tricky, but you can do it safely and easily with the right tools and a careful approach. Learning how to take out embroidery is useful if you made a mistake, want to reuse fabric, or simply change a design. This guide will walk you through the steps to unstitch embroidery without harming your material.
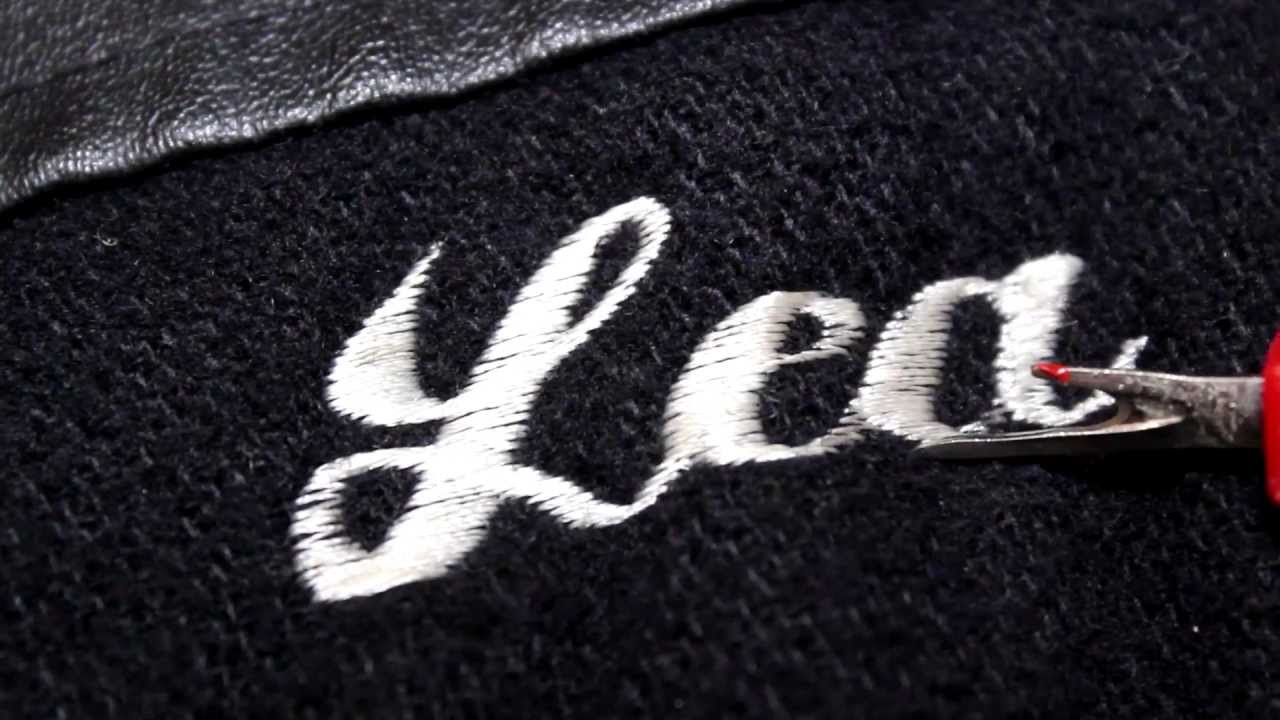
Image Source: i.ytimg.com
Why You Might Need to Remove Stitches
People need to remove embroidery for many reasons. Maybe you misspelled a name, picked the wrong colors, or just don’t like how it looks. Sometimes, you might find a piece of fabric with embroidery you want to take off to use the fabric for something else. Fixing mistakes is the most common reason. A small slip-up can mean you need to unpick stitches from a whole section.
Getting Your Workspace Ready
Before you start removing embroidery thread, set up a good place to work. Pick a flat surface like a table. Make sure the area is clean. You don’t want dust or dirt getting on your fabric. Good lighting is very important. It helps you see the small stitches and avoid cutting the fabric by mistake. A lamp that shines directly on your work area is perfect.
Essential Tools for Stitch Removal
Having the right tools for stitch removal makes the job much easier and safer. You don’t need many things, but the ones you use should be good quality. These are the main embroidery removal tools you’ll need:
The Seam Ripper
This is your best friend for removing embroidery stitches. A seam ripper is a small tool with a sharp point and a curved blade with a red ball on the tip. The sharp part cuts stitches. The red ball helps protect the fabric from getting poked or cut. Choose a seam ripper that feels comfortable in your hand and has a sharp blade. A dull one will make the work harder and could snag the fabric.
Small, Sharp Scissors
You might need very small, sharp scissors, like embroidery scissors. These are good for cutting stitches in tight spots or for snipping longer threads after you’ve loosened them. The sharp, fine points let you be very precise. Be extra careful when using scissors near the fabric. It’s easier to cut the fabric by mistake with scissors than with a seam ripper.
Tweezers
Tweezers are great for removing embroidery thread after you’ve cut the stitches. Once the threads are loose, you can use tweezers to gently pull them out of the fabric. This is much better than trying to pick them out with your fingers, which can be slow and might pull the fabric out of shape.
Lint Roller or Tape
When you unpick stitches, lots of tiny thread pieces will come loose. A lint roller or even sticky tape is perfect for picking up these small pieces from your fabric and workspace. This keeps things tidy and prevents threads from getting tangled or stuck in your work area.
Other Helpful Items
- Magnifying glass: If the stitches are very small or your eyesight isn’t perfect, a magnifying glass helps you see clearly what you are doing.
- Piece of cardboard or cutting mat: Place this under the fabric while you work. It protects your table surface and can sometimes provide a firmer base for cutting stitches.
How to Remove Embroidery Stitches with a Seam Ripper
This is the most common and safest way to remove embroidery stitches. Taking your time is key to removing stitches without damage.
Step 1: Lay the Fabric Flat
Put the item with the embroidery on your clean, flat workspace. Smooth it out so there are no wrinkles or bumps where you will be working.
Step 2: Find the Back of the Embroidery
It is usually easiest to unpick stitches from the back of the fabric. On the back, you can often see the connecting threads and loops more clearly than the tight stitches on the front. Look for the bobbin thread (the thread from the bottom) and where the top thread loops.
Step 3: Use the Seam Ripper to Cut Stitches
Hold the fabric steady with one hand. Take your seam ripper in the other hand. Slide the point of the seam ripper under a stitch on the back. Make sure the sharp part of the blade is facing up towards the thread you want to cut, not down towards the fabric. The red ball should be against the fabric to protect it. Gently push the seam ripper forward to cut the thread.
- Tip: Don’t try to cut every single stitch. You can often slide the seam ripper under several stitches at once, especially with certain types of machine embroidery. Be careful not to gather the fabric as you do this. Just snip a few stitches in a row.
Step 4: Work in Small Sections
Don’t try to remove all the embroidery at once. Focus on a small area, maybe an inch or two long. Cutting stitches in small sections makes the job more manageable and helps you avoid mistakes.
Step 5: Flip to the Front and Gently Pull Threads
Once you’ve cut stitches on the back of a small section, flip the fabric over to the front. The top embroidery threads should now be loose. You can gently pull these loose threads away. Use your fingers first. If threads are stuck or hard to grab, use your tweezers to pick them out. Be gentle! Don’t pull hard, as this could stretch or damaged fabric.
Step 6: Clean Up Loose Threads
As you pull threads out, small bits will be left behind. Use your lint roller or tape to pick up these small pieces from the front and back of the fabric. This prevents a mess and helps you see the remaining stitches clearly.
Step 7: Repeat the Process
Go back to the back of the fabric and repeat steps 3-6 on the next small section. Keep working patiently until all the embroidery you want to remove is gone.
How to Remove Embroidery Stitches with Scissors
Using small, sharp scissors is another way to unpick stitches, though it requires more care.
Step 1: Lay the Fabric Flat
Same as with the seam ripper method, start with your fabric smooth and flat on your workspace.
Step 2: Find the Back of the Embroidery
Working from the back is usually best. You’ll see the loops of thread.
Step 3: Use Scissors to Snip Threads
Hold the fabric steady. Take your small, sharp scissors. Very carefully, insert the tip of one blade under a few stitches on the back. Angle the scissors so you only snip the thread loops, not the fabric. Snip only a small number of threads at a time. This method is often better for very dense embroidery where it’s hard to get a seam ripper underneath.
- Warning: It is very easy to cut the fabric with scissors. Go slowly and be very careful. Do not try to cut many stitches at once.
Step 4: Flip and Remove Threads
After snipping threads on the back, turn the fabric to the front. The top threads should be loose. Use your fingers or tweezers to gently pull out the cut threads.
Step 5: Clean Up
Use a lint roller to clean up the loose threads.
Step 6: Keep Going
Repeat these steps until all the unwanted embroidery is gone.
Advanced Techniques for Tricky Situations
Some embroidery is harder to remove than others. Here are tips for tricky spots.
Removing Dense Embroidery
Dense embroidery has many stitches packed closely together. It can be hard to get a seam ripper underneath.
* Tip: Try the scissors method from the back, snipping just a few threads at a time very carefully.
* Tip: On the front, you can sometimes gently lift a few top threads with a needle or pin, then use the tip of your seam ripper or scissors to snip just those lifted threads. Work slowly, lifting and snipping tiny amounts.
Working with Delicate Fabrics
Delicate fabrics like silk or thin cotton can be easily damaged fabric by stitch removal tools.
* Tip: Be extra gentle. Use a sharp seam ripper or very fine-point scissors. A dull tool will pull and snag.
* Tip: Work from the back whenever possible.
* Tip: Use a hoop or frame to keep the fabric taut while you work. This can help prevent accidentally pulling or stretching the fabric.
* Tip: Consider if removal is truly possible without damage. Sometimes, covering the embroidery might be a better option than risking damaged fabric.
Removing Stitches from Thick Fabrics
Thick fabrics or items like hats and bags can also be difficult.
* Tip: The fabric itself might be stiff, making it hard to get the seam ripper blade flat against the back. You might need to fold or bend the item slightly to access the stitches properly.
* Tip: Be careful not to poke through multiple layers if the item is lined.
Dealing with Different Thread Types
- Rayon or Metallic Thread: These threads can be slippery or break easily. They might also leave more residue. Go slowly and use tweezers to pull them out cleanly.
- Polyester Thread: This is strong and might need a very sharp tool to cut cleanly.
Avoiding Damaged Fabric
The biggest worry when removing embroidery stitches is damaging the fabric underneath. Follow these tips for removing stitches without damage.
- Go Slow and Be Patient: Rushing is the easiest way to make a mistake and cut the fabric. Take your time. This is not a race.
- Use Sharp Tools: A dull seam ripper or scissors will snag threads and pull at the fabric. Make sure your tools are sharp.
- Work from the Back: As mentioned, the back usually shows the loops and connecting threads, making it easier to cut only the thread.
- Angle Your Tool Correctly: Whether using a seam ripper or scissors, make sure the cutting edge is aimed only at the thread you want to cut. For a seam ripper, the red ball should be protecting the fabric.
- Pull Threads Gently: Once stitches are cut, gently pull the threads out. Don’t yank them. Pulling too hard can stretch the fabric or enlarge the needle holes.
- Test on a Hidden Area (If Possible): If the item has embroidery in a less visible spot (like inside a pocket or on a hem if the design is near it), practice removing embroidery stitches there first. This helps you get a feel for how the thread and fabric behave before working on the main area.
- Watch for Fabric Fibers: As you cut and pull threads, watch closely to make sure you are only removing embroidery thread and not accidentally cutting or pulling fibers from the main fabric.
Post-Removal Care
After you have successfully unstitch embroidery, the fabric might look a bit rough. There will likely be tiny needle holes and maybe some slight puckering.
Cleaning the Fabric
Once all the threads are removed and you’ve used your lint roller, it’s a good idea to clean the fabric. For most fabrics, a gentle wash is best. This can help the fibers relax and return to their original position. Check the fabric’s care label first.
Pressing the Fabric
After washing and drying (or while slightly damp, depending on the fabric), gently press the area where the embroidery was. Use an iron setting suitable for the fabric type. Pressing can help smooth out any bumps and make the needle holes less noticeable. Use a pressing cloth to protect the fabric. Iron from the back first, then the front.
Comprehending How Stitches Lie
To be good at unpicking stitches, it helps to think about how embroidery stitches are made. Machine embroidery often uses a top thread and a bobbin thread. The bobbin thread forms loops on the back. By cutting these loops on the back, you release the top thread on the front. Hand embroidery stitches are formed differently, often creating knots or specific patterns of thread loops. Looking closely at the back helps you see where the thread can be cut safely.
Comparing Embroidery Removal Tools
Let’s look quickly at the main manual tools for stitch removal.
| Tool | Best Use Cases | Pros | Cons | Risk of Damaged Fabric |
|---|---|---|---|---|
| Seam Ripper | Machine embroidery, most hand embroidery | Fast, red ball protects fabric, easy to use | Can struggle with very dense stitches | Low if used correctly |
| Small Scissors | Dense stitches, tight areas, snipping loose ends | Precise tips, good for fine work | Very high risk of cutting fabric by mistake | High |
| Tweezers | Pulling out loose threads after cutting | Excellent for grabbing small pieces | Cannot cut stitches, only remove loose ones | Very Low |
| Lint Roller | Cleaning up loose threads | Fast and effective for cleanup | Does not help with stitch removal itself | None |
Seam rippers are generally the go-to tool for safety and speed when removing embroidery stitches. Scissors should be used with extreme caution or only for snipping threads that are already mostly removed.
Handling Mistakes During Removal
What happens if you accidentally snip the fabric? Don’t panic. A small snip might be repairable depending on the fabric and its location.
- Stop Immediately: Stop removing embroidery thread in that area.
- Assess the Damage: Look closely at the cut. How big is it? Are fibers frayed?
- Repair Options:
- Fray Check: For very small snips or nicks that aren’t through-and-through, a tiny drop of liquid seam sealant like Fray Check can stop it from getting bigger. Use very little.
- Iron-on Interfacing/Patch: For a slightly larger cut, you can apply a small piece of lightweight iron-on interfacing or a small patch on the back of the fabric to reinforce the area. This is best if you plan to re-embroider over the spot or if it’s an unseen area.
- Darning or Mending: For visible areas, you might need to carefully mend the cut by hand using fine thread that matches the fabric. This requires sewing skill.
- Accept and Move On: Sometimes, if the damage is bad or in a highly visible spot, you might have to accept that the fabric is damaged fabric and cannot be used for its original purpose. This is why patience and care are so important!
Grasping the Art of Careful Unpicking Stitches
Unpicking stitches is less about speed and more about control. Think of it like surgery on fabric. You need a steady hand and a clear view of what you are doing.
- Hold the Fabric Firm: Make sure the fabric doesn’t shift or bunch up while you are cutting stitches.
- Go Stitch by Stitch (or loop by loop): Even if you slide the seam ripper under a few loops, focus on ensuring each one is cut cleanly without catching the fabric.
- Listen to the Snip: You should hear a small snip as the thread cuts. If you hear a different sound, check immediately.
- Check the Front Often: Flip the fabric to the front frequently to see which threads are loose and which are still holding on. This tells you if you are cutting the right threads on the back.
- Use Light and Magnification: If you are struggling to see, improve your lighting or use a magnifying tool. Trying to remove stitches you can’t see clearly is a recipe for damaged fabric.
When to Ask for Help
Most small embroidery can be removed at home. However, there are times when it might be best to get help.
- Very Expensive or Sentimental Fabric: If the item is high value or means a lot to you, and the embroidery is complex or on delicate fabric, you might want to take it to a professional tailor or dry cleaner who offers this service.
- Large, Dense Designs: Removing very large, heavily stitched designs can be extremely time-consuming and tiring. This increases the chance of mistakes.
- Worries About Damage: If you feel unsure and are very worried about damaged fabric, practicing on scrap fabric first is good. If you still feel unsure, a professional might be safer.
Professional services for unstitch embroidery exist, but they can be costly, sometimes more than the original embroidery itself. Weigh the cost of the item and your comfort level against the potential cost of professional removal or the risk of ruining the fabric yourself.
Frequently Asked Questions About Unstitch Embroidery
Here are some common questions people ask about removing embroidery thread.
Can All Embroidery Be Removed?
Yes, almost all embroidery can be removed. The question is whether it can be removed without damage to the fabric. Some very dense or intricate embroidery, especially on delicate materials, might leave behind noticeable holes or marks even after removal.
Will the Holes Go Away After Removing Stitches?
Small needle holes are often left behind. On many fabrics (like cotton, linen, denim), these holes will shrink or disappear after washing and pressing. However, on very tightly woven or synthetic fabrics, the holes might be more permanent. Dense embroidery with many needle passes will leave more noticeable holes.
Is It Hard to Remove Embroidery?
It’s not necessarily “hard,” but it requires patience, good light, and careful work. It can be time-consuming, especially for larger designs. The difficulty depends on the size and density of the design, the type of thread, and the fabric.
How Long Does It Take to Unpick Stitches?
This varies greatly. A small name might take 15-30 minutes. A complex logo or large design could take several hours or even longer, spread out over multiple sessions. Don’t expect to remove a large design quickly.
What is the Best Tool for Removing Embroidery?
For most people and most projects, a sharp seam ripper is the best tool for removing embroidery stitches safely and easily.
Conclusion
Removing embroidery stitches doesn’t have to be a scary task. With the right embroidery removal tools – mainly a sharp seam ripper – good lighting, patience, and a careful hand, you can unpick stitches and successfully remove embroidery thread from most fabrics. Remember to work from the back when possible, cut only the threads, pull gently with tweezers, and take your time to avoid damaged fabric. After removal, a wash and press can help the fabric recover. Practice makes perfect, so don’t be afraid to give it a try on a test piece if you’re new to this.