
Want to change the neck on your t-shirt without sewing? You can cut a t-shirt v-neck easily by folding the shirt in half, marking your desired depth, and cutting from the fold to your mark. This no-sew t-shirt modification is a great way to give old shirts a new look. This guide will show you how to do this and other DIY t-shirt neck alteration methods without a sewing machine. You can easily customize t-shirt neckline without machine and create a stylish raw edge t-shirt neckline.
Changing a t-shirt neck without sewing is a simple craft project. It lets you upcycle t-shirt necklines you don’t like. You can make a shirt fit better or just look different. It’s an easy t-shirt neck alteration anyone can do.
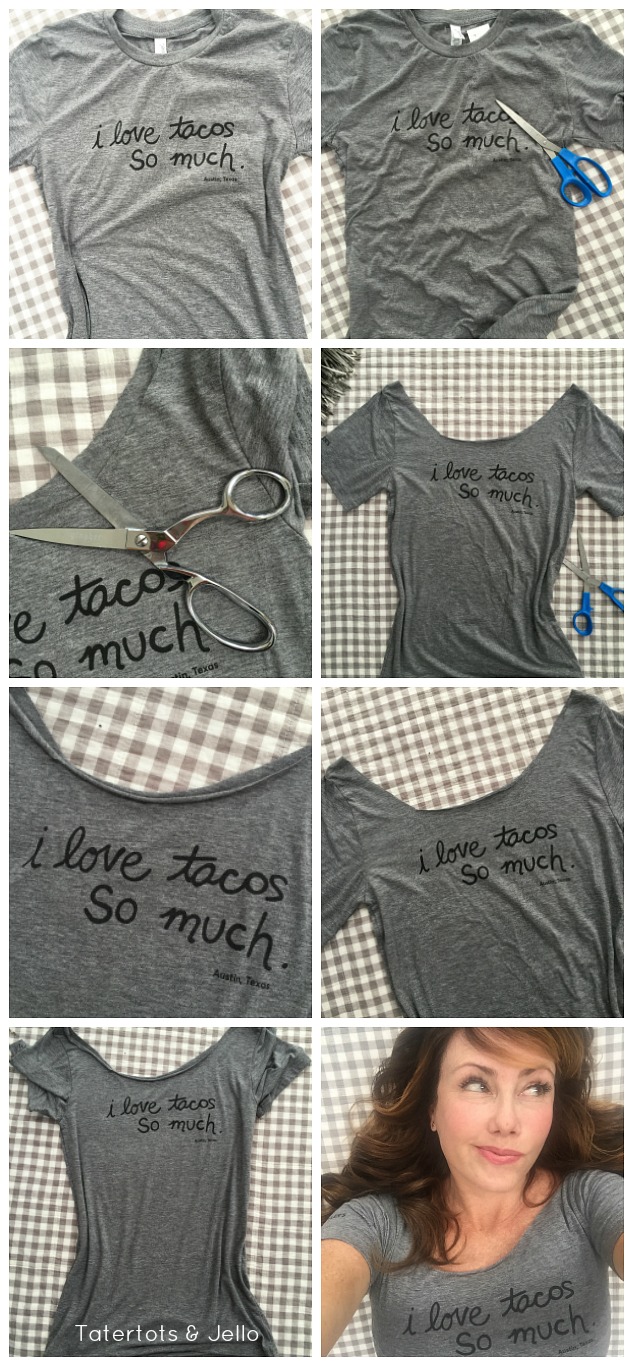
Image Source: tatertotsandjello.com
Why Change a T-Shirt Neckline?
There are many good reasons to alter a t-shirt neck.
- Fit: A neck might feel too tight. Cutting it makes it looser and more comfortable.
- Style: Maybe you don’t like crew necks. You can change it to a V-neck or scoop neck. You can even make an off-the-shoulder t-shirt DIY.
- Update: An old shirt can look new and fresh with a different neckline. It’s a great way to upcycle t-shirt necklines you might not wear anymore.
- Comfort: Some necklines feel itchy or bulky. Cutting them off makes the shirt softer around your neck.
- Fashion: You can follow trends like the slash neckline t-shirt look easily.
Things You Need
Gather your tools before you start cutting t-shirt neckline. You don’t need much for these no-sew t-shirt modification projects.
- A t-shirt you want to change.
- Sharp fabric scissors or very sharp regular scissors.
- Chalk, a marker, or a pen to mark lines (choose a color that shows up on your shirt).
- A ruler or measuring tape.
- Pins (optional, but helpful).
- Something flat to work on (a table or the floor).
Make sure your scissors are sharp. Dull scissors can pull and stretch the fabric. This makes the edge look messy. Sharp scissors cut cleanly.
Preparing Your T-Shirt
Wash and dry your t-shirt first. This helps the fabric relax. It also pre-shrinks it. If you cut it before washing, it might change shape after you wash it later. Lay the shirt flat on your work surface. Smooth out any wrinkles.
The Basic Raw Edge
When you cut t-shirt neckline without sewing, the edge will not be finished like a store-bought shirt. It will be a raw edge t-shirt neckline. T-shirt fabric (jersey knit) is special. When you cut it, the edge tends to roll up a little. This rolling is what makes the no-sew look work. It keeps the edge from fraying too much. The raw edge look is part of the style.
How to Make a Simple Round Neckline (Scoop Neck)
This is one of the easiest DIY t-shirt neck alteration methods. It makes the neck wider and lower.
Step-by-Step Guide
- Lay the shirt flat: Put the t-shirt on your work surface. Make sure the front and back are smooth.
- Decide how much to cut: Look at the current neckline. Think about how much lower or wider you want it. Use your chalk or pen to make a mark where the lowest point of your new neckline will be. Make a mark where the sides will be (on the shoulders).
- Draw the line: Connect your marks with a smooth curve. Start near the shoulder seam on one side. Draw down to the lowest point you marked. Then draw up to the shoulder seam on the other side. This line shows where you will cut. Make sure the curve is even.
- Cut carefully: Hold the shirt flat. Use your sharp scissors. Cut slowly along the line you drew. Try to cut in one smooth motion if you can. Don’t pull or stretch the fabric as you cut. Just let the scissors glide.
- Check the front and back: If you are only changing the front, stop here. If you want the back lower too, draw a line on the back. Cut the back the same way. Often, people only cut the front or cut the back just a little.
- Stretch the edge: Gently pull the cut edge all the way around. This helps the fabric roll. It makes the raw edge t-shirt neckline look finished without sewing.
- Try it on: Put the shirt on and see how it looks. You can always cut a little more if you want it lower or wider. Be careful, you cannot add fabric back! Start by cutting less than you think you need.
Tips for a Good Scoop Neck
- Fold the shirt in half lengthwise before drawing the line. Draw half the curve from the fold to the shoulder. Then unfold and cut through both layers. This makes sure both sides of the neckline are the same.
- Use a shirt you like the neckline of as a guide. Lay it on top of the shirt you are changing. Draw your line following its shape.
- Cut just outside your drawn line. You can always trim more later.
How to Cut T-Shirt V-Neck
Making a V-neck is another popular no-sew t-shirt modification. It gives a different shape than a scoop neck.
Step-by-Step Guide
- Lay the shirt flat: Put the t-shirt down smoothly.
- Fold the shirt: Fold the shirt in half lengthwise. Line up the shoulder seams and the sides. Make the fold neat and straight down the middle of the front of the shirt.
- Mark the V: Decide how deep you want the V to go. Mark a point on the fold line where the bottom of the V will be. This is the lowest point.
- Draw the V line: Starting from the current neckline near the shoulder, draw a straight line to the point you marked on the fold. You will draw this line only on one side of the folded shirt.
- Cut the V: Hold the folded fabric firmly. Use your sharp scissors to cut along the line you drew. Cut through both layers of the front of the shirt at the same time.
- Unfold and check: Unfold the shirt. You will have a V shape cut out.
- Stretch the edge: Gently pull the cut edges of the V. This helps the fabric roll.
- Try it on: Put the shirt on. See if the V is the right depth and width. You can trim a little more if needed. Remember, cut only a little at a time.
Tips for a Good V-Neck
- You can draw a slightly curved V instead of a straight line if you like. Draw a soft curve from the shoulder towards the center fold, meeting at the point you marked.
- Cut slightly inside your line the first time. You can always make it deeper or wider by cutting more.
- Make sure your fold is perfectly straight. If the fold is crooked, your V will be uneven.
Making an Off-the-Shoulder T-Shirt DIY
This style is great for showing a little skin. It’s an easy t-shirt neck alteration that changes the whole look of the shirt.
Step-by-Step Guide
- Lay the shirt flat: Put the t-shirt down smoothly.
- Decide how low and wide: Think about how far down your shoulders you want the neckline to go. You can make it wide enough to fall off one shoulder or both. Mark where the edge will be near the shoulder seams. Mark how low it will be on the chest/back.
- Draw the line: You will draw a long, wide curve. Start near the top of one sleeve or shoulder. Draw a wide, gentle curve across the shirt, going down to the lowest point you marked. Then continue the curve up to the top of the other sleeve or shoulder. This cut will go across the front AND the back.
- Cut along the line: Use your sharp scissors. Cut smoothly along the curve you drew. Cut through both the front and back layers of the shirt at the same time.
- Stretch the edge: Gently pull the entire cut edge all the way around. This helps the fabric roll.
- Try it on: Put the shirt on. The neckline should be wide enough to sit off your shoulders. If it’s too tight, you can carefully trim a little more, making the curve wider.
Tips for a Good Off-Shoulder Look
- This works best on larger or stretchier t-shirts. A tight shirt won’t stay off the shoulder well.
- Start by cutting a smaller curve. Try it on. Then cut more to make it wider if needed.
- You can cut straight across instead of a curve for a simpler look, but the curve often sits better.
- Consider cutting off the original neck band completely first before making your new off-shoulder cut.
Creating a Slash Neckline T-Shirt
This look involves cutting several slits in the neckline area. It creates a cool, edgy effect without sewing.
Step-by-Step Guide
- Lay the shirt flat: Put the t-shirt down smoothly.
- Decide the area: Think about how far down you want the slashes to go. Mark the top and bottom points of the area where you want the slashes.
- Mark the slash lines: Starting from the top mark, use your ruler and pen to draw horizontal lines across the shirt within the area you marked. Make the lines evenly spaced. The space between lines can be small (about 1/2 inch) or larger (1-2 inches), depending on the look you want. The lines can go all the way across the chest or just in the center.
- Cut the slashes: Use very sharp scissors. Cut along EACH horizontal line you drew. Cut through only the front layer of the shirt. Do not cut the back! Stop cutting before you reach the sides of the shirt or the end points you planned for the slashes.
- Stretch the slashes: After cutting each line, gently pull the fabric on either side of the cut. This makes the slash open up and the edges roll slightly.
- Repeat: Cut and stretch all the lines you marked.
- Stretch the whole area: Once all slashes are cut and stretched, gently pull the whole slashed area downwards and outwards. This makes the slashes open more and relaxes the fabric.
- Try it on: Put the shirt on. The slashes will spread out on your body. You can adjust the look by pulling the fabric gently.
Tips for a Good Slash Neck
- Measure the distance between your lines carefully for an even look.
- Make sure your scissors are extra sharp for clean cuts. Ragged cuts don’t look as good with this style.
- Start with fewer slashes or wider spacing if you are unsure. You can always add more later.
- This technique can also be done on the back of a shirt or on sleeves.
- The slashes will open more on a tighter shirt than a loose one.
Other No-Sew Neckline Ideas
You can customize t-shirt neckline without machine in other ways too:
- Wider Neck (Boat Neck): Similar to the scoop neck, but cut wider across the shoulders and less deep. Draw a line that is almost straight across, just slightly curved down in the middle. Cut across the front and back.
- Cut off Neck Band: Simply cut off the existing neck band right next to the seam. This leaves a small raw edge and makes the neck slightly wider. It’s the easiest t-shirt neck alteration.
- Distressed Edge: After cutting any of the above styles, you can make the edge look more “worn.” Rub the cut edge on a rough surface like concrete or sandpaper. This helps it fray a little more.
Which Fabric Works Best?
Most standard cotton or cotton-blend t-shirts work well for no-sew alterations. Jersey knit fabric, which most tees are made of, naturally rolls when cut.
- Thicker fabrics: Might not roll as much. They might just have a raw, flat edge.
- Thin or very stretchy fabrics: Can be harder to cut neatly. They can stretch out of shape easily while you are cutting. Cut slowly and carefully.
- Rib knit: Will roll tightly into a tube. This can look cool but is different from jersey.
- Polyester or synthetic blends: Some will roll, some won’t. Test on a small piece first if you are unsure.
Always do a small test cut on a hidden part of the shirt (like the hem) if you are not sure how the fabric will behave.
Making Your Cuts Neat
Getting a clean cut is important for a good raw edge t-shirt neckline.
- Use sharp scissors: This is the most important tip.
- Lay the fabric flat: Make sure there are no bumps or folds under the area you are cutting.
- Cut in one smooth line: Try not to stop and start a lot.
- Don’t pull the fabric: Let the scissors do the work. If you pull, the cut line will be wavy and uneven.
- Cut less than you think you need: You can always cut more. You cannot put fabric back.
What Happens After You Cut?
After cutting t-shirt neckline without sewing, the magic happens when you wash the shirt. The raw edges will roll up more after washing and drying. This creates the finished no-sew look.
- Washing: Wash your altered shirt in a washing machine.
- Drying: Dry it in a dryer. The heat and tumbling help the edges roll.
- Checking: After washing and drying, the edges should have a nice rolled look. If they didn’t roll much, you can gently pull and stretch them again.
Caring for Your Altered Shirt
Care for your altered shirt like you would any other t-shirt. The raw edge is quite durable because jersey knit doesn’t fray much past the rolled edge.
- Washing: Machine wash is fine.
- Drying: Machine dry helps the edge roll.
- Ironing: Avoid ironing directly on the raw edge if you like the rolled look. Ironing will flatten the roll.
Upcycle T-Shirt Neck Projects
Using these no-sew t-shirt modification methods is great for upcycling old clothes.
- Take a plain old t-shirt and give it a stylish new neckline.
- Change a shirt that is too tight around the neck.
- Turn a basic tee into something unique.
- Save money by updating clothes instead of buying new ones.
These easy t-shirt neck alteration ideas are perfect for anyone wanting to try DIY clothing projects. You don’t need to be a sewing expert. You just need a t-shirt and some scissors.
Grasping the No-Sew Concept
It’s helpful to grasp why this works. T-shirt fabric is a knit fabric. It is made of loops, like a sweater, but much smaller. When you cut knit fabric, the loops at the edge try to curl up on themselves. This is different from woven fabrics (like denim or bed sheets) which fray easily when cut. The natural curl of the knit fabric creates that neat, rolled raw edge t-shirt neckline. This allows for a durable and stylish finish without needing to sew a hem. Knowing this helps you understand why pulling the edges after cutting helps the rolling process.
Choosing the Right T-Shirt Size
For some no-sew neckline alterations, like the off-the-shoulder style, using a t-shirt that is a little bigger than your usual size can work well. A larger shirt will hang more loosely. This makes it easier for the wide neckline to fall off your shoulder. For standard scoop or V-necks, your normal size is fine.
Table: No-Sew Neckline Options at a Glance
| Neckline Style | Description | Cut Shape | Difficulty | Best For |
|---|---|---|---|---|
| Simple Round (Scoop) | Wider and lower than original round neck | Smooth curve across front (and maybe back) | Easy | Basic update, more comfort |
| V-Neck | Creates a V shape in the front | Straight or slightly curved lines meeting at a point | Easy | Changing style, elongating neck look |
| Off-the-Shoulder | Wide neckline that sits off the shoulders | Wide curve across front and back | Medium | Fashion look, using oversized shirts |
| Slash Neck | Horizontal slits in the neckline area | Several horizontal lines across the front | Medium | Edgy look, adding texture |
| Wider Neck (Boat) | Wide across shoulders, less deep than scoop | Almost straight line across front and back | Easy | Wider fit, subtle change |
| Cut Off Neck Band Only | Removes original tight neck band | Cut right next to original seam | Very Easy | Quick fix for tight neck, minimal change |
This table gives you a quick guide to choose your DIY t-shirt neck alteration.
Step-by-Step: Re-cutting for Adjustments
What if you cut your neckline but want it a little different?
- Try the shirt on: See exactly where you want to change it. Is it not low enough? Not wide enough? Uneven?
- Mark the new line: Take the shirt off. Lay it flat again. Use your chalk or pen to draw a new line where you want to cut more. Draw carefully, remembering that you can only cut away fabric.
- Fold (if needed): If you are making a V-neck deeper or wider, fold the shirt neatly in half again. If you are making a scoop or off-shoulder wider, just smooth it flat.
- Cut slowly: Cut along your new line. Cut just a little at a time.
- Stretch the edge: Gently pull the newly cut edge.
- Try it on again: Check your work. Repeat if you need to trim just a tiny bit more.
Taking it slow and cutting small amounts is key to getting the neckline just right. This applies to any cutting t-shirt neckline project.
Keeping It Simple: Easy T-Shirt Neck Alteration
All these methods are designed to be easy t-shirt neck alteration projects. They don’t need fancy tools or skills. The most difficult part is often just deciding where to cut and having the courage to make the first snip! Remember, it’s just a t-shirt. If you make a mistake, you can try again on a different shirt. Or maybe the “mistake” creates a unique look! Part of DIY t-shirt neck alteration is having fun and being creative.
Using Patterns or Templates (Optional)
While you can freehand your cuts or use another shirt as a guide, you can also make a pattern.
- Find a shirt with a neckline shape you love.
- Lay it flat.
- Place a piece of paper over the neckline area.
- Trace the shape of the neckline onto the paper.
- Cut out the paper shape. This is your pattern.
- To use it, lay the paper pattern on the t-shirt you want to alter.
- Trace around the pattern with chalk or a marker.
- Cut along the traced line.
Using a pattern can help if you want to make the exact same neckline on many shirts, or if you are nervous about drawing directly on the fabric. This makes customizing t-shirt neckline without machine even more predictable.
Frequently Asked Questions (FAQ)
Q: Will the raw edge really not fray apart?
A: T-shirt fabric (jersey knit) is made in a way that makes the edges curl instead of fraying a lot like woven fabrics. The curl helps keep the edge stable. It might have very minimal fraying, but it shouldn’t unravel completely.
Q: Can I do this on any type of shirt fabric?
A: It works best on typical cotton or cotton blend jersey knit t-shirts. Other fabrics might not roll the same way. Test a small cut first if you are unsure.
Q: How do I make sure the cut is even on both sides?
A: For scoop and V-necks, folding the shirt exactly in half lengthwise before cutting is the best way to get a symmetrical shape. For off-shoulder or slash necks, drawing a clear line across the front while the shirt is flat helps.
Q: My cut edge isn’t rolling. What can I do?
A: Try gently pulling and stretching the cut edge all the way around. Washing and machine drying the shirt will also help the fabric roll up. Some fabrics just don’t roll as much as others, which is okay – the raw edge look is still there.
Q: Can I sew the edge later if I don’t like the raw look?
A: Yes, you can add a sewn hem later if you change your mind. You would need a sewing machine with a stretch stitch or serger, or you could hand sew a simple hem. But the goal of these DIY methods is to avoid sewing!
Q: What if I cut too much?
A: Unfortunately, you cannot add fabric back once it’s cut. That’s why it’s smart to cut less than you think you need first. Start small, try it on, and cut more if necessary. If you cut way too much, you might have to use the shirt for a different project or accept the extra-low/wide neckline.
Q: Does the raw edge feel uncomfortable?
A: For most people, the rolled raw edge of soft t-shirt fabric is not uncomfortable against the skin. It’s softer than a thick sewn hem might be.
Q: Can I use these techniques on tank tops or dresses made of t-shirt material?
A: Yes! These no-sew t-shirt modification techniques work on any garment made from similar knit fabric, like tank tops, dresses, or even leggings if you wanted to change the waistband (though that’s a different project).
Q: Will the neck stretch out over time?
A: Knit fabrics can stretch, especially when cut. The raw edge might stretch a little with wear, which is part of the relaxed look. It’s unlikely to stretch so much that it becomes unwearable unless the fabric is very thin or already stretched out.
Interpreting the Results
After you wash and dry your shirt, take a look at the raw edge t-shirt neckline. See how the fabric has rolled up. This is the finished look for these no-sew projects. You’ve successfully completed a DIY t-shirt neck alteration! You customized your t-shirt neckline without machine, using just scissors and a little care. It’s a simple way to upcycle t-shirt necklines and give them a new life.
These easy t-shirt neck alteration steps prove that you don’t need to be a sewing expert to change your clothes. Cutting t-shirt neckline is a fun and fast way to update your wardrobe. Have fun experimenting with different styles!