
So you’ve sewn your pillow, put in the stuffing, and now there’s one last step: closing the opening. What is the best stitch for closing a pillow? The best stitch often depends on how you want the finished pillow to look and whether you are sewing by hand or machine. For a nearly invisible finish, a hand stitch like the slip stitch is usually best. If speed and strength are more important, especially for items that will get a lot of use, machine sewing the opening shut can work. Can you leave an opening in a pillow? No, you must close the opening to keep the stuffing inside and give your pillow a finished look. This article will guide you through the best ways to close that final seam.
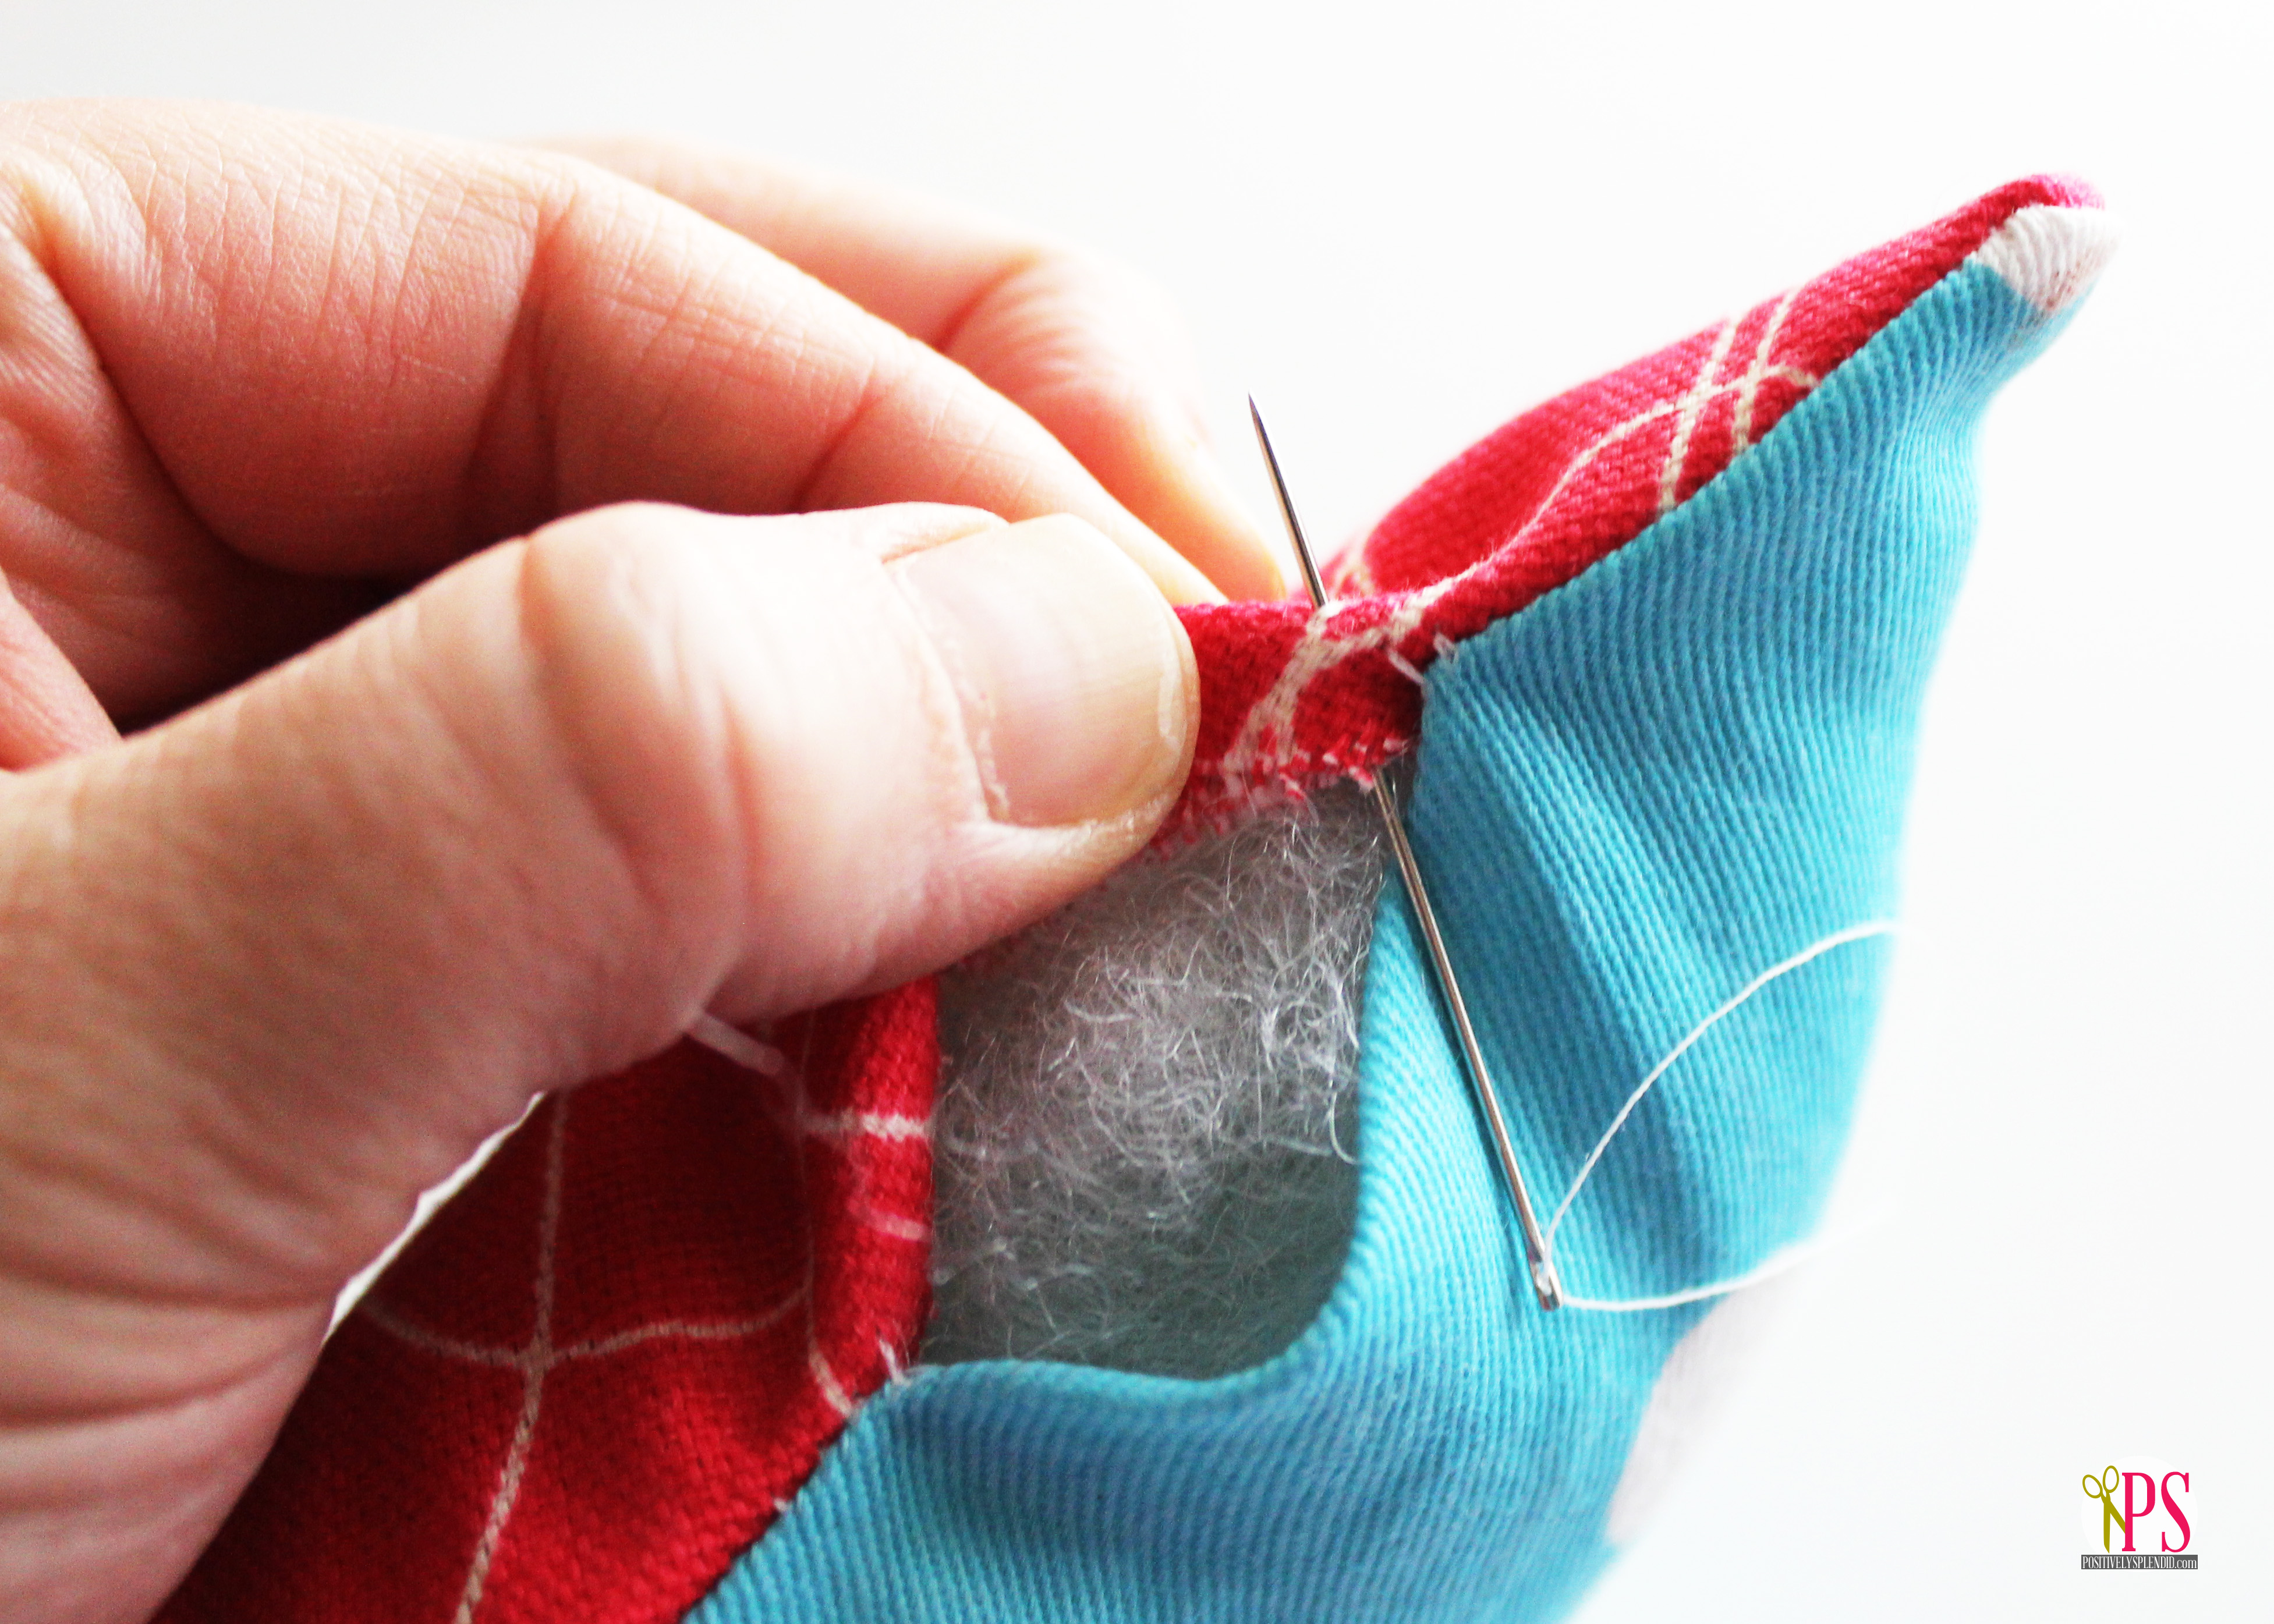
Image Source: www.positivelysplendid.com
Why Closing That Last Bit Matters
You’ve worked hard to sew your pillow sides. Now you have a perfect pocket. You’ve turned it right side out. You’ve put in the soft stuffing. But there is still that one space left open.
Closing this space is very important. It is the final touch. A good closing makes your pillow look neat and clean. It keeps the stuffing inside. This is key for a pillow that lasts and looks nice.
Choosing the right way to close it makes a big difference. Some ways hide the stitches well. Some ways are fast. Let’s look at how to finish your pillow with skill.
Preparing Your Pillow for Closing
Before you sew the last seam, you need to get your pillow ready. This step helps make the closing easier and look better.
Turning and Checking Pillow Edges
After sewing three or four sides, you turn the fabric right side out. This means the pretty side is on the outside. Use a tool with a dull point, like a chopstick or a turning tool, to gently push out the corners. Make them nice and sharp.
Now, look at the open edge. The fabric should be folded inward. It should match the seam allowance you used on the other sides. If you sewed with a half-inch seam allowance, fold the raw edges of the opening inside by a half inch. Press this fold with an iron. This makes a clean line to follow when you sew. Pressing the fold is part of finishing pillow edges neatly before closing.
Stuffing a Pillow Before Closing
Now comes the fun part: putting the filling inside. There are many types of stuffing, like polyester fiberfill, down, or scraps of fabric.
- Put the stuffing in through the open hole.
- Push it into the corners first. Make sure they are filled well so they don’t look floppy.
- Keep adding stuffing until the pillow is as full as you want it.
- For a firm pillow, add a lot of stuffing. For a soft, squishy one, use less.
- Do not overstuff too much. If it’s too full, it will be hard to close the opening smoothly. The seam might pull or even break later.
- Make the stuffing even inside the pillow. Feel around to find any empty spots.
Once stuffed, the edges of your opening might want to roll open. Pin them shut along the fold you pressed. Use pins to hold the folded edges together. This holds the stuffing in and keeps the edges lined up, ready for sewing.
Ways to Close the Pillow Opening
There are two main ways to close the opening on a pillow after it’s stuffed: sewing by hand or sewing with a machine. Each has its good points and its less good points.
Closing by Hand: The Hidden Seam
Hand sewing is often used for the final closure on decorative pillows. The main reason is that you can make the stitches almost invisible. This is called an invisible seam pillow tutorial method if you follow steps to hide the thread. The most popular stitch for this is the slip stitch. This method helps with sewing pillow opening shut neatly.
What is the Slip Stitch?
The slip stitch is a hand sewing stitch. It is used to join two folded edges together so the thread does not show much from the outside. People also call it a ladder stitch or blind stitch. It’s perfect for slip stitch closing pillow seams.
Why Use the Slip Stitch?
- Invisible: When done right, you can barely see the stitches on the outside of the pillow.
- Neat: It creates a smooth, clean finish along the edge.
- Control: You have full control over how tight the seam is.
- Works on Stuffed Items: It is designed for closing holes where you can’t sew flat fabric.
How to Do the Slip Stitch
This is how to hand sew pillow seam with a slip stitch:
- Thread Your Needle: Cut a piece of thread. Use a color that matches your pillow fabric well. A single thread works for fine fabrics, but a double thread (folded over) is stronger for heavier fabrics or pillows that get used a lot. Do not cut a piece that is too long; it will tangle easily. About 18-24 inches is a good length. Tie a small knot at one end.
- Start Hiding Your Knot: Put your needle inside the fold of one side of the opening. Push the needle through the fold so the knot is hidden inside the folded edge. Bring the needle out of the folded edge right at the point where the opening begins.
- Take the First “Bite”: Look at the folded edge directly across the opening from where your thread came out. Take a tiny stitch (like a tiny “bite” of fabric, maybe 1/8 inch or less) into the fold of that second side, exactly opposite your thread.
- Go Back to the First Side: Now, move your needle straight across the opening again to the first side where you started. Put the needle into the fold of this first side, right next to where the thread came out before. Slide the needle along inside the fold for a short distance (about 1/8 to 1/4 inch).
- Come Out and Cross: Bring the needle out of the fold on the first side. Now, cross the gap to the second side again. Put the needle into the fold of the second side, right opposite where your thread just came out. Slide the needle along inside the fold for the same short distance (1/8 to 1/4 inch).
- Repeat the Pattern: Keep going back and forth. Go into the fold of one side, travel along inside the fold, come out, cross to the other side, go into its fold, travel along inside, come out. You are making tiny stitches that go into the folded edges, hidden inside the fold itself, and crossing the gap with the thread mostly hidden.
- Pull the Thread Gently: After every few stitches (maybe 3-4 stitches), gently pull the thread. As you pull, the edges of the opening will be drawn together. The stitches will sink into the folds and disappear. Do not pull too hard, or the fabric might gather or pucker.
- Continue to the End: Keep making these small stitches, pulling gently as you go, until you reach the very end of the opening. Keep the stitch length even for the best look.
- Finish Securely: When you get to the end, make a strong knot. Take a small stitch, but before pulling the loop tight, pass the needle through the loop two or three times. Pull tight to make a knot right at the fabric surface. To hide the knot, push the needle into the fabric very close to the knot. Push the needle through the pillow stuffing for about an inch or two, then bring it out of the fabric somewhere away from the seam. Pull the thread gently so the knot pops inside the pillow, then cut the thread close to the fabric.
This method, when done with small, even stitches and matching thread, creates a beautiful, almost invisible close. It is the go-to stitch for many crafters finishing their pillow sewing techniques.
Closing by Machine: Fast and Strong
Machine sewing the opening shut is faster than hand sewing. It also creates a very strong seam. The main difference is that the stitches will be visible on the outside of the pillow. This method is good for pillows where the final seam won’t be seen or doesn’t need to be invisible, like on the back of a floor cushion or a pet bed. This is how to machine sewing pillow closed.
How to Machine Sew the Opening
- Prepare the Opening: As with hand sewing, fold the raw edges of the opening inside by your seam allowance (e.g., 1/2 inch) and press them well with an iron. Pin the folded edges together to hold them in place. Make sure the stuffing is pushed away from the edge so you don’t sew through it.
- Set Up Your Machine: Use a standard needle for your fabric type and thread that matches your fabric. A standard straight stitch is what you need. Set your stitch length to a normal length, not too short or too long.
- Start Sewing: Place the pinned opening under your machine’s presser foot. Start sewing very close to the folded edge, maybe 1/8 inch away from the folded edge. You are sewing through both folded layers of fabric, right along the very edge of the opening.
- Sew Along the Edge: Sew a straight line along the entire length of the opening, keeping your distance from the folded edge even. Sew slowly and carefully to keep the line straight. Remove pins as you sew, don’t sew over them.
- Lock Your Stitches: Sew back and forth a few stitches at the beginning and end of the seam to lock the stitches. This stops the seam from coming undone.
- Trim Threads: Cut your threads close to the fabric.
This method is fast and makes a very strong seam. It’s a practical way of sewing pillow opening shut, though it leaves a clear line of stitches.
Comparing Closing Methods
Here is a simple table to show the good and bad points of the two main ways to close a pillow opening.
| Feature | Slip Stitch (Hand Sewn) | Machine Sewn |
|---|---|---|
| Look | Nearly invisible seam | Visible line of stitches |
| Speed | Slower | Faster |
| Strength | Good, if done well, but generally less strong than machine | Very strong |
| Ease | Takes practice to master | Easy, if you can sew a straight line |
| Best Use | Decorative pillows, plush toys, projects where seam needs to be hidden | Utility pillows, floor cushions, pet beds, where seam visibility is okay |
Knowing these points helps you choose the right way for your project. Both are valid pillow sewing techniques.
Step-by-Step Guides
Let’s go into more detail on the two main methods.
Detailed Steps for the Slip Stitch (Hand Sewing)
This guide helps create that hidden seam effect for your hand sew pillow seam.
-
Items You Need:
- Stuffed pillow with opening
- Needle (hand sewing needle, sharp point)
- Thread (matching color to fabric)
- Scissors
- Pins (optional, but helpful)
- Iron (used earlier to press folds)
-
The Steps:
- Prepare the Opening: Make sure the raw edges of the opening are folded inside by your seam allowance and pressed flat. Pin the folded edges together to hold them.
- Thread Your Needle: Cut about 20 inches of thread. Thread your needle and tie a secure knot at one end. For extra strength, use a double thread.
- Hide the Knot: Insert the needle into the fold of one side of the opening, very close to where the opening starts. Push the needle along inside the fold for a short distance (about 1/4 inch) and bring it out at the edge where the fold is. Pull the thread gently so the knot is tucked inside the fold.
- First Stitch Across: Look at the folded edge directly opposite where your thread came out. Insert the needle into the fold of this opposite side, right across from where your thread is.
- Move Along the Second Fold: Slide the needle along inside the fold of the second side for a short distance (about 1/4 inch). Bring the needle out at the edge of the fold.
- Move Back to the First Fold: Now, cross the gap back to the first side. Insert the needle into the fold of the first side, right across from where your thread just came out on the second side.
- Move Along the First Fold: Slide the needle along inside the fold of the first side for about 1/4 inch. Bring the needle out at the edge of the fold.
- Repeat the Pattern: You are creating a line of small stitches that go back and forth between the two folded edges. Each stitch enters a fold, travels inside it for a bit, and comes out. The thread then crosses the gap to the other side to start the next stitch in that fold.
- Pull to Close: After sewing 3-4 stitches, stop and gently pull the thread. Watch as the stitches sink into the folds and the opening closes up. Do not pull too hard or it will pucker.
- Keep Going: Continue sewing stitches, moving back and forth between the two folded edges, pulling the thread gently every few stitches to close the seam.
- Reach the End: Sew all the way to the very end of the opening. Make your last stitch as close to the end as possible.
- Tie Off Securely: Make a strong knot right at the seam line. Take a small stitch, form a loop with the thread, and pass the needle through the loop two or three times before pulling tight.
- Hide the Tail: Insert the needle into the fabric right next to the knot. Push the needle and thread into the pillow and through the stuffing for a few inches. Bring the needle out somewhere away from the seam. Pull the thread gently so the knot disappears inside the pillow. Cut the thread close to the fabric.
Your invisible seam pillow tutorial is now complete! The closing should be hard to see.
Detailed Steps for Machine Sewing the Opening Closed
This guide shows how to use your machine for machine sewing pillow closed quickly and strongly. It’s great for sewing pillow opening shut when speed is key.
-
Items You Need:
- Stuffed pillow with opening
- Sewing machine
- Thread (matching color)
- Needle (machine needle, correct size for fabric)
- Scissors
- Pins
-
The Steps:
- Prepare the Opening: Ensure the raw edges of the opening are folded inside by your seam allowance (e.g., 1/2 inch) and pressed flat. Pin the folded edges together along the whole length of the opening. Push stuffing away from the edge.
- Set Up Machine: Put matching thread in your machine. Select a straight stitch. Set the stitch length to a standard setting (e.g., 2.5).
- Position Pillow: Place the pillow under the presser foot so the folded edge you are about to sew is positioned where your needle will go. You want to sew a line very close to the folded edge.
- Start Sewing: Lower the presser foot. Start sewing a few stitches along the opening edge.
- Lock the Start: Sew backwards for a few stitches over your first stitches. This locks the seam so it doesn’t come undone.
- Sew Forward: Sew slowly and steadily along the folded edge of the opening. Aim to keep the stitches about 1/8 inch away from the very edge of the fold. This line of stitching will go through both folded layers of fabric, joining them together.
- Remove Pins: As you sew, remove the pins just before you reach them. Do not sew over pins, it can break your needle.
- Keep Line Straight: Keep the line of stitching as straight as possible. Use a guide on your machine plate or your presser foot to help.
- Reach the End: Sew all the way to the end of the opening.
- Lock the End: Sew backwards for a few stitches over your last stitches to lock the seam securely.
- Cut Threads: Lift the presser foot and needle. Pull the pillow away from the machine and cut the threads close to the fabric.
You now have a machine-closed seam. It is visible, but very strong. This is one of the practical pillow sewing techniques.
Tips for a Great Closure
No matter which method you choose, here are some tips to help make your closing look its best. These tips relate to finishing pillow edges and the seam itself.
- Press Your Folds: Always press the folded edges of the opening before you start sewing. This creates a crisp line that is much easier to sew along, whether by hand or machine.
- Use Matching Thread: This is very important for the slip stitch method. If you can’t find an exact match, choose a thread that is a shade darker than your fabric, as lighter thread shows more. For machine sewing, matching thread makes the visible seam less noticeable.
- Use the Right Needle:
- For hand sewing: Use a sharp needle that is easy for you to handle. A needle that is too big can leave large holes; one that is too small might be hard to push through the fabric.
- For machine sewing: Use a needle that is the right size and type for your fabric. A universal needle works for most fabrics. A needle that is dull or the wrong size can cause skipped stitches or thread breaks.
- Stitch Length Matters:
- For slip stitch: Keep your stitches small and even, around 1/8 to 1/4 inch long inside the fold. Small stitches are stronger and hide better.
- For machine sewing: A standard stitch length is fine. Avoid very short stitches, which can sometimes make holes in the fabric, or very long stitches, which are not as strong and don’t look as neat.
- Manage the Stuffing: Keep the stuffing tucked inside as you sew. For machine sewing, be very careful not to sew through the stuffing. It can jam your machine. Use your fingers or a tool to push it back.
- Start and End Neatly: Hide your knot carefully when hand sewing. Lock your stitches well when machine sewing. This prevents the seam from opening up later.
- Practice Makes Perfect: If you are new to the slip stitch, practice on some scrap fabric first. Get a feel for making the stitches even and pulling the thread just enough.
Other Ways to Close a Pillow Cover
Sometimes, you might not have a simple opening that needs to be sewn shut after stuffing. Some pillow covers are designed with different closures from the start. Knowing these helps with sewing a pillow cover closed in different ways.
Envelope Closures
An envelope closure has overlapping fabric panels on the back. You insert the pillow form through the overlap. There is no opening to sew shut after inserting the pillow form. The closure is part of the cover design. You sew all the seams of the cover first, leaving the back panels open where they overlap.
Zipper Closures
Many pillow covers have zippers on one edge. You install the zipper before sewing the side seams. You leave the zipper open, sew the other three sides (or four, depending on design), turn the cover right side out, insert the pillow form, and then zip it closed. Again, no final seam to stitch shut by hand or machine after stuffing.
These types of closures are planned before you even start stuffing a pillow before closing. They change the whole process of how you finish the pillow. The methods discussed earlier (slip stitch, machine seam) are for pillows where you sew most of the way around, stuff, and then close that last gap.
Fitting Closure into Pillow Sewing Techniques
Choosing how to close your pillow is part of the bigger picture of pillow sewing techniques. The way you finish the seam should fit the style and use of the pillow.
- For fancy cushions: You will likely want that nearly invisible hand-sewn slip stitch.
- For floor pillows that kids jump on: A strong machine-sewn seam is probably better, even if you can see it.
- For pillow covers you want to wash often: A zipper or envelope back makes it easy to remove the insert, so you don’t have to deal with sewing pillow opening shut each time.
Think about who will use the pillow and how. This helps you pick the right closure method when you start sewing.
Troubleshooting Common Issues
Even with the best tips, things can sometimes go wrong. Here are a few common problems and how to fix them.
- Stitches are visible (slip stitch):
- Are you using matching thread? Try darker thread if you can’t match perfectly.
- Are your stitches too big? Try making them smaller (1/8 to 1/4 inch inside the fold).
- Are you going too deep into the fabric? You should only be catching the very edge of the fold.
- Are you pulling the thread gently? Pulling too hard can make the fabric pucker and show the stitches.
- The seam looks bumpy or puckered:
- Did you press the folds well before sewing? Pressing is key for a flat edge.
- Are your stitches too tight (especially slip stitch)? Loosen your pull slightly.
- Is the pillow overstuffed? Remove a little stuffing. Too much stuffing makes the seam strain and pucker.
- Stuffing is poking out:
- Did you push the stuffing back before sewing?
- Are your stitches too far apart? Make them closer together.
- Is the thread strong enough? Try a double thread for hand sewing or a stronger type of thread.
- Machine seam is wobbly:
- Are you sewing too fast? Slow down and guide the fabric carefully.
- Are you watching your guide or presser foot edge? Try to keep the fabric lined up with a point on your machine.
- Are the edges pinned well? More pins can help hold the line straighter.
Dealing with these small issues helps you get better at finishing pillow edges and closures.
Frequently Asked Questions (FAQ)
Here are some common questions people ask about closing pillows.
Q: How small should the opening be before I stuff the pillow?
A: It needs to be big enough to comfortably get your hand and the stuffing inside. For a standard size pillow (18×18 inches), an opening of 4 to 6 inches is usually enough. If the opening is too small, stuffing is hard. If it’s too big, it takes longer to sew shut.
Q: Can I use fabric glue instead of sewing?
A: Fabric glue might work for very light-duty projects or small decorations, but it is generally not strong enough for closing a stuffed pillow opening. It will likely not hold up to use and washing, and the stuffing could come out. Sewing is the recommended and durable method for sewing pillow opening shut.
Q: What kind of thread is best for closing a pillow?
A: A good quality all-purpose polyester thread is usually best. It is strong and has a little stretch, which helps the seam last. Cotton thread can break more easily, especially if the pillow is used often. Make sure the thread matches your fabric color.
Q: Do I need special tools for the slip stitch?
A: You just need a hand sewing needle, thread, and scissors. Pins are very helpful to hold the edges while you sew. An iron is also key for pressing the folds before you start.
Q: Can I machine sew a slip stitch?
A: Some sewing machines have a “blind hem stitch” setting, which is similar to a slip stitch. However, it is designed for flat edges like hems, not for closing a stuffed opening. Trying to use it on a stuffed pillow opening is very difficult and usually does not work well. The hand-sewn slip stitch is the best way to achieve an invisible seam pillow tutorial outcome on a stuffed item.
Q: How do I close a pillow that has piping around the edge?
A: If you have piping, the opening edges should still be folded inside along the seam line, just like a regular pillow. When you do the slip stitch, make sure your needle catches the main pillow fabric right behind the piping cord, as well as the folded edge on the other side. This helps make the seam stronger and hide better along the piping line. For machine sewing, you’d sew close to the folded edge, right next to the piping.
Q: Is there any way to avoid sewing the opening shut?
A: Yes, by making a pillow cover with a full closure like a zipper or an envelope back. These pillow sewing techniques mean you sew the cover completely before putting the pillow form inside. This is a good option if you plan ahead. However, for a simple sewn pillow, you must close that last opening.
Putting It All Together
You have learned about getting your pillow ready, the two main ways to close it (hand sewing with a slip stitch for a hidden seam, or machine sewing for speed and strength), and tips for making it look good. You also know about other ways to close pillow covers like zippers or envelope backs.
Choosing the right method for sewing pillow opening shut depends on what you want the finished pillow to be like. Whether you choose the careful, hidden stitches of a slip stitch or the fast, strong line of a machine seam, practicing will help you get a better result.
Finishing that last seam is a key step in making a beautiful, finished pillow. With these tips and techniques, you can master how to close your pillow sewing projects with confidence. Happy sewing!