
Image Source: i.ytimg.com
DIY Tutorial: How To Make Tassels With Embroidery Floss
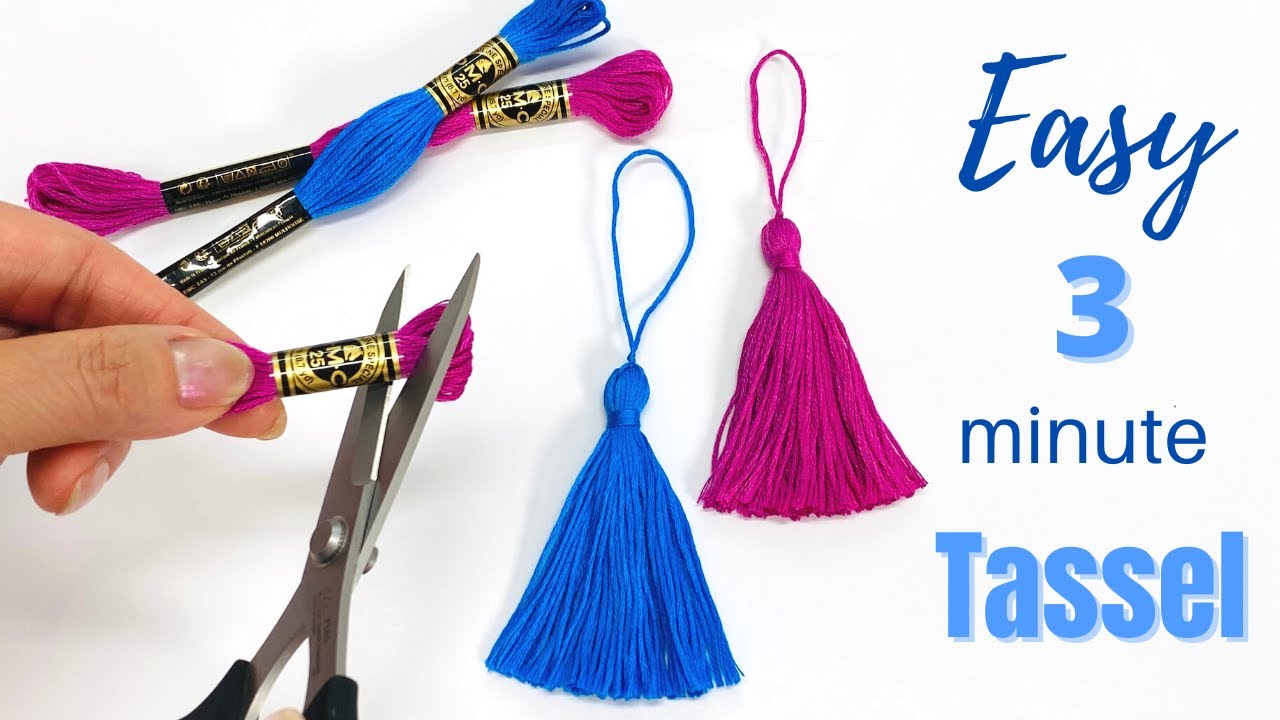
Do you want to make pretty little decorations for your crafts? Making tassels is a great way to add a fun touch. You can use embroidery floss to make these tassels. It is an easy craft. You only need a few simple things. This guide will show you how. You can make a DIY embroidery floss tassel today!
What Tassels Are and Why Make Them
Tassels are bundles of threads tied together at one end. They hang down freely. People use them to decorate things. They add a nice finish to many projects. Think about keychains, jewelry, curtains, or pillows.
Making your own tassels lets you pick the colors. You can make them any size you want. It is cheaper than buying them. It is also a fun way to use up small bits of thread. Crafting tassels with thread is a simple skill. Anyone can learn it. This tassel making tutorial is for you.
Materials Needed for Tassels
You do not need many things to start. Most likely, you have some of these items already. Gathering your supplies is the first step.
Here is what you will need:
- Embroidery Floss: This is the main material. Pick your favorite colors. Embroidery floss is made of six strands twisted together. You can use all six strands or split them.
- Scissors: Sharp ones are best. They help you cut the thread cleanly.
- Something to Wrap Around: This sets the size of your tassel.
- Cardboard piece: A small piece of cardboard works well. An old gift card or a piece of a cereal box is perfect. Using cardboard for tassels is a common method.
- Your fingers: You can just use your fingers! This is the finger tassel technique. It is an easy tassel making method.
- A Separate Piece of Thread: This will tie the tassel head. It should be about 6-8 inches long. Use floss that matches or contrasts.
- Another Separate Piece of Thread: This will be the loop to hang the tassel. Make it longer, maybe 10-12 inches.
Here is a simple list:
- Embroidery floss
- Sharp scissors
- Cardboard or your fingers
- Short piece of thread for tying
- Long piece of thread for the loop
Let’s look at the thread more. Embroidery floss is good because it is shiny. It comes in many colors. It is not too thick, so it makes nice small tassels. You can use other types of thread too. But floss is a popular choice for small tassels.
Getting Ready to Make Tassels
Find a clear spot to work. Make sure your scissors are sharp. Have your floss colors ready. Decide if you will use cardboard or your fingers. Using cardboard for tassels gives a more even shape, especially for beginners. The finger tassel technique is faster once you practice.
Let’s get started on the actual steps. We will go through two main methods. Both are ways to make handmade thread tassels.
Method 1: Using Cardboard or a Template
This is a classic way to make tassels. It helps control the length. It gives a neat result. This is a step-by-step tassel guide using cardboard.
H4 Choosing Your Cardboard
The size of your cardboard decides the length of your tassel. If you want a 2-inch tassel, your cardboard should be about 2 inches tall. Use a sturdy piece. A rectangular shape is easy to hold. An old credit card or library card is a good size for smaller tassels. For bigger ones, cut a piece from a box.
H4 Wrapping the Floss
- Anchor the Start: Hold the end of your embroidery floss against the cardboard. Hold it at the bottom edge. Use your thumb to keep it in place.
- Start Wrapping: Begin wrapping the floss around the cardboard. Wrap it lengthwise. Keep the wraps close together. Do not overlap them too much. Keep the tension even. This means wrap it firmly but not too tight.
- Count Your Wraps: The more times you wrap, the fatter your tassel will be. For a medium tassel, wrap about 50-60 times. For smaller tassels, wrap fewer times, maybe 30-40. Write down the number if you want to make more tassels the same size. This is key for making small tassels.
- End the Wrap: When you have wrapped enough times, cut the floss from the skein. Leave a tail of a few inches. Keep the wrapped floss on the cardboard.
Here is a quick look at wrapping:
- Hold floss end at bottom of cardboard.
- Wrap around the length of the cardboard.
- Keep wraps side-by-side.
- Wrap many times (e.g., 50-60 for medium).
- Cut floss, leave tail.
- Keep wrapped floss on cardboard.
H4 Tying the Hanging Loop
Now, let’s add the piece you will use to hang the tassel. This is the longer piece of thread you cut earlier.
- Slide Loop Thread Under: Carefully slide the long piece of thread under the wrapped floss bundle. Do this at the top edge of the cardboard. Slide it under all the wrapped threads.
- Tie a Knot: Bring the two ends of the long thread up to the top edge. Tie a strong knot right at the edge of the cardboard. A double knot works well. Pull it tight. This knot will be the top of your tassel’s head. This loop is how you attach the tassel later.
Remember: Tie the loop thread at the top of the cardboard wrap.
H4 Securing the Head
This step forms the ‘head’ of the tassel. This is where all the threads are cinched together. Use the shorter piece of thread now.
- Slide Tying Thread Under: Slide the shorter piece of thread under the wrapped floss bundle. Do this about 1/2 inch down from the top where you tied the loop. Slide it under all the wrapped threads.
- Tie a Tight Knot: Bring the ends of the shorter thread together on one side of the bundle. Wrap the ends around the bundle several times. Wrap it going down. This cinches the threads together. Wrap maybe 3-4 times.
- Tie Off: Bring the ends of the shorter thread together again. Tie a very tight double knot. Pull it as tight as you can without breaking the thread. This knot forms the neck of your tassel head.
- Hide the Ends: Use a needle or your finger to push the ends of this tying thread down into the main bundle of threads. This hides the knot and makes the head look smooth.
Let’s break down securing the head:
- Slide short thread under wrap, below the loop knot (about 1/2 inch down).
- Wrap short thread ends around bundle tightly several times.
- Tie a tight double knot.
- Hide the knot ends by pushing them into the tassel body.
Your tassel is starting to take shape!
H4 Cutting the Bottom Loops
Your wrapped floss forms loops at the bottom of the cardboard. Now you need to cut these loops open.
- Slide Tassel Off Cardboard: Gently slide the entire wrapped and tied bundle off the cardboard.
- Cut the Bottom: Hold the tassel firmly by the head. Use your sharp scissors to cut straight across the bottom loops. Make sure you cut all the loops. Be careful not to cut the threads higher up.
Now you have a bundle of straight threads below the head. This is the skirt of the tassel.
H4 Trimming and Shaping
Your tassel will likely have uneven ends after cutting. This is normal. Trimming makes it look neat and professional.
- Hold and Straighten: Hold the tassel by the hanging loop. Let the threads hang down straight. Gently comb through the threads with your fingers. Make sure they are not tangled.
- Trim the Ends: Use your scissors to trim the bottom of the tassel. Cut straight across. Trim carefully until all the ends are even. You can make the bottom flat or slightly rounded. Trim just a little bit at a time until you like how it looks.
You have now completed a DIY embroidery floss tassel using cardboard! This step-by-step tassel guide showed you how. This method is great for getting uniform results.
Method 2: Finger Tassel Technique
This method is even simpler. It is very fast. It is a true easy tassel making method. You do not need any tools except scissors and the thread. This uses the finger tassel technique.
H4 Wrapping the Floss on Your Fingers
- Choose Your Fingers: You will wrap the floss around your fingers. The number of fingers you use and how far down you wrap determines the tassel length.
- For small tassels, wrap around just two fingers (like your index and middle finger).
- For medium tassels, wrap around three or four fingers.
- The length you wrap down your fingers is the tassel length.
- Anchor the Start: Hold the end of the embroidery floss against your palm with your thumb.
- Start Wrapping: Begin wrapping the floss around your chosen fingers. Wrap it around smoothly, not too tight. Wrap up and down the length of your fingers.
- Count Your Wraps: Just like with cardboard, more wraps mean a fatter tassel. Wrap about 50-60 times for a good size. For small tassels, fewer wraps (30-40) and shorter fingers give a nice mini tassel.
- End the Wrap: Cut the floss from the skein. Leave a tail of a few inches. Keep the wrapped floss on your fingers.
Quick steps for wrapping on fingers:
- Hold floss end on palm.
- Wrap around 2, 3, or 4 fingers.
- Keep wraps smooth.
- Wrap many times (e.g., 50-60).
- Cut floss, leave tail.
- Keep wrapped floss on fingers.
H4 Adding the Hanging Loop
This is similar to the cardboard method. Use your long piece of thread here.
- Slide Loop Thread Under: Carefully slide the long piece of thread under the wrapped floss bundle. Slide it between your fingers and the wrapped threads. Do this near the top edge of your fingers (where the wraps stop near your hand).
- Tie a Knot: Gently slide the wrapped floss off your fingers. Be careful to keep the loops together. Bring the two ends of the long thread together. Tie a strong knot. Tie it tight. This knot should be right at the top of the bundle. This forms the hanging loop.
Remember: Slide loop thread under before taking floss off fingers, or immediately after carefully sliding it off. Then tie knot at the very top.
H4 Securing the Head
This step is a bit trickier than with cardboard because the threads are looser at this stage. Use your shorter piece of thread.
- Lay Tassel Flat: Lay the bundle flat on a table. Make sure the hanging loop is at the top.
- Slide Tying Thread Under: Slide the shorter piece of thread under the bundle. Do this about 1/2 inch down from the top (below the hanging loop knot).
- Tie a Tight Knot: Bring the ends of the shorter thread together on one side. Wrap the ends around the bundle several times, moving down. Wrap tightly to cinch the head. Wrap 3-4 times.
- Tie Off: Bring the ends together again. Tie a very tight double knot. Pull it hard.
- Hide the Ends: Push the ends of the tying thread down into the tassel body using a needle or your finger.
Securing the head with fingers:
- Lay bundle flat.
- Slide short thread under, below hanging loop (about 1/2 inch down).
- Wrap short thread ends around bundle tightly.
- Tie a tight double knot.
- Hide knot ends in tassel body.
H4 Cutting and Trimming
Your bundle still has loops at the bottom.
- Hold Tassel: Hold the tassel by the hanging loop. Let the threads hang down.
- Cut the Bottom: Use your scissors to cut straight across the bottom loops. Cut through all of them.
- Trim: Hold the tassel by the loop. Gently smooth the threads. Trim the bottom ends evenly with sharp scissors.
You have now made a handmade thread tassel using the finger technique! This easy tassel making method is great for quick tassels. This step-by-step tassel guide for the finger method is simple to follow.
Summarizing the Steps (Both Methods)
Let’s quickly look at the main steps for crafting tassels with thread:
- Wrap Thread: Wrap embroidery floss around a template (cardboard) or your fingers. The number of wraps makes it thicker. The template/finger length makes it longer.
- Tie Hanging Loop: Slide a separate thread under the top of the wrapped bundle and tie a knot.
- Secure Head: Slide another thread under the bundle just below the hanging loop. Wrap it around tightly to form the head. Tie a knot.
- Cut Loops: Cut the loops at the bottom of the bundle.
- Trim: Make the ends even and neat by trimming.
These steps give you a basic DIY embroidery floss tassel.
How to Make Small Tassels
Both methods can make small tassels.
- Using Cardboard: Use a short piece of cardboard. Wrap fewer times (e.g., 30-40). A credit card size or smaller works well for little tassels.
- Finger Technique: Wrap around only two fingers. Do not wrap far down your fingers. Wrap fewer times (e.g., 30-40). This makes a really quick, small tassel.
For tiny tassels, you might wrap fewer than 30 times. The key for small tassels is a shorter wrapping height and fewer wraps.
Ideas for Using Your Handmade Thread Tassels
Your finished tassels can be used in many ways. Here are some ideas:
- Jewelry: Add them to earrings, necklaces, or bracelets.
- Keychains: Make fun and colorful keychains.
- Decor: Tie them onto pillows, blankets, or curtains.
- Garlands: String many tassels together for a festive garland.
- Gift Wrap: Use them instead of a bow on presents.
- Bookmarks: Add one to the end of a ribbon bookmark.
- Apparel: Sew them onto bags, jackets, or scarves.
These handmade thread tassels add a lovely touch to almost anything!
Deciphering Tassel Making Tips and Tricks
Here are some extra tips to make your tassels even better:
- Use Quality Floss: Better floss looks nicer and is easier to work with. It is usually less likely to tangle.
- Wrap Evenly: Try to keep your wrapping tension the same. This makes the final tassel hang straight.
- Tie Knots Tightly: The knots at the head need to be very tight. This keeps the tassel from falling apart. Pull hard!
- Hide the Ends Well: Use a darning needle to carefully pull the tying thread ends down into the middle of the tassel. This makes the head smooth.
- Steam Gently: If your tassel looks a bit messy, you can hold it over steam (from a kettle or iron, be careful!). This helps the threads hang straight. Do not get it too wet.
- Trim Sharp: Use very sharp scissors for trimming. This gives a clean, straight edge. Dull scissors can make the ends look frayed.
- Practice Makes Perfect: Your first few tassels might not be perfect. Keep practicing! You will get better and faster.
Using these tips will help you master crafting tassels with thread.
Comparing the Methods: Cardboard vs. Finger
Both methods have pros and cons.
| Feature | Cardboard Method | Finger Method |
|---|---|---|
| Ease for Beginners | Easier to keep length even | Very simple, no extra tools needed |
| Speed | A bit slower to set up | Very fast |
| Uniformity | Easier to make many tassels the same size | Can vary slightly in size/shape |
| Tools Needed | Scissors, Floss, Cardboard, Tying Thread | Scissors, Floss, Tying Thread |
| Portability | Easy to do anywhere | Easy to do anywhere |
| Control | More control over shape and length | Less precise control |
Both are great ways to create a DIY embroidery floss tassel. Choose the one you like best! Or use the cardboard method for projects needing many identical tassels. Use the finger method when you need a quick tassel.
Exploring Other Threads
While embroidery floss is great, you can use other threads too.
- Craft Thread: Similar to floss, often cheaper.
- Pearl Cotton: A mercerized cotton thread, very shiny. Comes in different weights.
- Thin Yarn: Acrylic or cotton yarn can work. Choose thin weights like fingering or sport. Thicker yarn makes bigger, bulkier tassels.
- Sewing Thread: You would need many strands for a tassel with sewing thread. It might be too thin.
Experiment with different threads! Each will give a different look and feel to your handmade thread tassels.
Extending Your Crafting
Once you are comfortable making basic tassels, try these ideas:
- Use Multiple Colors: Wrap stripes of different colors on your cardboard or fingers.
- Combine Materials: Add thin ribbons or metallic threads along with the floss.
- Beads: Add a bead above the tassel head on the hanging loop.
- Different Head Wraps: Wrap the head with a different color floss or thread for a contrast look.
Crafting tassels with thread is just the start. There are many ways to make them unique. This tassel making tutorial covered the basics. Now you can get creative!
Grasping Common Questions
People often have questions when they start making tassels. Here are some answers.
H5 What if My Tassel Looks Uneven After Cutting?
This is very common! Do not worry. Just trim it carefully. Hold it by the loop so it hangs freely. Use sharp scissors to cut straight across the bottom. Trim just a little bit at a time until it looks even. You can comb the threads gently with your fingers first.
H5 How Many Wraps Should I Use?
It depends on how full you want the tassel and the thickness of your thread. For standard embroidery floss and a medium tassel, 50-60 wraps is a good start. For smaller tassels or thinner thread, use fewer wraps (30-40). For fatter tassels, use more (70+). Experiment to find what you like.
H5 How Long Does It Take to Make One Tassel?
After you learn the steps, making a single tassel is very fast. The finger method can take just a few minutes (3-5 minutes). The cardboard method might take a little longer, maybe 5-10 minutes. It is a quick craft project!
H5 Can I Use Yarn Instead of Embroidery Floss?
Yes, you can! Use thinner yarns like fingering or sport weight yarn for best results, especially if you want smaller tassels. Thicker yarns like worsted or bulky will make large, thick tassels. The number of wraps will need to change depending on the yarn thickness. Start with fewer wraps for thicker yarn.
H5 My Tassel Head Is Not Tight. What Happened?
The knot you tie to secure the head needs to be very tight. Also, make sure you wrap the thread around the bundle firmly before tying the knot. If the head is loose, the tassel might fall apart. Try pulling the knot tighter next time.
H5 How Do I Make the Tassel Fluffy?
Embroidery floss is already pretty soft. After trimming, you can gently separate the strands a bit with your fingers if you want it fluffier. Holding it over steam also helps the threads relax and hang nicely, making it look fuller.
H5 What Size Cardboard Should I Use for a Specific Tassel Length?
The length of the cardboard determines the length of the threads before you tie the head. The head takes up some space. So, if you want a finished tassel that is 2 inches long (not counting the loop), your cardboard should be slightly longer than 2 inches, perhaps 2.25 or 2.5 inches. The space for the head will take up the difference.
H5 Can I Use Other Templates Besides Cardboard?
Yes! You can use anything flat and sturdy. A ruler, a book, a piece of wood, or even a fork (for tiny tassels) can work as a template. The key is that it is strong enough to wrap around and that you can easily slide the thread bundle off. Using cardboard for tassels is just the most common because it’s easy to cut to size.
FAQ Section
Here are some common questions listed together.
Q: What is the best thread for making small tassels?
A: Embroidery floss is excellent for making small tassels because it is fine and comes in many colors. Thin craft thread or pearl cotton also work well.
Q: Is the finger tassel technique hard for beginners?
A: No, it is very easy. It might feel a little awkward the first time, but you quickly get the hang of it. It is a very quick way to make a tassel.
Q: How do I attach my handmade thread tassel to something?
A: Use the hanging loop you created. You can tie it directly onto a zipper pull, button, or hook. You can thread it onto a jump ring for jewelry or a split ring for a keychain. You can also thread ribbon or cord through the loop to tie it onto packages or decor.
Q: How many strands of embroidery floss should I use?
A: A standard skein has 6 strands. You typically wrap the full 6-strand thread bundle as one unit. This is the easiest way. If you wanted a very fine, wispy tassel, you could separate the strands, but this takes much more wrapping. For most tassels, wrap the whole 6-strand thread.
Q: My tassel head looks bumpy. How can I make it smooth?
A: Make sure you wrap the tying thread very tightly around the bundle. Wrap it neatly, side-by-side, before tying the knot. Also, make sure you hide the knot ends fully by pushing them into the center of the tassel head. Practice helps make the head smoother.
Q: Can I make very large tassels with this method?
A: You can make larger tassels by using a taller template (a piece of cardboard cut to size) and wrapping many more times. However, for very large, thick tassels, yarn or thicker cords might be easier to work with than embroidery floss because you would need an extreme amount of floss.
Crafting tassels with thread, especially with embroidery floss, is a rewarding and simple skill. This detailed guide has shown you how to make a DIY embroidery floss tassel using different methods. Whether you use the step-by-step tassel guide with cardboard or the easy tassel making method with your fingers, you can create beautiful handmade thread tassels. You now know the materials needed for tassels, how to make small tassels, and lots of tips. Happy crafting!