
Sewing is fun! It lets you make cool things. To sew well, your machine needs to work right. A big part of this is the bobbin. It holds the thread that makes the bottom of your stitches. Getting the bobbin ready and putting it in the machine is super important. This guide will show you the easy way to load a bobbin in a Brother sewing machine.
How do I load a bobbin in a Brother sewing machine? You load a bobbin by first winding thread onto it using the machine’s bobbin winder, then placing the wound bobbin into the machine either directly under a bobbin cover (top loading) or inside a bobbin case before putting it in the machine (front loading). Getting this step right helps your stitches look good and stops thread problems.
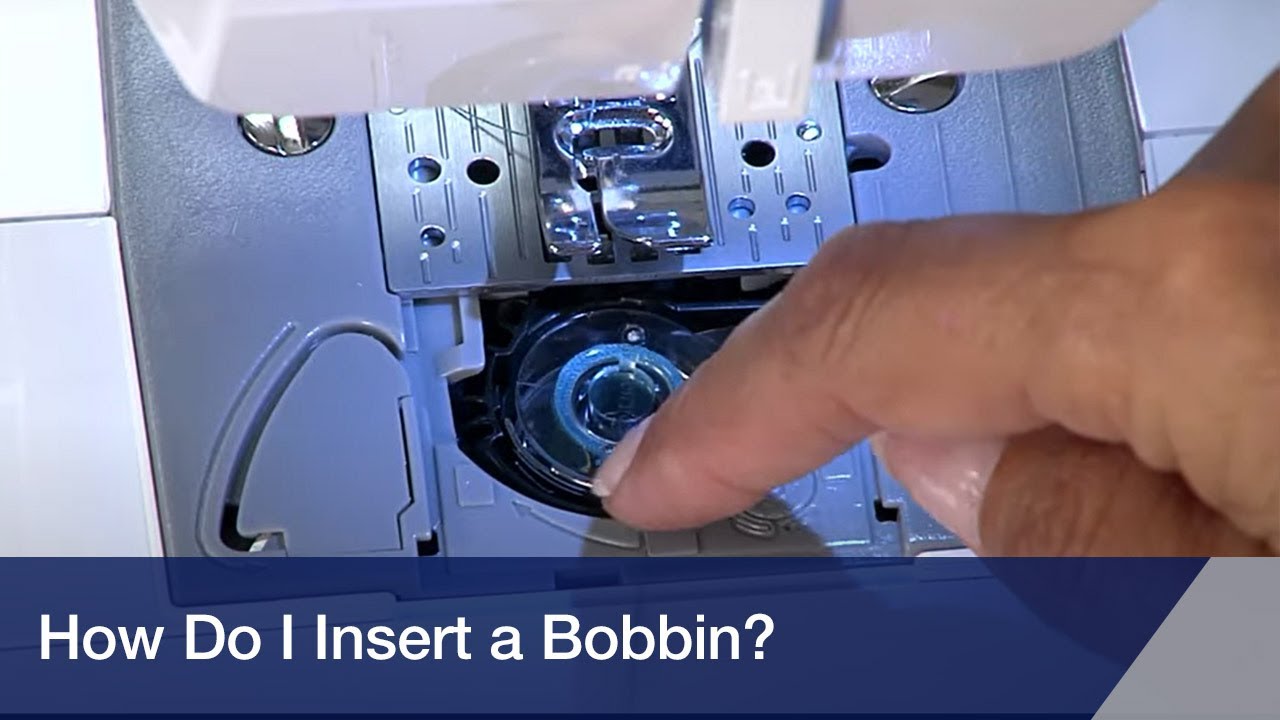
Image Source: i.ytimg.com
Why Getting the Bobbin Right Matters
Having the bobbin loaded the right way is key for good sewing. If the thread comes off the bobbin wrong, your stitches can be messy. They might loop on the top or bottom. The thread could even break a lot. Loading the bobbin the right way from the start saves you time and makes sewing more fun. It helps keep your sewing machine happy too!
Getting Ready to Load Your Bobbin
Before you load the bobbin, you need a few things. You need thread, an empty bobbin, and your Brother sewing machine. Make sure you have the right size bobbin for your machine. Brother machines usually use a standard type, but check your manual if you are not sure. Using the wrong bobbin can cause big problems. It might not fit right. Or the thread might not come off smoothly. Get your thread ready. Put it on the spool pin at the top of your machine. Make sure it’s sitting nicely.
Winding a Bobbin
The first step is often winding a bobbin. An empty bobbin needs thread on it. Your Brother machine has a special part just for this. It’s called the bobbin winder. Let’s find it and learn how to use it.
Finding the Bobbin Winder
Look on the top of your Brother sewing machine. You will see a small pin or a spot where a bobbin can sit. This is usually near the thread spool pin. There might also be a lever or knob nearby. This is part of the bobbin winder. It helps the bobbin spin fast to get the thread on it. Get your empty bobbin ready.
Setting Up Thread for Winding
Take the thread from your spool pin. You need to guide it to the bobbin winder. Your machine has guides for this. Look for numbers or pictures near the thread path. They show you where the thread needs to go. You will usually guide the thread through a small loop or hook. Then, take the end of the thread. Push it through the small hole on the empty bobbin. Push it from the inside of the bobbin towards the outside. Hold onto the thread end for a moment.
How to Wind the Bobbin Correctly
Now, put the bobbin onto the bobbin winder pin. Push it down firmly. Take the end of the thread you pushed through the bobbin hole. Hold it slightly to the side. Most Brother machines need you to push the bobbin winder pin or lever to the side. This makes the machine focus power on winding the bobbin, not on sewing. Push the lever or pin over.
Now, you can start winding. Gently press your foot pedal. The bobbin will start to spin. The thread will wrap around it. Watch the thread as it winds. The first few wraps might be a bit messy. You can stop after a few wraps. Cut off the short thread end you were holding. Now, start winding again.
The machine will wind the thread evenly. The thread should fill the bobbin nicely. Don’t fill it too much. Stop winding when the bobbin is full. There is often a small sensor or a lever on the bobbin winder. It will stop the winding on its own when the bobbin is full. If your machine doesn’t stop itself, watch it. Stop when the thread is close to the edge of the bobbin.
Tips for a Well-Wound Bobbin
- Don’t wind too fast: Start slow. Get the thread going smoothly. Then you can wind a bit faster.
- Wind evenly: The thread should go across the bobbin evenly. It should not pile up on one side.
- Not too tight: The thread should be smooth, not super tight. Winding too tight can stretch the thread. This can cause problems later.
- Not too loose: If it’s too loose, the thread can fall off the bobbin too easily.
- Use the right spool size: Make sure your thread spool fits well on the pin. If it’s too big or small, it might not unwind smoothly.
- Check your machine manual: Your manual might have specific steps for winding a bobbin on your exact model.
Once the bobbin is full, stop the machine. Push the bobbin winder pin or lever back to its home position. Carefully take the wound bobbin off the pin. Cut the thread connecting the bobbin to the spool. Now you have a ready-to-use bobbin!
Loading the Bobbin into the Machine
Now that you have a wound bobbin, you need to put it in the machine. Brother machines have two main ways to load the bobbin. It depends on your machine model. You might have a top loading bobbin system or a front-loading system that uses a bobbin case. It is important to know which type your machine has. This tells you how to put the bobbin in.
Finding Your Bobbin System Type
Look at the area under your sewing machine needle.
* Top Loading Bobbin: If you see a flat, clear plastic cover right below the needle plate, you likely have a top loading bobbin system. The bobbin drops in from the top. This is very common on newer machines.
* Front Loading (Bobbin Case): If you don’t see a top cover and instead see a door on the front of the machine, usually near the base, you likely have a front-loading system that uses a bobbin case. The bobbin goes into a metal case first, and then the case goes into the machine from the front. This is common on older or some mechanical machines.
Check your machine manual if you are not sure. Knowing your system is the first step to inserting the bobbin correctly.
Loading a Top Loading Bobbin (Easy Drop-In)
This is often called the ‘easy way’ because you just drop the bobbin in. Most newer Brother machines use this method.
Locating the Bobbin Cover
Your top loading bobbin goes right under the needle. Look at the flat part your fabric sits on. Right in front of where the needle goes down, you will see a cover. It might be clear plastic. It might have lines marked on it. This is the bobbin cover. You need to open or remove this cover.
Removing the Bobbin Cover
Most bobbin covers have a small lever or button. Push the lever or slide the button. The cover will pop open or slide off. Lift the cover off completely. Put it somewhere safe where you won’t lose it. Now you can see the bobbin area below.
Inserting the Bobbin
This part is key. The bobbin must spin the right way when it is inside the machine. Look at your wound bobbin. Which way does the thread come off the side?
* For most Brother top loading bobbin machines, the thread should come off the left side of the bobbin when you drop it in.
* Imagine the letter ‘P’. The thread comes off like the curve of the ‘P’. Or imagine the number ‘6’. The thread comes off like the curve of the ‘6’.
Hold the bobbin with the thread coming off the correct side. Gently drop the bobbin into the round space below the needle plate. It should sit flat in the space.
Guiding the Thread
Once the bobbin is in the space, you need to guide the thread. Look at the metal plate around the bobbin area. There are small channels or slots. These are thread guides. Take the end of the bobbin thread. Pull it into the first slot or channel. Guide the thread along the path. It will go into a second slot. The path usually looks like a curved line or steps. Follow the numbers or pictures marked on the machine if they are there.
Pull the thread gently. Make sure it sits down in the channels. It should not be loose or sitting on top of the metal. Leave a little tail of thread, maybe 4-6 inches long. This tail should rest on the metal plate near the needle hole.
Replacing the Bobbin Cover
Now, put the bobbin cover back on. Line it up with the opening. Gently push it down or slide it back into place. It should snap or click shut. Make sure it is closed completely and is flat. If it’s not flat, the fabric won’t feed smoothly.
Your top loading bobbin is now loaded! The thread tail is ready to be used for stitching. You have successfully completed inserting the bobbin.
Loading a Front Loading Bobbin (Using a Bobbin Case)
This method uses a bobbin case. The bobbin goes into this case first. Then the case goes into the machine.
Accessing the Bobbin Case Area
The bobbin case area is usually at the front of the machine, near the bottom. There is a door or cover you need to open. This door might be a hard plastic cover that swings open. Or it might be a removable part. Open this door. You will see a metal part inside. This is where the bobbin case goes.
Getting the Bobbin Case Ready
Take out the old bobbin case if there is one in there. Inside the bobbin case, there is a bobbin space and a small slot or opening on the side. There is also a little arm or latch that you can pull on. This arm is often used to hold the case when you put it in or take it out.
Inserting the Bobbin into the Bobbin Case
Take your newly wound bobbin. Hold it in your hand. Look at which way the thread comes off.
* For most Brother machines using a bobbin case, the thread should come off the right side of the bobbin.
* Imagine the letter ‘Q’ or the number ‘9’. The thread comes off like the curve of the ‘Q’ or ‘9’.
Place the bobbin into the bobbin case. It should fit snugly. Now, you need to guide the thread into the tension spring of the bobbin case. Take the thread end. Pull it into the slot on the side of the bobbin case. Pull it under the small metal spring you see there. Keep pulling gently. The thread should slide smoothly under the spring. It will come out of a small opening at the edge of the case. Leave a tail of thread hanging from the bobbin case, about 4-6 inches long.
Inserting the Bobbin Case into the Machine
Now, hold the bobbin case by the little arm or latch. The thread tail should be hanging out. The bobbin case needs to go into the round opening inside the machine. This opening has a pin in the center. This pin is where the middle of the bobbin case sits.
Line up the center of the bobbin case with the pin in the machine. Push the bobbin case firmly onto the pin. It needs to sit all the way back. You will feel it click or lock into place. The little arm or latch you were holding will usually release once it’s in correctly. Make sure the bobbin case is sitting flat and is locked.
Closing the Access Door
Once the bobbin case is in, close the door or cover on the front of the machine. Make sure it is closed completely.
Your front-loading bobbin is now loaded! The thread tail is inside, ready to be used. You have finished inserting the bobbin and the bobbin case.
Bringing Up the Lower Thread
No matter if you have a top loading bobbin or a front-loading one, you need to bring the lower thread up through the needle plate hole before you can sew. This connects the lower thread (from the bobbin) with the upper thread (from the spool).
First, make sure your machine’s needle is up high. Turn the handwheel on the side of the machine towards you to raise the needle. If you have already done Brother sewing machine threading for the top thread, that thread should be through the needle.
Hold the end of the upper thread (the one coming through the needle). Keep it loose.
Now, turn the handwheel towards you one full turn. As the needle goes down and comes back up, the upper thread will catch the lower thread loop from the bobbin area. Watch the needle hole in the plate. As the needle comes back up, you will see a small loop of the lower thread appear just above the needle plate.
Use your fingers or a small tool like tweezers. Gently pull this loop of lower thread up through the hole in the needle plate. Pull it all the way out so you have a thread tail.
Now you should have two thread tails coming from under the presser foot: the upper thread and the lower thread. Pull both threads under the presser foot and towards the back of the machine. Place them together behind the presser foot. This gets them ready for sewing.
You have now successfully loaded the bobbin and brought up the lower thread! You are ready to start sewing. This completes the main steps of Brother sewing machine threading involving the bobbin part.
Adjusting Thread Tension
Sometimes, even with the bobbin loaded right, stitches don’t look perfect. This can be because of thread tension. Thread tension is how tight or loose the upper and lower threads are when they meet in the fabric.
- If the upper thread looks flat on top and the lower thread forms loops on the bottom of the fabric, the upper thread tension might be too tight.
- If the lower thread looks flat on the bottom and the upper thread forms loops on the top of the fabric, the lower thread (bobbin) tension might be too tight, or the upper tension is too loose.
Most of the time, you only adjust the upper thread tension using the dial on the front or side of your machine. The bobbin tension is usually set correctly at the factory. You rarely need to change it.
If your stitches are bad, first check your Brother sewing machine threading for the upper thread. Make sure it is in all the guides. Then check the bobbin loading again. If it’s still bad, try sewing on a scrap piece of fabric. Adjust the upper thread tension dial one number at a time. Sew a test line after each change. See if the stitches get better.
Getting thread tension right is part of making nice stitches. The bobbin thread plays an equal role with the upper thread in forming the stitch. They need to pull together with the right amount of firmness.
Troubleshooting Common Bobbin Issues
Sometimes things go wrong. Here are some common problems with the bobbin and how to fix them simply.
- Thread tangling under the fabric: This often looks like a big mess of thread (‘bird’s nest’). This is usually a problem with the upper Brother sewing machine threading, not the bobbin. Re-thread the top thread completely. Make sure the presser foot is up when you thread the top. This lets the thread sit correctly in the tension discs.
- Poor stitches on top or bottom: Check how you wound the bobbin. Is it too loose or too tight? Rewind it. Make sure the bobbin is in the machine the right way (thread coming off the correct side). Check the bobbin cover is on right (for top-load) or the bobbin case is fully seated (for front-load). Check your upper thread tension.
- Bobbin not winding correctly: Is the thread coming off the spool smoothly? Is the thread guided correctly to the bobbin winder? Is the bobbin pushed down firmly on the pin? Is the bobbin winder lever pushed over? Check these things.
- Bobbin cover won’t close (top load): Is the bobbin sitting flat in its spot? Is the thread tail guided correctly into the slots? The thread shouldn’t be sticking out where the cover needs to sit.
- Bobbin case won’t go in (front load): Is the bobbin sitting correctly inside the bobbin case? Is the little latch on the bobbin case pulled out? Make sure it’s lined up with the center pin in the machine. Don’t force it.
- Thread breaking often: This can be old thread, the wrong type of needle, or thread tension problems. It can also be a bobbin wound too tightly. Try a fresh bobbin wound correctly.
Solving these simple issues helps you sew without frustration. Most bobbin problems come from winding it wrong or inserting the bobbin the wrong way round. Always check these first!
Relating Bobbin Loading to Full Machine Threading
Loading the bobbin is just one part of getting your machine ready to sew. The other big part is threading the machine with the upper thread.
You load the bobbin first. This gets your lower thread ready.
Then, you thread the upper thread. This means taking thread from the spool. Guiding it through hooks, loops, and tension discs all the way down to the needle. This is the upper Brother sewing machine threading.
Both the upper and lower threads meet below the needle plate. They lock together to form a stitch. If either the upper threading or the bobbin loading is wrong, the stitch won’t form right.
So, loading the bobbin is half of the job. The other half is the upper thread. Both need to be done carefully for good stitches.
Simple Care for the Bobbin Area
Keep the area around your bobbin clean. Lint and dust can build up. This can mess up the lower thread or the bobbin case movement. Use a small brush that came with your machine. Gently brush away lint from the bobbin area. Do this often. It helps your machine run smoothly. This is part of keeping your Brother sewing machine happy.
Summary Table: Bobbin Loading Types
Here is a simple table showing the key steps for each type of bobbin system.
| Feature | Top Loading Bobbin | Front Loading (Bobbin Case) |
|---|---|---|
| Where is it? | Under a clear cover on the needle plate. | Behind a door on the front/base. |
| What holds the bobbin? | The space in the machine bed. | A metal bobbin case. |
| How thread comes off? | Usually left side (like ‘P’ or ‘6’). | Usually right side (like ‘Q’ or ‘9’). |
| How to load? | Drop bobbin in, follow thread path. | Put bobbin in case, put case in machine. |
| Bringing up thread? | Yes, turn handwheel. | Yes, turn handwheel. |
Remember, the winding part using the bobbin winder is the same for both types of machines. Only the loading part is different.
Final Thoughts
Loading a bobbin might seem tricky at first. But it is simple once you know the steps. Whether you have a top loading bobbin or use a bobbin case, follow the guide. Pay attention to the direction the thread comes off the bobbin. Use the bobbin winder correctly. Make sure your bobbin cover or bobbin case is in place.
With a properly wound and loaded bobbin, your Brother sewing machine is ready. You can make beautiful stitches. Don’t rush this step. It is really important for happy sewing! Practice makes it easier. Soon, you will load your bobbin without even thinking about it. Just drop it in (or pop the case in) and go!
Frequently Asked Questions
Is the bobbin winding direction important?
Yes! For most Brother machines, the thread needs to come off the bobbin in a specific direction when you load it into the machine. For top loading bobbins, it’s usually the left side. For bobbin cases, it’s usually the right side. Putting it in backwards is a very common reason for stitches to mess up.
How do I know when the bobbin is full?
Many Brother machines with a bobbin winder have a small arm or sensor that stops the winding when the bobbin reaches a certain level. If yours doesn’t, watch the bobbin as it fills. Stop winding when the thread gets close to the edge of the bobbin sides. Don’t overfill it.
Can I use pre-wound bobbins?
Yes, you can often buy bobbins already wound with thread. Just make sure they are the right type and size for your specific Brother sewing machine model. Using the wrong type can cause problems.
My bobbin thread is looping on the bottom. What is wrong?
This is usually caused by problems with the upper Brother sewing machine threading, not the bobbin. Make sure your upper thread is threaded correctly, especially through the tension discs. Re-thread the entire upper thread path with the presser foot up. Check your upper thread tension setting too.
My bobbin thread is looping on the top. What is wrong?
This can be caused by the bobbin being loaded incorrectly (wrong direction). Or the thread might not be correctly seated in the bobbin case tension spring (for front load). Or the upper thread tension is too loose. Check your bobbin loading first, then check upper tension.
Do I need to oil the bobbin area?
Check your machine’s manual. Some older machines need oiling in specific spots, including the bobbin case area. Newer electronic machines often need less or no oiling by the user. Follow your manual’s instructions for care. Keeping it clean from lint is always a good idea, though.
What is the lower thread?
The lower thread is the thread that comes from the bobbin. It meets the upper thread in the fabric to form each stitch. Getting the bobbin ready means getting the lower thread ready to sew.