
Image Source: www.coralandco.com
Easy Steps for How To Thread A Husqvarna Sewing Machine
Learning how to thread your Husqvarna sewing machine is a key first step before you can start sewing. Don’t worry, it’s simpler than it looks! You will learn the main steps for getting thread ready on your machine, covering both the upper thread path and putting in the lower thread bobbin.
Getting Your Machine Ready
Before you start threading, make sure your sewing machine is ready.
It’s a good idea to turn the machine off. This makes it safer.
Raise the sewing foot. There is a lever on the back of the needle bar or to the side. Push it up.
Raise the needle to its highest point. You can turn the handwheel on the right side of the machine to do this. Turn the wheel towards you. The needle goes up and down. Stop when it is as high as it can go.
Seeing The Main Husqvarna Sewing Machine Parts
Your Husqvarna sewing machine has many parts. We will look at the parts you use for threading.
Knowing these parts helps you follow the steps easily.
- Spool Pin: This is where you put the spool of thread. It can be on top or side.
- Thread Guide: Small hooks or holes the thread goes through first.
- Tension Discs: These are round parts that put the right amount of pull on the thread. Proper sewing machine tension discs are needed for good stitches.
- Thread Take-Up Lever: This arm moves up and down. It pulls the thread for each stitch. The thread must go through this lever.
- Needle Bar: The part the needle is attached to.
- Needle: The sharp point that pushes thread through the fabric.
- Bobbin Winder: A small post and guide used for winding bobbin sewing machine thread.
- Bobbin Case: This holds the bobbin. It’s under the needle plate.
- Bobbin: The little spool that holds the lower thread.
These parts make the sewing machine thread path. The thread follows a certain way through these parts. This path is designed carefully. It makes the thread move correctly for sewing.
Making Sense Of The Thread Path
The thread travels a special way. It starts at the spool pin. It goes through guides. It goes through the tension discs. Then it goes up to the thread take-up lever. From there, it goes down to the needle. This is the upper threading sewing machine path.
The lower thread path is separate. It starts with the bobbin. The bobbin sits in its case. The thread comes out of the bobbin case. It meets the upper thread under the fabric. Both threads must be set right.
Your Husqvarna Viking threading guide in the machine manual or on the machine itself shows this path. Look for arrows or numbers printed on the machine. Follow these guides. They show you where the thread needs to go.
Winding The Bobbin
Before you thread the upper part, you need a bobbin filled with thread. This is the lower thread. Winding bobbin sewing machine thread is simple.
- Put an empty bobbin on the bobbin winder post. This post is often on the top or front of the machine.
- Place a spool of thread on the spool pin.
- Take the thread end. Guide it through the bobbin winding guide. This guide is a hook or disc near the spool pin.
- Bring the thread to the empty bobbin. Wrap the end of the thread around the bobbin center a few times.
- Push the bobbin winder post towards the right (or as shown on your machine). This locks it in place for winding.
- Hold the thread end that you wrapped on the bobbin for a moment.
- Gently press the foot pedal. The bobbin will spin fast. Thread will wrap around it.
- Watch the bobbin fill up. It stops when it’s full on many machines. If it doesn’t stop, lift your foot off the pedal when it looks full. Do not overfill the bobbin.
- Cut the thread between the spool and the bobbin.
- Push the bobbin winder post back to the left (or its resting place).
- Take the full bobbin off the post.
You now have a full bobbin ready for lower thread bobbin installation. Make sure the thread is wound evenly. A messy bobbin can cause problems when sewing.
Inserting The Bobbin Husqvarna Machine
Now you need to put the full bobbin into the machine. This is the lower thread bobbin installation. The way you do this depends on your specific Husqvarna model.
Some machines have a front-loading bobbin case. This is often under a flap or door on the front of the machine below the needle.
Other machines have a top-loading bobbin. This is under a slide-off plate right below the needle.
For Top-Loading Bobbins:
- Open the bobbin cover plate. It slides off towards you or to the side.
- Take out the old bobbin if there is one.
- Pick up your new, full bobbin. Look at how the thread comes off the bobbin. There is usually a picture next to the bobbin area showing the right way. The thread might need to come off clockwise or counter-clockwise.
- Place the bobbin into the bobbin case area.
- Pull the thread end. Guide it into the small slot or guide path in the bobbin area. There is a tension spring here. The thread must go under this spring.
- Pull the thread along the path until it rests in the small groove. Leave a tail of thread about 4-6 inches long.
- Close the bobbin cover plate.
For Front-Loading Bobbins:
- Open the bobbin case door. This is usually on the front of the machine, under the sewing bed.
- Take out the metal bobbin case. There is a small latch or handle on it. Open the latch to take it out.
- Open the bobbin case latch fully. Put the full bobbin inside the case.
- Hold the bobbin in the case. The thread must come off the bobbin in the correct direction. Check your manual or the case for a picture.
- Guide the thread into the slot on the side of the bobbin case. Pull it firmly into the tension spring on the case.
- Close the latch on the bobbin case.
- Hold the bobbin case by the latch. Push it back into the machine. It should click into place.
- Release the latch. The bobbin case is now installed. Leave the door open for a moment. Leave a thread tail hanging out.
Always check your specific Husqvarna Viking threading guide in your manual. It shows the exact steps for your model. Inserting bobbin Husqvarna correctly is vital for good stitches.
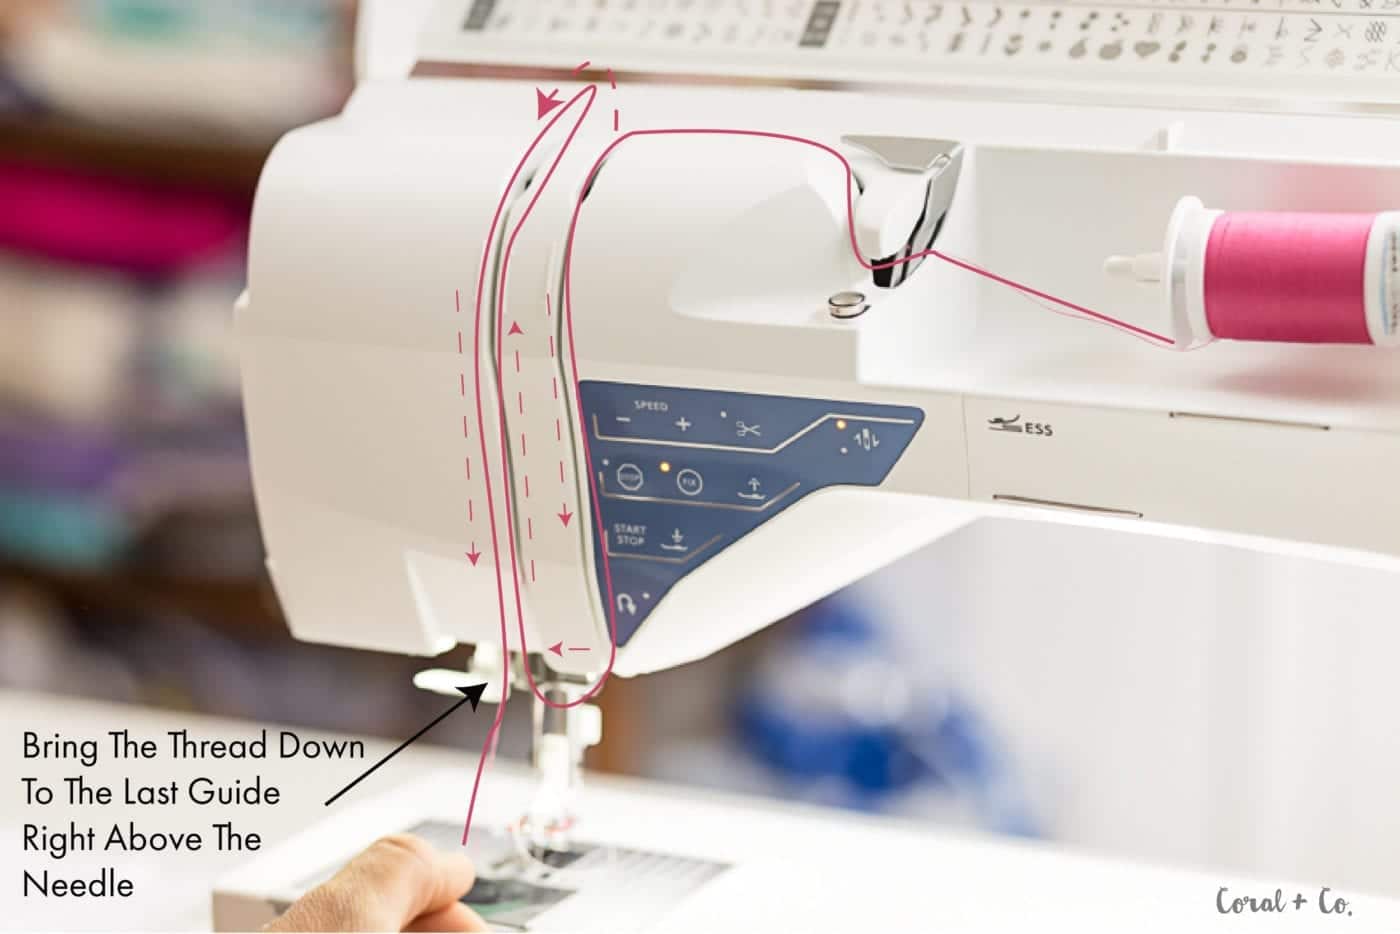
Upper Threading Sewing Machine Steps
Now let’s put the thread on the top part of the machine. This thread goes through the needle.
- Put your spool of thread on the spool pin. Make sure it spins freely. If using a large spool, you might need a spool cap to hold it in place. Use the right size cap.
- Find the first thread guide. It’s usually near the spool pin. It might be a hook or a hole. Guide the thread into this guide.
- Follow the path down the machine. There are often numbered guides or arrows. The thread will go down the right side of the machine’s front.
- Now, the thread needs to go between the sewing machine tension discs. These discs control how tight the thread is. Pull the thread firmly so it goes down into the space between the discs. Make sure it seats correctly. This is important for proper tension.
- After the tension discs, the thread path goes up. The thread needs to go up towards the top of the machine.
- Reach the thread take-up lever. This is a moving arm. It must be in its highest position. Remember how we raised the needle? That also raises this lever. Guide the thread through the eye or hook of the thread take-up lever. Some machines have a guide just before the lever.
- After going through the take-up lever, the thread path goes back down towards the needle.
- Follow the guides down the needle bar. There might be hooks or guides to keep the thread straight as it goes down. Thread these guides.
- You are now at the needle. The final step is needle threading sewing machine.
Needle Threading Sewing Machine
This is the last step for the upper thread.
- Make sure the needle is at its highest point. Turn the handwheel if needed.
- Cut the end of your thread cleanly. A fresh cut makes it easier to push through the needle eye.
- Some Husqvarna machines have a built-in needle threader. If yours does, use it! It’s a small device that helps push the thread through the tiny needle eye. Follow your machine’s instructions for using the automatic needle threader. They usually involve lowering a lever and guiding the thread.
- If you do not have a needle threader, you must thread the needle by hand.
- Look at the needle eye. On most home machines, you thread the needle from the front to the back.
- Hold the thread end. Push it through the eye of the needle.
- Pull a few inches of thread through the needle eye.
- Guide the thread under the sewing foot and pull it towards the back of the machine. It should lie under the raised foot.
Your upper thread is now ready!
Bringing Up The Lower Thread
You have the upper thread through the needle and under the foot. You have the bobbin inserted. Now you need to bring the bobbin thread up through the needle plate hole.
- Hold the tail of the upper thread loosely with your left hand.
- Turn the handwheel on the side of the machine towards you.
- Watch the needle go down into the needle plate hole. It goes all the way down.
- As the needle comes back up, it catches the bobbin thread.
- Keep turning the handwheel towards you. The needle will pull a loop of bobbin thread up through the hole.
- Stop turning when the needle is back at its highest point.
- Use a seam ripper or your finger to gently pull the loop of bobbin thread up.
- Pull the loop to bring the end of the bobbin thread out fully.
- You should now have two threads: the upper thread coming from the needle, and the bobbin thread pulled up from below.
- Guide both thread tails under the sewing foot. Pull them towards the back of the machine. Lay them behind the foot. Leave a tail of about 4-6 inches.
Both threads are now ready for sewing.
Summarizing The Sewing Machine Thread Path
Let’s quickly go over the full path again.
Upper Thread:
– Spool Pin
– First Thread Guide
– Down the Channel
– Through Tension Discs
– Up to Thread Take-Up Lever
– Down the Needle Bar Guides
– Through the Needle Eye
– Under the Presser Foot
Lower Thread:
– Bobbin in Bobbin Case
– Through Bobbin Case Tension (slot or spring)
– Pulled up by the needle
This full path ensures the threads lock together correctly to form a stitch. Any mistake in this path can stop the machine from sewing or make bad stitches.
Checking Your Threading
Before you start sewing on your fabric, always do a test stitch on a scrap piece of fabric. This lets you check the stitch quality. Look at the top and bottom of the test fabric.
- Good Stitch: The stitches look the same on both sides. The threads lock neatly in the middle of the fabric layers.
- Bad Stitch:
- Loops on the bottom: This often means the upper thread tension is too loose. Or the upper thread is not correctly in the tension discs or take-up lever.
- Loops on the top: This often means the bobbin thread tension is too loose. Or the bobbin is not inserted correctly in its case or tension slot.
If your test stitch looks bad, re-check your threading.
Is the spool on correctly?
Did you go through all the guides?
Is the thread firmly in the tension discs? (Do this with the presser foot up!).
Is the thread through the thread take-up lever? (It must be up when you thread it).
Is the needle threaded front-to-back?
Is the bobbin in the right way?
Is the bobbin thread in the bobbin case tension slot?
Sometimes just re-threading the machine completely fixes the problem. It’s an easy first step for troubleshooting stitch issues.
Tips for Easy Threading
- Use good quality thread. Cheap thread can break easily or leave lint. This clogs your machine.
- Match your thread size and needle size. Thicker threads need bigger needles.
- Always thread with the presser foot UP. This opens the tension discs. If the foot is down, the discs are closed, and the thread won’t seat correctly in them. This is a common mistake.
- Keep your machine clean. Lint builds up, especially around the bobbin case and tension discs. This can affect tension and threading. Use a small brush to clean these areas often.
- Read your manual. Every Husqvarna model is a little different. Your manual is the best guide for your specific machine parts and threading path. Look for your Husqvarna Viking threading guide pictures.
- Use the right bobbin. Use only bobbins made for your machine. Using the wrong size or type of bobbin can cause major problems.
- Cut the thread end clean. A frayed end is hard to get through the needle.
- Take your time. Don’t rush the threading process. It’s a key step for successful sewing.
Following these easy steps for how to thread a Husqvarna sewing machine will help you get sewing faster. Remember the key steps: winding the bobbin, inserting the bobbin Husqvarna, and following the upper threading sewing machine path carefully, ending with needle threading sewing machine. Paying attention to your sewing machine parts like the tension discs and thread take-up lever will help you thread correctly every time. The correct lower thread bobbin installation is just as important as the upper thread.
More About Husqvarna Sewing Machine Parts Used in Threading
Let’s look a bit more at some parts and why they matter.
The Spool Pin
This simple pin holds your thread spool. Some machines have one, some have two. Having two lets you sew with a double needle or wind a bobbin without unthreading the main thread. Make sure the thread unwinds smoothly from the spool. Some threads (like rayon or metallic) work better with a vertical spool pin and a special guide. Most common threads work well on a horizontal pin with a spool cap.
Thread Guides
These small hooks, loops, or holes guide the thread along the correct path. They keep the thread from tangling or going where it shouldn’t. Think of them as road signs for the thread. Missing a guide means the thread takes a shortcut. This shortcut avoids important parts, like the tension discs.
Sewing Machine Tension Discs
These are perhaps one of the most critical parts for good stitches. The thread passes between these discs. There is a spring that pushes the discs together. This creates pressure on the thread. You can change this pressure with your tension dial or screen setting. More pressure means tighter thread. Less pressure means looser thread. If the thread is not seated correctly between the discs, there is no pressure. This leads to very loose stitches, especially on the bottom. This is why threading with the foot up is so important. It opens the discs.
Thread Take-Up Lever
This arm goes up and down with the needle bar. Its job is to pull thread from the spool, feed thread to the needle as it makes a stitch, and then pull the stitch tight. The thread must go through the hole or hook in this lever. If you miss the take-up lever, the machine will not form stitches correctly at all. It will likely make a tangled mess on the bottom of the fabric, sometimes called “bird’s nest”. Always make sure this lever is at its highest point when you start threading downwards.
The Needle
The needle is more than just a sharp point. It has a shaft, a groove, a scarf, and an eye. The long groove on the front side holds the thread as the needle goes down through the fabric. The scarf on the back side helps the bobbin hook catch the thread loop to form a stitch. The eye is where the thread passes through. Needles come in different sizes and types for different fabrics and threads. Using the right needle is key to preventing thread breaks and skipped stitches. Needle threading sewing machine is the final step in the upper path.
The Bobbin Case and Bobbin
The bobbin holds the lower thread. The bobbin case holds the bobbin and provides tension for the lower thread. In top-loading systems, the case is built-in, and a small tension spring is part of the machine’s bobbin area. In front-loading systems, the bobbin case is a separate metal part with its own tension spring. Just like the upper tension discs, the lower thread must pass through this spring system to have the right amount of pull. If the bobbin is wound unevenly, or if the thread is not in the tension spring, the lower thread will be too loose.
Common Threading Problems and Fixes
Even with easy steps, sometimes things go wrong.
- Thread breaks often:
- Is the machine threaded correctly? Re-thread carefully.
- Is the needle bent or dull? Change the needle.
- Is the thread old or poor quality? Try new thread.
- Is the tension too tight? Check your tension setting.
- Is the machine clean? Clean out lint, especially around the bobbin case and tension discs.
- Skipped stitches:
- Is the needle put in correctly? It must face the right way (flat side usually to the back).
- Is it the right needle for the fabric?
- Is the machine threaded correctly, especially the upper path and needle threading sewing machine?
- Is the bobbin inserted correctly?
- Thread bunching up (bird’s nest):
- Most often, the upper thread is not in the tension discs or missed the thread take-up lever. Re-thread the upper path with the foot UP.
- Less often, the bobbin thread is completely loose (missed tension spring). Re-insert the bobbin carefully.
- Stitches look uneven or loose on top/bottom:
- Check your tension settings. Adjust the tension dial slightly.
- Re-thread both the upper and lower threads completely.
- Make sure the thread take-up lever was at the highest point when you threaded.
- Ensure the bobbin thread is in the tension spring of the bobbin case/area.
Most sewing problems related to stitches come back to threading or tension. Knowing the parts like the sewing machine tension discs and thread take-up lever helps you check the right places.
Maintenance Related to Threading
Keeping your machine clean is a big part of keeping it threading and sewing well. Lint from thread and fabric collects in the thread path, in the tension discs, and around the bobbin area.
- Cleaning Tension Discs: Use a piece of strong thread or a special tension cleaning tool (if your machine came with one). Floss the thread between the tension discs with the presser foot down. Move it back and forth gently. This can pull out hidden lint.
- Cleaning Bobbin Area: Remove the needle plate (usually requires unscrewing). Remove the bobbin case. Use a small brush (usually included with the machine) to brush away all the lint. Never use canned air inside the bobbin area of home machines, as it can blow lint deeper into the machine.
- Regular Oiling: Some older or mechanical Husqvarna models require oiling. Check your manual. Oiling points are often near moving parts involved in stitch formation, which includes parts affected by the thread path.
Proper maintenance ensures that the Husqvarna sewing machine parts function smoothly. This makes threading easier and more reliable.
Variations in Husqvarna Models
Husqvarna Viking sewing machines come in many models, from simple mechanical ones to advanced computerised machines. While the basic principles of threading (spool -> guides -> tension -> take-up lever -> needle AND bobbin winding -> inserting bobbin Husqvarna) are the same, the exact location and look of the parts can differ.
- Thread Guides: Some machines have guides that look like simple wire hooks. Others have enclosed guides where you just slide the thread into a slot.
- Tension Control: Older machines have a dial. Newer machines have buttons or touch screens to set tension. The internal tension discs work similarly though.
- Thread Take-Up Lever: On some machines, the take-up lever is hidden behind a cover. You just need to make sure the thread goes into the slot leading to it. On others, the lever is visible. You must thread through its eye.
- Bobbin Systems: As discussed, top-loading and front-loading systems are different for inserting bobbin Husqvarna. Top-loading is often considered easier and less prone to lint issues. Front-loading uses a separate metal case.
Always refer to your specific Husqvarna Viking threading guide in your machine’s instruction book. It will show clear pictures or diagrams for your model. Even if the pictures look a little different, the steps you learned here will apply. You will still need to find the spool pin, the guides, the tension area, the thread take-up lever, and the needle. You will still need to wind and insert the bobbin.
Knowing the general path helps you make sense of the specific path for your machine.
Making Threading Part of Your Routine
Getting used to threading takes a few tries. Don’t get frustrated. Each time you do it, it will feel more natural. Think of it like tying your shoes. Hard at first, then easy.
Make threading part of your sewing routine:
1. Choose your project and thread.
2. Wind your bobbin.
3. Install the bobbin (lower thread bobbin installation).
4. Thread the upper path (upper threading sewing machine), making sure the foot is up and the take-up lever is high.
5. Thread the needle (needle threading sewing machine).
6. Pull up the bobbin thread.
7. Place both threads under the foot and to the back.
8. Sew a test stitch.
Doing these steps in order helps ensure you don’t miss anything. It helps make threading error-free.
Threading your Husqvarna sewing machine correctly is the first step to enjoying your sewing projects. It affects how well your machine runs and how good your stitches look. By knowing your Husqvarna sewing machine parts and following the thread path, you can thread your machine quickly and correctly every time. The process of winding bobbin sewing machine thread, inserting bobbin Husqvarna properly, following the upper threading sewing machine route through the thread take-up lever and sewing machine tension discs, and finally needle threading sewing machine is fundamental. The lower thread bobbin installation must work with the upper thread for perfect stitches. Use your Husqvarna Viking threading guide as your map.
Frequently Asked Questions
h5 Why is my thread breaking when I sew?
Thread breaking often happens because of wrong threading, a bad needle, poor thread quality, or too much tension. Check that your machine is threaded correctly, top and bottom. Make sure the thread goes through all guides and the tension discs correctly (with the foot up!). Check your needle is sharp, not bent, and right for your fabric and thread. Also, clean lint from the thread path and bobbin area.
h5 My machine makes loops on the bottom of the fabric. Why?
Loops on the bottom usually mean the upper thread is too loose. This is almost always because the upper thread is not correctly placed in the tension discs. Make sure the presser foot is up when you thread the upper part so the tension discs are open. Re-thread the upper path carefully. Also, check if the thread missed the thread take-up lever.
h5 My machine makes loops on the top of the fabric. Why?
Loops on the top usually mean the bobbin thread is too loose. Make sure the bobbin is wound evenly. Check that the bobbin is inserted into its case or holder correctly and that the thread is pulled through the tension spring in the bobbin area. Re-insert the bobbin completely.
h5 Does it matter which way the bobbin goes in?
Yes, it matters very much. The thread must come off the bobbin in a specific direction (clockwise or counter-clockwise) so that it pulls through the bobbin case tension correctly. Check the diagram printed on your machine near the bobbin area or in your manual.
h5 Do I have to use a Husqvarna bobbin?
It is best to use bobbins made for your specific Husqvarna model. Bobbins look similar but differ slightly in size, shape, and the material they are made from. Using the wrong bobbin can cause tension problems, jamming, or even damage to your machine’s bobbin system.
h5 How often should I clean my machine?
Clean your machine often, especially the bobbin area and around the feed dogs, after major projects or after using fabric or thread that creates a lot of lint. Regular light cleaning is better than waiting for problems to appear.
h5 Should the presser foot be up or down when I thread?
Always thread the upper thread with the presser foot UP. This opens the tension discs and lets the thread seat correctly between them. If the foot is down, the discs are closed, and the thread will not go in right, leading to loose stitches.
h5 Where is the thread take-up lever?
The thread take-up lever is usually located towards the top-front of the machine, above the needle area. It’s an arm that moves up and down as the machine sews. It might be visible or hidden behind a cover with a threading slot leading to it. Check your Husqvarna Viking threading guide.
h5 How do I use the automatic needle threader?
Automatic needle threaders vary by machine model. Generally, you lower the threader mechanism, guide the thread in front of the needle and into hooks on the threader, then release the lever. A small wire or hook pushes the thread loop through the needle eye. Refer to your specific model’s manual for exact steps.