
Learning how to use a sewing pattern is a fun step into making your own clothes or home goods. You might wonder, “How exactly do I use a sewing pattern?” It’s a roadmap! A sewing pattern gives you the shapes of the fabric pieces you need and tells you how to put them together. It shows you where to cut, where to sew, and important details to make your project look just right. This guide will walk you through everything, from picking a pattern to cutting your fabric.
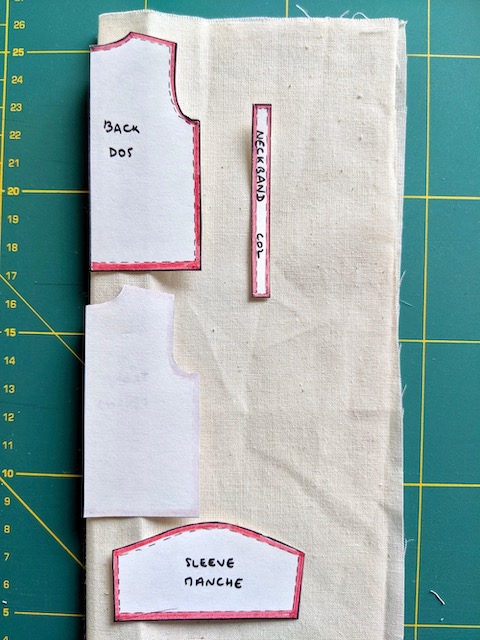
Image Source: camimade.com
Getting Started With Sewing Patterns
Sewing patterns are tools. They help you make projects like dresses, shirts, bags, or pillows. Think of a pattern as blueprints. It has paper pieces you use to cut fabric. It also has instructions that tell you what to do.
Using a pattern is a skill you learn. It takes a little practice. But once you know the basics, you can make many things! We will go step by step.
Picking Your First Pattern
Start simple. Choose patterns marked “Easy” or “Beginner.” Look for patterns that use fabrics that are easy to sew. Cotton or linen are good choices. Jersey knit fabric can be stretchy and harder for beginners.
Look at the picture on the pattern. Do you like it? Can you see yourself making it? Think about what you want to make. A simple skirt, a basic top, or a pillow are great first projects.
Grasping The Sewing Pattern Envelope
The sewing pattern envelope is packed with information. Don’t throw it away! It’s your first source of facts about the project.
Look at the front. You will see a picture of the finished item. It might show different versions you can make (like a short dress or a long dress).
Look at the back. This side tells you many important things:
- What you need: It lists fabric types that work well. It tells you how much fabric you need. It also lists other things you need, like buttons, zippers, elastic, or interfacing.
- Sizes: It shows the different sizes the pattern comes in.
- Finished size: It might give the finished size of the clothing item. This helps you see how loose or tight it will be.
- Difficulty: It tells you if the pattern is easy, medium, or hard.
- Small pictures: These often show the different views or options of the pattern you can make.
Always check the back of the envelope before you buy fabric! This saves you time and money.
Choosing Your Pattern Size
Picking the right size is key for clothes. Do not just pick your usual store size. Pattern sizes can be different.
The envelope back has a size chart. This chart tells you which size pattern piece to use based on your body measurements.
How To Measure Yourself
You will need a fabric tape measure. It’s best to have someone help you. Wear light clothes or just underwear.
- Bust: Measure around the fullest part of your chest. Keep the tape level.
- Waist: Measure around the narrowest part of your body. This is usually near your belly button.
- Hips: Measure around the fullest part of your hips and rear. Keep the tape level.
Compare your measurements to the size chart on the envelope.
Example Size Chart (Check your specific pattern envelope!)
| Measurement (Inches) | Size A | Size B | Size C |
|---|---|---|---|
| Bust | 32 | 34 | 36 |
| Waist | 25 | 27 | 29 |
| Hips | 34 | 36 | 38 |
Find the size that matches your measurements best. If your measurements fall between sizes, it’s often better to pick the larger size. You can always make clothes smaller. Making them bigger is harder.
For projects like bags or pillows, you usually just pick one size given. Choosing pattern size for clothing needs these measurements.
Preparing Fabric For Sewing
Before you cut your fabric, you need to get it ready. This step is important! It stops your finished project from shrinking later. Preparing fabric for sewing means washing and drying it just like you will wash and dry the finished item.
- Wash your fabric in the washing machine.
- Dry it in the dryer or hang it up, depending on the fabric type.
- Iron your fabric. This makes it flat and easy to cut accurately. Use the right iron setting for your fabric type. Wrinkles can mess up your cutting.
Sometimes, if you have tricky fabric like silk or wool, you might prepare it differently. The pattern instructions might tell you how. But for most beginner fabrics like cotton, washing and pressing is enough.
Reading Sewing Patterns and Instructions
Inside the pattern envelope, you find the pattern pieces. You also find the sewing pattern instructions. These instructions are like a book just for your project. They tell you how to cut and sew.
The instructions usually have a page about reading sewing patterns. This page shows you what the different lines and shapes on the pattern pieces mean. It also explains the symbols used.
Interpreting Pattern Symbols and Markings
The paper pattern pieces have lines, dots, triangles, and other shapes on them. These are pattern markings. They give you vital information. Interpreting pattern symbols is a key skill.
Here are common pattern markings and what they tell you:
- Cutting Lines: These are the lines around the edge of each pattern piece. This is where you cut the fabric. They might be solid or dashed lines. Different lines can mean different sizes.
- Sewing Lines (or Seam Lines): Sometimes there is another line inside the cutting line. This shows where you will sew. The space between the cutting line and sewing line is called the seam allowance.
- Grainline: This is a long line with arrows at both ends. It tells you how to place the pattern piece on your fabric. The line must be parallel to the selvage (the finished edge of the fabric). Placing it wrong can make your finished item twist or hang strangely.
- Place on Fold Line: This is an arrow that is bent at the end. It has words like “PLACE ON FOLD.” This line must be placed exactly on the folded edge of your fabric. When you cut, you get a piece that is twice as wide as the pattern piece, without a seam on that edge.
- Notches: These are small diamond or triangle shapes on the edge of the pattern pieces. They match up with notches on other pieces. They help you put the right pieces together in the right order. If there are two or three notches close together, they usually mark the back of the garment. Single notches often mark the front.
- Dots or Circles: These show placement for things like pockets, buttonholes, pleats, or gathers. You mark these onto your fabric.
- Triangles or Squares: Like dots, these show placement or matching points.
- Lengthen or Shorten Lines: These are two parallel lines across the pattern piece. If you need to make the item longer or shorter, you cut the pattern piece along one line, spread it apart (for longer) or overlap it (for shorter), and tape it.
- Arrows (not grainline): Single arrows might show the direction of gathers or pleats.
Learning these pattern markings helps you use the pattern correctly. Don’t skip reading this part of the instructions!
Preparing The Pattern Pieces
Pattern pieces come printed on large tissue paper sheets.
You have two main choices:
1. Cut out your size: Find the cutting line for the size you chose. Carefully cut out each pattern piece along that line.
2. Trace your size: Place thin tracing paper over the pattern sheet. Trace all the lines and markings for your size. This keeps the original pattern intact if you want to make a different size later.
Many beginners cut out their size directly. It’s faster.
Once pieces are cut (or traced), smooth them out. They might be wrinkled. You can gently press them with a cool iron (no steam) or just flatten them well.
Keep all the pieces for one pattern together. Use a large envelope or bag. Mark the envelope with the pattern number and size. This makes it easy to find later.
Pattern Layout On Fabric
Now you have your ironed fabric and your pattern pieces. It’s time to plan the pattern layout on fabric. This step shows you how to place the pattern pieces on the fabric before cutting.
The pattern instructions will have diagrams showing you the best way to lay out the pieces. These diagrams are important! They show you:
- How to fold the fabric (usually in half lengthwise).
- Where to place each pattern piece.
- Which way the grainline arrows should point.
Understanding Fabric Grain
Fabric is made of threads woven together.
* Lengthwise grain: Threads that run parallel to the selvage (the finished edge of the fabric). This grain has little stretch.
* Crosswise grain: Threads that run across the fabric, from selvage to selvage. This grain has a little more stretch than lengthwise.
* Bias: The diagonal line across the fabric (at a 45-degree angle to the selvage). Cutting on the bias gives the fabric a lot of stretch and drape.
The grainline arrow on your pattern piece must be placed parallel to the selvage. This is very important for how your finished item hangs and fits. Use a tape measure to check that the ends of the grainline arrow are the same distance from the selvage.
Laying Out The Pieces
Lay your fabric out flat on a large surface, like a table or the floor. Fold it as shown in the pattern layout diagram.
Place the largest pattern pieces first. Then fit the smaller pieces around them.
- Check that any “Place on Fold” lines are exactly on the folded edge.
- Check that all grainline arrows are parallel to the selvage.
- Make sure you have enough space to cut around all the pieces.
The layout diagram helps you use the least amount of fabric. It also makes sure your pieces are cut on the correct grain.
Use pattern weights or pins to hold the pattern pieces in place on the fabric. If using pins, place them inside the cutting line so you don’t cut over them.
Cutting Fabric From Pattern
This is a step where accuracy matters. Cutting fabric from pattern pieces needs care.
You can use sewing shears (special fabric scissors) or a rotary cutter and mat.
- Sewing Shears: These scissors are very sharp and used only for fabric. Cut smoothly along the cutting line. Do not lift the fabric while cutting. Keep the lower blade of the scissors on the table.
- Rotary Cutter: This is a wheel-shaped blade. You use it with a special cutting mat. It cuts through multiple layers of fabric easily. You guide it along the edge of the pattern piece. Be very careful; these are extremely sharp.
Cut each piece slowly and accurately. If the pattern piece has notches, cut them outward away from the pattern piece edge, or cut small snips into the seam allowance. Do not cut the notches away completely; you need them for matching.
Cut out all the pieces shown in the instructions for your chosen view and size. Make sure you cut the right number of each piece (e.g., “Cut 2” or “Cut 1 on Fold”).
After cutting, keep the fabric pieces organized. Pin the paper pattern piece to the fabric piece it matches. This helps you remember what each piece is.
Sewing Pattern Instructions – Following The Steps
With your fabric pieces cut, you are ready to sew! The sewing pattern instructions will guide you through putting everything together.
The instructions break down the sewing process into steps. Read each step carefully before you do it. Pictures or diagrams often go with each step.
- Find your pieces: Identify the fabric pieces needed for the step. Use the pattern pieces pinned to the fabric.
- Read the words: See what the instructions tell you to do (e.g., “Sew front to back at shoulder seams,” “Press seam open”).
- Look at the pictures: The diagrams show you how pieces fit together and how seams should look.
Terms you might see:
* Right sides together: Place the good, pretty sides of the fabric pieces facing each other. This is how you usually sew seams.
* Wrong sides together: Place the dull or back sides of the fabric together. Used for some special seams or folding edges.
* Seam allowance: The distance from the edge of the fabric to the line of stitching. The pattern instructions will tell you the seam allowance to use (often 5/8 inch or 1/2 inch). Use the guide marks on your sewing machine plate to sew a straight, even seam allowance.
* Press: Use an iron to flatten the fabric. Pressing seams open or to one side makes your sewing look neat and professional. Always press as the instructions say!
* Finish edge: Treat the raw edge of the fabric to stop it from fraying. This might be done with a serger, zigzag stitch on your sewing machine, or pinking shears.
* Staystitch: Stitching done on curved or bias edges before sewing seams. It prevents the fabric from stretching out of shape.
* Understitch: Stitching a seam allowance to one piece of fabric (like a facing). It helps an edge lie flat and keeps a facing from rolling to the outside.
* Topstitch: Stitching done on the outside of the project, usually for decoration or strength.
Follow the steps in order. Don’t jump ahead. The instructions are written in a logical sequence.
Pattern Alterations – Making Small Changes
Sometimes you need to change the pattern slightly to fit you better. This is called pattern alterations. For beginners, it’s best to make simple changes or skip this step on your first project.
Common simple alterations:
- Lengthening or Shortening: If you are taller or shorter than average, you might need to add or remove length from a dress, pants, or sleeves. Use the lengthen/shorten lines on the pattern piece.
- Adjusting Width: If you are between sizes, you might blend between sizes at different points (e.g., a size medium bust but a size large hip). You draw a new cutting line smoothly connecting the lines for different sizes.
Look for guides on basic pattern alterations when you feel ready. It’s a skill that takes practice. For your first project, focus on following the pattern as is. If it doesn’t fit perfectly, you learn what changes you might need next time.
Finishing Your Project
Once you have sewn all the pieces together according to the sewing pattern instructions, you will have a finished item! The instructions will guide you through adding closures like zippers or buttons, hemming edges, and doing final pressing.
Take your time on the last steps. Finishing touches make a big difference in how your project looks.
Reading Sewing Patterns With Confidence
Using patterns gets easier the more you do it. Each pattern is a little different. But they all use similar symbols and follow a similar process.
- Always read the envelope first.
- Measure yourself to choose the right size.
- Prepare your fabric by washing and ironing.
- Learn the meaning of pattern markings.
- Follow the layout diagram carefully.
- Cut accurately.
- Read and follow the sewing instructions step by step.
Don’t be afraid to make mistakes. Everyone does! Sewing is a journey. Your first projects might not be perfect, but you will learn so much. With practice, reading sewing patterns will feel natural.
Practice Makes Perfect
Start with a very simple project. Maybe a plain skirt with an elastic waist, a simple tote bag, or a basic top. These use simple shapes and techniques.
As you get more comfortable, try patterns with more pieces or different details like collars, sleeves, or zippers.
Keep your pattern instructions. Write notes on them about what you learned or changes you made. This helps you next time.
Joining a sewing group or online community can also help. You can ask questions and see what others are making.
Using a sewing pattern unlocks endless possibilities for making things with fabric. Enjoy the process!
FAQ: Common Questions About Using Sewing Patterns
h4 Why do I need to wash my fabric before I cut it?
Fabric can shrink when you wash it for the first time. If you cut and sew your project before washing, it might get smaller after you wash it later. This could make your clothes not fit anymore. Washing first lets the fabric shrink before you cut. It’s part of preparing fabric for sewing.
h4 What is the selvage edge of fabric?
The selvage is the finished edge you see on the fabric when you buy it off the bolt. It often looks slightly different from the cut edges and does not fray. The lengthwise grain of the fabric runs parallel to the selvage.
h4 Can I use any fabric with any pattern?
Not really. The pattern envelope suggests fabric types because the design works best with how those fabrics behave (e.g., drape, stretch, weight). Using a fabric that is too stiff or too stretchy can change how the finished item looks and fits. Always check the suggestions on the sewing pattern envelope.
h4 What is seam allowance?
Seam allowance is the space between the edge of your fabric and your line of stitches. Patterns include this space so you don’t have to add it yourself. The pattern instructions will tell you the seam allowance to use, usually 5/8 inch or 1/2 inch. You sew this far from the raw edge.
h4 How do I know which cutting line is for my size?
Look at the pattern instructions. There will be a page that shows the different lines for each size. For example, size Small might be a solid line, Medium a dashed line, Large a dotted line. Find the line type that matches your chosen size and cut along it.
h4 What if my measurements don’t match one size exactly?
This is very common! If your bust, waist, and hip measurements fall into different sizes on the chart, you might need to blend between sizes. For beginners, pick the size that matches your largest measurement or the measurement most important for the fit (like bust for a top, hips for pants). As you get more skilled, you can learn pattern alterations to fit multiple sizes.
h4 Do I need to cut out every single piece on the pattern sheet?
No. The pattern sheet includes pieces for all the different views or options the pattern offers. Look at the instruction sheet’s list of pieces needed for the specific view you chose. Only cut those pieces.
h4 What are notches used for?
Notches are like little matching marks. You use them to line up different fabric pieces before you sew them together. They ensure you connect the right edges and that parts like sleeves or collars fit correctly into the body of the garment. They are part of the important pattern markings to pay attention to.
h4 Is tracing the pattern better than cutting it out?
Tracing saves the original pattern sheet. If you want to make the project in a different size later, you can. Cutting is faster if you are sure you only need that one size. It’s a personal choice.
h4 My fabric layout looks different than the diagram. Is that okay?
Try to follow the diagram as closely as possible, especially regarding the grainline. The diagram is designed to help you use fabric wisely and make sure pieces are cut on the correct grain. Small shifts might be okay if you check grainlines and have enough fabric, but the diagram is the safest way for beginners. This step is important for pattern layout on fabric.
h4 How do I transfer pattern markings like dots or triangles to my fabric?
There are a few ways:
* Tailor’s chalk or fabric pens: Mark directly onto the wrong side of your fabric through the pattern paper.
* Tracing wheel and paper: Place special carbon paper between the pattern and fabric. Roll a tracing wheel over the markings, leaving a line on the fabric.
* Tailor’s tacks: Use needle and thread to make small, loose loops through the pattern and fabric. This is good for delicate fabrics or markings in the middle of a piece.
Choose a method that works for your fabric and doesn’t show on the right side. These markings are vital for following the sewing pattern instructions.