
Getting clothes to fit just right is a big goal in sewing. How do you make sure the clothes you sew fit you well? It all starts with taking your body measurements correctly. Having good body measurements is the first and most important step for picking the right pattern size and making any changes needed so your finished garment fits like a dream. This guide will show you how to get accurate measurements every time.
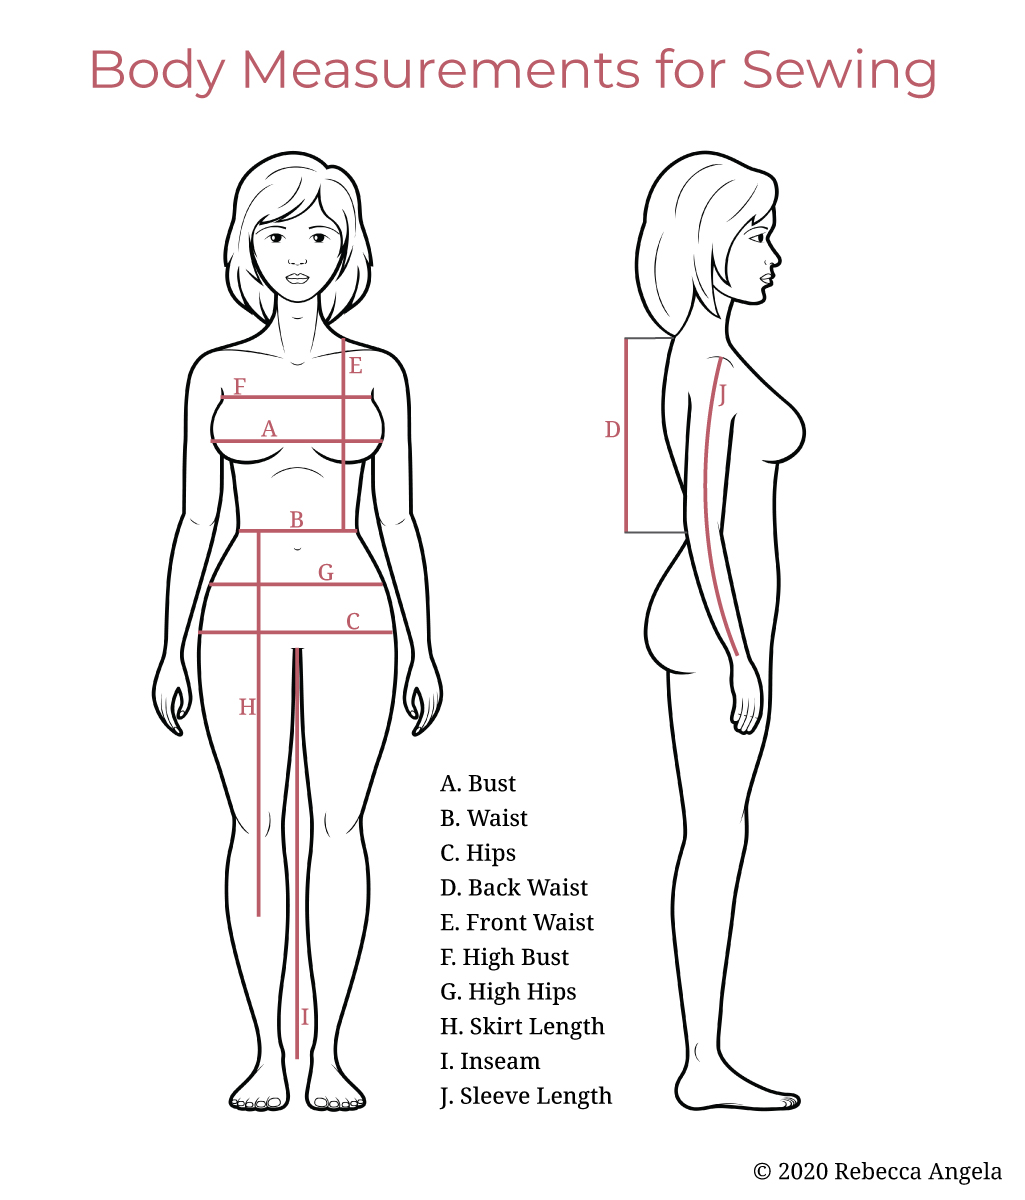
Image Source: rebecca-angela.com.au
Why Good Measurements Matter a Lot
Think of body measurements as the map you use to find the right path for your sewing project. If your map is wrong, you might end up in the wrong place.
Using wrong body measurements for patterns means the clothes might be too tight or too loose. They might not hang right. Parts might feel uncomfortable. Accurate body measurements are the basic tool you need. They help you choose the best size from a pattern chart. They also tell you where you might need to change the pattern a little bit to match your unique shape. This makes sure your sewing time leads to clothes you love to wear.
What You Need to Get Started
Before you start measuring, make sure you have a few things ready.
Tools for Measuring
- A flexible measuring tape: This is key. Make sure it’s a soft, flexible tape used for sewing or tailoring. Don’t use a hard metal construction tape. Check that the numbers are easy to read. Make sure the tape hasn’t stretched out over time.
- A full-length mirror: This helps you see what you are doing. You can check that the tape is straight and in the right place.
- Pen and paper (or phone): You need to write down your measurements right away. Don’t try to remember them.
- A friend or family member (helpful, but not required): Some measurements are much easier to take with help. This is especially true for back measurements or places you can’t easily reach.
Getting Your Body Ready
Wear light, close-fitting clothes. Things like leggings and a tank top work well. Heavy or baggy clothes will add extra inches and make your measurements wrong.
Stand in a natural way. Don’t suck in your stomach or puff out your chest. Just stand relaxed.
Tie a thin string or elastic around your natural waist. This is usually the narrowest part of your body. It helps you find your waist easily when measuring other parts. Let the string settle naturally as you stand relaxed.
How to Take Key Measurements
These are the main measurements you will need for almost all sewing patterns. Getting these right is very important. This is where using a measuring tape for sewing comes in handy.
Finding Your Bust Measurement for Sewing
The bust measurement is one of the most important numbers for tops, dresses, and jackets.
Step-by-Step Bust Measurement
- Stand up straight but relaxed.
- Bring the measuring tape around your back.
- Bring both ends to the front.
- Wrap the tape around the fullest part of your bust. This is usually over your nipples.
- Make sure the tape is level all the way around your body. Check in the mirror.
- The tape should be snug, but not tight. It should not squeeze you. You should be able to put one finger under the tape.
- Read the number where the tape ends meet. This is your bust measurement for sewing.
Tips for Bust Measurement
- Wear the bra you plan to wear with the finished garment. Different bras can change this measurement.
- Keep your arms relaxed by your sides. Don’t lift them up high. This changes the measurement.
- Make sure the tape isn’t twisted anywhere.
Finding Your Waist Measurement for Sewing
The waist measurement is key for skirts, pants, and fitted tops or dresses. Your natural waist is often the smallest part of your torso. It’s usually where you bend naturally. If you tied a string around your waist, this is where it should be.
Step-by-Step Waist Measurement
- Keep the string you tied around your natural waist in place.
- Stand relaxed. Do not suck in your stomach. Breathe normally.
- Wrap the measuring tape around your body at the level of the string.
- Make sure the tape stays level all the way around.
- The tape should feel snug, but not tight. You should be able to put one finger under it.
- Read the number where the tape ends meet. This is your waist measurement for sewing.
Tips for Waist Measurement
- Bend to the side. Where your body creases is your natural waist.
- Take this measurement while standing.
- Don’t look down while measuring your waist. This can change your posture and the measurement. Keep your head up.
Finding Your Hip Measurement for Sewing
The hip measurement is needed for pants, skirts, shorts, and some dresses. It is measured around the fullest part of your hips and rear. This is not always at the hip bone level.
Step-by-Step Hip Measurement
- Stand with your feet together.
- Wrap the measuring tape around the fullest part of your hips and bottom.
- Make sure the tape is level all the way around your body. Use the mirror to check the back.
- The tape should be snug, but not tight. It should move easily if you shift your weight slightly.
- Read the number where the tape ends meet. This is your hip measurement for sewing.
Tips for Hip Measurement
- This measurement is often much easier with a helper to check the back.
- Feel around to find the widest point before wrapping the tape. It might be lower than you think.
Taking Other Important Measurements
Besides the main three, other measurements are often needed depending on the pattern you are using. These help make sure the garment fits well in other places like shoulders, arms, and legs.
Getting Your Shoulder Width Measurement
This measurement helps make sure tops, dresses, and jackets fit well across the upper back and shoulders.
Step-by-Step Shoulder Width Measurement
- Find the bony point on top of one shoulder. This is where your shoulder meets your arm. You can feel it.
- Place the start of the measuring tape at this point on one shoulder.
- Run the tape straight across your upper back to the same point on your other shoulder.
- Keep the tape flat against your back.
- Read the number. This is your shoulder width measurement.
Tips for Shoulder Width Measurement
- This is much easier with a helper.
- Keep your arms relaxed at your sides.
- Don’t measure across the top of your shoulders like a yoke. Measure straight across the back.
Finding Your Back Waist Length Measurement
This measurement helps fit tops and dresses correctly between the shoulder and the waist. It tells you where the waist seam should sit.
Step-by-Step Back Waist Length Measurement
- Find the bumpy bone at the base of your neck. This is the 7th cervical vertebra. It sticks out when you tilt your head forward.
- Place the start of the measuring tape at this bone.
- Run the tape straight down your back.
- Measure down to the level of your natural waistline (where your waist string is).
- Read the number. This is your back waist length measurement.
Tips for Back Waist Length Measurement
- Definitely use a helper for this measurement. You can’t reach the top starting point easily yourself.
- Stand straight but relaxed.
Getting Your Sleeve Length Measurement
This measurement is for long sleeves. It tells you how long the sleeve should be from the shoulder to the wrist.
Step-by-Step Sleeve Length Measurement
- Stand with one arm relaxed at your side, or slightly bent at the elbow as if holding something lightly.
- Place the start of the measuring tape at the shoulder point (the same point used for shoulder width).
- Run the tape down the outside of your arm, over the elbow joint.
- Measure down to where you want the sleeve to end, usually at the wrist bone or slightly past it.
- Read the number. This is your sleeve length measurement.
Tips for Sleeve Length Measurement
- Bend your arm slightly. This gives you enough length for movement. If you measure with a straight arm, the sleeve might be too short when you bend your arm.
- Have a helper measure for the most accurate result.
Finding Your Inseam Measurement
This measurement is for pants, shorts, and jumpsuits. It tells you the length of the leg seam on the inside of the leg.
Step-by-Step Inseam Measurement
- Wear the type of shoes you plan to wear with the finished garment (e.g., flats, heels).
- Stand straight with your feet slightly apart.
- Place the start of the measuring tape high up on the inner thigh, right at the crotch.
- Run the tape down the inside of your leg to the bottom edge of your pants hem (where you want the pants to end).
- Make sure the tape is straight and not twisted.
- Read the number. This is your inseam measurement.
Tips for Inseam Measurement
- It can be hard to get the starting point high enough yourself. A helper makes this much easier and more accurate.
- You can also measure the inseam of a pair of pants that fit you well. Lay the pants flat, smooth them out, and measure along the inside leg seam from the crotch to the hem.
Other Useful Measurements
Depending on the pattern, you might need these too:
- High Bust/Upper Bust: Measure around your body right above your bust, under your arms. This is helpful if your full bust measurement is much larger than your upper bust, suggesting you might need a smaller pattern size adjusted at the bust.
- Arm Circumference (Bicep): Measure around the fullest part of your upper arm. Useful for fitted sleeves.
- Thigh Circumference: Measure around the fullest part of one thigh. Useful for fitted pants or shorts.
- Calf Circumference: Measure around the fullest part of your calf. Useful for fitted pants or boots.
- Front Waist Length: Measure from the dip at the base of your neck in the front down to your natural waist.
- Shoulder to Bust Point: Measure from the top of your shoulder (near your neck) down to the fullest part of your bust (the apex).
Writing Down Your Measurements
As you take each measurement, write it down right away. Create a simple chart or list. Make sure to write down the unit you are using (inches or centimeters). It’s a good idea to take each measurement two times to make sure you get the same number. If the numbers are different, measure a third time. Use the number you get most often.
Here is a simple table you can use:
| Measurement | How to Find It | Your Measurement (inches or cm) | Notes (e.g., with bra) |
|---|---|---|---|
| Bust | Fullest part | ||
| Waist | Natural waist (smallest part) | ||
| Hip | Fullest part of hips and rear | ||
| Shoulder Width | Across upper back, bone to bone | ||
| Back Waist Length | Base of neck bone down to waist | ||
| Sleeve Length | Shoulder bone down arm to wrist (arm slightly bent) | ||
| Inseam | High inner thigh to hem (wear shoes) | ||
| High Bust/Upper Bust | Above bust, under arms | ||
| Arm Circumference | Fullest part of upper arm | ||
| Thigh Circumference | Fullest part of thigh | ||
| Calf Circumference | Fullest part of calf | ||
| Front Waist Length | Base of front neck dip to waist | ||
| Shoulder to Bust Point | Top of shoulder (neck side) to bust apex |
Keep this list handy. You will need it every time you start a new sewing project. Update it every so often, maybe every few months. Bodies can change.
Connecting Your Measurements to Patterns
Now you have your accurate body measurements. What do you do with them? This is where body measurements for patterns come into play.
Every sewing pattern includes a size chart. This chart lists body measurements for each size the pattern offers. You need to compare your measurements to the measurements on the pattern’s size chart.
Look at the pattern envelope or instructions. Find the chart that shows body measurements. It usually lists bust, waist, and hip. It might list others too.
Compare your bust, waist, and hip numbers to the chart. You might find that your bust fits one size, your waist another, and your hip a third size. This is very common! Bodies are different shapes.
Picking the Right Pattern Size
Pattern sizes are not the same as ready-to-wear clothing sizes you buy in stores. Always use your body measurements, not the size you usually buy in shops.
For tops and dresses, often the bust measurement is the most important for choosing the starting size. It’s usually easier to adjust the waist and hips than the shoulder and bust area.
For skirts and pants, the hip measurement is often the most important, followed by the waist.
If your measurements fall into different sizes, choose the size that is closest to your largest important measurement (bust for tops/dresses, hip for bottoms). Then, you will need to learn how to “grade” or “blend” between sizes on the pattern. This means drawing new lines on the pattern pieces to smoothly go from one size at the bust to a different size at the waist and hip, for example.
This is why accurate body measurements are so important. They show you exactly how your body compares to the pattern’s shape and where you need to make changes for a good fit.
Top Tips for Getting Accurate Body Measurements
Let’s sum up the best ways to get your measurements right:
- Use a flexible cloth measuring tape. It should be soft and not stretched.
- Wear light, close-fitting clothes. Nothing bulky.
- Stand naturally and relaxed. Don’t hold your breath or stand too stiff.
- Tie a string at your natural waist. This helps find the right spot.
- Make sure the tape is level. Check it in the mirror, especially for bust and hips.
- Keep the tape snug but not tight. It should lie flat against your body without digging in.
- Write down measurements right away. Don’t rely on memory.
- Measure twice (or three times!). Make sure you get the same number.
- Ask for help for hard-to-reach spots. Back measurements are much easier with a friend.
- Measure over the right undergarments. Wear the bra you’d wear with the finished item.
- Measure length measurements (like inseam) with the shoes you’ll wear.
Getting these accurate body measurements is truly the groundwork for successful sewing projects that fit you well and make you feel great.
Common Mistakes and How to Fix Them
Even with the right tools, people sometimes make mistakes when taking measurements. Knowing these helps you avoid them.
- Using a metal or stiff tape measure: These cannot wrap smoothly around curves like the bust or hips. They will give you wrong numbers. Fix: Always use a flexible sewing tape measure.
- Holding the tape too tight or too loose: Too tight squeezes the body and gives a smaller number than needed. Too loose lets the tape droop and gives a bigger number. Fix: The tape should lie flat against the body but allow one finger to slip underneath it.
- Not keeping the tape level: This often happens with bust or hip measurements when measuring by yourself. The tape might drop lower in the back. Fix: Use a full-length mirror to check if the tape is level all the way around. Ask a friend for help.
- Wearing bulky clothes: Sweaters, jeans, or other thick clothes add inches. Fix: Measure over lightweight, form-fitting clothes like activewear.
- Standing in a forced way: Sucking in your stomach or standing extra straight changes your shape. Fix: Breathe normally and stand in your relaxed, natural posture.
- Measuring random spots for waist or hip: The waist is the natural waist (usually smallest part). The hip is the fullest part of the lower body, which can be lower than the hip bones. Fix: Use a string to find your natural waist. Feel around to find the widest part of your hips and rear.
- Not measuring crucial lengths correctly: For example, not bending the arm slightly for sleeve length can make sleeves too short. Not measuring from the correct starting point for back waist length. Fix: Follow the step-by-step guides carefully for each measurement. Use a helper for lengths like back waist and inseam.
- Forgetting to write down measurements immediately: You might mix them up or forget them. Fix: Have your pen and paper ready and write each number down as soon as you get it.
- Not re-measuring regularly: Your body shape can change over time. Using old measurements can lead to poor fit. Fix: Re-measure yourself every few months or before starting a big project.
By being aware of these common errors and taking steps to avoid them, you can ensure you get the most accurate body measurements possible. This sets you up for success when you start working with body measurements for patterns. Using a measuring tape for sewing the right way is a simple skill, but getting it right makes a huge difference in your sewing results. The time you spend getting these numbers right at the start will save you much more time and frustration later on, by avoiding fitting problems and getting a perfect fit every time.
Frequently Asked Questions (FAQ)
How often should I take my body measurements?
It’s a good idea to re-measure yourself every few months. Also, take new measurements any time your weight or body shape changes noticeably. Always measure before starting a new project, especially for something fitted.
Can I measure myself, or do I need a helper?
You can measure many parts yourself, like bust, waist, and hip. However, measurements like shoulder width, back waist length, sleeve length, and inseam are much easier and more accurate if a helper takes them for you.
Why are pattern sizes different from store clothing sizes?
Pattern companies use standard size charts that have been used in sewing for a long time. Store clothing sizes (ready-to-wear) vary a lot between brands and have changed over the years. Always ignore your store size and use your actual body measurements to pick a sewing pattern size.
What if my measurements are between sizes on a pattern chart?
If your measurements are between sizes, it’s generally better to choose the larger size. It’s easier to make a garment smaller than it is to make it larger.
What if my bust, waist, and hip are all different pattern sizes?
This is very common! You should pick the size based on the measurement that is most important for the garment type (bust for tops/dresses, hip for skirts/pants). Then, you will need to adjust the pattern pieces to fit your other measurements. This is called grading between sizes.
Does posture affect measurements?
Yes, definitely. Standing slumped or sucking in your stomach will give wrong measurements. Stand naturally straight and relaxed for the most accurate numbers.
What if I lose or gain weight?
If your weight changes in a way that affects your body shape, take your measurements again. Using old measurements when your body has changed will lead to clothes that don’t fit.
Taking accurate body measurements is a skill that improves with practice. Don’t rush it. Take your time, follow the steps, and measure twice. This small effort at the beginning of your sewing journey will lead to much better fitting clothes and more enjoyment from your sewing projects. Happy sewing!