
A sewing machine helps us join cloth. It does this very fast. It uses a needle and thread. It makes stitches quickly. The machine works by looping two threads together. One thread comes from above. The other thread comes from below. This clever dance makes a strong seam. This guide will show you each step. It will explain how this amazing tool works. We will look at its parts. We will see how they move.
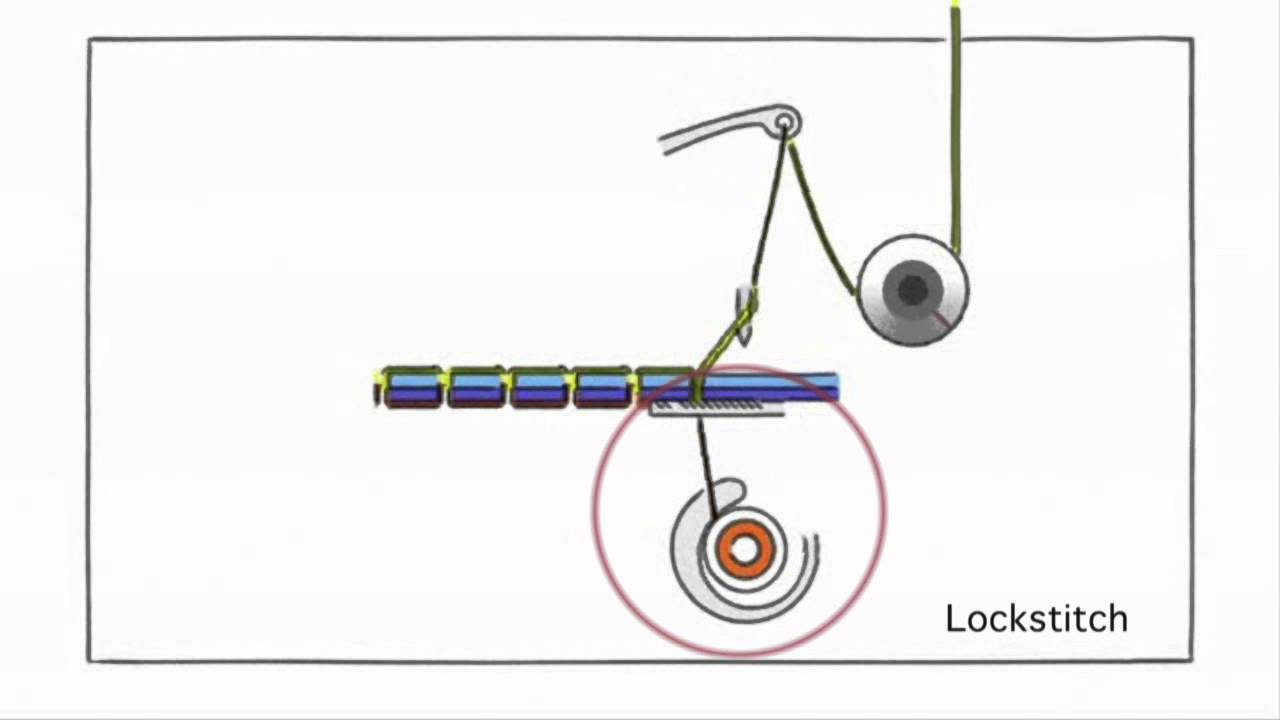
Image Source: i.ytimg.com
Tracing Early Sewing Machine Technology
People have sewn by hand for ages. But hand sewing takes time. It needs much effort. People wanted a faster way. Many tried to build a machine. They wanted it to sew by itself.
The path to the sewing machine was long. Many inventors played a part. They faced many problems. How could a machine hold the fabric? How could it make a strong stitch? How could it feed the cloth? These were big questions.
First Ideas and Failures
One early idea came from Charles Weisenthal. He was a German inventor. In 1755, he got a patent. This was for a needle. It had two points. It had an eye in the middle. This needle would help a machine. But his machine did not work well. It was only for chain stitches. A chain stitch is like a crochet loop. It can easily come undone.
Then, in 1790, Thomas Saint drew plans. He was English. He planned a machine for leather. It used an awl. This awl made a hole. Then a needle pushed thread through. It made a chain stitch too. It was not very practical. There is no proof he even built it.
Barthelemy Thimonnier’s Machine
A big step came in 1830. Barthelemy Thimonnier was French. He made a machine that worked. It used a hooked needle. It made a chain stitch. He used it to sew uniforms. French soldiers wore them. This was the first working sewing machine. It was used in a factory.
But his factory was destroyed. Tailors feared the machine. They thought it would take their jobs. This was a sad end for him. Yet, his machine proved it could be done. It showed that machines could sew.
Walter Hunt’s Dual Thread Stitch
In the 1830s, Walter Hunt had an idea. He was from New York. He thought of a new stitch. It used two threads. One thread came from a needle. The other thread came from a small bobbin. This bobbin spun a loop. The needle thread went through this loop. This made a strong stitch. We call it a lockstitch. This stitch does not easily unravel.
Hunt did not get a patent right away. He did not think it was important. This was a missed chance. His idea was very good. It changed sewing forever.
Elias Howe and the Patent Fight
Elias Howe was an American inventor. In 1846, he got a patent. This was for a lockstitch machine. His machine had key parts. It had a needle with an eye near the point. It had a shuttle. This shuttle carried the lower thread. It made the lockstitch.
Howe’s machine was good. But he had trouble selling it. Others copied his ideas. Isaac Singer was one of them. Singer made sewing machines popular. He changed Howe’s design a bit. He made it easier to use. This led to big court fights. Howe won his cases. He got money for his ideas.
Isaac Singer’s Contributions
Isaac Singer did not invent the stitch. But he made the machine better. He added a straight needle. It moved up and down. He added a presser foot. This held the fabric down. He made the feed mechanism. This moved the fabric forward. He also made it affordable. His marketing was very strong. He made sewing machines common. They went into many homes. His changes made machines practical. They were easy for people to use.
This journey shows how many minds helped. They worked to make sewing easier. Each inventor added a piece. Together, they built the modern sewing machine.
Deciphering Sewing Machine Internal Workings
A sewing machine looks simple. It has a needle and thread. But inside, many parts work together. They move in perfect time. They make a stitch. This is how the sewing machine internal workings combine.
Let us look at the main parts. Each part has a special job. They all must work smoothly.
- Needle: This is a special needle. It has a hole (eye) near its point. It carries the top thread.
- Bobbin: This is a small spool. It holds the bottom thread. It sits under the sewing plate.
- Shuttle or Rotary Hook: This part helps the needle thread grab the bobbin thread. It spins or moves back and forth.
- Feed Dogs: These are small, toothed bars. They sit under the fabric. They move the fabric forward.
- Presser Foot: This metal foot holds the fabric down. It keeps the fabric flat.
- Thread Tension System: This system controls how tight the threads are. It ensures a balanced stitch.
- Handwheel: You can turn this wheel by hand. It moves the needle up and down. It helps you start sewing slowly.
- Foot Pedal: This pedal connects to the motor. You press it with your foot. It controls the sewing speed.
- Motor (for electric machines): This provides power. It makes all the parts move.
- Thread Take-up Lever: This part pulls the top thread. It keeps it from tangling. It also pulls the thread tight as a stitch forms.
All these parts are linked. Gears and levers connect them. When the motor runs, they move together. They make a stitch cycle.
Grasping the Stitch Formation Process
The heart of the sewing machine is its stitch formation process. Modern sewing machines mostly make a lockstitch. This stitch is strong. It is also reversible. This means it looks the same on both sides of the fabric.
Let’s break down how this happens. It’s a dance between two threads.
The Lockstitch Principle Explained
The lockstitch principle explained in simple terms means this: The top thread loops around the bottom thread. The two threads become locked together. Imagine two rings. One ring goes through the other. Then they are pulled tight. That is a lockstitch.
This process involves several key steps. They happen very fast.
- Needle Descent: The needle goes down. It pushes the top thread through the fabric. It makes a tiny loop of thread on the underside.
- Hook Action: A special hook (shuttle or rotary hook) spins or moves. It catches the loop of the top thread.
- Bobbin Thread Passage: The hook carries the top thread loop. It pulls it around the bobbin. The bobbin thread sits inside the bobbin case. The top thread loop goes around the bobbin thread.
- Loop Tightening: The thread take-up lever pulls up. It pulls the top thread tight. This pulls the bobbin thread up through the fabric. The two threads meet in the middle. They form a knot. This knot is hidden inside the fabric layers.
- Fabric Movement: As the stitch tightens, the feed dogs move. They pull the fabric forward. This gets it ready for the next stitch.
- Needle Ascent: The needle pulls up out of the fabric. It is ready to start the next stitch cycle.
This whole process takes less than a second. It repeats for every stitch. This creates a strong, even seam.
The Critical Needle and Bobbin Mechanism
At the very core of the lockstitch is the needle and bobbin mechanism. These two work in tandem. They are like a team. They make sure the threads lock together.
The Special Needle
The sewing machine needle is not like a hand-sewing needle. Its eye is near the point. This is very important.
- When the needle goes down, it pushes thread through the fabric.
- As it starts to come up, the thread forms a small loop. This loop is just above the eye. This loop is called the “needle loop.”
- This loop is then caught by the hook.
Without this special needle, the lockstitch would not work. The needle’s shape and timing are vital.
The Bobbin System
The bobbin is a small spool. It holds the bottom thread. It sits in a special case. This case is under the needle plate.
There are two main types of bobbin systems:
- Oscillating Shuttle: This system is older. The shuttle moves back and forth. It looks like a boat. It carries the bobbin. As the needle makes a loop, the shuttle swings. It passes through the loop. This pulls the top thread around the bobbin thread.
- Rotary Hook: This is more common in modern machines. The hook spins in a circle. It spins around the bobbin case. As the needle forms a loop, the rotary hook spins. It catches the loop. It carries the loop around the stationary bobbin case. The bobbin thread stays still. The top thread goes all the way around it.
Both systems do the same job. They wrap the top thread loop around the bobbin thread. This creates the lock. The rotary hook is often faster and smoother.
Tracing the Sewing Machine Thread Path
For a sewing machine to work, thread must go in the right places. The sewing machine thread path is very specific. It guides the top thread from the spool to the needle. It also ensures the thread has the right tension.
Let’s follow the top thread’s journey:
- Spool Pin: The thread spool sits on a pin. This is usually on top of the machine.
- Thread Guide (Upper): The thread goes through a few guides. These keep it from tangling. They help direct it.
- Tension Discs: This is a crucial step. The thread goes between two metal discs. These discs press together. They create resistance. This resistance is called tension. You can adjust how tight these discs squeeze. This controls the top thread’s tension.
- Tension Spring/Lever: After the discs, the thread often goes through a spring or a small lever. This helps keep the tension even.
- Thread Take-up Lever: This is a moving arm. The thread goes through a hole in this arm. This lever moves up and down.
- When the needle goes down, the take-up lever goes down. It releases thread.
- When the needle comes up, the take-up lever goes up. It pulls the thread tight. It pulls the stitch knot tight.
- Lower Thread Guides: After the take-up lever, the thread goes through more guides. These lead it down to the needle.
- Needle Eye: The thread finally goes through the eye of the needle. This is always threaded from front to back on most machines.
The bobbin thread has its own path. It comes from the bobbin. It goes into the bobbin case. It then goes through a small tension spring on the bobbin case itself. This sets the bobbin thread tension.
For a perfect stitch, both thread paths must be correct. Both tensions must be balanced. If one is too loose or too tight, the stitch will look bad. It might loop on one side. Or it might break.
Observing Feed Dog Operation
How does the fabric move under the needle? This is the job of the feed dog operation. The feed dogs are small, toothed bars. They sit under the needle plate. They push the fabric. They make sure each stitch is the same length.
The feed dog operation works in a cycle of four steps:
- Raise: The feed dogs lift up. They poke through slots in the needle plate.
- Move: They move the fabric backward. This happens while the needle is out of the fabric. They pull the fabric along. The length they move determines the stitch length.
- Lower: The feed dogs drop back down. They go below the needle plate surface.
- Return: They slide forward to their starting position. They are now ready to lift up again.
This up-and-down, back-and-forth motion is crucial. It ensures the fabric moves a set distance. This makes stitches even. If the feed dogs do not move, the machine will sew in one spot. It will make a tangled mess.
You can often change the stitch length. A dial on the machine adjusts how far the feed dogs move. A longer movement means longer stitches. A shorter movement means shorter stitches.
Examining the Thread Tension System
The thread tension system is vital. It controls the pull on the threads. This makes sure the stitch is strong and looks good. If the tension is wrong, stitches can look messy. They might loop. They might break.
Why Tension Matters
Imagine pulling two ropes. If you pull one much harder than the other, they won’t make a neat knot. The same is true for threads.
- Too Much Top Tension: The top thread pulls too hard. It pulls the bobbin thread too far up. You will see loops of bobbin thread on top of the fabric.
- Too Little Top Tension: The top thread is too loose. The bobbin thread pulls it down. You will see loops of top thread on the bottom of the fabric.
- Balanced Tension: The top and bobbin threads pull with equal force. Their knot forms neatly inside the fabric layers. The stitch looks clean on both sides.
Components of Tension
The main parts of the tension system are:
- Tension Discs (Top Thread): As mentioned, these discs squeeze the top thread. A dial changes how tightly they squeeze.
- Bobbin Case Tension (Bottom Thread): The bobbin case has a small spring. The bobbin thread passes under it. A tiny screw adjusts the pressure of this spring. This controls bobbin tension. This is often factory-set and rarely needs adjustment.
- Take-up Lever: This lever helps to pull the top thread tight at the right moment. It also releases thread when needed.
Adjusting tension is a key skill for sewers. It ensures neat, strong stitches every time. It is a finely tuned system.
The Role of the Presser Foot Function
The presser foot function might seem simple. But it is very important. This metal foot sits on the fabric. It presses it down against the feed dogs.
Here is why it is so important:
- Holds Fabric Flat: The presser foot keeps the fabric flat and smooth. This prevents it from puckering or moving unevenly.
- Allows Feed Dogs to Work: By pressing the fabric down, the feed dogs can grip it. They can move the fabric forward evenly. If the fabric bounces up, the feed dogs cannot grip it well. The stitches would be uneven.
- Guides Fabric: Many presser feet have guides. These help you sew in a straight line.
- Different Types: There are many types of presser feet. Each has a special job.
- All-Purpose Foot: This is the standard foot. It works for most sewing.
- Zipper Foot: This foot has a narrow side. It lets you sew very close to a zipper.
- Buttonhole Foot: This foot helps make perfect buttonholes.
- Walking Foot: This foot has its own feed dogs. It helps move thick layers of fabric evenly.
The presser foot can be lifted and lowered. When sewing, it is down. When you need to place fabric or turn a corner, you lift it up. A lever or button on the machine controls this. Its simple design is vital for good sewing.
The Shuttle Hook Mechanism: A Closer Look
The shuttle hook mechanism is the heart of the lockstitch. We talked about it earlier. Let us look at it in more detail. This is where the magic happens. The top thread and bobbin thread meet here.
Two Main Types Revisited
As we know, there are two types:
-
Oscillating Shuttle:
- Movement: The shuttle moves in an arc. It swings back and forth. Think of a small boat rocking.
- Bobbin: The bobbin sits inside this shuttle.
- Action: When the needle goes down and comes up, it forms a loop. The front tip of the shuttle swings forward. It catches this loop. The shuttle continues its swing. It carries the top thread loop around the bobbin. The bobbin thread stays inside the bobbin in the shuttle. The top thread goes around it. This wraps the top thread around the bobbin thread.
- Sound: These machines often make a distinct “clunk-clunk” sound. This is the shuttle moving.
- Pros: Very strong, less prone to timing issues in some older designs.
- Cons: Can be slower. Might need more oiling.
-
Rotary Hook:
- Movement: The hook spins in a full circle. It spins constantly when the machine runs.
- Bobbin: The bobbin sits in a stationary bobbin case. The hook spins around this case.
- Action: The needle makes a loop. The tip of the fast-spinning rotary hook catches this loop. It pulls the loop around the outside of the bobbin case. The top thread encircles the bobbin thread.
- Sound: These machines are usually quieter. They have a smoother “whirr.”
- Pros: Much faster. Smoother operation. Less vibration. Less oiling needed for many modern designs.
- Cons: Can be more sensitive to timing.
Both methods create the same strong lockstitch. They simply use different ways to wrap the top thread around the bobbin thread. The rotary hook is more common now. It allows for higher speeds and quieter sewing.
Powering the Machine: Motor and Controls
Most modern sewing machines are electric. They use a motor. This motor makes all the parts move.
The Motor’s Role
The motor converts electricity into motion. It connects to the main shaft of the machine. This shaft has gears and cams. These gears and cams control the movement of:
- The needle bar (up and down).
- The feed dogs (up, back, down, forward).
- The hook mechanism (shuttle or rotary).
- The thread take-up lever.
All these parts must move at the exact right time. The motor makes this happen.
Foot Pedal Control
You control the motor’s speed with a foot pedal.
- Press gently: The motor runs slowly. The machine sews slowly.
- Press harder: The motor speeds up. The machine sews faster.
This gives you full control over your sewing speed. It lets you go slow for tricky parts. You can speed up for long, straight seams.
Handwheel for Precision
The handwheel is usually on the right side of the machine. You can turn it by hand. This moves the needle up and down slowly. It also moves all the other connected parts.
- Starting: Use the handwheel to bring the needle down into the fabric. This helps you start sewing neatly.
- Stopping: Use the handwheel to make sure the needle ends up at its highest point. This helps you pull the fabric out easily.
- Troubleshooting: If thread gets stuck, you can use the handwheel. It helps you untangle it slowly.
The handwheel is a direct link to the machine’s inner workings. It gives you manual control.
Tying it All Together: The Complete Cycle
Imagine all these parts moving at once.
- You press the pedal. The motor starts.
- The handwheel turns. The needle bar moves down.
- The needle punches through the fabric. It makes a loop of top thread.
- The feed dogs are down and moved back.
- As the needle starts to rise, the hook catches the loop.
- The hook carries the loop around the bobbin thread. The top thread wraps around the bottom thread.
- The thread take-up lever pulls up. It tightens the loop into a knot.
- As the knot pulls tight, the feed dogs rise. They grip the fabric.
- The feed dogs move the fabric backward. They set it up for the next stitch.
- The feed dogs drop. They move forward.
- The needle comes out of the fabric completely. It is now ready for the next stitch cycle.
This rapid sequence repeats many times a second. It creates a continuous, strong seam. It is a marvel of simple mechanics working together.
FAQ: Common Questions About Sewing Machine Workings
Q: Why does my sewing machine make loops on the fabric?
A: This often means your thread tension is off. If loops are on top, your bobbin tension might be too tight, or your top tension too loose. If loops are on the bottom, your top tension might be too tight, or your bobbin tension too loose. Check your machine’s thread path first. Make sure the thread is seated correctly in the tension discs.
Q: What is the difference between a chain stitch and a lockstitch?
A: A chain stitch uses only one thread. It forms loops like a crochet chain. It can easily unravel if you pull one end. A lockstitch uses two threads. They interlock together inside the fabric. This makes a very strong stitch that does not unravel easily. Most home sewing machines make a lockstitch.
Q: Why is my fabric not moving forward?
A: Your feed dogs might not be working. Check if they are engaged. There is usually a lever to lower them for free-motion sewing. Make sure this lever is in the correct position for regular sewing. Also, check that your presser foot is down. If it is up, the fabric will not be held down for the feed dogs to grip.
Q: Can I use any thread in my sewing machine?
A: Mostly, yes. But it is best to use good quality thread. Poor quality thread can break easily. It can leave lint. This can cause problems for the machine. Also, use the right size needle for your thread and fabric. Thick thread needs a larger needle.
Q: Why does my needle keep breaking?
A: Needles can break for many reasons. Your needle might be bent. It might be old. It might be the wrong size for your fabric. Sewing over pins can break a needle. Pulling the fabric too hard while sewing can also break a needle. Make sure your needle is put in correctly.