
Image Source: images.squarespace-cdn.com
How Do You Baste In Sewing: A Quick Guide for Beginners
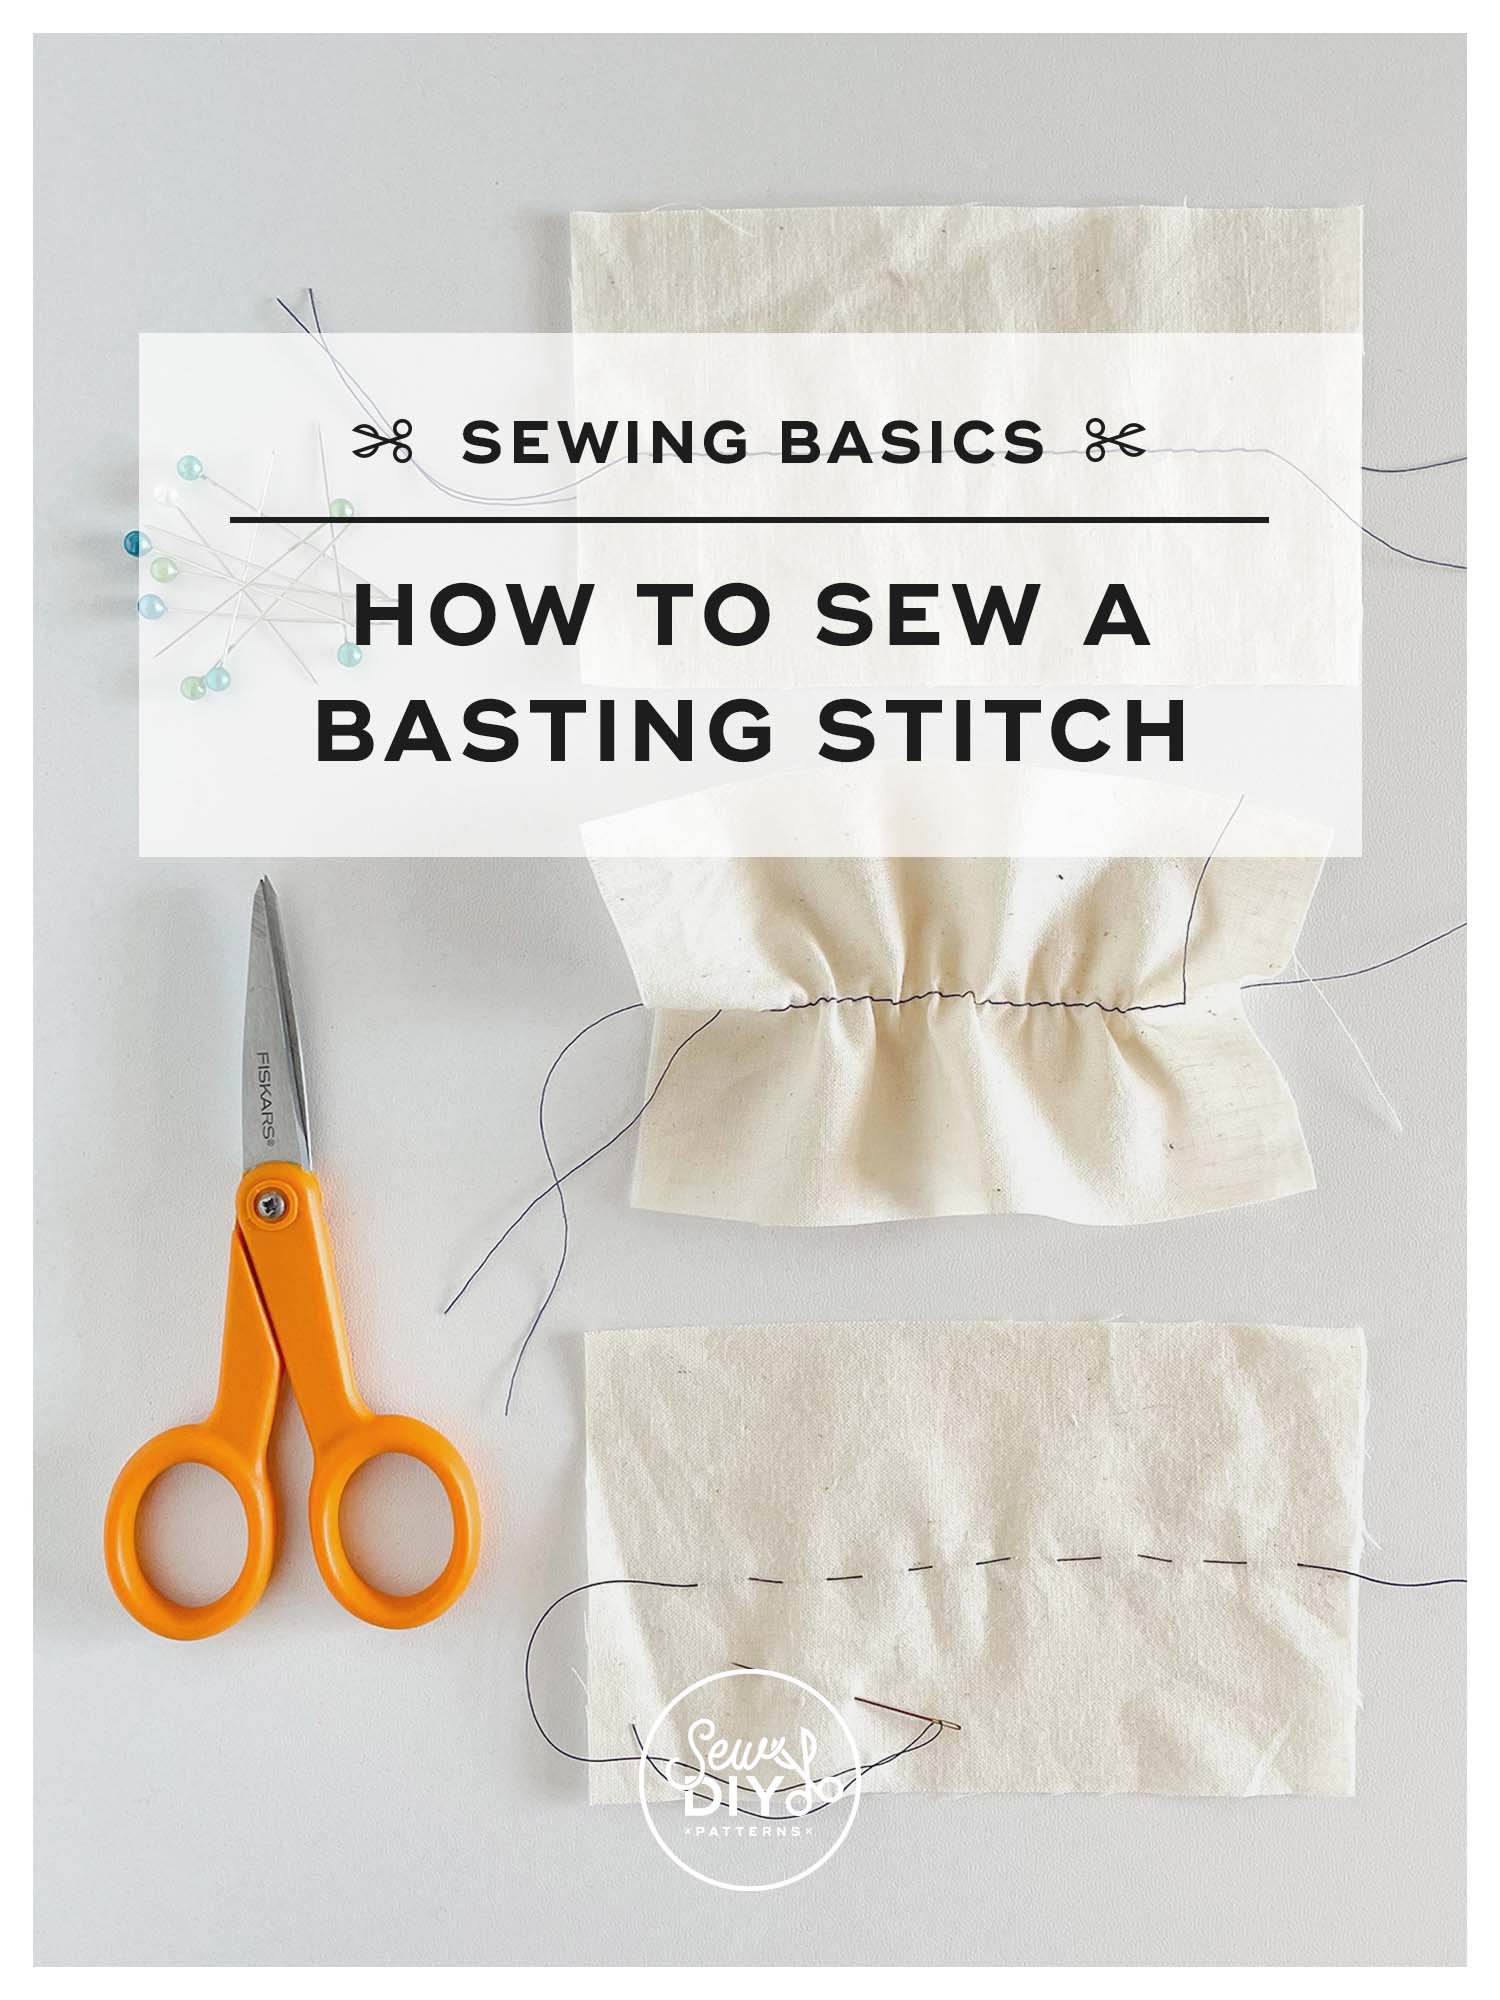
To baste in sewing means to use simple, temporary sewing stitches to hold two or more pieces of fabric together. This helps you get ready for permanent machine stitching. You can use a needle and thread for hand basting, or set your sewing machine to a very long stitch length for machine basting. Basting is a key step in preparing fabric for sewing, making sure everything stays in place. It helps you get a good fit, stops fabric from slipping, and makes sewing much easier.
Grasping the Idea of Basting
Basting is a simple but powerful tool in sewing. Think of it as a helpful friend that holds your fabric pieces right where you want them. These are not forever stitches. They are temporary sewing stitches. You put them in, do your main sewing, and then take them out. This makes sure your project turns out neat and tidy.
Basting is very useful for many reasons. It helps you keep fabric layers together. It also stops fabric shifting when you sew. This leads to better sewing garment fitting. It’s like a practice run before the real thing.
Why Basting Matters So Much
Basting might seem like an extra step. But it saves you time and trouble later. Here are some key reasons why it’s so important:
- Holding Fabric Layers Together: Basting is great for fabric stabilization methods. It keeps your fabric pieces from moving apart. This is very helpful when working with many layers, like in quilting.
- Preventing Fabric Shifting: Some fabrics are slippery. Silk or rayon can be hard to sew straight. Basting holds them steady. This stops them from sliding around as you sew.
- Aiding Sewing Garment Fitting: When making clothes, you often need to check the fit. Basting lets you put a garment together quickly. You can try it on, make changes, and then sew it for good. This is much easier than ripping out permanent stitches.
- Preparing Fabric for Sewing: Basting helps set things up. You can use it to hold pleats, gathers, or zippers in place. This makes sure they are even and straight before you sew them with your machine.
- Guiding Permanent Stitches: The basting stitches act like a guide. They show you exactly where to sew your final line of stitches. This helps you sew more accurately.
The Two Main Ways to Baste
There are two main ways to baste: by hand and by machine. Both are good, but you use them for different tasks.
The Hand Basting Technique
Hand basting means using a needle and thread to make long temporary stitches. This method is very flexible. It gives you great control.
When to Pick Hand Basting
- Delicate Fabrics: If your fabric is very fine or slippery, hand basting is best. It won’t leave marks like pins can.
- Curved Seams: Hand basting handles curves very well. It molds the fabric gently.
- Precise Sewing Garment Fitting: For custom clothing, hand basting is perfect. It lets you adjust the fit easily.
- Fabrics That Stretch: It helps keep stretchy fabrics from getting wavy.
- Bulky Layers: For thick fabrics, hand basting can be stronger than pins.
How to Hand Baste: A Step-by-Step Guide
- Pick Your Thread: Use a strong thread that is easy to see. A contrasting color is best. This makes it easy to spot and remove later. Do not use very fine thread.
- Thread Your Needle: Use a needle that suits your fabric. A longer needle can make basting faster.
- No Knots Needed (Often): For most basting, you do not need a knot at the end of your thread. Just leave a tail of about 2-3 inches. This makes removal easier.
- Start Stitching:
- Bring the needle up from the back of the fabric.
- Take a long stitch (about 1/4 inch to 1 inch). Go through all layers.
- Push the needle back down.
- Bring it up again a bit further along.
- Repeat this action. Keep your stitches even.
- Aim for longer stitches on flat areas. Shorter stitches work better on curves.
- Finish Your Line: At the end of your basting line, take two or three small backstitches. Or, simply leave another 2-3 inch tail. This stops the stitches from coming undone too soon.
- Check and Adjust: Before you sew for good, look at your basting. Does it hold everything neatly? Make changes if needed.
- Remove After Sewing: Once your permanent stitch is in place, pull out the basting thread. If you did not knot it, it should come out easily.
Different Hand Basting Stitches
You can use a few types of hand basting stitches:
- Even Basting: This is the most common. It uses stitches of equal length on both sides of the fabric. It is good for straight seams.
- Uneven Basting: Here, the stitches are longer on the top side and shorter on the bottom. This is fast to do. It is good for general holding.
- Diagonal Basting: The stitches go at an angle. They are great for holding large areas flat. Think about lining a jacket or doing quilting basting methods. The stitches form slanted lines. They look like big crosses.
- Tailor’s Tacks: These are small loops of thread. You use them to mark points on fabric, like dart ends or pocket places. They are good for transferring marks from a pattern to the fabric. They stay in place even if the fabric moves a bit.
The Machine Basting Stitch
Machine basting uses your sewing machine. It is much faster than hand basting.
When to Pick Machine Basting
- Long, Straight Seams: For items like curtains or long skirt seams, machine basting is fast.
- Quilting Basting Methods: When you need to hold quilt layers together before machine quilting.
- Gathering Fabric: You can use a long machine stitch to make gathers.
- Less Precise Jobs: When perfect fit is not the main goal, machine basting works well. It’s still good for preventing fabric shifting.
How to Machine Baste: A Step-by-Step Guide
- Change Stitch Length: This is the most important step. Set your sewing machine to its longest stitch length. This is usually around 4mm to 5mm. Some machines have a special “basting” setting.
- Adjust Tension (Sometimes): For machine basting, you might loosen your top thread tension a little. This makes the stitches easier to remove. Check your machine’s manual if you are unsure.
- No Backstitching: Do not backstitch at the start or end of your machine basting. This makes the stitches hard to remove.
- Start Sewing: Sew your line of basting stitches. You can leave long thread tails at the start and end. This also helps with removal.
- Check and Adjust: Look at your work. Is it holding well? If you need to make changes, it’s easy to pull out these long stitches.
- Remove After Sewing: After you sew your final seam, pull out the basting stitches. If you left long tails, just pull on one end. The whole line should come out.
Tips for Machine Basting
- Contrasting Thread: Again, use a thread color that stands out.
- Needle Size: Use a needle that is right for your fabric.
- Test First: Always test your machine basting on a scrap piece of your fabric. Make sure the stitches are easy to remove.
Choosing Your Basting Weapon: Hand vs. Machine
Both hand and machine basting are valuable. Here’s a table to help you decide which one to use:
| Feature | Hand Basting | Machine Basting |
|---|---|---|
| Control | High precision, very flexible | Less precise, faster |
| Speed | Slower, more time-consuming | Much faster |
| Best For | Curved seams, delicate fabrics, precise fitting, bulky layers | Long straight seams, quilting, quick gathers |
| Ease of Removal | Very easy if no knots are used | Easy if stitch length is long and no backstitch |
| Skill Level | Good for all, especially beginners learning control | Easy for anyone comfortable with a machine |
| Fabric Type | Good for all, especially slippery or delicate fabrics | Good for most stable fabrics |
Times When You Definitely Need to Baste
Basting is not always needed for every sewing project. But in some cases, it is a must-do step.
Sewing Garment Fitting and Alterations
When making clothes, basting is your best friend.
- Muslins/Mock-ups: If you make a test version of a garment (called a muslin or mock-up), basting is perfect. You can quickly sew the pieces together, try it on, and adjust the fit. It’s simple to take out the stitches and change things.
- Trying on Clothes: Before sewing the final seams on a real garment, baste it together. You can try it on to check how it hangs and fits. This helps you get the perfect look.
- Complex Seams: For armholes or necklines, basting helps you ease in fabric smoothly. This is part of fabric stabilization methods.
Setting Zippers
Putting in a zipper can be tricky. Basting makes it much easier.
- Holding in Place: Baste the zipper tape to the fabric. This stops it from moving as you machine stitch. It ensures a straight, neat zipper.
- Checking Placement: You can baste the zipper, close it, and check its position. If it’s not right, you can easily undo the basting and try again.
Attaching Bias Tape or Trim
Bias tape and other trims can shift.
- Even Application: Basting ensures that the bias tape is applied evenly along curves or edges. This prevents puckers.
- Smooth Finish: It helps you get a smooth finish, especially on necklines or armholes.
Quilting Basting Methods
Quilting involves three layers: the quilt top, batting, and backing. Holding these layers together is key.
- Layer Stability: Basting keeps all three layers from shifting as you quilt. This prevents wrinkles or bunched areas.
- Methods: You can machine baste long lines. Or you can hand baste with long diagonal stitches. Basting spray is also popular for quilters. It’s a temporary glue that holds layers without stitches.
Working with Slippery or Shifting Fabrics
Some fabrics are just plain difficult.
- Chiffon, Silk, Rayon: These fabrics love to slide around. Basting them together firmly helps prevent fabric shifting. It gives you better control during machine sewing.
- Velvet or Napped Fabrics: Fabrics with a nap (like velvet) can shift against each other. Basting them in place ensures the nap stays in the right direction and layers don’t slip.
Gathering Fabric
When you need to make ruffles or gathers, machine basting is a quick way to do it.
- Long Stitches: You sew one or two rows of very long machine stitches.
- Pulling Threads: Then, you pull on the bobbin threads to create gathers. This is much faster than hand gathering.
Setting Pleats or Tucks
For sharp pleats or neat tucks, basting holds them in place before you sew.
- Crisp Lines: Baste along the fold line or where the tuck will be. This makes sure your pleats are crisp and even. This is part of preparing fabric for sewing.
Pointers for Great Basting
To make your basting as helpful as possible, keep these tips in mind:
- Choose the Right Thread: Use a medium-weight thread. Cotton or a poly-cotton blend works well. Avoid very thin or thick threads.
- Use a Contrasting Color: Always use a thread color that is very different from your fabric. If you have blue fabric, use white or yellow thread for basting. This makes it super easy to see and remove later.
- Remove Stitches Carefully: After permanent sewing, remove basting stitches gently. Do not pull too hard. Cut them every few inches if they are long. This prevents stretching or damaging your fabric.
- Practice Makes Perfect: If you are new to basting, try it on a scrap of fabric first. Get a feel for the stitch length and tension.
- Don’t Make Them Too Tight: Basting stitches should hold the fabric, but not pull or pucker it. Keep them loose enough to be removed easily.
- Check Both Sides: Make sure your basting goes through all layers of fabric. Look at both the front and back to confirm.
Common Basting Mistakes to Avoid
Even simple steps can go wrong. Here are some common basting errors:
- Stitches Too Short: If your basting stitches are too small, they act like permanent stitches. They will be hard to remove. They also will not let the fabric move enough for fitting.
- Stitches Too Tight: If you pull the thread too tight, your fabric will pucker. This can mess up your final seam. It also makes removal tough.
- Forgetting to Remove Stitches: It happens! Sometimes, people forget to take out their basting. Always remove them after your final seam is sewn. Otherwise, they will show and can weaken your garment.
- Using the Wrong Thread: Using thread that is too thick can leave holes. Using thread that matches your fabric color makes it very hard to see and remove.
- Backstitching on Machine Basting: This makes your machine basting hard to remove. Just leave long tails instead.
Beyond the Basics: Advanced Basting Scenarios
While basting is generally simple, some situations benefit from specific basting methods.
Tailor’s Tacks for Marking
As mentioned, tailor’s tacks are special. They are small, loose loops of thread. You use them to mark positions, like dart points or pocket placement.
- How to Do It: You stitch a loose loop through the pattern and fabric layers. Then you cut the loop in the middle. When you separate the pattern, half the loops stay on each fabric piece. This lets you transfer marks exactly. They are very gentle on fabric and won’t leave holes.
Basting Curved Seams
Curved seams, like those on collars or armholes, need careful basting.
- Shorter Stitches: Use shorter basting stitches (both hand and machine) on curves. This helps the fabric curve smoothly.
- Ease in: Basting helps to “ease in” one piece of fabric to another without gathers. This is often done when sewing a sleeve into an armhole. The basting helps distribute the fabric evenly.
Basting for Quilting (More Detail)
Quilting basting methods are super important.
- Spray Basting: Many quilters use temporary adhesive spray. You spray one layer, lay another on top, and smooth it. It’s fast, but you need good ventilation.
- Pin Basting: Large safety pins are also used. You put pins every few inches across the quilt. This works, but pins can distort the fabric.
- Thread Basting: For very large quilts, hand or machine basting in grids is common. This makes sure every part of the quilt sandwich is secure. You often baste lines every 4-6 inches across the entire quilt. This is critical for preventing fabric shifting during quilting.
In Summary
Basting is a core skill for any sewer. It is a temporary way of holding fabric. Whether you choose the careful hand basting technique or the speedy machine basting stitch, it helps prepare fabric for sewing. It is a key part of fabric stabilization methods. It also helps with sewing garment fitting. It makes sure fabric layers are held together. This stops fabric shifting. Using long temporary stitches, basting gives you control and a neat finish.
Do not skip this step, especially for important projects. It will save you time and frustration. Practice these steps, and you will see your sewing projects turn out better than ever.
Frequently Asked Questions (FAQ)
Q1: What is the main purpose of basting in sewing?
A1: The main purpose of basting is to hold fabric layers together temporarily. It helps prevent the fabric from shifting while you sew. It also allows you to check the fit of a garment before permanent stitching.
Q2: Can I use regular sewing thread for basting?
A2: Yes, you can use regular sewing thread for basting. It’s best to choose a color that stands out from your fabric. This makes it easy to see and remove later.
Q3: How long should basting stitches be?
A3: Basting stitches are usually long temporary stitches. They can range from 1/4 inch to 1 inch or more. For machine basting, use your machine’s longest stitch setting. Shorter stitches are good for curves, longer ones for straight seams.
Q4: Do I have to remove basting stitches?
A4: Yes, you must remove basting stitches after you have sewn your permanent seam. They are only meant to be temporary. Leaving them in can make your project look messy. It can also weaken the fabric over time.
Q5: Is hand basting better than machine basting?
A5: Neither is strictly “better.” They are used for different jobs. Hand basting offers more control for curves, delicate fabrics, and precise garment fitting. Machine basting is much faster for long, straight seams or for quilting basting methods.
Q6: What if my fabric is slippery?
A6: If your fabric is slippery (like silk or chiffon), hand basting is often the best choice. It provides more control and helps prevent fabric shifting. You can also use fine pins or temporary basting spray, but stitches offer more grip.
Q7: Can I baste over pins?
A7: No, you should not baste over pins. Basting is meant to replace pins, not work with them. Remove pins as you baste. If you use a sewing machine, sewing over pins can break your needle or damage your machine.
Q8: What is basting spray?
A8: Basting spray is a temporary adhesive used in quilting. You spray it on fabric layers to hold them together. It’s a quick way to baste a quilt sandwich without stitches or many pins. It is also a fabric stabilization method.
Q9: When should I use tailor’s tacks?
A9: Use tailor’s tacks when you need to mark points from a pattern onto your fabric. This is common for darts, buttonholes, or pocket placements. They are very accurate and won’t leave marks.