
How do you do applique embroidery? Applique embroidery adds shapes cut from fabric onto a base fabric, then stitches around the edges. You can do this by hand or machine. This guide will walk you through the simple steps. It helps you use fabric pieces to make fun designs. It adds texture and color to your sewing or embroidery projects.
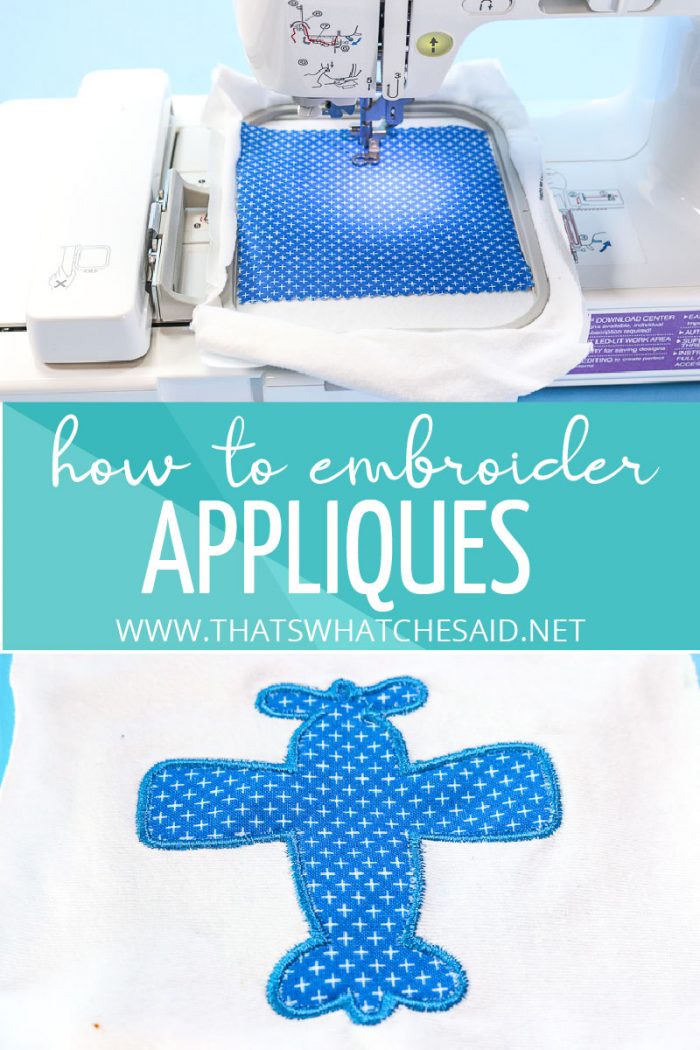
Image Source: www.thatswhatchesaid.net
Grasping Applique Embroidery
Applique is a sewing art. It means adding pieces of fabric on top of a base fabric. You sew or glue the edges down. This creates a design. Think of it like cutting out paper shapes and sticking them onto another piece of paper. But you use fabric and attach it with stitches.
Applique is different from regular embroidery. Regular embroidery uses thread to make designs on the fabric surface. Applique uses fabric shapes first. Then, you can add embroidery stitches around the edges or on the shapes. This mix makes designs pop!
Applique saves time and stitches. You use a big piece of fabric for a large area of color. You do not need to fill that area with thread. This is great for big shapes or solid color blocks in your designs. It also adds body and interest to your work.
Materials You Will Need
Getting ready is the first step. You need the right tools and supplies. Here is what you will likely need for applique.
Picking Your Fabrics
You need at least two types of fabric.
* Base Fabric: This is the main fabric. You put your applique pieces on it. It should be strong enough to hold the added fabric. Cotton, linen, or blends work well.
* Applique Fabrics: These are the fabrics you cut shapes from. Choose fabrics that do not fray too much. Cotton is a popular choice. Batiks work great because they are tightly woven and fray less. Think about your applique fabric choices based on your project. Will it be washed often? What look do you want?
Fabric Preparation for Applique
Always prepare your fabrics first. Wash and dry them. This shrinks them before you start. It prevents puckering later. Press the fabrics smooth. Wrinkles can make cutting and placing shapes hard. This step is key for nice results.
Getting Your Pattern Ready
You need a design or pattern. This is the shape you want to cut out. You can draw your own shape. Or you can use a pattern from a book or online. Keep it simple when you start. Basic shapes like circles, squares, or hearts are good.
Tools for Cutting
You need tools to cut your fabric shapes.
* Sharp scissors are a must. Small, sharp scissors work best for curves and points.
* A rotary cutter and mat can help with straight lines or simple shapes.
Adhesives and Stabilizers
These help hold your fabric in place.
* Fusible Web: This is a sticky sheet. It has glue on both sides. You iron it onto the back of your applique fabric. Then you peel off paper and iron the fabric shape onto your base. Fusible web applique makes placing shapes easy.
* Temporary Fabric Glue or Spray: You can use this to hold pieces lightly before stitching.
* Embroidery Stabilizer: This supports your fabric while you stitch. It stops the fabric from puckering or stretching. The right embroidery stabilizer for applique is important. Tear-away, cut-away, or wash-away types exist. Choose one based on your fabric and stitches.
Needles and Thread
You need tools for sewing the edges.
* Needles: Use a sharp sewing needle for hand applique. For machine applique, use a needle that matches your fabric type. A sharp or microtex needle is often best.
* Thread: Choose thread that matches or contrasts your applique fabric. Cotton or polyester threads work well. For machine applique, you might use different threads in the top and bobbin.
Ways to Secure Fabrics
Besides adhesive, you might need other ways to hold things.
* Pins can hold fabric pieces down.
* Special clips can help hold layers.
Steps for Doing Applique
Let’s break down the process. Here are the basic steps to do applique embroidery.
Step 1: Get Your Fabric Ready
As mentioned, wash, dry, and press your fabrics. This is the foundation. Smooth fabric makes everything easier. Think about your applique fabric choices now. Pick colors and patterns that work well together.
Step 2: Plan Your Design
Decide what shapes you will use. Where will they go on your base fabric? You can draw the design on the base fabric lightly. Use a fabric pen that disappears.
Step 3: Make Your Applique Pieces
This is where you create your shapes. There are a few ways to do this depending on how you will finish the edges.
Creating Shapes with Fusible Web
Using fusible web applique is a popular method.
* Cut a piece of fusible web a bit larger than your design shape.
* Place the web, glue side down, on the back of your applique fabric.
* Iron it according to the web maker’s instructions. This melts the glue onto the fabric back.
* Let it cool down.
* Trace your design onto the paper side of the fusible web. Make sure the shape faces the right way if it matters (like letters).
* Cut out the shape right on the line you traced.
* Peel the paper backing off your fabric shape. Now it has glue on the back.
Creating Shapes Without Fusible Web
You can also prepare shapes without glue. This is often used for turned edge applique.
* Trace your design onto your applique fabric.
* Cut out the shape. Leave extra fabric around the traced line. This is called a seam allowance. It is usually about 1/4 inch to 1/2 inch wide.
Step 4: Place Your Applique Pieces
Put your cut fabric shapes onto your base fabric. Look at your design plan.
* If using fusible web, place the shape where you want it. Iron it down to stick it in place. Use a pressing cloth. This holds the piece firmly while you work.
* If not using fusible web, place the cut shape on the base fabric. Pin it in place. You can also use a bit of temporary fabric glue stick to hold it.
Step 5: Prepare for Stitching
Add embroidery stabilizer for applique behind your base fabric. This supports the fabric. It prevents it from pulling or puckering as you stitch. Choose a stabilizer right for your project. Put it in your hoop or under your fabric on your machine.
Securing Applique Edges
Now it is time to stitch down the edges. This step keeps the fabric from fraying. It also adds a finished look. There are main ways to do this: raw edge and turned edge. The stitches you use are called applique stitches.
Raw Edge Applique
Raw edge applique tips are simple. You leave the cut edge of the fabric shape showing. You stitch over or around this edge to hold it down and stop fraying.
-
How to Do It: Place your shape on the base fabric. Hold it with fusible web, glue, or pins. Then, stitch around the edge. The stitches go over the very edge of the applique fabric.
-
Securing Applique Edges for Raw Applique:
- Zigzag Stitch: This is very common. Set your machine to a zigzag stitch. Adjust the width and length. A wider stitch covers more of the edge. A shorter length makes a denser stitch. The stitches should go off the edge of the applique fabric and onto the base fabric.
- Satin Stitch: This is a very dense zigzag stitch. The stitches are very close together. It makes a smooth, raised edge. This looks nice but uses more thread.
- Straight Stitch: You can stitch close to the edge. This holds the fabric down. The edge might still fray a bit over time. This gives a more rustic look. Use this with fabrics that do not fray much or if you like the look of fraying.
- Free-Motion Stitching: You can use free-motion quilting on your machine. Stitch around the edge a few times. This makes a slightly messy but cool look.
Turned Edge Applique
Turned edge applique steps hide the raw edge. You turn the edge of the applique fabric under before stitching. This gives a clean, smooth finish.
-
How to Do It: This method is often done by hand. If you cut your shape with a seam allowance, you press or fold that allowance under. Use an iron or finger press it. Special tools can help turn curves neatly. Use glue stick or pins to hold the folded edge in place on the base fabric. Then, stitch.
-
Securing Applique Edges for Turned Applique:
- Hand Applique Tutorial (Turned Edge): This is classic. Use a small, sharp needle and fine thread. Use a matching thread color. The goal is to make your stitches nearly invisible. The blind stitch is perfect for this. Take a small stitch in the base fabric right next to the fold. Then take a tiny stitch into the folded edge of the applique fabric. Pull the thread. The stitch should disappear into the fold. Continue this around the entire shape. The running stitch can also be used.
- Machine Applique Guide (Turned Edge): You can do turned edge by machine too. After turning the edge under and holding it with glue or pins, stitch very close to the folded edge. A straight stitch is used. Or you can use a small zigzag stitch set almost to a straight stitch. This gives a clean finish.
Applique Stitches Overview
Let’s look closer at the applique stitches.
| Stitch Type | Best For | Look | Method | Notes |
|---|---|---|---|---|
| Zigzag Stitch | Raw Edge | Covers Edge | Machine | Width and length can be changed. |
| Satin Stitch | Raw Edge | Smooth, Raised | Machine | Dense zigzag. Uses more thread. |
| Straight Stitch | Raw Edge/Turned | Simple line/Clean | Machine or Hand | Can allow fraying or hide turned edge. |
| Blind Stitch | Turned Edge | Invisible | Hand | Hides stitches in the fold. |
| Running Stitch | Turned Edge | Visible Small Dash | Hand | Holds edge down, visible effect. |
| Blanket Stitch | Raw or Turned | Decorative Loops | Hand or Machine | Adds a decorative edge. |
The blanket stitch is popular for both raw and turned edges. For raw edges, the stitches go over the edge. For turned edges, they sit along the folded edge. It adds a nice decorative touch.
Adding Embroidery to Applique
Once your applique pieces are secure, you can add more embroidery. This adds detail.
- Stitch around the edges of your applique shapes with a different stitch or color.
- Add details onto the applique shape itself. French knots for eyes, straight stitches for stems, etc.
- Add background embroidery around the applique piece.
This combination makes your design more interesting.
Tips for Getting Started
Here are some raw edge applique tips and general advice for beginners.
- Start Small: Do not pick a huge, complex design for your first try. Start with one or two simple shapes.
- Practice Cutting: Cutting shapes smoothly takes practice. Cut practice shapes from scrap fabric first.
- Test Your Stitches: Before stitching on your project, test your machine settings or hand stitches on scrap fabric. Use the same layers (base fabric + applique fabric + stabilizer).
- Use the Right Stabilizer: Choosing the correct embroidery stabilizer for applique is key. It stops your fabric from getting distorted. Ask for help at a fabric store if you are unsure.
- Ironing Matters: Proper pressing at each step makes a big difference in the final look.
- Do Not Rush: Applique, especially hand applique, takes time. Enjoy the process.
- Thread Color: The color of your applique stitches affects the look. Matching thread blends in. Contrasting thread makes the stitches stand out.
Common Questions About Applique
Let’s answer some things people often ask.
What are applique stitches?
Applique stitches are the stitches used to sew the edge of the applique fabric piece onto the base fabric. They stop the edge from fraying. They also make the edge look finished. Common stitches are zigzag, satin stitch, straight stitch, blanket stitch, and blind stitch.
Can you machine applique?
Yes, absolutely! Machine applique is very common and fast. You can use a machine to stitch around raw edges with zigzag or satin stitches. You can also use a machine to stitch close to the edge of turned edges with a straight stitch. A machine applique guide helps you pick the right settings and needles.
How do you finish raw edge applique?
To finish raw edge applique, you stitch over or very close to the cut edge of the fabric. This stops fraying and secures the shape. Popular ways are using a zigzag stitch, satin stitch, straight stitch close to the edge, or free-motion stitching around it. Raw edge applique tips often involve choosing fabrics that do not fray much or accepting a little bit of fray for the style.
What is fusible web applique?
Fusible web applique uses a thin web material with glue on both sides. You iron the web onto the back of your applique fabric. You cut out the shape. You peel off the paper liner. Then you iron the fabric shape onto your base fabric. The heat melts the glue, sticking the piece in place. This makes it easy to position and hold shapes before stitching the edges down.
How do you do hand applique?
Hand applique is sewing applique pieces onto the base fabric by hand. It often uses the turned edge method. You turn the raw edge under and hold it with pins or glue. Then you sew it down with small, hidden stitches like the blind stitch. A hand applique tutorial focuses on making neat, small stitches that are not seen from the front.
What is the difference between raw edge and turned edge applique?
The main difference is how the edge of the applique fabric is treated.
* Raw Edge: The cut edge of the applique fabric is left as is. Stitches go over this edge to stop fraying. The edge of the fabric piece is visible.
* Turned Edge: The raw edge of the applique fabric is folded under before it is stitched down. This hides the cut edge. The edge is smooth and neat.
How do you prepare fabric for applique?
Fabric preparation for applique involves washing, drying, and pressing the fabrics. This preshrinks them. It removes any finishes that might affect adhesive or stitching. It makes the fabric smooth for cutting and placing shapes.
What kind of embroidery stabilizer should I use for applique?
The right embroidery stabilizer for applique depends on your base fabric and the density of your stitches.
* Tear-away is good for stable fabrics and designs that do not have very dense stitching. You tear it away after stitching.
* Cut-away is best for stretchy fabrics or dense stitches like satin stitch. It stays with the fabric and gives permanent support. You trim away the extra.
* Wash-away dissolves in water. It is good for delicate fabrics or if you do not want any stabilizer left.
Always test stabilizer on a scrap of your fabric.
How do you make sure the edges of the applique don’t lift up?
Securing applique edges properly is key.
* If using fusible web, make sure you iron it well so the piece sticks firmly.
* For any method, stitch close to the edge of the applique piece all the way around. Make sure your stitches catch both the applique fabric and the base fabric. For turned edges, make sure your stitches catch the folded edge securely.
What fabrics are good choices for applique?
Applique fabric choices matter. Quilting cottons are popular. They are easy to work with and come in many colors and patterns. Batiks are great for raw edge because they fray less. Felt does not fray at all, making it very easy for raw edge applique. Avoid very thin or very thick fabrics when starting.
More Helpful Hints
Here are a few extra raw edge applique tips and general pointers.
- Layering: You can layer applique shapes. Put bigger shapes down first. Then add smaller shapes on top. Secure each layer before adding the next.
- Thread Choice: The thread weight and fiber (cotton, poly, rayon) can change the look of your applique stitches. Thicker thread makes stitches stand out more.
- Needle Size: Use a needle size that fits your thread and fabric. Too large a needle makes big holes. Too small a needle can break or skip stitches.
- Practice on Scraps: Always test your stitches and techniques on scrap fabric before working on your main project. This helps you get the settings right (for machine) or the feel right (for hand).
Different Styles to Explore
Once you feel good about the basics, you can look at other applique styles.
* Reverse Applique: You layer fabrics. Cut away the top layers to show the fabric below. You stitch around the cut edges.
* Broderie Perse: You cut out motifs (like flowers or birds) from printed fabric. You place these cutouts on a background fabric. You stitch around the edges. It looks like the motifs were part of the original fabric.
* Mola Applique: This is a reverse applique technique from the Kuna people of Panama. It involves many layers and very fine stitching.
These styles build on the basic skills. But start with the simple methods first.
Taking Care of Your Applique Project
You finished a project! How do you care for it?
* Washing depends on the fabrics and threads used. Check fabric care tags. Gentle cycle and cold water are usually best.
* Lay flat to dry if possible. Or tumble dry on low.
* Iron from the back if needed. Use a pressing cloth to protect stitches and applique pieces.
Proper care keeps your applique looking good for a long time.
Starting Your First Applique Project
Applique embroidery is a fun way to add charm to your textile projects. You learned how to do it. You know about fabric preparation for applique, picking applique fabric choices, and using embroidery stabilizer for applique. You explored securing applique edges with different applique stitches. You saw how machine applique guide and hand applique tutorial methods work. You also got raw edge applique tips and learned turned edge applique steps.
Now you have the knowledge to begin. Pick a simple design. Get your supplies. Take your time. Applique lets you use fabric like paint. It is a rewarding craft. Give it a try and see what beautiful things you can create!
Frequently Asked Questions (FAQ)
What is the easiest way to start applique?
Begin with raw edge applique using fusible web and a machine zigzag stitch. This is fast and holds the fabric well while you stitch. Use simple shapes like circles or squares.
How can I make my applique stitches neat?
For machine stitches, test tension and stitch length/width on scraps. Go slowly around curves. For hand stitches, keep stitch length small and even. Practice helps a lot.
Do I have to use stabilizer?
It is highly recommended. Embroidery stabilizer for applique stops the base fabric from puckering. It gives support so stitches look smooth and even. Without it, your project can become wavy or distorted.
Can I mix hand and machine applique?
Yes! You can machine applique a piece down for speed. Then you can add hand embroidery details on or around the piece. Mixing techniques can add depth and interest to your design.
My fabric edges are fraying under the raw edge stitches. What should I do?
Make your zigzag or satin stitch wider. Make sure the stitches go over the very edge of the applique fabric and onto the base fabric. Using fabrics that fray less, like batiks or felt, also helps.
How do I turn small, sharp points for turned edge applique?
After trimming the seam allowance, snip carefully into the point of the seam allowance without cutting the stitching line. Use a point turner tool or a needle to gently push the fabric point out when turning the edge. Press it well.
Can I use different types of fabric for the base and applique?
Yes, but make sure they have similar washing needs. Using fabrics that shrink differently can cause problems later. Consider the weight too; a heavy applique fabric on a light base fabric might not work well.
Where can I find applique patterns?
Look in quilting books, embroidery pattern books, craft magazines, and online craft websites. Simple shapes from coloring books can also be used as patterns.