
Can you remove embroidery without damaging the fabric? Yes, you absolutely can remove embroidery safely, provided you use the right tools and techniques. The process involves carefully cutting or dissolving the stitches without harming the underlying material.
Embroidery adds a beautiful touch to clothing and textiles, but sometimes you need or want to remove it. Whether it’s a design you’ve outgrown, a mistake on a project, or repurposing an item, knowing how to remove embroidery is a valuable skill. This guide will walk you through safe and effective methods for embroidery removal, from simple stitch cutting to more advanced techniques.
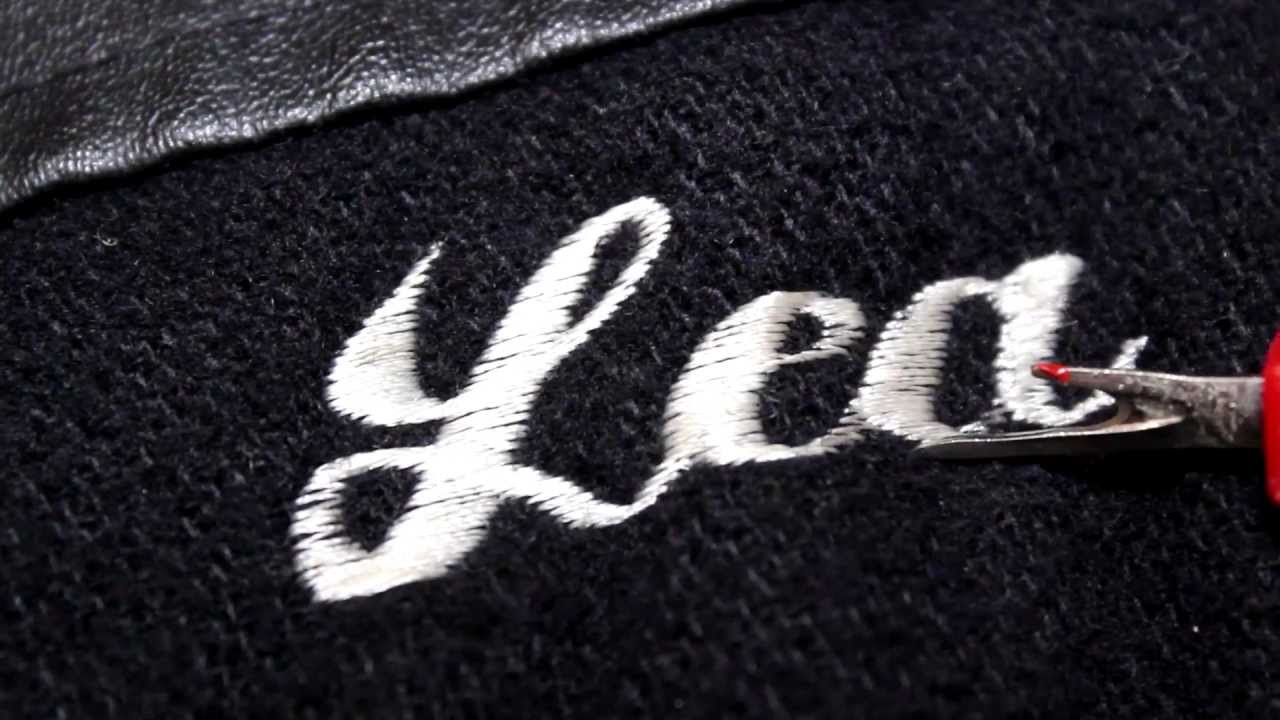
Image Source: i.ytimg.com
Why Remove Embroidery?
There are many reasons why someone might want to perform embroidery removal. Common scenarios include:
- Mistakes: Everyone makes errors when stitching. Sometimes, the best solution is to unpick embroidery and start again.
- Outdated Designs: Fashion and personal style change. An embroidered logo or design might no longer be to your taste.
- Repurposing Items: You might have a shirt with an embroidered patch that you want to turn into something else, like a tote bag or a cushion cover.
- Damaged Embroidery: If the embroidery itself is worn or damaged, you might want to remove it to repair or restyle the garment.
- Preparing for New Embroidery: Sometimes, you need to remove an old design to make way for a new one on the same piece of fabric.
- Washing and Care: In rare cases, specific embroidery threads might not be washable, requiring removal before laundering.
Essential Tools for Embroidery Removal
Having the right tools makes the job of stitch removal much easier and safer for your fabric. Here are the key items you’ll need:
The Humble Seam Ripper
The most common and effective tool for how to take out embroidery is a seam ripper.
- Types of Seam Rippers:
- Standard Seam Ripper: These have a sharp, V-shaped metal tip with a small blade inside. The V-shape allows you to get under a stitch, and the blade cuts it.
- Electric Seam Rippers: For larger projects or tough stitches, an electric seam ripper can speed up the process. They vibrate or spin to cut threads.
- Ergonomic Seam Rippers: Designed for comfort, these have larger, padded handles that are easier to grip for extended periods.
Other Helpful Tools
- Small, Sharp Scissors (Embroidery Scissors or Craft Scissors): For cutting thicker threads or larger areas of embroidery.
- Tweezers: Excellent for pulling out small bits of thread or backing material after cutting.
- Magnifying Glass or Lamp: Especially useful for intricate designs or if you have vision difficulties. It helps you see each stitch clearly.
- Light-Colored Fabric: If you’re working on dark fabric, a white or light-colored surface underneath can make it easier to see the stitches.
- Embroidery Removal Kits: These kits often contain a selection of seam rippers, scissors, tweezers, and sometimes even thread conditioners or solvents. They are a great starting point for beginners.
Methods for Embroidery Removal
There are two primary methods for embroidery removal: physically cutting the stitches and dissolving them. The best method often depends on the type of thread, the fabric, and the complexity of the embroidery.
Method 1: Physically Cutting Stitches
This is the most common and generally safest method for stitch removal. It involves carefully cutting each thread that makes up the embroidery.
Step-by-Step Guide to Cutting Stitches
- Prepare Your Workspace: Find a well-lit area. Lay the fabric flat on a stable surface.
- Identify the Stitching Order: Look at the embroidery. Usually, the top stitches are the ones you see most clearly. You’ll want to cut these first. Beneath these, you’ll find connecting threads or stitches that hold the design in place.
- Insert the Seam Ripper: Gently slide the sharp point of your seam ripper under a stitch. Be careful not to push too far and pierce the fabric.
- Cut the Thread: Once under the stitch, slide the seam ripper along to cut the thread.
- Remove the Cut Thread: Use tweezers or your fingers to pull the cut thread away from the fabric.
- Repeat: Continue this process, stitch by stitch. Work systematically. For how to take out embroidery efficiently, focus on cutting the threads that are easiest to access first.
- Dealing with Top and Bottom Threads: Often, embroidery has a top layer of visible stitches and a bottom layer of stabilizing stitches or threads that anchor the design. You’ll need to cut both. Start with the top threads, then carefully access and cut the bottom threads.
- Thread Backing: If there’s a fabric backing (like stabilizer), you may need to cut that away as well once all the thread is removed.
- Clean Up: After removing all the stitches, gently brush away any remaining thread fragments. You might want to use a lint roller to get the fabric perfectly clean.
Tips for Cutting Stitches
- Patience is Key: This method requires patience. Rushing can lead to snagging or tearing the fabric.
- Work from the Outside In: For complex designs, it can be easier to start removing stitches from the outer edges and work your way towards the center.
- Cut Against the Fabric Grain: If possible, try to cut stitches so the seam ripper blade moves in the same direction as the fabric’s weave. This helps minimize snagging.
- Check for Thread Loops: Sometimes, threads can form small loops. You might need to use small scissors to snip these loops before you can pull the threads out.
- Handle Delicate Fabrics with Care: For very fine or delicate fabrics like silk or lace, use extreme caution. A very sharp seam ripper and a light touch are essential.
Method 2: Dissolving Embroidery
This method is particularly useful for water-soluble stabilizers and some types of embroidery threads. It’s a less manual approach but requires careful consideration of the fabric’s properties.
Dissolving Water-Soluble Stabilizers
If your embroidery was done with water-soluble stabilizer, removing the stabilizer is usually straightforward.
- Submerge the Item: Place the embroidered item in lukewarm water.
- Agitate Gently: Swish the fabric gently in the water. The stabilizer should begin to dissolve.
- Rinse Thoroughly: Once the stabilizer is gone, rinse the fabric thoroughly with clean water to remove any residue.
- Dry as Usual: Hang or lay the fabric flat to dry according to its care instructions.
Dissolving Thread (Less Common and Risky)
While there isn’t a universal solvent for all embroidery threads, some specialized methods exist.
- Chemical Embroidery Removal: Certain chemical treatments are designed to break down specific thread types. These are often chemical embroidery removal products, but they can be very aggressive.
- How it Works: These chemicals work by breaking the molecular bonds within the thread fibers.
- Risks: The major risk here is that the chemical might also damage or discolor the fabric. It’s crucial to test any chemical on an inconspicuous area first.
- Commonly Used Chemicals (with extreme caution):
- Acetone: Can sometimes break down certain synthetic threads, but it can also damage acetate fabrics and some dyes.
- Hydrogen Peroxide: Mild oxidizing agent that might lighten some threads but can also affect fabric color.
- Bleach Embroidery Removal: Using household bleach is generally not recommended for embroidery removal unless the fabric is pure white cotton or linen and the threads are known to be bleach-resistant. Bleach is a harsh chemical that will almost certainly damage colored fabrics and many types of synthetic threads. It can also weaken fabric fibers over time.
When to Consider Dissolving Methods
- When the embroidery thread is known to be water-soluble.
- When dealing with specific types of embroidery where a known solvent exists and you have tested it.
- For very intricate designs where cutting stitches is extremely difficult and time-consuming, and you are willing to risk potential fabric damage.
Important Note on Dissolving: Always test any chemical or solvent on a hidden part of the fabric (like an inside seam) before applying it to the entire embroidery. Wait for the test area to dry completely to check for discoloration or damage.
Specific Scenarios and How to Handle Them
How to Remove Machine Embroidery
Remove machine embroidery often involves tighter stitches and potentially the use of stabilizers, which can make the process slightly different from hand embroidery.
- Identify the Thread Type: Machine embroidery threads can be cotton, polyester, rayon, or silk. Polyester and rayon are generally more durable than cotton and silk.
- Stabilizer Behind the Design: Machine embroidery almost always uses a stabilizer underneath the fabric. This can be tear-away, cut-away, or water-soluble.
- Tear-away stabilizer: Gently tear it away after you’ve removed the stitches.
- Cut-away stabilizer: You might need to carefully cut this away with small scissors after the embroidery threads are gone.
- Water-soluble stabilizer: Dissolve this in water as described above.
- Cutting Machine Embroidery: The process is the same as hand embroidery – use a seam ripper to cut each stitch. Pay close attention to how the threads are layered.
How to Remove Embroidery from Delicate Fabrics
Delicate fabrics like silk, satin, organza, or lace require extra care.
- Use the Finest Tools: A very sharp, fine-tipped seam ripper is crucial. Embroidery scissors with very pointed tips can also be helpful.
- Work on a Flat Surface: Ensure the fabric isn’t stretched or pulled while you work.
- Cut One Stitch at a Time: Avoid pulling threads; focus on cleanly snipping each one.
- Support the Fabric: Place a piece of white tissue paper or a soft cloth underneath the embroidery area to provide a stable surface and prevent snagging.
- Consider Professional Help: For very valuable or delicate items, a professional cleaner or tailor might be the safest option.
How to Remove Embroidery from Knit Fabrics
Knit fabrics can stretch and distort easily, making embroidery removal tricky.
- Stabilize the Area: Before you start, you can try to stabilize the knit fabric by ironing on a temporary stabilizer or using a sticky stabilizer underneath the embroidered area. This helps prevent stretching.
- Cut Stitches Carefully: Use a seam ripper with a very light touch. Cut only one thread at a time and avoid pulling.
- Work from the Back: Sometimes, working from the back of the fabric can give you better access to the anchor threads, making it easier to unpick embroidery.
- Minimize Handling: The less you pull and stretch the knit, the better.
How to Remove Embroidery from Towels or Terrycloth
The loops of terrycloth can make it difficult to see and access the stitches.
- Use a Small, Sharp Seam Ripper: A smaller tool is better for navigating the fabric loops.
- Work in Good Light: You need to see clearly where the stitches are hiding within the loops.
- Patience is Essential: This can be a slow process.
- Trim Threads: After cutting threads, you might have small loops left. You can carefully trim these with small scissors.
After Embroidery Removal: Restoring the Fabric
Once you’ve successfully performed embroidery removal, you’ll want to ensure the fabric looks as good as possible.
Removing Thread Residue
- Lint Roller: A good quality lint roller is excellent for picking up small bits of thread and fuzz.
- Gentle Brushing: Use a soft brush (like a toothbrush or a dedicated fabric brush) to gently sweep away remaining debris.
- Washing: After removing most of the thread, washing the item according to its care instructions can help remove any remaining residue and relax the fabric.
Dealing with Marks or Holes
Even with careful work, you might be left with slight marks or small holes where the stitches were.
- Ironing: Ironing the area can sometimes help the fabric fibers relax and close small holes. Iron from the wrong side of the fabric.
- Steaming: A steamer can also help the fabric fibers relax.
- Covering Small Holes: For tiny holes, a bit of fabric glue applied from the back can sometimes hold the fibers together.
- Redesigning: If there are slight marks, you might consider adding a new, smaller embroidery design or a patch to cover the area.
When to Use Embroidery Removal Kits
Embroidery removal kits are a fantastic resource, especially for those new to the process. They typically include:
- A Variety of Seam Rippers: Different sizes and shapes can be useful for various tasks.
- Sharp Scissors: For cutting thicker threads or stabilizer.
- Tweezers: For pulling out threads.
- Sometimes a Needle Threader: Can be repurposed for pushing out small threads.
Using a kit ensures you have the basic, quality tools needed to safely and effectively perform stitch removal. It’s a good investment if you anticipate doing embroidery removal more than once or twice.
Frequently Asked Questions (FAQ)
Q: Can I remove embroidery from a t-shirt?
A: Yes, you can remove embroidery from a t-shirt. T-shirts are usually made of cotton or cotton blends, which are fairly durable. Use a seam ripper to carefully cut each stitch, working from the back if it makes it easier to access the anchor threads. Be patient, and try not to stretch the fabric as you work.
Q: What is the best way to remove embroidery from delicate fabric like silk?
A: For silk or other delicate fabrics, the best approach is extreme caution and the use of very fine, sharp tools. Use a pointed seam ripper and small embroidery scissors. Work slowly, cutting one stitch at a time, and avoid pulling or stretching the fabric. If the item is valuable, consider professional help.
Q: How do I remove the stabilizer after removing machine embroidery?
A: The method for removing stabilizer depends on its type. Tear-away stabilizer should be carefully torn away. Cut-away stabilizer may need to be trimmed with small scissors. Water-soluble stabilizer dissolves when the fabric is rinsed in cool or lukewarm water. Always check the stabilizer’s instructions if possible.
Q: Will removing embroidery leave holes in the fabric?
A: It’s possible, especially if the embroidery was dense or the fabric is very fine. However, if done carefully with a sharp seam ripper, the holes are usually very small and often close up when the fabric is washed and ironed. Sometimes, a slight indentation or change in fabric texture may remain.
Q: Are there any embroidery removal kits that use chemicals?
A: While some specialized chemical embroidery removal products exist, they are not common in general embroidery removal kits. Most kits focus on mechanical removal using seam rippers and scissors. Using chemicals can be risky for the fabric, so mechanical methods are generally preferred for safety and predictability.
Q: What’s the difference between removing hand embroidery and machine embroidery?
A: Machine embroidery often has tighter stitches and may use different thread types and stabilizers compared to hand embroidery. You might also encounter more layers of stitching and backing with machine embroidery. The core process of cutting stitches remains the same, but you might need to be more meticulous with machine designs.
By following these methods and tips, you can confidently tackle the task of how to remove embroidery safely and effectively, preserving the integrity of your fabric and achieving the desired result.