
Do you want to start embroidery? It’s easy! You can begin with just a few simple items. Learn some basic stitches. Then, try a small project. This guide shows you how to begin hand embroidery. You will learn all the basics. Soon, you will make beautiful stitched art. Embroidery is a fun craft. You use a needle and thread. You make pictures on fabric. Anyone can learn it. It does not cost much to start. Many people find it relaxing. It is a great way to be creative.
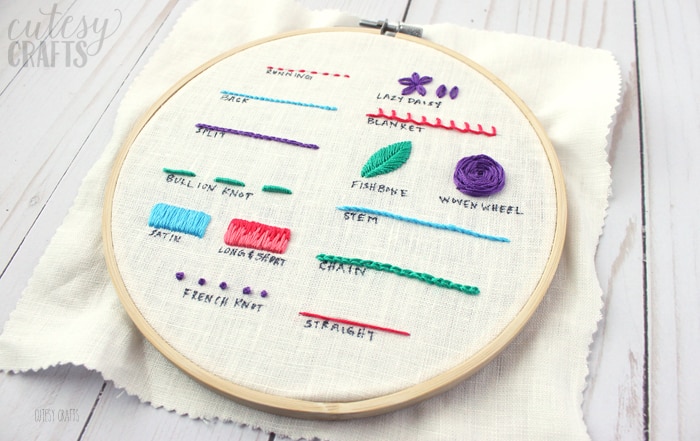
Image Source: cutesycrafts.com
Gathering Your First Gear for Stitching
Starting embroidery is simple. You do not need many tools. The right beginner embroidery supplies make learning easy. Think of these as your basic art kit. Having the right embroidery tools for beginners helps you work well.
Essential Materials for New Stitchers
Here are the few things you need to get started:
- Embroidery Floss: This is your thread. It comes in many colors. It has six thin strands. You can use all six strands. Or, you can pull some apart. This makes your stitches thinner. Most new projects use two or three strands. DMC is a popular brand. It is easy to find. It is also good quality.
- Needles: You need special needles. They are called embroidery needles. They have a larger eye. This makes threading easier. They are also sharp. This helps them go through fabric smoothly. A pack of assorted needles is a good start. Sizes 3 to 9 are common. Size 7 is a good middle choice.
- Hoops: An embroidery hoop holds your fabric tight. This makes it easier to stitch. Hoops come in wood or plastic. They have two parts. You place your fabric between them. Then, you tighten a screw. Sizes from 4 to 8 inches are good for beginners. A 6-inch hoop works well for many small projects.
- Fabric: You need fabric to stitch on. Cotton or linen are best for new learners. They are easy to work with. They do not stretch too much. Plain cotton muslin is a great first choice. Aida cloth is for cross-stitch. It is not for hand embroidery. Avoid very thin or very thick fabrics at first.
- Scissors: Small, sharp scissors are very helpful. They cut your thread cleanly. They are also good for tiny snips. Regular craft scissors work too. But smaller ones are easier to handle.
- Pencil or Water-Soluble Marker: You need this to draw your design. A regular pencil works fine. A water-soluble marker is better. It washes away with water. This leaves no marks on your finished work.
What to Look for in a First Embroidery Kit
Many people like to buy a first embroidery kit. Kits are great for beginners. They come with everything you need. This saves you time. You do not have to pick out each item.
A good first embroidery kit should have:
- Fabric: Pre-printed fabric is best. The design is already there. You just stitch over the lines.
- Floss: All the colors for your design are in the kit.
- Needles: One or two needles are usually included.
- Hoop: A small hoop often comes with it.
- Instructions: Clear steps on how to do the project. They usually show you the basic stitches needed.
Why choose a kit?
- Easy start: Everything is ready for you.
- No guesswork: You know you have the right supplies.
- Guided project: You learn by doing a specific piece.
- Cost-effective: Often cheaper than buying items separately.
You can find kits online. Craft stores also sell many options. Look for kits that say “beginner” or “easy.” Choose a design you like. This will keep you interested.
Grasping Basic Stitching Methods
Now you have your supplies. It is time to learn how to stitch! Learning embroidery basics starts with how to use your needle and thread. Then, you learn a few simple stitches. These basic stitches are the building blocks. You can make many things with just a few of them.
Getting Started with Needle and Thread
Before you stitch, you need to set up.
- How to thread a needle:
- Cut an arm’s length of floss. This is about 18 to 24 inches. Too long, and it knots easily.
- Separate the strands. Most designs use two or three strands. Pull them apart gently.
- Wet the end of the thread a little. Pinch it flat.
- Push the flattened end through the needle’s eye. Use good light. If it is hard, try a needle threader.
- How to knot your thread (starting):
- After threading, bring the two ends of the floss together. They should be even.
- Tie a small knot at the very end. Loop the thread. Push the end through the loop. Pull tight. Make a double knot for extra security.
- Alternative (no knot start): Some people do not use a knot. They take a tiny stitch on the back of the fabric. Then they stitch over it. This traps the thread. This makes a cleaner back. For beginners, a simple knot is fine.
- How to knot your thread (ending):
- When your thread is short, you need to end it.
- Turn your fabric over. Look at the back.
- Slide your needle under a few nearby stitches.
- Make a small loop with the thread. Push your needle through the loop. Pull gently to make a knot.
- Do this two or three times. This makes it secure.
- Snip the extra thread close to the knot.
Your First Stitches: Easy to Learn
Here are some basic embroidery stitches to start with. Practice each one. Do them on scrap fabric first.
-
Running Stitch:
- How to do it: Bring your needle up from the back of the fabric. Push it down a short way in front. Bring it up again a short way in front of that. Keep going. You make a line of small, even dashes.
- What it’s good for: Creating outlines, filling in shapes, making a dashed line. It is very simple and fast.
-
Back Stitch:
- How to do it: Bring your needle up from the back (Point A). Push it down a short way in front (Point B). Now, bring your needle up again a short way ahead (Point C). Push it back down into Point B. You are going “back” into the last stitch. This makes a solid line.
- What it’s good for: Outlining designs, writing letters, making strong, clear lines. It is a very common stitch.
-
Stem Stitch:
- How to do it: Bring your needle up. Push it down a short distance away. Before pulling tight, bring the needle up halfway between the first two points. Keep the working thread under your thumb. Pull the thread through. Each stitch slightly overlaps the last.
- What it’s good for: Making stems for flowers, curving lines, outlining. It gives a nice rope-like texture.
-
Satin Stitch:
- How to do it: This stitch fills shapes. Bring your needle up on one side of the shape. Go straight across the shape. Push your needle down on the other side. Bring it up right next to where you started. Keep making straight stitches very close together. They should lay flat and smooth.
- What it’s good for: Filling in areas completely, making smooth blocks of color. It needs practice to look smooth.
-
French Knot:
- How to do it: Bring your needle up through the fabric. Hold the thread taut with your non-stitching hand. Wrap the thread around the needle two or three times. Push the needle back into the fabric, very close to where you came up. Hold the wraps with your thumb while you pull the needle through.
- What it’s good for: Making small dots, eyes, flower centers, textures. It can be tricky at first. Do not give up!
-
Lazy Daisy Stitch (Detached Chain Stitch):
- How to do it: Bring your needle up. Make a loop with your thread. Push the needle back down very close to where you came up. Bring the needle up again a short distance away. Trap the loop under the needle. Pull through. Push the needle down just outside the loop to anchor it.
- What it’s good for: Making flower petals, leaves, decorative elements. It creates a petal shape.
Practice each stitch until you feel comfortable. Repetition is key. Soon, these will feel natural.
Your First Stitched Creations
After learning basic stitches, you are ready to make something! Easy hand embroidery projects are the best way to start. Do not pick something too big or too complex. Simple designs help you build confidence.
Picking Simple Ideas to Begin
Why start small?
* Less overwhelming: A small project feels doable.
* Faster finish: You see results quickly. This keeps you motivated.
* Practice space: You can try out your new stitches. Mistakes are okay!
Here are some simple embroidery designs to begin with:
- Simple lines or shapes: Just stitch a square, a circle, or parallel lines. Use running stitch or back stitch. This helps you practice keeping lines straight.
- Basic letters: Stitch your initial, or a short word like “Joy” or “Love.” Back stitch is perfect for this.
- Small floral designs: A single lazy daisy flower. A few french knots for dots. A simple stem stitch for a stem. These look pretty and are fun to make.
- Simple outlines: Take a simple drawing. Maybe a star, a heart, or a simple animal shape. Just outline it with back stitch.
How to get designs:
- Free patterns online: Many blogs offer free beginner patterns. Search for “free easy embroidery patterns.”
- Kits: As mentioned, kits often come with pre-printed designs.
- Draw your own: If you like to draw, sketch something simple on your fabric.
- Trace a picture: Find a simple coloring book page. Put your fabric over it. Trace the lines with your pencil or marker. Hold it up to a window for light.
Step-by-Step for a First Project
Let’s walk through how to make your first embroidered piece.
- Choose a design: Pick one of the simple ideas above. Or use a kit’s design.
- Transfer the design: If your fabric is plain, draw your design on it. Use a pencil or water-soluble marker. Place your fabric over the design. Use a light box or a sunny window to see through. Trace the lines gently.
- Hoop the fabric: Loosen the screw on your embroidery hoop. Separate the two rings. Place the inner ring on a flat surface. Lay your fabric over it, centered on your design. Place the outer ring over the fabric. Push it down. It should fit snugly. Pull the fabric gently from the edges. Make sure it is drum-tight. Then, tighten the screw firmly. The fabric should not move or ripple.
- Start stitching!
- Thread your needle with your chosen floss color. Use 2 or 3 strands.
- Start from the back of the fabric. Bring your needle up where you want to start stitching.
- Follow the lines of your design. Use the basic stitches you learned.
- Work slowly. Try to make your stitches even.
- When you run out of thread, end your thread on the back. Start a new piece if needed.
- Change colors as your design requires.
- Finishing your work:
- Once all your stitching is done, remove the fabric from the hoop.
- If you used a water-soluble marker, gently rinse your fabric. Let it dry flat.
- Trim any loose threads on the back.
- Now, what to do with your finished piece? You can put it back in the hoop for display. Trim the fabric around the hoop. Glue or sew the edges to the back of the hoop. Or, frame it. You can also turn it into a patch, a small pillow, or part of a tote bag.
Smart Tips for New Stitchers
Starting something new can bring questions. Here are some embroidery tips for beginners to help you along. These simple ideas will make your learning smoother and more fun.
Helpful Advice as You Start
- Practice makes perfect: The more you stitch, the better you will get. Do not expect perfection on your first try. Every stitch you make teaches you something new. Keep a practice fabric.
- Do not pull too tight: Pulling your thread too hard can pucker your fabric. This means the fabric gets gathered up and bumpy. Aim for a gentle tension. Your stitches should lie flat.
- Use enough light: Good lighting prevents eye strain. It also helps you see your stitches clearly. Sit near a window. Or use a bright lamp.
- Take breaks: Embroidery uses small muscles. It can also strain your eyes. Step away for a few minutes every hour. Stretch your hands and neck.
- Do not be afraid to make mistakes: Everyone makes mistakes. Stitches can be pulled out. It is okay. It is part of learning. A small seam ripper can help if you need to undo stitches.
- Watch videos: Seeing someone stitch can be very helpful. YouTube has many tutorials for beginners. Search for “how to do [stitch name]” or “beginner embroidery project.”
- Join online groups: There are many friendly embroidery groups online. You can ask questions. You can share your work. You can get ideas from others. This is a great way to feel part of a community.
- Keep your thread clean: As you stitch, your thread can get dirty from your hands. Wash your hands often. Keep your project clean.
- Store your floss well: Keep your floss wound on bobbins or in bags. This stops it from tangling. It also keeps it clean.
Solving Common Newbie Problems
Even with the best embroidery tips for beginners, you might run into small problems. Here are some common ones and how to fix them:
- Knots in thread: This happens a lot!
- Why it happens: Thread is too long, or you are stitching too fast.
- Fix: Use shorter lengths of thread (arm’s length). Slow down. If a knot forms, try to gently pull it out with your needle tip. If it is stuck, cut the thread and restart.
- Uneven stitches:
- Why it happens: Inconsistent tension. Not measuring stitch length.
- Fix: Practice keeping your stitches the same size. Try to pull the thread with the same gentle pressure each time. Use printed lines to guide your stitch length.
- Fabric puckering:
- Why it happens: Pulling stitches too tight. Hoop not tight enough.
- Fix: Relax your tension. Do not pull so hard. Make sure your fabric is drum-tight in the hoop. Pull it taut every few stitches if needed.
- Running out of thread in the middle of a stitch:
- Why it happens: Not planning for enough thread.
- Fix: It is better to end your thread when you have a few inches left. You can then start a new piece of thread for the next stitch. Do not try to make one tiny last stitch. You will run out and have trouble securing it.
- Difficulty threading the needle:
- Why it happens: Small needle eye, frayed thread.
- Fix: Use an embroidery needle with a larger eye. Wet the end of your thread. Twist it tightly. Use a needle threader. These are small tools that make threading very easy.
Moving Forward in Your Stitching Journey
You have taken the first steps! Getting started with embroidery is an exciting journey. There is always something new to try. How to start hand embroidery truly is about building one skill upon another.
Your Path Beyond the Basics
Once you feel good about the basics:
- Exploring new stitches: There are hundreds of embroidery stitches! Look up more. Try the chain stitch, blanket stitch, feather stitch. Each one adds a new look to your work.
- Different fabrics and threads: Try stitching on different types of fabric. Linen, felt, or even clothing. Experiment with other kinds of thread. Pearl cotton or even thin yarns.
- Larger projects: When ready, take on bigger pieces. Maybe a picture for your wall. Or a design for a cushion cover.
- Making gifts: Hand-stitched items make wonderful, personal gifts. Your friends and family will love them.
- Adding beads or sequins: You can add sparkle to your embroidery. Learn how to stitch on beads or small shiny pieces.
Making Embroidery a Fun Hobby
Embroidery is more than just making pretty things.
- Enjoy the process: The act of stitching can be very calming. It is a slow craft. It lets you focus.
- It is relaxing: Many people find embroidery a great way to unwind. It takes your mind off daily stress.
- A creative outlet: It gives you a way to express yourself. You choose the colors, the design, the stitches. Each piece you make is unique.
- Portable: You can take your embroidery project almost anywhere. Stitch in front of the TV, at a park, or even on a trip.
Start slow. Be patient with yourself. Most importantly, have fun with it! Embroidery is a rewarding skill. It lets you create beautiful textile art with your own hands.
Frequently Asked Questions (FAQ)
Here are some common questions from new embroiderers:
How long does it take to learn basic embroidery?
You can learn the most basic embroidery stitches in just an hour or two. Practicing them to make them neat takes more time. You will likely feel comfortable making simple projects after a few days or a week of regular practice.
Is embroidery hard to learn?
No, embroidery is not hard to learn. It is a very beginner-friendly craft. The first steps are simple. It just takes patience and practice. It is more about muscle memory than complex rules.
What is the best fabric for embroidery beginners?
Plain, light-colored cotton or linen fabric is best for getting started with embroidery. These fabrics are easy to pull the needle through. They do not stretch too much. This helps your stitches look even.
How do you finish embroidery?
After stitching, you can finish your piece in many ways. The simplest way is to display it in the hoop. You can also frame it like a picture. Many people turn their embroidery into decorative items like pillows, patches, or parts of clothing.
Can I use any needle for embroidery?
It is best to use embroidery tools for beginners designed for stitching. Embroidery needles have a larger eye. This makes it easier to thread with embroidery floss. They also have a sharp point. This helps them glide through fabric cleanly. Regular sewing needles can be too small or too dull.