
Do you want to know how to thread a bobbin on a sewing machine quickly and correctly? This guide will show you the simple steps to get your sewing machine ready for action.
When you’re in the middle of a sewing project, the last thing you want is to struggle with your bobbin. A properly wound bobbin is the key to smooth, even stitches. This guide is all about how to thread a bobbin on a sewing machine efficiently. We’ll cover everything from bobbin winder setup to winding a bobbin correctly, making sure you can get back to your creative work in no time.
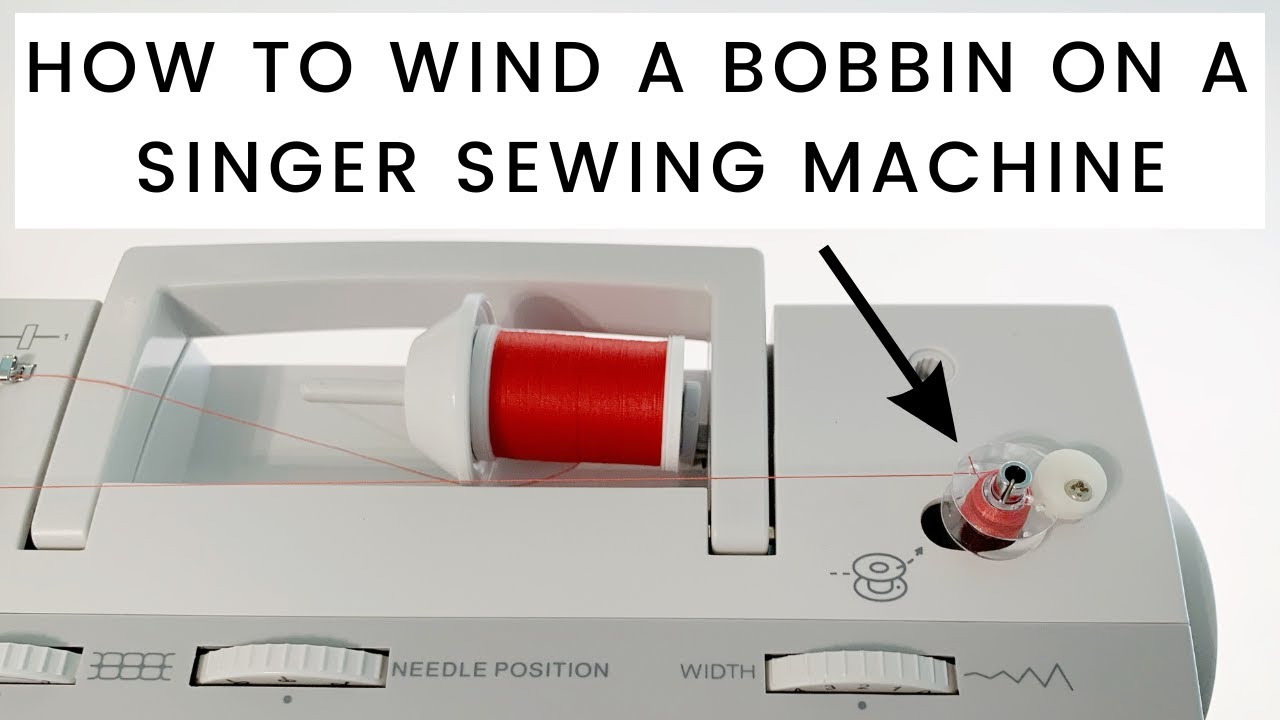
Image Source: i.ytimg.com
Getting Started with Bobbin Winding
Before you can start sewing, you need to wind a bobbin. This is a fundamental skill for any sewer. A well-wound bobbin ensures your stitches are balanced and your machine runs smoothly. Let’s break down the process into easy steps.
Understanding the Bobbin and Bobbin Case
Your sewing machine has two main parts that work together to create stitches: the needle and the bobbin. The needle carries the upper thread, and the bobbin holds the lower thread, which is usually a different color or type than the upper thread. The bobbin sits in a bobbin case, which is usually located under the needle plate.
Essential Tools for Bobbin Winding
- Sewing Machine: Of course!
- Bobbin: Make sure it’s the correct type for your machine. Different machines use different sizes and shapes of bobbins.
- Thread: The same thread you’ll be using for your project is best.
- Scissors or Thread Snips: For cutting the thread.
- Your Sewing Machine Manual: Always a good reference!
The Bobbin Winding Process: Step-by-Step
Mastering the sewing machine bobbin winding process is crucial. Here’s how to do it smoothly and efficiently.
Step 1: Setting Up the Bobbin Winder
The first step involves preparing your sewing machine’s bobbin winder. This might seem obvious, but it’s important to get it right for winding a bobbin correctly.
- Locate the Bobbin Winder: Most sewing machines have a dedicated bobbin winder assembly. This typically includes a spindle where the bobbin sits and a tension disc or guide for the thread.
- Engage the Winder: On many machines, there’s a lever or a switch that you need to move to engage the bobbin winder. This disengages the machine’s sewing mechanism so only the bobbin winder operates. Check your machine’s manual if you’re unsure.
- Place the Bobbin on the Spindle: Put an empty bobbin onto the bobbin winder spindle. It usually sits on a post and might have a small groove or hole to secure the thread end.
- Secure the Bobbin: Some spindles have a small clip or a cap to hold the bobbin in place. Make sure the bobbin is snug but can still spin freely.
Step 2: Threading the Bobbin Winder
This is where the magic of threading a sewing bobbin begins. Proper threading ensures even winding and prevents tangles.
- Find the Thread Guide: Look for a thread guide specifically for the bobbin winder. It’s usually a small hook or slit near the spindle.
- Thread the Machine: Start by threading your sewing machine as if you were going to sew normally, but instead of guiding the thread through the needle, you’ll guide it to the bobbin winder.
- Pass Through the Tension Discs: When you thread the upper part of the machine, you’ll pass the thread through the upper tension discs. For bobbin winding, you’ll usually thread the thread through these discs as well. This is vital for bobbin thread tension.
- Guide to the Bobbin Winder: After passing through the upper tension discs, guide the thread towards the bobbin winder.
- Thread the Bobbin: Many machines have a specific hole or notch on the bobbin itself to start the thread. Push the end of the thread through this hole from the inside out.
- Wrap the Thread: Wrap the thread end a few times around the bobbin, usually in a counter-clockwise direction, to secure it.
- Trap the Thread End: Most bobbin winders have a small blade or cutter. Hold the thread tail taut and guide it against this blade to trim it close to the bobbin. This prevents the tail from getting caught and creating issues.
Step 3: Winding the Bobbin
Now for the actual sewing bobbin winding technique. This step requires attention to detail for the best results.
- Hold the Thread Tail: Hold the end of the thread that is coming from the spool firmly for the first few wraps. This helps start the winding cleanly.
- Start Winding: Press the foot pedal gently to start the bobbin winder. The bobbin should start spinning.
- Even Winding: As the bobbin winds, the thread should be distributed evenly across it. Most modern machines have an automatic shut-off feature that stops winding when the bobbin is full, or a mechanism that guides the thread side-to-side. If your machine doesn’t, you may need to manually guide the thread with your finger to ensure it winds evenly.
- Monitor the Bobbin Thread Tension: Pay attention to how the thread is being wound. If it looks too loose or too tight, adjust how you’re guiding the thread or check the thread path through the tension discs. Proper bobbin thread tension is achieved through correct threading and, if needed, minor adjustments to the bobbin case tension (more on that later).
- Stop Winding: When the bobbin is full, the machine will usually stop automatically. If not, stop it manually.
- Cut the Thread: Cut the thread coming from the spool.
- Remove the Bobbin: Carefully remove the wound bobbin from the spindle.
Troubleshooting Common Bobbin Winding Issues
Even with the best intentions, you might encounter some hiccups. Here are solutions for common problems with bobbin case winding.
Bobbin Not Winding Evenly
- Cause: Thread not guided correctly during winding, or the machine’s auto-guide isn’t working.
- Solution: Manually guide the thread with your finger during the initial wraps. Ensure the thread is passing through the thread guide on the bobbin winder. Check your machine’s manual for any specific winding guides.
Thread Coming Loose or Tangling
- Cause: Thread tail not trimmed properly, or the bobbin wasn’t started correctly.
- Solution: Make sure the thread tail is trimmed very close to the bobbin after the first few wraps. Ensure the thread is securely through the starting hole of the bobbin.
Bobbin Not Winding Tightly
- Cause: Thread passing too loosely through the tension discs, or the bobbin isn’t secured properly on the spindle.
- Solution: Double-check that the thread is correctly threaded through the upper tension discs. Ensure the bobbin is snug on the spindle.
Bobbin Winder Not Engaging
- Cause: The bobbin winder mechanism hasn’t been properly engaged.
- Solution: Consult your sewing machine manual to find the lever or switch that engages the bobbin winder. Make sure it’s fully in the “wind” position.
How to Load a Bobbin into the Sewing Machine
Once you have a perfectly wound bobbin, the next crucial step is learning how to load a bobbin correctly. This is just as important as winding it.
Top-Loading Bobbins vs. Front-Loading Bobbins
Sewing machines generally have two types of bobbin systems: top-loading (drop-in) and front-loading (front-loading). The method for loading the bobbin differs between them.
Top-Loading (Drop-In) Bobbin System
This is the more modern system, known for its ease of use.
- Remove the Needle Plate: Gently lift off the needle plate cover or the accessory tray to expose the bobbin case.
- Remove the Bobbin Case (if applicable): Some drop-in systems have a removable bobbin case. If yours does, lift it out. Others have the bobbin housing directly integrated.
- Place the Wound Bobbin: Take your wound bobbin and place it into the bobbin case or housing.
- Check the Bobbin Thread Direction: This is critical! For most drop-in systems, the bobbin should be placed so that the thread unwinds in a counter-clockwise direction. Look for an arrow on the bobbin case or housing indicating the correct direction.
- Guide the Thread: There’s usually a small slot or notch in the bobbin case or housing where you’ll guide the thread. Pull the thread through this slot, leaving a tail of about 4-6 inches.
- Replace the Bobbin Case (if applicable): If you removed the bobbin case, put it back into its housing. It should click into place.
- Replace the Needle Plate: Put the needle plate cover back on.
Front-Loading (Front-Loading) Bobbin System
This is the traditional system found on many older and some newer machines.
- Open the Bobbin Cover: Locate the small door or cover on the front of the sewing machine, below the needle. Open this cover.
- Remove the Bobbin Case: The bobbin case, with the bobbin inside, usually slides or clips out.
- Place the Wound Bobbin: Take your wound bobbin and place it into the bobbin case.
- Check the Bobbin Thread Direction: For front-loading systems, the bobbin thread usually unwinds in a clockwise direction. Again, check for any arrows on the bobbin case.
- Guide the Thread: Similar to the drop-in system, guide the thread through the slot or notch in the bobbin case, leaving a tail of about 4-6 inches.
- Insert the Bobbin Case: Slide the bobbin case back into the shuttle mechanism. It usually has a small lever or prong that needs to align with a notch in the machine. Ensure it’s seated correctly.
- Close the Bobbin Cover: Close the cover.
Bringing Up the Bobbin Thread
After loading the bobbin, you need to bring the bobbin thread up to the needle.
- Hold the Upper Thread: Gently hold the upper thread tail with your left hand.
- Turn the Handwheel: Turn the machine’s handwheel towards you (counter-clockwise) to lower the needle.
- Catch the Bobbin Thread: As the needle goes down and then starts to come back up, it will catch the bobbin thread and loop it around.
- Pull Up the Loop: Continue turning the handwheel until the needle is at its highest point. You should see a small loop of bobbin thread. Use your fingers or tweezers to pull this loop up and out from under the needle plate.
- Position the Threads: You should now have both the upper thread and the bobbin thread tails together. Place them under the presser foot and towards the back of the machine.
Factors Affecting Bobbin Winding and Tension
Several factors can influence the quality of your bobbin winding and the resulting stitch tension.
Bobbin Thread Tension Adjustments
While the bobbin winder is designed to maintain consistent tension, sometimes you might need to make minor adjustments, especially if you notice your stitches are uneven.
- The Bobbin Case Screw: Most bobbin cases have a small screw that controls the tension of the bobbin thread.
- Tightening the screw (turning it clockwise): Increases the tension.
- Loosening the screw (turning it counter-clockwise): Decreases the tension.
- Important Note: Make very small adjustments (a quarter turn at a time) and test your stitches after each change. Always refer to your sewing machine manual for specific instructions on adjusting bobbin tension.
Thread Quality and Type
The type and quality of thread you use can impact bobbin winding.
- Smoothness: Use good quality, smooth thread. Rough or fuzzy threads can cause uneven winding and breakages.
- Weight: Ensure your bobbin thread weight is appropriate for your project and matches your upper thread weight as closely as possible for balanced stitches.
- Material: Cotton, polyester, and silk threads generally wind well. Specialty threads might require different approaches.
Bobbin Winder Setup Precision
The precise bobbin winder setup is paramount.
- Spindle Stability: Ensure the bobbin spindle is securely in place and not wobbly.
- Tension Disc Cleanliness: Dust and lint can accumulate in the tension discs. Clean them regularly with a small brush or compressed air.
Tips for Fast and Efficient Bobbin Winding
Want to speed up your workflow? Here are some tips for how to thread a sewing machine bobbin fast.
Keep Spare Wound Bobbins Ready
The ultimate way to save time is to always have a few spare bobbins wound and ready to go. When you start a new project, wind several bobbins at once.
Use a Dedicated Bobbin Winder
For very frequent sewing or for those who work with many different thread colors, a separate, high-speed bobbin winder can be a great investment. These are often faster and can wind more evenly than the built-in ones on some machines.
Practice Makes Perfect
The more you practice the sewing bobbin winding technique, the faster and more confident you’ll become. Each sewing machine is slightly different, so getting familiar with yours is key.
Maintain Your Machine
A well-maintained sewing machine operates more efficiently. Regularly clean lint and dust from your bobbin area and thread guides.
Follow a Consistent Threading Path
Once you know the correct path for your specific machine, stick to it. Don’t try to take shortcuts, as this can lead to errors and slower winding overall.
Frequently Asked Questions About Bobbin Winding
Here are some common questions people have about threading and winding bobbins.
Q1: Can I use any bobbin with my sewing machine?
A1: No, you must use bobbins specifically designed for your sewing machine model. Bobs are typically categorized by size, shape, and whether they have a groove or are smooth. Using the wrong bobbin can cause stitching problems and even damage your machine. Check your manual for the correct bobbin type.
Q2: How do I know if my bobbin thread direction is correct?
A2: For most top-loading (drop-in) bobbin systems, the thread should unwind counter-clockwise. For front-loading systems, it’s usually clockwise. Look for arrows on the bobbin case or consult your machine’s manual. The direction is crucial for the machine to pick up the thread correctly.
Q3: Why is my bobbin thread loose or bunching up?
A3: This often indicates an issue with the bobbin thread tension or how the bobbin was loaded.
* Tension: Try a slight adjustment to the bobbin case screw (loosen it slightly).
* Loading: Ensure the thread is properly guided through the bobbin case slot and that you’re holding the thread tail when you start winding.
* Upper Thread: Sometimes, issues with the upper thread tension can also manifest as bobbin thread problems. Make sure your upper thread is also correctly tensioned.
Q4: How much thread should I leave on the bobbin?
A4: It’s best to wind the bobbin until it’s full, but not so full that the thread starts to spill over or wind unevenly. Most machines have an auto-stop feature. If yours doesn’t, stop when the thread is close to the top edge of the bobbin.
Q5: My sewing machine isn’t winding the bobbin at all. What could be wrong?
A5:
* Engaging the Winder: Ensure the bobbin winder mechanism is properly engaged.
* Thread Path: Double-check that the thread is threaded correctly through all the guides and tension discs for the bobbin winder.
* Obstruction: Look for any lint or thread obstructions around the bobbin winder spindle or the tension discs.
* Motor Issue: In rare cases, there might be an issue with the bobbin winder motor or clutch. Consult your manual or a repair technician if problems persist.
By following these steps and tips, you can master the art of sewing machine bobbin winding. A well-wound bobbin is the foundation of beautiful stitches, and with a little practice, you’ll be threading a sewing bobbin quickly and confidently, ready to tackle any sewing project.