
Learning how to thread a sewing machine is the first, essential step to unlocking your creative potential. Can I thread a sewing machine without a manual? Yes, you can, with clear instructions and a little patience! This guide will walk you through the process, ensuring you can get your machine ready to sew in no time.
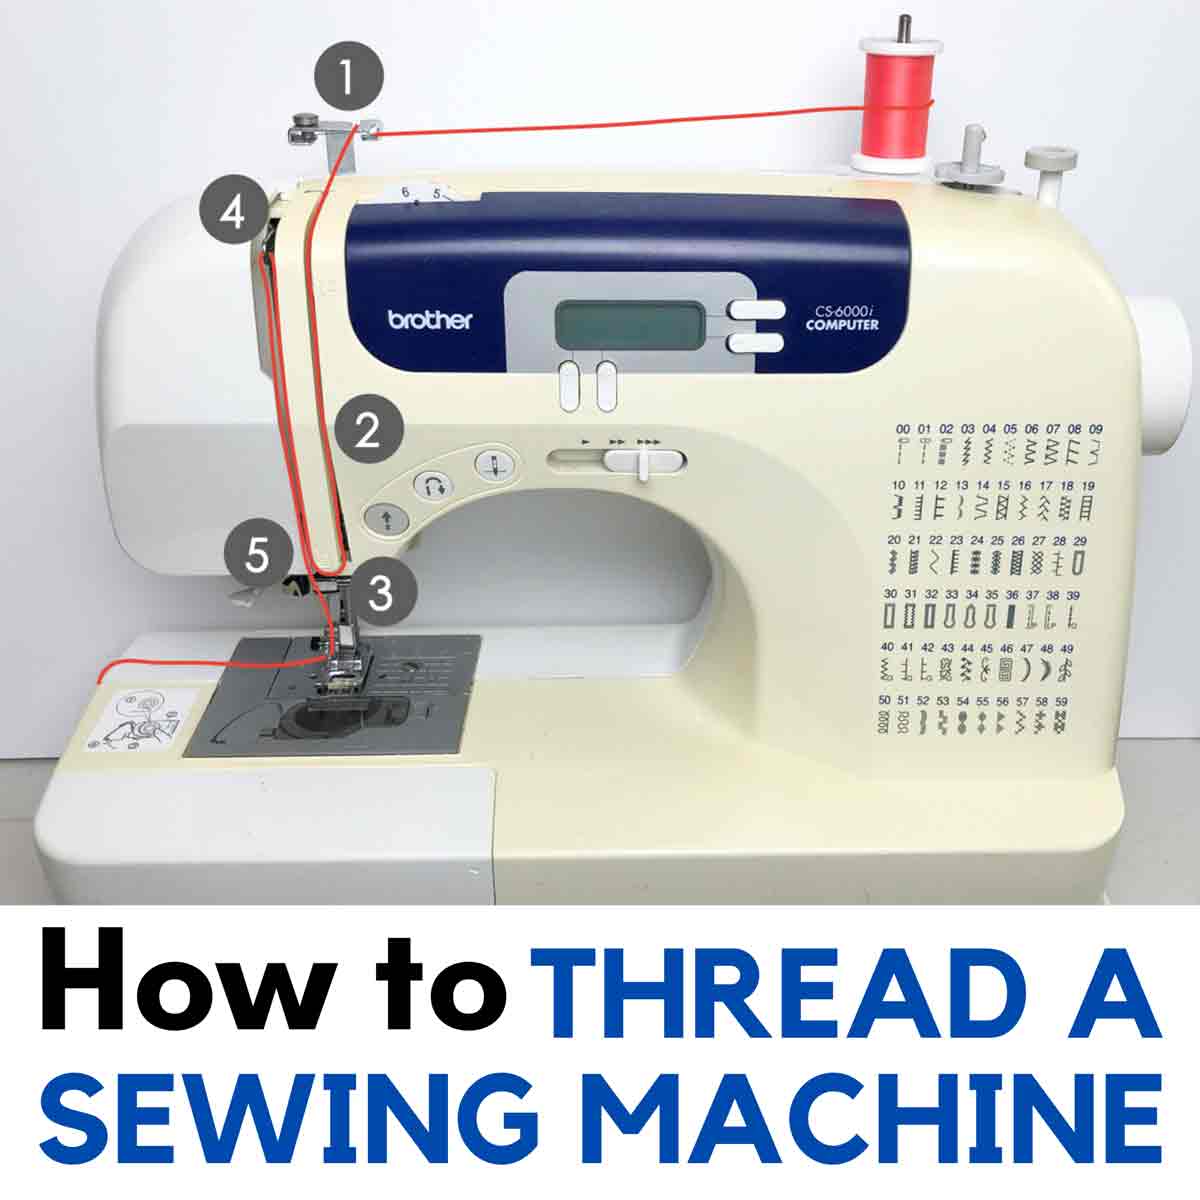
Image Source: mindymakes.com
The Journey of Your Sewing Machine Thread
To successfully thread a sewing machine, you need to follow a specific path. This path ensures the thread interacts correctly with the machine’s mechanics to create stitches. Let’s break down the sewing machine thread path step-by-step.
Preparing for Threading
Before you begin threading a sewing machine, ensure you have the right supplies. You’ll need:
- Your sewing machine: Make sure it’s plugged in and turned on (if it has a power switch).
- A spool of thread: Choose a good quality thread suitable for your fabric.
- A sewing machine needle: Ensure it’s the correct type and size for your fabric and thread.
- The sewing machine manual (if available): This can be a helpful reference.
Step 1: Setting Up the Thread Spool
The first part of the sewing machine thread setup involves placing the thread spool correctly.
Placing the Sewing Machine Thread Spool
- Locate the sewing machine thread spool pin. This is usually a small rod sticking up from the top of the machine.
- Place your spool of thread onto the spool pin. The thread should unwind from the top of the spool, moving towards the front of the machine.
- Some machines have a horizontal spool pin, while others have a vertical one. Follow the orientation designed for your machine.
- If your thread unwinds too fast or tangles, you might need a spool cap or a thread net. These accessories help control the thread flow.
Step 2: Guiding the Upper Thread Sewing Machine
This is where the thread begins its journey through the machine.
Navigating the Sewing Machine Thread Path
- First Thread Guide: Find the very first thread guide, usually a small metal or plastic loop near the spool pin. Pass the thread through this guide.
- Tension Discs: This is a crucial part of the sewing machine thread setup. You’ll see two metal discs with a space between them.
- Make sure the presser foot is in the “up” position. This opens the tension discs.
- Pass the thread down into the groove between these discs. It should go from right to left, or left to right, depending on your machine’s design, but the key is that it goes between the discs.
- Fathoming the Tension Discs: Think of these discs as a gentle clamp. When the presser foot is down, they squeeze the thread, controlling how easily it pulls through. If the presser foot is up, they relax, allowing the thread to be threaded easily.
- Take-Up Lever: Locate the take-up lever, which moves up and down as the needle moves.
- Pass the thread through the eye of the take-up lever. It’s vital that the thread goes through the eye of the lever and not just around it.
- Interpreting the Take-Up Lever’s Role: This lever helps to pull the thread down to the needle and then back up, creating the stitch loop.
- Further Thread Guides: Continue following the numbered path indicated on your machine. There will be several more thread guides, often small metal loops or clips, along the sewing machine thread path.
- Each guide is designed to keep the thread straight and properly tensioned.
- Deciphering the Thread Guides: Imagine a path marked on your machine, usually with numbers or arrows. Follow this path precisely.
- Needle Clamp Thread Guide: Near the needle itself, there’s usually a small hook or guide. Pass the thread through this guide.
- The Sewing Machine Needle Threading****: This is the final step for the upper thread.
- Preparing the Needle: Make sure the flat side of the needle is facing the correct direction according to your machine’s manual (usually to the side, not the front or back).
- Threading the Needle: Using your fingers or an automatic needle threader if your machine has one, pass the thread through the eye of the needle.
- Needle Eye Orientation: The thread should go through the eye from front to back, or side to side, depending on the needle type and machine. Most common is front to back.
- Leave a few inches of thread hanging through the needle’s eye.
Step 3: Preparing the Bobbin Thread
Now, it’s time to deal with the bottom thread, which comes from the bobbin.
Setting Up the Bobbin Thread Sewing Machine
- Winding the Bobbin:
- Place an empty bobbin onto the bobbin winder spindle.
- Bring the end of the thread from your spool over to the bobbin winder.
- Pass the thread through the small hole in the bobbin, then loop it around the bobbin a couple of times.
- Hold the thread end firmly against the bobbin.
- Slide the bobbin winder spindle to engage the winding mechanism (this might involve moving a lever or the flywheel).
- Press the foot pedal to start winding. Keep a light tension on the thread as it winds.
- When the bobbin is full, it will usually slow down or stop automatically. Cut the thread and remove the wound bobbin.
- Inserting the Bobbin:
- Locate the bobbin case. This can be a removable plastic case or a metal shuttle that stays in place.
- Place the wound bobbin into the bobbin case (or shuttle). The thread should unwind in a specific direction (usually counter-clockwise, but check your manual).
- Ensure the thread is seated in the small notch or groove of the bobbin case.
- Bringing Up the Bobbin Thread: This is a critical step to get the bobbin thread sewing machine ready.
- Hold the tail of the upper thread sewing machine with one hand.
- Use your other hand to turn the machine’s handwheel towards you, lowering the needle into the bobbin area and then bringing it back up.
- As the needle comes up, it will catch the bobbin thread sewing machine and pull a loop of it up through the bobbin case opening.
- Use your fingers or a seam ripper to pull this loop of bobbin thread completely out.
- Now you should have two thread tails hanging: one from the needle and one from the bobbin.
Step 4: Final Checks and Adjustments
Once both threads are in place, you need to ensure everything is set correctly.
Fine-Tuning the Sewing Machine Thread Tension
- The Importance of Tension: The sewing machine thread tension is what determines how well the upper and lower threads interlock to create a strong stitch. If the tension is off, you’ll get puckering, loops, or weak seams.
- Checking the Stitch: Sew a test seam on a scrap piece of your fabric.
- Balanced Tension: You should see an even stitch on both sides of the fabric. The threads interlock perfectly in the middle of the fabric layers.
- Too Loose: If the stitches look loopy on the underside, the upper thread tension might be too loose, or the bobbin tension might be too tight.
- Too Tight: If the stitches look puckered or the thread breaks easily, the upper thread tension might be too tight, or the bobbin tension too loose.
- Adjusting Tension:
- Upper Thread: Use the tension dial (usually numbered) on your machine. Turning it to a higher number increases tension, and to a lower number decreases it. Make small adjustments.
- Bobbin Thread: Adjusting bobbin tension is less common and often involves a small screw on the bobbin case (if it’s removable). Consult your manual for this. It’s best to leave bobbin tension alone unless you’re experienced or have a specific problem.
- The Sewing Machine Thread Sensor*: Some modern machines have a *sewing machine thread sensor. This sensor detects if the thread is broken or has run out. If your machine has one, ensure the thread is correctly routed through it, as indicated in your manual. A malfunctioning sensor can prevent the machine from sewing.
Common Threading Issues and Solutions
Even with clear steps, threading can sometimes be tricky. Here are some common problems and how to fix them.
Troubleshooting Threading Problems
- Thread Not Going Through Tension Discs:
- Problem: The presser foot is down.
- Solution: Always ensure the presser foot is up before threading the tension discs.
- Thread Tangling at the Needle:
- Problem: The sewing machine needle threading was incorrect, or the needle itself is bent or dull.
- Solution: Re-thread the needle carefully. Ensure the thread goes through the eye, not around it. Check the needle for damage and replace it if necessary. Also, check that the sewing machine thread spool is seated correctly and unwinding smoothly.
- Skipped Stitches:
- Problem: Incorrect needle type/size, bent needle, or improper threading of the upper or bobbin thread.
- Solution: Ensure you’re using the right needle for your fabric and thread. Re-thread the machine completely. Check the needle’s alignment.
- Thread Breaking:
- Problem: Tension is too tight, needle is sharp or damaged, thread is of poor quality, or the sewing machine thread path is obstructed.
- Solution: Adjust the tension to a lower setting. Check the needle for burrs or damage. Try a different spool of thread. Ensure all thread guides are clear.
- Bobbin Thread Looping on Top:
- Problem: The upper thread tension is too loose, or the bobbin wasn’t inserted correctly.
- Solution: Increase the upper thread tension slightly. Re-insert the bobbin, ensuring the thread is in the notch and unwinding in the correct direction. Make sure you brought up the bobbin thread by turning the handwheel towards you.
Mastering the Sewing Machine Thread Setup
The key to mastering how to thread a sewing machine is practice. Don’t be discouraged if it takes a few tries. Each sewing machine has its unique sewing machine thread path, so familiarizing yourself with your specific model is important.
Tips for Smooth Threading
- Use Good Lighting: Make sure you can see all the thread guides and the needle eye clearly.
- Cut the Thread End: Snip the end of your thread at an angle to create a clean point, making it easier to pass through guides and the needle.
- Follow the Numbers: Most machines have a numbered diagram on them indicating the thread path. Follow these numbers religiously.
- Don’t Force It: If the thread feels stuck, stop and check if you’ve missed a guide or if there’s a snag.
- Regular Maintenance: Keep your machine clean, especially around the bobbin area and tension discs. Lint buildup can interfere with threading and tension.
Conclusion
Learning how to thread a sewing machine is a fundamental skill that opens up a world of creative possibilities. By following these detailed steps, paying attention to the sewing machine thread path, and practicing the correct sewing machine thread setup, you’ll be able to confidently prepare your machine for any sewing project. Remember to check your sewing machine thread tension and ensure your sewing machine needle threading is accurate. With patience and practice, you’ll soon find threading your sewing machine becomes second nature, allowing you to focus on the joy of creating.
Frequently Asked Questions (FAQ)
Q1: What if my sewing machine doesn’t have numbers showing the thread path?
A1: Most sewing machines have a diagram printed on them. If yours doesn’t, consult your owner’s manual. If you don’t have the manual, search online for “[Your Sewing Machine Brand and Model] threading diagram” or “how to thread [Your Sewing Machine Brand and Model]”.
Q2: Can I use any type of thread on my sewing machine?
A2: While you can technically thread most threads, it’s best to use good quality sewing thread. Heavy-duty threads might require a larger needle, and very fine threads might not hold up well. Always match your thread to your fabric and project needs.
Q3: My needle threader isn’t working. What should I do?
A3: Ensure the needle is inserted correctly and is the right type for your machine. Check if the needle threader mechanism itself is clean and free of lint. If it’s bent or damaged, it may need to be replaced. Sometimes, re-threading the upper thread correctly can help the needle threader engage properly.
Q4: How do I know if my sewing machine thread tension is correct?
A4: Sew a test seam on a scrap of your fabric. A balanced stitch will look the same on both sides, with the threads interlocking in the middle of the fabric. If you see loops on the underside, the upper tension is too loose or the bobbin tension is too tight. If the fabric puckers or the thread breaks, the upper tension is likely too tight.
Q5: Do I need to thread the bobbin every time I sew?
A5: No, you only need to thread the bobbin when you want to start a new sewing project or when the current bobbin runs out of thread. You will wind a new bobbin when the current one is depleted.
Q6: What is the purpose of the sewing machine thread sensor?
A6: The sewing machine thread sensor, found on some newer machines, detects if the thread has broken or run out. If it detects an issue, it will often stop the machine and alert you, preventing further stitching errors or damage. Ensure the thread is correctly routed through this sensor according to your manual.