
Sewing machine tension helps threads pull evenly. This makes your stitches strong and look good. You can adjust tension yourself with care. Doing this fixes many stitch problems.
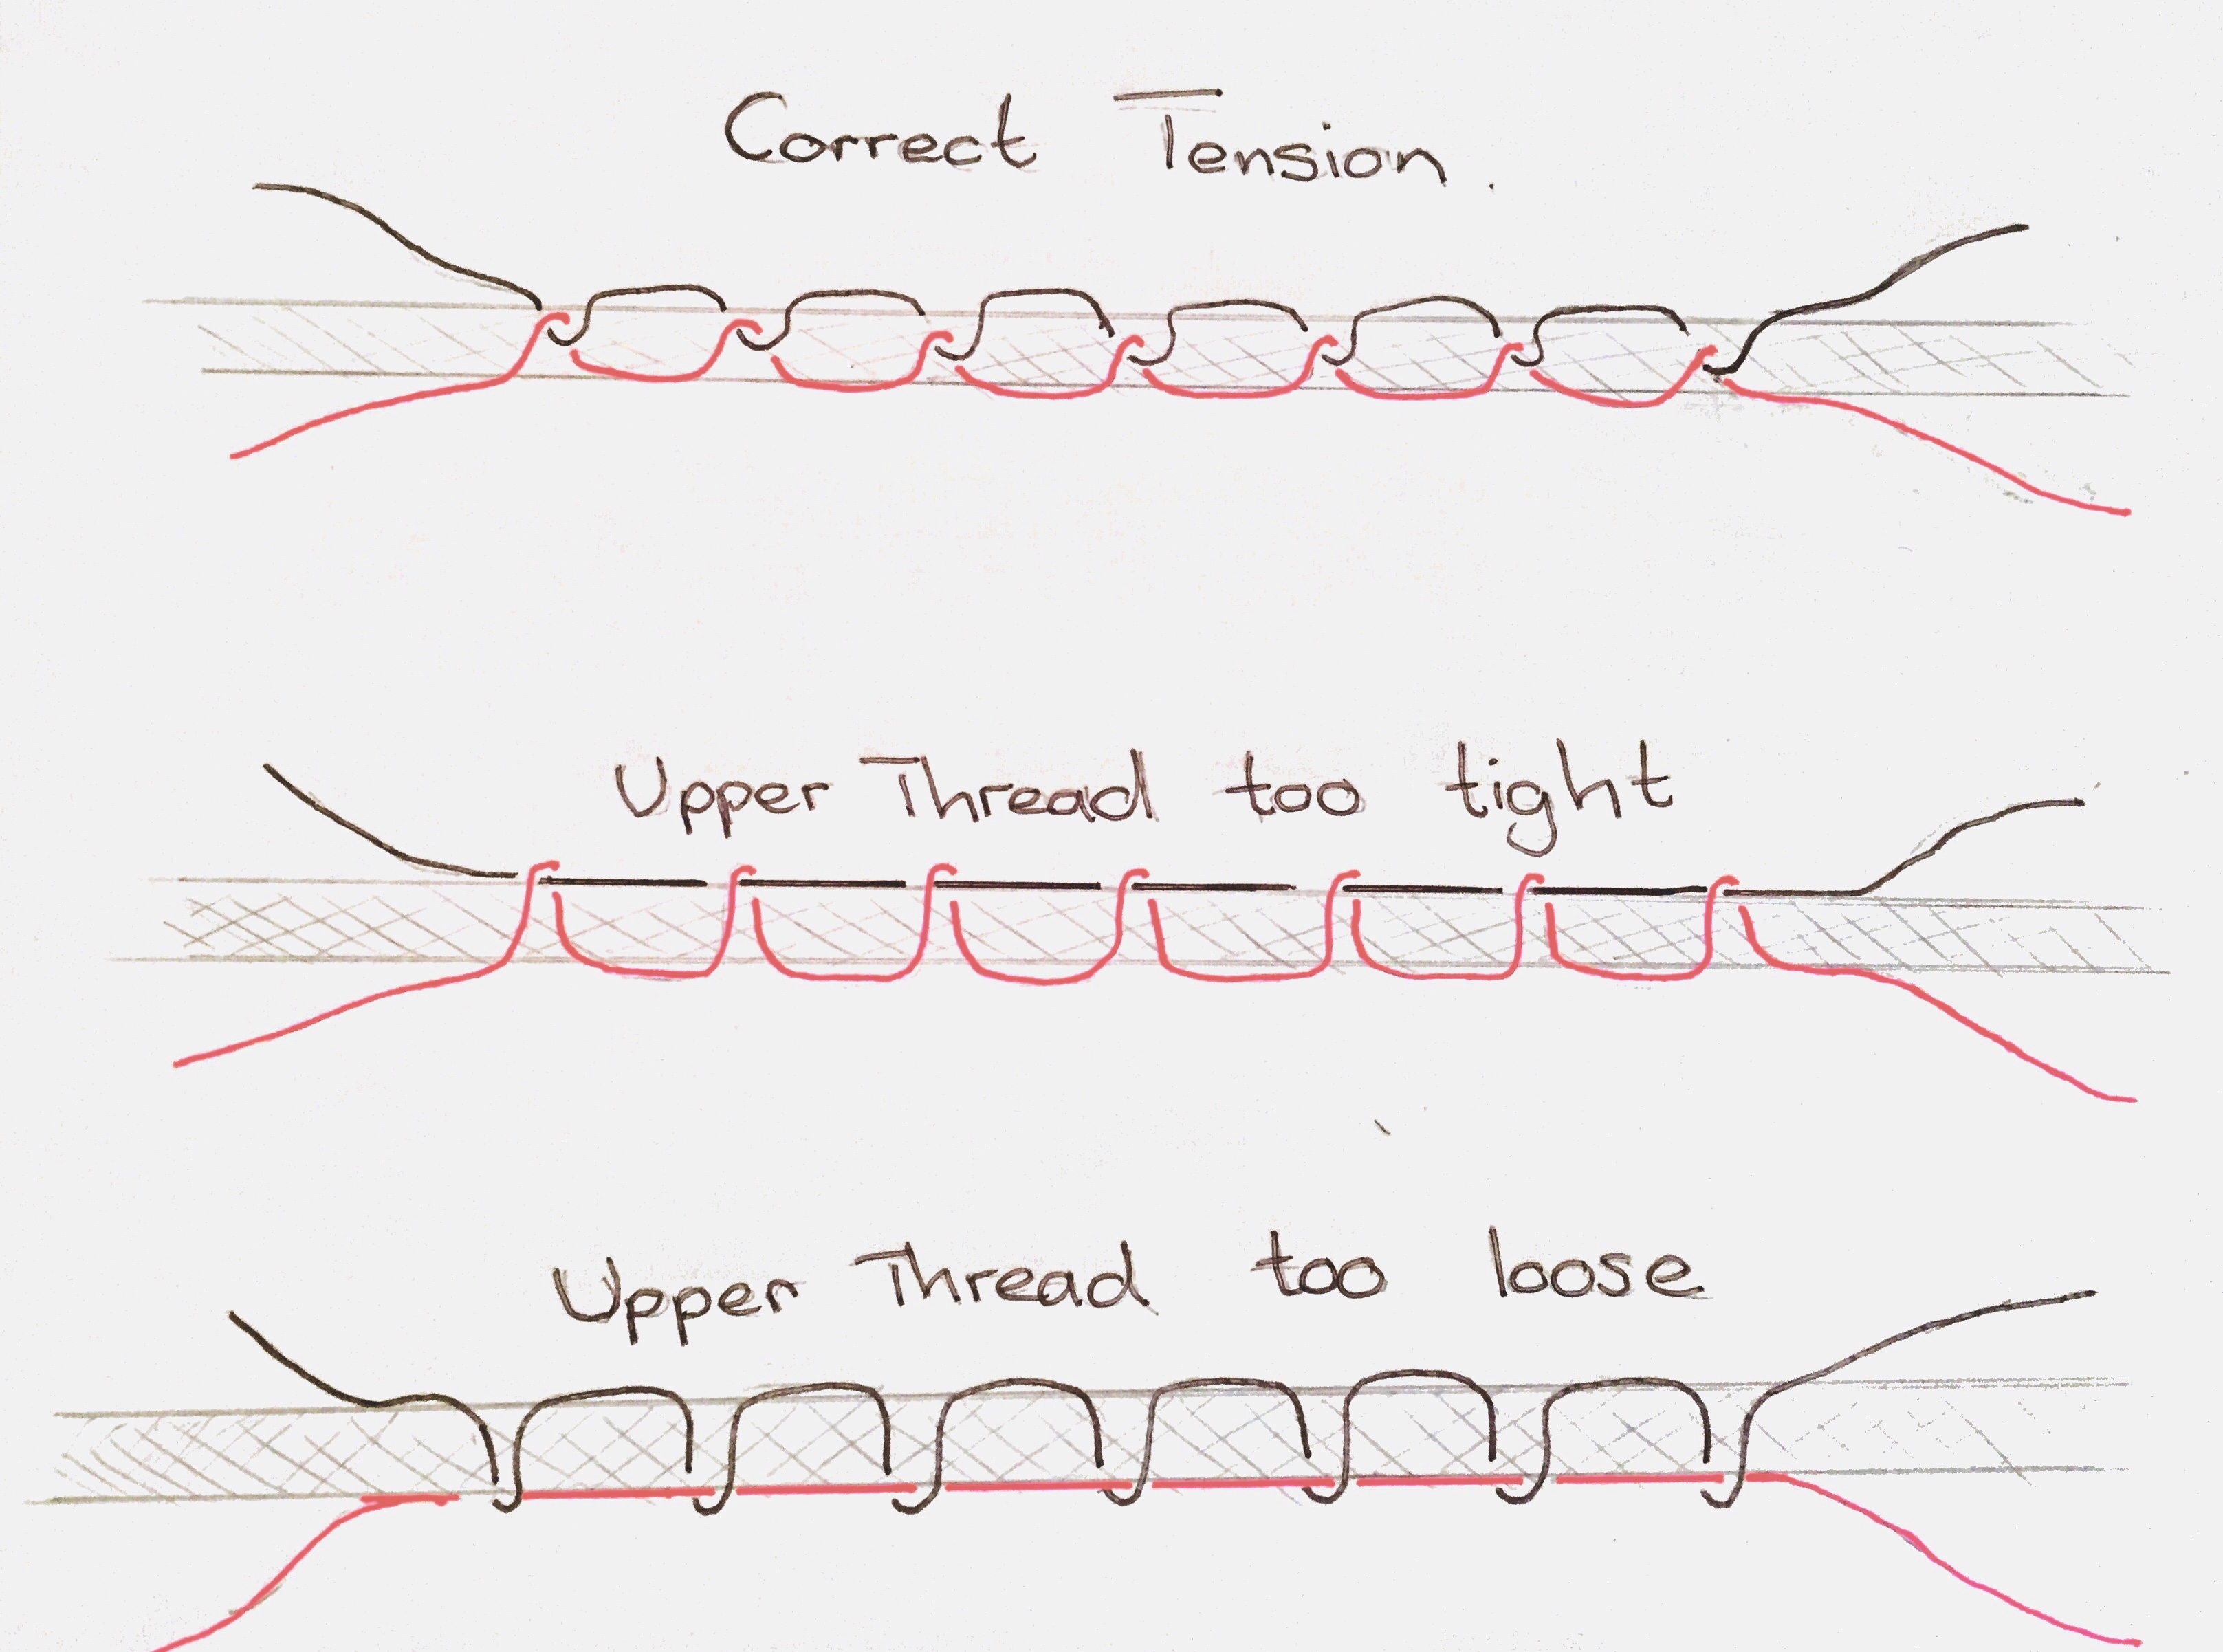
Image Source: www.sewschool.co.uk
The Core of Stitch Perfection: What Balanced Tension Means
Every stitch has two threads. One comes from the top. One comes from the bobbin. For a good stitch, these threads must pull with equal strength. This is called balanced tension. It looks like two threads meeting right in the middle of your fabric. This creates a neat, strong seam.
When threads meet off-center, your sewing machine stitch quality drops. The seam can be weak. It might look messy. Correct tension gives a neat, even line. It makes your sewing look professional.
Grasping the Ideal Stitch
Think of a good stitch as two ropes tying a knot. If one rope pulls too hard, the knot moves to that side. If both pull the same, the knot stays in the middle. Your sewing machine does this. The top thread comes down. The bobbin thread comes up. They join in the fabric’s middle.
- Top View: You see a straight line of stitches.
- Bottom View: You see a straight line of stitches.
- Side View (cut fabric): The threads lock right inside the fabric.
This shows a balanced stitch appearance. It means your tension is just right.
Common Signs of Tension Trouble
Your sewing machine will tell you when tension is off. Look at your stitches. Many common problems point to bad tension.
Loose Stitches Troubleshooting
One common issue is stitches that look loose. They might form loops.
- Loops on Top: The bottom thread pulls too much. It drags the top thread underneath. Your top stitches look like loops.
- Loops on Bottom: The top thread pulls too much. It drags the bottom thread up. Your bottom stitches look like loops.
These loops mean your threads are not meeting in the middle. They are a clear sign of loose stitches troubleshooting needs.
Thread Looping Fix
If you see loops, your tension is off. Big loops often show that one thread is too loose. A thread looping fix often means making one thread tighter or the other looser.
Puckering Fabric Solution
Sometimes, the fabric gathers or wrinkles. This is called puckering. It often happens when threads pull too hard. The stitches are too tight for the fabric. It makes the fabric pull in. This needs a puckering fabric solution. It usually means your tension is too high.
Skipped Stitches Remedies
Sometimes, your machine misses a stitch. It might sew a bit, then jump. This leaves a gap. While not always a tension problem, wrong tension can make it worse. Skipped stitches remedies often involve checking the needle or re-threading. But sometimes tension adjustments help.
Uneven Tension Sewing Machine
Your stitches might look good for a bit. Then they look bad. Or one side of the seam looks fine. The other side does not. This is an uneven tension sewing machine problem. It can be tricky. It means the thread pull is not steady.
What You Need for Adjustments
You do not need many tools. But having the right ones helps.
- Fabric Scraps: Always test tension on a scrap. Use the same fabric as your project.
- Different Thread Colors: Use one color for the top thread. Use a different color for the bobbin thread. This helps you see where problems are.
- Small Screwdriver: Most machines have a special screwdriver. You need it for the bobbin case screw.
- Lint Brush and Tweezers: For cleaning your machine.
Getting Ready Before You Adjust
Never start adjusting tension right away. Do some checks first. Many stitch problems are not tension problems at all.
Comprehensive Machine Cleaning
Dust and lint can build up. They can block thread paths. This stops threads from moving freely. This changes the tension. Sewing machine maintenance tips always start with cleaning.
- Take out the Needle Plate: Use your screwdriver. Lift the plate.
- Remove the Bobbin Case: Take out the bobbin and its case.
- Brush Away Lint: Use a small brush. Clean out all dust. Focus on the feed dogs. Clean the bobbin area well. Get rid of all lint.
- Check Thread Paths: Look for any fuzz. It can hide in the little holes. Use tweezers if needed.
A clean machine lets the thread move smoothly. This makes tension adjustments easier.
Inspect the Needle
A bent or dull needle can cause problems. It can skip stitches. It can break thread. It can affect how the thread moves through the fabric.
- Check for Bends: Look closely at the needle. Is it perfectly straight?
- Check the Tip: Is the tip sharp and smooth? Or is it dull or hooked?
- Right Needle for Fabric: Use the correct needle type. Heavy fabric needs a strong needle. Knit fabric needs a ballpoint needle.
Change the needle if it looks bad. Always use a new needle for a new project.
Re-thread Your Machine
This is very important. Many tension problems come from bad threading. Even a small mistake can mess up stitches.
- Lift the Presser Foot: Always lift the foot before threading. This opens the tension discs. If the foot is down, the thread will not sit right.
- Follow the Path Exactly: Look at your machine’s manual. It shows the exact path for the thread. Do not skip any guides.
- Seat the Thread in Tension Discs: Make sure the thread goes deep into the tension discs. You should feel a slight pop or click.
- Pull the Bobbin Thread Up: After threading the top, pull the bobbin thread up. Hold both threads under the presser foot. Put them behind the foot.
Good threading gives a good starting point.
Proper Bobbin Use
Your bobbin must be wound correctly. It needs to be the right type for your machine.
- Correct Bobbin Type: Use only bobbins made for your machine. They come in many sizes.
- Evenly Wound Bobbin: Wind the bobbin smoothly. Do not overfill it. Do not underfill it. An uneven bobbin can cause
uneven tension sewing machineissues.
Check these things first. If stitches are still bad, then adjust tension.
Mastering Upper Thread Tension Settings
The upper thread tension is usually the first thing you adjust. This is the setting you change most often.
Locating the Tension Dial
Your machine has a tension dial. It has numbers. It is often on the front or top of the machine. The numbers usually go from 0 to 9. Some machines have a slide instead of a dial.
How the Numbers Work
- Higher Number: Means tighter tension. The thread pulls harder.
- Lower Number: Means looser tension. The thread pulls softer.
Most machines have a middle setting. This is often around 3, 4, or 5. This is your general starting point.
General Starting Points
For most sewing, start at the middle setting. This might be 4 or 5 on your dial. Then, test it on your fabric. Different fabrics need different settings.
- Light Fabrics (silk, thin cotton): Might need slightly lower tension. (e.g., 3-4)
- Medium Fabrics (quilting cotton, linen): Often work well at the middle setting. (e.g., 4-5)
- Heavy Fabrics (denim, canvas): Might need slightly higher tension. (e.g., 5-6)
These are just guides. Your machine and thread might need different numbers.
How to Test and Adjust Upper Tension
- Prepare a Scrap: Take two layers of your project fabric. Cut a piece about 6 inches by 6 inches.
- Use Different Threads: Put a bright color thread on top. Put a different bright color in the bobbin. This helps you see which thread is causing problems.
- Sew a Test Seam: Sew a straight line. Make it at least 4 inches long.
- Examine the Stitches:
- Perfect Stitch: Both top and bottom look smooth and even. The threads lock in the middle of the fabric. You see little dots of the bobbin thread on top. You see little dots of the top thread on the bottom.
- Loops on Bottom (Top thread too tight): The top thread pulls the bobbin thread up. You see top thread loops on the bottom of the fabric. Loosen the upper tension. Turn the dial to a lower number (e.g., from 4 to 3.5).
- Loops on Top (Top thread too loose): The bobbin thread pulls the top thread down. You see bobbin thread loops on the top of the fabric. Tighten the upper tension. Turn the dial to a higher number (e.g., from 4 to 4.5).
- Adjust and Re-test: Make small changes. Adjust the dial a half-step at a time. Sew a new test line after each change. Keep doing this until your stitches look good.
Remember, always make small changes. Big changes can make things worse.
Adjusting the Bobbin Tension Screw (When Needed)
The bobbin tension screw is tiny. It is on the bobbin case. You should almost never touch this screw. It is a last resort. Most tension problems can be fixed with the upper tension dial.
When to Touch It
Only adjust bobbin tension if:
- You have tried everything else with the upper tension.
- Your machine manual tells you to.
- You know for sure the problem is with the bobbin thread tension. This is usually when stitches are very bad even after upper tension changes. For example, if the top thread looks perfect, but the bobbin thread is always loose, even with maximum upper tension.
Locating the Screw
The bobbin case holds the bobbin. On the bobbin case, you will see a small, flat metal spring. This is where the bobbin thread pulls through. There is a tiny screw on this spring. This is the bobbin tension screw.
Small Turns, Tiny Adjustments
- To Tighten Bobbin Tension: Turn the screw a tiny bit to the right (clockwise). Think of it like a clock. Turn it just a hair.
- To Loosen Bobbin Tension: Turn the screw a tiny bit to the left (counter-clockwise). Again, a very small turn.
Even a quarter turn can make a big difference.
A Warning
This screw is very sensitive. It is easy to over-adjust. If you turn it too much, it is hard to get back to the right setting. If you must adjust it, mark its starting position. Use a marker or nail polish. This way, you can go back to where you started.
If you adjust the bobbin tension, you might need to adjust your upper tension again too. They work together.
Fixing Specific Stitch Problems in Detail
Let’s look at how to fix common stitch issues. We will focus on balanced stitch appearance.
Top Stitches Loose (Loops on Bottom)
- Problem: The top thread is too loose. The bottom thread pulls it down. You see loops of top thread on the bottom side of your fabric.
- Cause: Your
upper thread tension settingsare too low. Or the top thread is not in the tension discs right. - Fix:
- First, re-thread the top thread. Make sure it is in all guides. Make sure it snaps into the tension discs.
- If still looping, increase your
upper thread tension settings. Turn the dial to a higher number. Do this in small steps. Test after each step.
Bottom Stitches Loose (Loops on Top)
- Problem: The top thread is too tight. It pulls the bobbin thread up. You see loops of bobbin thread on the top side of your fabric. This is a common
thread looping fixneed. - Cause: Your
upper thread tension settingsare too high. Or your bobbin is wound too loose. Or thebobbin tension screwis too loose. - Fix:
- First, re-thread the top thread. Make sure it is not caught anywhere.
- Next, decrease your
upper thread tension settings. Turn the dial to a lower number. Do this in small steps. Test after each step. - Check your bobbin. Is it wound evenly? Is it the right type? Re-wind it if needed.
- If none of these work, and you are sure the upper tension is as loose as it can be (lowest setting), then you might need to tighten the
bobbin tension screwa tiny bit. Remember the warning here.
Fabric Puckering (Gathering)
- Problem: The fabric bunches up. Stitches pull it tight. This is a clear
puckering fabric solutionneed. - Cause: Both threads are too tight for the fabric. Usually, the
upper thread tension settingsare too high. Sometimes, the stitch length is too short. - Fix:
- Lower your
upper thread tension settings. Make it looser. - If still puckering, try a longer stitch length. Shorter stitches use more thread in a small space. This can pull fabric.
- Use a walking foot for very thin or slippery fabrics. This helps feed both layers evenly.
- Lower your
Skipped Stitches
- Problem: The machine misses a stitch. It leaves a gap in the seam.
Skipped stitches remediesare important. - Cause: Most often, this is a bad needle. It can be a bent needle. It can be the wrong type of needle. Or the needle is not pushed all the way up. Less often, it can be extreme tension issues.
- Fix:
- Change your needle first. Make sure it is new and correct for your fabric. Make sure it is pushed all the way up.
- Re-thread the machine. Make sure no steps were missed.
- Clean the bobbin area well.
- Check if tension is very, very tight or loose. If so, adjust it. But usually, it’s not a direct tension problem.
Uneven Tension (Inconsistent Stitches)
- Problem: Stitches look good, then bad. Or one side looks good, the other bad. This is an
uneven tension sewing machineissue. - Cause: This is often a sign of dirt. Or a badly wound bobbin. Or a damaged thread path.
- Fix:
- Clean your machine thoroughly. Pay extra attention to the tension discs. Lint can hide there.
- Check the top thread path very carefully. Is it catching on anything?
- Re-wind your bobbin. Make sure it is even and smooth.
- Check the thread spool. Is it unwinding smoothly? Is it getting stuck?
- Check the needle and its insertion.
- Sometimes, poor quality thread can cause this. Try a new spool of good quality thread.
Getting a Perfect Balanced Stitch Appearance
After fixing problems, you want to get that balanced stitch appearance. This means top and bottom threads meet right in the middle.
How to Check for Balance
- Pull Fabric Apart: Gently pull your test seam apart. Look at the stitches. If they are balanced, the threads will look like they lock right in the middle. You will see small dots of the opposing thread on each side.
- No Loops: No loops should be visible on top or bottom.
- Smooth Seam: The fabric should lay flat. No puckering.
Test on Every New Project
Each fabric, thread, and needle combination is different.
- Fabric Weight: Heavy fabrics need more tension than light fabrics.
- Thread Type: Thick thread needs different tension than thin thread.
- Needle Size: A bigger needle makes a bigger hole. This can change how tension looks.
Always test on a scrap of your actual project fabric. Do this before you start sewing on the real thing. This saves you headaches later.
Tips for Consistent Tension and Better Sewing
Keeping your tension right is part of good sewing habits.
- Use Good Quality Thread: Cheap thread can break. It can shed lint. It can have thick and thin spots. This makes
uneven tension sewing machineproblems. Good quality thread runs smoothly. It helps create goodsewing machine stitch quality. - Regular Cleaning: Make cleaning a habit. Lint and dust are tension killers. Follow
sewing machine maintenance tipsoften. Clean your machine every few projects. Clean it after using fluffy fabrics. - Always Use the Right Needle: Match the needle to your fabric. A sharp needle for woven fabrics. A ballpoint needle for knits. A denim needle for heavy fabrics.
- Thread Carefully Every Time: Get into the habit of correct threading. Always lift the presser foot. This makes sure the thread sits right in the tension discs.
- Take Your Time: Do not rush. Make small adjustments. Test, then adjust again. Being patient pays off.
- Keep Notes: Write down tension settings. Note them for different fabrics or projects. For example: “Cotton, denim, size 14 needle, tension 5.” This helps you later.
- Do Not Force It: If the machine resists, stop. Do not pull or push the fabric hard. This can stretch fabric or bend the needle. It also messes with stitch formation.
- Check the Presser Foot Pressure: Some machines let you change how hard the presser foot pushes down. Too much pressure can cause puckering. Too little can cause skipped stitches. Check your manual for this setting.
Frequently Asked Questions (FAQ)
How often should I check my sewing machine tension?
You should check your tension every time you start a new project. Especially if you change fabric type, thread, or needle. It’s also good to do a quick test if your stitches suddenly look bad.
Can wrong tension cause my needle to break?
Yes, it can. If tension is too tight, it puts too much stress on the needle. This can make the needle bend or snap. This is especially true if you sew on thick fabric.
Why do my stitches look good on one fabric but not another?
Different fabrics need different tension. Thick fabrics need more thread pull. Thin fabrics need less. Also, stretchy fabrics act differently than non-stretchy ones. Always test tension on a scrap of the fabric you are using.
Is there a “perfect” tension setting for my sewing machine?
No, there is no single “perfect” setting. The best tension depends on your fabric, thread, and needle. It also depends on the type of stitch you are making. The middle setting on your dial is a good starting point. But you will adjust it from there.
What if I can’t fix my sewing machine tension problems?
If you have tried all the steps, and your stitches are still bad, your machine might need a check-up. An old machine might have worn-out parts. Or it might need professional cleaning. Take it to a sewing machine repair shop. They can help find and fix the problem.