
What is sewing machine tension? It is how your sewing machine controls the pull on the top thread and the bottom thread. This pull makes sure your stitches look good and hold strong. Can I adjust it myself? Yes, you absolutely can! Learning how to adjust sewing machine tension is a key skill. It will help you fix common stitch problems. It will also make your sewing projects look much better.
Sewing machine tension makes sure two threads connect in the middle of your fabric. One thread comes from the needle (upper thread). The other comes from the bobbin (bottom thread). If the tension is wrong, your stitches can look bad. They might be too loose or too tight. They might even break. This guide will show you how to get perfect stitches every time. It is easier than you think.
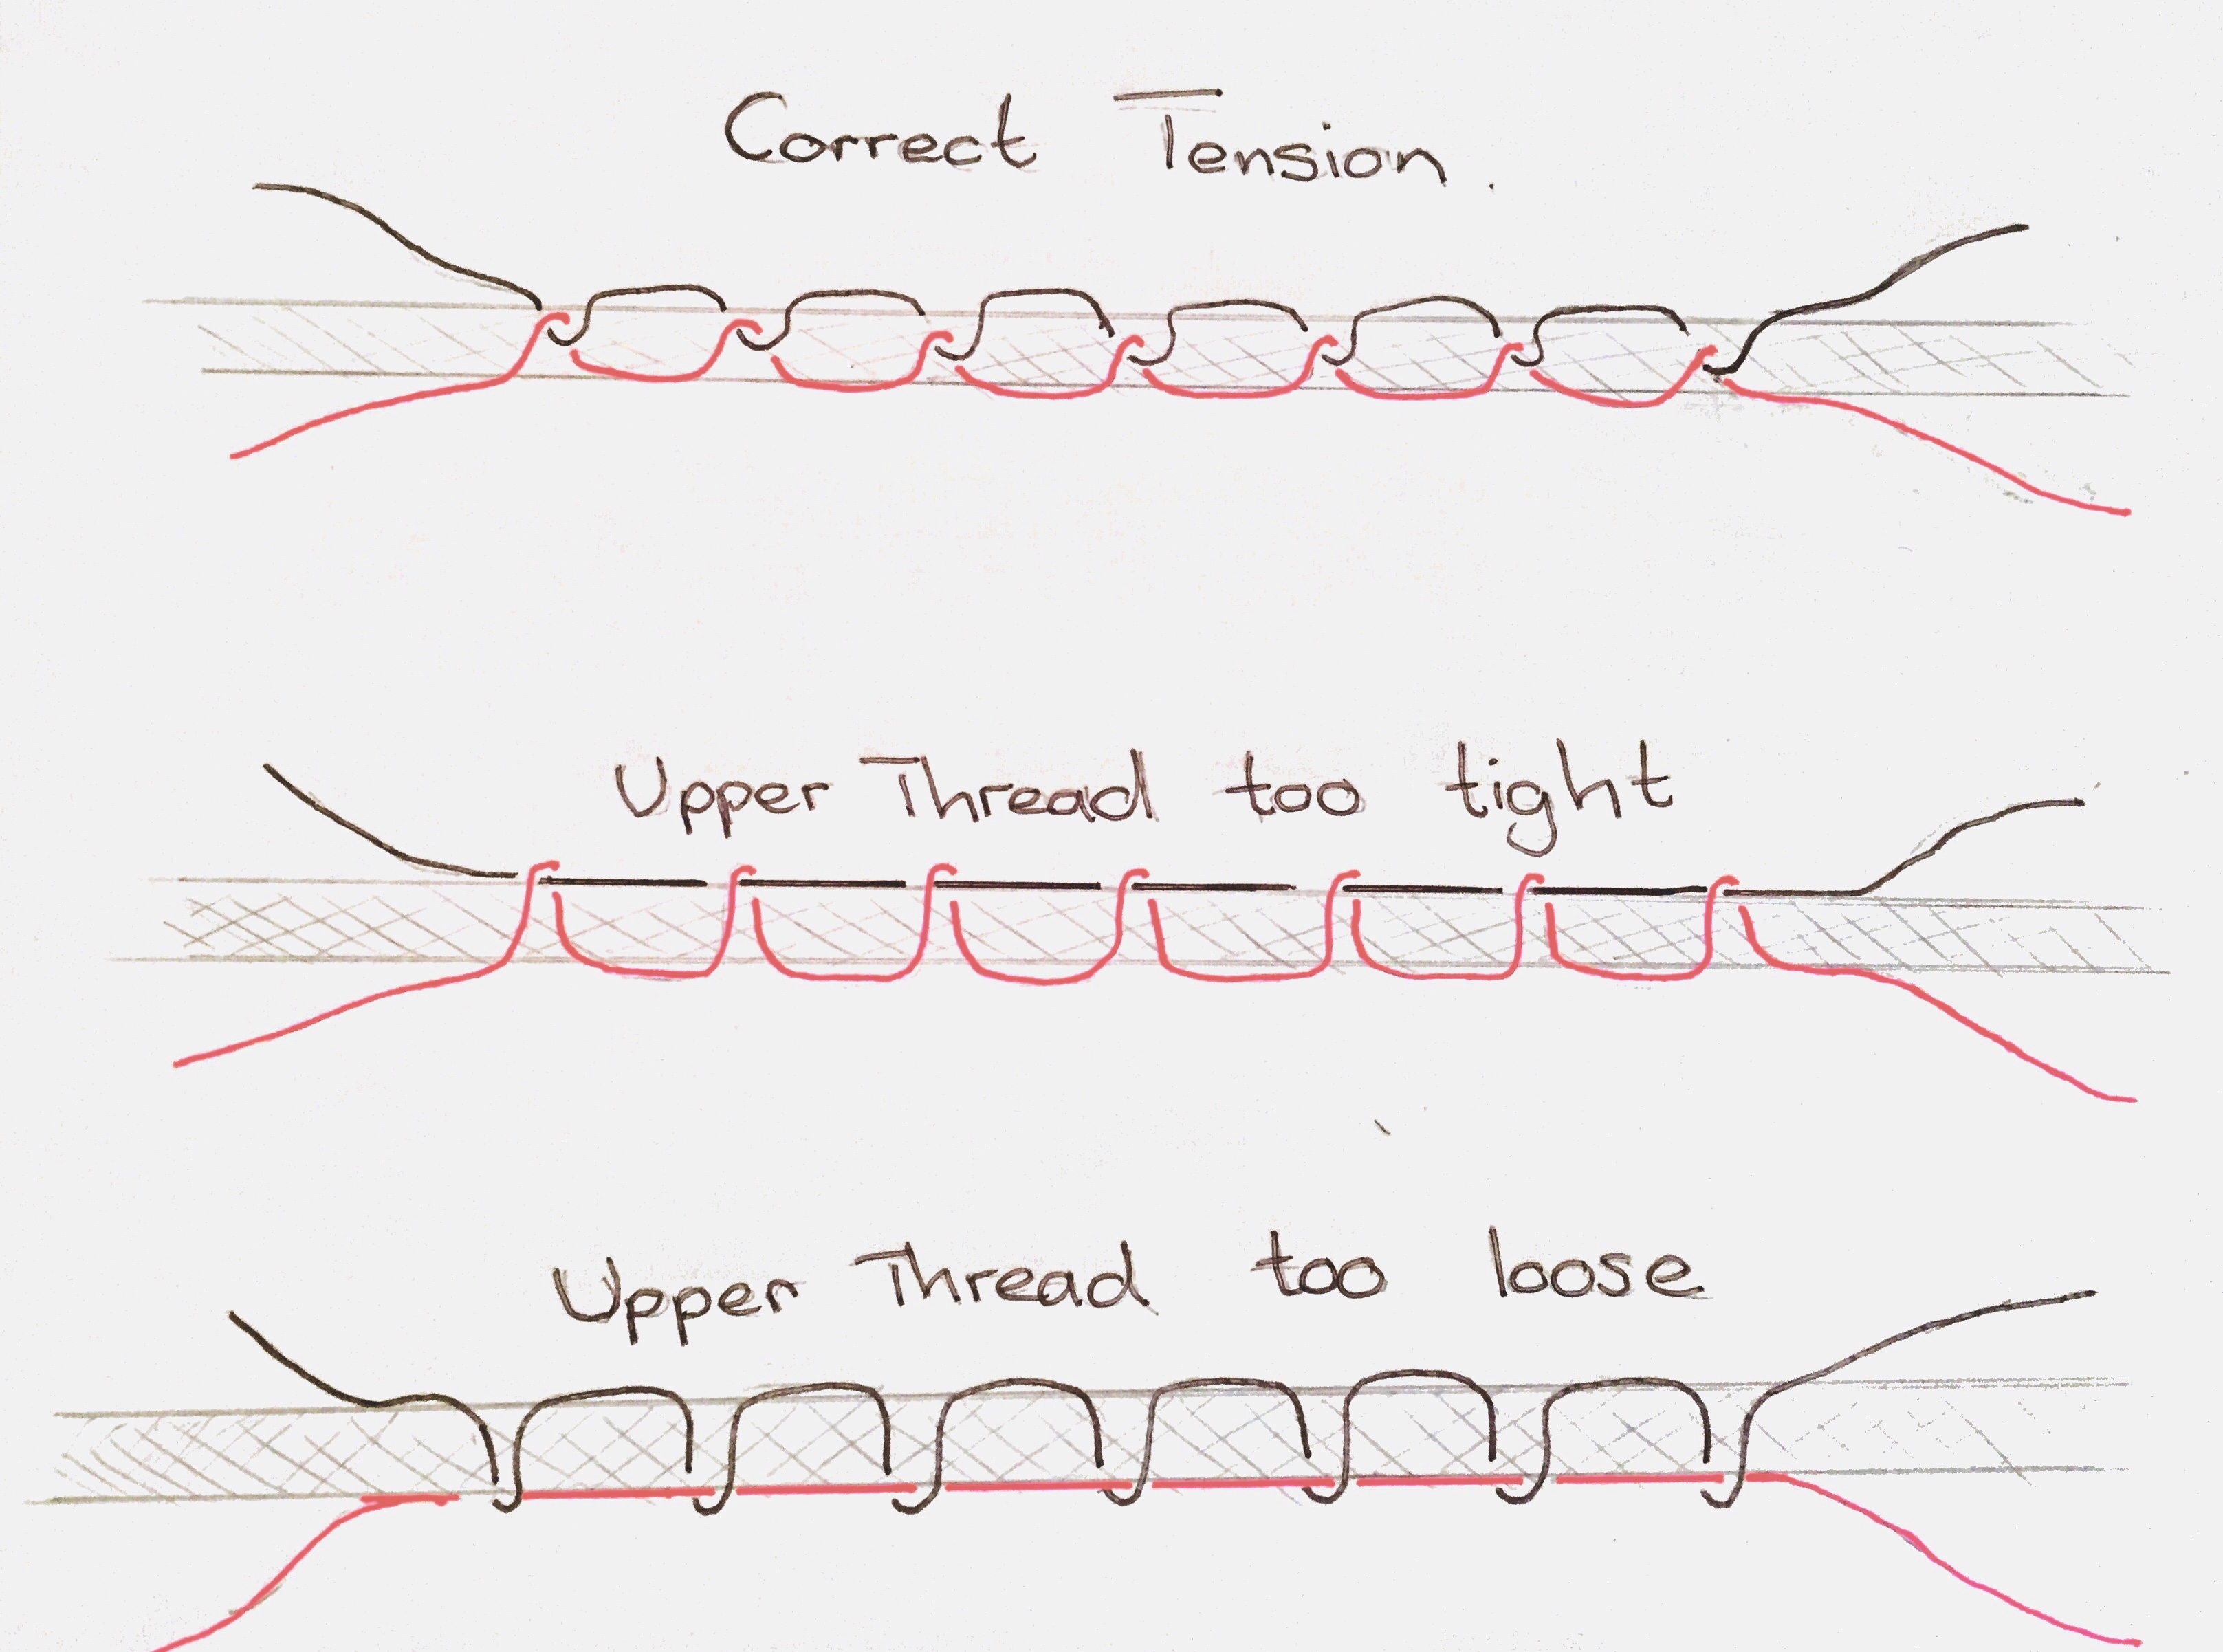
Image Source: www.sewschool.co.uk
Comprehending Sewing Machine Tension
Sewing machine tension might seem like a mystery. But it is not. It is simply about balance. Imagine two people pulling a rope. If they pull with the same strength, the middle of the rope stays in the middle. Your sewing machine works like this. The upper thread pulls from the top. The bobbin thread pulls from the bottom.
When you sew, the needle pushes the upper thread through the fabric. Then, the bobbin hook grabs this thread. It wraps it around the bobbin thread. This creates a knot. This knot should sit right in the middle of your fabric layers. If the threads do not pull with the right strength, this knot moves. It might sit on top or on the bottom. This is why tension is so important. It makes sure the threads meet in the middle.
The Upper Thread System
The upper thread comes from your spool. It goes through many parts. It goes through guides. It goes through the tension discs. Then, it goes through the take-up lever. Finally, it goes through the needle. The tension discs are important. They squeeze the thread. This creates the pull, or tension. You control this squeeze with your tension dial. We will talk about the tension dial settings later.
The Bobbin Thread System
The bobbin thread comes from the bobbin. It sits in a bobbin case or a drop-in bobbin holder. Both of these parts have a small spring. This spring creates the pull on the bobbin thread. This pull is the bobbin tension. Some bobbin cases have a tiny screw. This screw changes the pull of the spring. It changes the bobbin tension adjustment.
When both the upper thread and bobbin thread have the right tension, your stitches look neat. They are strong. They do not break easily. They make your sewing projects look professional.
Why Tension Matters: Common Stitch Quality Issues
Bad tension is easy to spot. It shows up as various stitch quality issues. These issues can make your projects look messy. They can even make them fall apart. Do not ignore them. Fix them.
Here are some common problems you might see:
- Loose stitches: The stitches look weak. They pull apart easily. They might loop on one side of the fabric.
- Tight stitches: The stitches pull the fabric. They make the fabric bunch up. This is called puckering. The thread might even break.
- Puckered fabric: The fabric gathers or wrinkles along the stitch line. This happens when the thread pulls too hard on the fabric.
- Skipped stitches: The machine misses some stitches. It leaves gaps in your seam. This can be very frustrating. It weakens your sewing.
Let us look at these stitch problems more closely. We will see how they link to tension.
Loose Stitches: Top or Bottom Loops
If your stitches are too loose, you will see loops. These loops can be on the top of the fabric. Or they can be on the bottom.
- Loose loops on the bottom of the fabric: This is a very common problem. It usually means your upper thread tension is too loose. The top thread is not pulling hard enough. So, the bobbin thread pulls it down. It makes big loops on the underside. It looks like a messy chain stitch.
- Loose loops on the top of the fabric: This means your bobbin tension adjustment is too loose. The bobbin thread is not pulling hard enough. So, the upper thread pulls it up. It makes loops on the top of your fabric. This is less common. Most of the time, you will fix the upper thread first.
Tight Stitches: The Pulling Effect
Tight stitches are also a clear sign of tension problems.
- Fabric puckering: When stitches are too tight, the fabric bunches up. This is puckered fabric. This often happens if the upper thread tension is too tight. Or if both tensions are too high. The thread pulls the fabric too much. It squeezes it. This makes the seam look wavy or gathered.
- Thread breaking: If the tension is extremely tight, the thread might snap. This is especially true for thinner threads. The thread just cannot handle the pull.
Skipped Stitches
Skipped stitches can be a sign of many issues. Sometimes, it is not just tension. But tension can play a part.
- If the tension is very off, the needle might not form a good loop. The bobbin hook then cannot catch the thread. This leads to a skipped stitch.
- More often, skipped stitches come from a dull needle. Or a wrong needle type. Or bad threading. Always check these first. We will cover this in the next section.
Before You Adjust: Basic Checks
Many stitch problems look like tension issues. But they are not. They are often simpler. Always check these basic things first. This will save you time. It will stop you from changing tension when you do not need to.
Here is a list of important checks:
- Is the machine threaded correctly? This is the number one cause of problems.
- Upper Thread: Take the upper thread out completely. Thread it again slowly. Make sure it goes through every guide. Make sure it goes between the tension discs. These discs must be up. To lift them, raise the presser foot. Thread the needle last.
- Bobbin Thread: Make sure the bobbin is wound evenly. Put the bobbin into its case or holder the right way. Pull the thread. It should flow smoothly. There should be some gentle pull.
- Is the needle the right type and size?
- Using the wrong needle can cause many issues. It can cause skipped stitches. It can also cause thread breaks.
- Make sure the needle is for your fabric. Use a ballpoint needle for knits. Use a universal needle for woven fabrics. Use a denim needle for thick fabrics.
- Is the needle sharp? A dull or bent needle causes problems. Replace it often.
- Is the needle put in the right way? The flat side should face the back on most machines. Check your machine manual.
- Is the machine clean?
- Lint and dust can build up. They can get into the tension discs. They can get into the bobbin area. This stops threads from moving freely.
- Open the bobbin area. Use a small brush to clean out lint. Do not use canned air. It can push lint deeper.
- Is your thread good quality?
- Cheap thread can cause issues. It can be lumpy. It can break easily. It can leave a lot of lint.
- Use good quality polyester or cotton thread. Make sure the upper thread and bobbin thread are the same type and weight. This helps with balancing sewing machine tension.
- Is the presser foot pressure correct?
- Some machines let you change how hard the presser foot presses down. If it is too high, it can stretch light fabrics. This can make them pucker. If it is too low, the fabric might not feed well. Check your manual if your machine has this setting.
After checking these things, if your stitches still look bad, then it is time to adjust the tension.
Grasping Your Tension Dial Settings
Your tension dial is usually on the front of your sewing machine. It is a round knob with numbers. These numbers control the upper thread tension.
- Higher numbers (e.g., 7, 8, 9) mean tighter tension. The discs squeeze the thread more.
- Lower numbers (e.g., 1, 2, 3) mean looser tension. The discs squeeze the thread less.
Most machines have a “normal” setting. This is often around 3, 4, or 5. This setting works for most mid-weight fabrics and threads. Always start here.
When you adjust the tension, make only small changes. Turn the dial just one number at a time. Then test your stitch. It is like tuning a guitar. Small turns give you the best results.
Here is a simple rule:
* If your stitches are too loose, increase the number (make tension tighter).
* If your stitches are too tight, decrease the number (make tension looser).
Remember, you are mostly adjusting the upper thread tension. The bobbin tension is rarely touched. We will talk about that later.
The Upper Thread Tension: Your First Focus
The upper thread tension is the most common adjustment you will make. It fixes most stitch quality issues. Your sewing machine’s tension dial controls it.
How to Adjust Upper Thread Tension
- Find your tension dial: It is usually on the front of your machine. It has numbers.
- Start at the normal setting: This is often 3, 4, or 5. Check your machine manual for the recommended setting.
- Prepare a test fabric: Get two layers of the same fabric you plan to sew. Use the same thread. This is important. Different fabrics and threads need different tension.
- Sew a test seam: Sew a straight stitch about 4 to 6 inches long. Use a contrasting thread color if you can. This helps you see the stitches better.
- Examine your stitch: Look at both the top and bottom of the fabric.
Signs Your Upper Thread Tension Needs Adjusting
-
Problem: Loops on the bottom of the fabric (loose upper thread)
- This is the most common problem. The top thread is not pulled tight enough. The bobbin thread pulls it down.
- Solution: Increase the upper thread tension. Turn the tension dial to a higher number. Turn it by one number (e.g., from 4 to 5).
- Test: Sew another test seam. Check the stitches again. Keep increasing by small amounts until the loops are gone. The stitches should look balanced.
-
Problem: Stitches pull the fabric, making it pucker (tight upper thread)
- This means the top thread is pulling too hard.
- Solution: Decrease the upper thread tension. Turn the tension dial to a lower number. Turn it by one number (e.g., from 4 to 3).
- Test: Sew another test seam. Check the stitches. Keep decreasing by small amounts until the fabric lies flat. The stitches should look balanced.
Sometimes, you might see small “dots” on the top or bottom. This means one thread is pulling the other’s loop through the fabric a bit too much. You want the threads to meet perfectly inside the fabric.
Bobbin Tension Adjustment: Handle with Care
Adjusting your bobbin tension is a big step. You should only do it if you have tried everything else. Most of the time, you will not need to touch it. The bobbin tension is usually set just right at the factory. It rarely goes wrong.
Warning: If you change your bobbin tension, it can be hard to get it back to normal. Mark your original setting first. Use a tiny dot of nail polish or a marker.
When to Adjust Bobbin Tension
You only adjust bobbin tension if:
- You have already checked all basic issues (threading, needle, cleanliness).
- You have adjusted the upper thread tension as much as you can.
- Your stitches still show problems related to the bobbin thread.
-
Problem: Loops on the top of the fabric (loose bobbin thread)
- This means the bobbin thread is not pulling hard enough. The upper thread pulls it up.
- Solution: Increase the bobbin tension. This makes the bobbin thread pull harder.
-
Problem: Upper thread is pulled to the bottom (tight bobbin thread)
- This means the bobbin thread is pulling too hard. It pulls the upper thread down.
- Solution: Decrease the bobbin tension. This makes the bobbin thread pull less hard.
How to Adjust Bobbin Tension
This depends on your bobbin type:
1. For machines with a metal bobbin case (removable case):
- Take out the bobbin case.
- Look for a very small screw on the side of the bobbin case. It is tiny!
- To make tension tighter: Turn the screw a tiny bit clockwise (right). Think of a clock’s hands moving forward.
- To make tension looser: Turn the screw a tiny bit counter-clockwise (left). Think of a clock’s hands moving backward.
- Use a tiny screwdriver. Turn the screw only a quarter turn at most. Even less is better. It is very sensitive.
Test method for metal bobbin cases (the “drop test”):
- Put a full bobbin into its case.
- Hold the bobbin case by the thread. Let it hang down.
- If the tension is right, the bobbin case should hang without moving.
- Give a gentle jerk up with your hand. The bobbin case should drop a few inches. Then it should stop. This means it has good tension.
- If it drops freely, it is too loose. Tighten the screw.
- If it does not drop at all, it is too tight. Loosen the screw.
2. For machines with a drop-in bobbin (no removable case):
- These machines are harder to adjust. The bobbin tension spring is built into the machine.
- Look for a very small screw on the metal plate where the bobbin sits. It is often very hidden.
- Again, make only tiny turns. Clockwise for tighter, counter-clockwise for looser.
- Many modern drop-in bobbin machines are not meant for users to adjust. If you cannot find the screw or feel unsure, do not force it. Take it to a sewing machine repair shop.
Remember: Adjusting bobbin tension is a last resort. Make small changes. Test. Make small changes again.
Balancing Sewing Machine Tension: The Gold Standard
The goal of all tension adjustments is balancing sewing machine tension. You want the stitches to look the same on both the top and bottom of your fabric. The knot where the threads meet should be hidden inside the fabric layers.
What a Balanced Stitch Looks Like
- Top Side: The stitches look smooth. The upper thread lies flat. You cannot see any bobbin thread pulled to the top.
- Bottom Side: The stitches look smooth. The bobbin thread lies flat. You cannot see any upper thread pulled to the bottom.
- Side View (if you could see inside): The top thread and bottom thread meet exactly in the middle of the fabric layers.
Think of it as two lines of thread crossing perfectly. They form a clean, strong seam.
How to Achieve Balance
- Always use test fabric: Use two layers of the exact fabric you will be sewing. If you are sewing a quilt with batting, use two layers of fabric and a layer of batting. The thickness and type of fabric change tension needs.
- Use the same thread: Use the same type and weight of thread for both the upper thread and the bobbin.
- Use contrasting thread colors for testing: Put a light-colored thread on top. Put a dark-colored thread in the bobbin. Or vice versa. This makes it very easy to see which thread is causing problems.
- Sew a straight stitch: A straight stitch is best for checking tension. Sew a line about 4 to 6 inches long.
- Examine the stitch carefully:
- If you see dots of the bobbin thread on top: Your upper tension is too high. Or your bobbin tension is too loose. (Start with lowering upper tension).
- If you see dots of the upper thread on the bottom: Your upper tension is too low. Or your bobbin tension is too tight. (Start with raising upper tension).
- Adjust slowly: Make small changes to the upper tension dial first. One number at a time. Sew a new test line after each change. Do not keep sewing on the old test line. The old stitches will not show the new tension.
- Only adjust bobbin tension as a last resort: If you cannot get a good stitch by only changing the upper tension, then consider the bobbin tension. But remember the warning.
When to Re-adjust Tension
You might need to adjust your tension when you:
- Change fabric type (e.g., from thin cotton to thick denim).
- Change thread type or weight (e.g., from all-purpose to heavy-duty topstitching thread).
- Change needle type or size.
- Clean your machine.
- After a long break from sewing.
It is normal for tension to need small tweaks. Do not be afraid to adjust it.
Troubleshooting Sewing Machine Stitches: A Quick Guide
This table helps you quickly find the problem and its most likely solution. It includes common stitch quality issues and what to do about them. This is your guide for troubleshooting sewing machine stitches.
| Problem | Appearance | Most Likely Cause(s) | Solution (Start Here) |
|---|---|---|---|
| Loose Stitches on Top | Upper thread loops or appears messy on top of fabric. | Bobbin tension too loose. | Increase bobbin tension (tiny screw adjustment, last resort). Check bobbin is inserted correctly. |
| Loose Stitches on Bottom | Upper thread loops or appears messy on bottom of fabric. | Upper thread tension too loose. | Increase upper thread tension (higher number on dial). Check upper threading. |
| Tight Stitches on Top | Fabric puckers; top thread appears pulled; bobbin thread shows on top. | Upper thread tension too tight. Bobbin tension too loose. | Decrease upper thread tension (lower number on dial). |
| Tight Stitches on Bottom | Fabric puckers; bottom thread appears pulled; upper thread shows on bottom. | Bobbin tension too tight. Upper thread tension too loose. | Decrease bobbin tension (tiny screw adjustment, last resort). |
| Puckered Fabric | Fabric gathers or wrinkles along seam. | Tension too tight (usually upper). Wrong needle size. | Decrease upper thread tension. Use correct needle for fabric weight. Less presser foot pressure. |
| Skipped Stitches | Gaps in the stitch line. | Wrong needle (dull, bent, wrong type). Incorrect threading. Tension can contribute. | Change needle. Re-thread machine (upper and bobbin). Check tension. |
| Uneven Stitches | Some stitches look good, others are messy. | Inconsistent thread feeding. Lint in tension discs. | Clean machine. Re-thread carefully. Check thread quality. |
| Thread Breaking | Upper or bobbin thread snaps often. | Too high tension (upper or bobbin). Dull/bent needle. Old thread. | Decrease tension. Change needle. Use good quality thread. |
Step-by-Step Tension Correction Process
Here is a simple, step-by-step plan to adjust your sewing machine tension. Follow these steps for the best results.
-
Check the Basics First:
- Is your machine threaded correctly? Re-thread both the upper and bobbin threads slowly and carefully. Make sure the presser foot is up when threading the upper thread.
- Is your needle new and correct? Replace your needle with a new one. Make sure it is the right type and size for your fabric and thread.
- Is your machine clean? Remove any lint from the bobbin area and around the tension discs.
- Are your threads matched? Use the same type and weight of thread for the top and bobbin. Use good quality thread.
-
Identify the Problem:
- Sew a test seam on two layers of your actual fabric. Use contrasting thread colors.
- Look at the top and bottom of your stitches.
- Which thread is looping? Which thread is pulling?
-
Adjust Upper Thread Tension (Always Start Here):
- If you see loops on the bottom of the fabric (meaning the upper thread is too loose), increase your upper thread tension. Turn the dial to a higher number.
- If your fabric is puckering or the upper thread is pulling too hard (meaning the upper thread is too tight), decrease your upper thread tension. Turn the dial to a lower number.
- Make changes slowly, one number at a time.
-
Test and Re-Adjust:
- After each tension change, sew a new test seam on a fresh piece of fabric.
- Examine the new stitches. Are they better? Worse?
- Repeat step 3 and 4 until the upper thread looks good and the stitches on the bottom are also clean. The knot should be in the middle.
-
Consider Bobbin Tension (Only if Necessary):
- If, after adjusting upper tension, you still see loops on the top of the fabric (meaning the bobbin thread is too loose), you might need to increase bobbin tension.
- If the upper thread is being pulled significantly to the bottom (meaning bobbin tension is too tight), you might need to decrease bobbin tension.
- Remember to mark your bobbin case before touching the screw. Make only tiny turns (quarter turn or less).
-
Test Bobbin Adjustment:
- Sew a new test seam after each tiny bobbin tension change.
- Keep adjusting the bobbin screw (very carefully!) until the stitches are balanced.
-
Final Fine-Tuning:
- Once your stitches look good with your test fabric and thread, you are all set.
- Make a note of the tension setting. This can help you next time.
Tips for Consistent Tension
Achieving and keeping good tension is a skill. These tips will help you sew better.
- Clean Your Machine Regularly: Lint and old thread bits can get stuck in the tension discs. They can also get in the bobbin area. This stops the thread from moving smoothly. Use a small brush to clean these parts often.
- Use Good Quality Thread: Cheap thread can be uneven. It can have weak spots. It can create more lint. This causes bad tension. Invest in good quality thread.
- Match Needle to Fabric and Thread: A needle that is too small for thick fabric or thread can cause tension problems. A needle that is too big for thin fabric can also cause issues. Always use the right needle.
- Ensure Proper Threading Path: Every time you thread your machine, make sure the thread goes through all guides. Make sure it snaps into the tension discs. If it skips a guide, tension will be off.
- Consistent Presser Foot Pressure: If your machine lets you adjust presser foot pressure, set it right. Too much pressure can cause puckering. Too little can cause skipped stitches.
- Practice on Scraps: Before starting a project, always do a test sew. Use scraps of the exact fabric and thread you will use. This is the best way to check tension.
Frequently Asked Questions (FAQ)
h4 Is it normal for sewing machine tension to change by itself?
Yes, small changes can happen. Over time, lint can build up. Parts can wear a little. Also, changing fabrics, threads, or needles will require small tension adjustments. It is not always a fault with your machine.
h4 How often should I adjust my sewing machine tension?
You should check your tension every time you start a new project. Or when you change fabric type, thread type, or needle. It is a good habit to do a quick test stitch. Most of the time, only small tweaks to the upper tension are needed.
h4 Does fabric type affect tension settings?
Yes, absolutely. Different fabrics need different tension. Thicker fabrics need a bit more tension. Thinner fabrics need less. Stretchy fabrics might also need special care. Always test your tension on the fabric you are using.
h4 My sewing machine has “auto-tension.” Does it really work?
Many modern machines have auto-tension. This feature usually works well for common fabrics and threads. It tries to set the tension for you. But it is not always perfect. If you still have stitch problems with auto-tension, you might need to adjust it manually. Your machine manual will tell you how to override the auto-setting.
h4 When should I call for sewing machine repair for tension issues?
If you have tried all the steps in this guide and still cannot get good stitches, it might be time for a repair. If the tension dial feels loose or broken, or if the bobbin case screw is stripped, a professional can help. They can clean and service your machine. They can also calibrate the tension parts.
Mastering sewing machine tension might seem hard at first. But with practice, it becomes easy. It will make a big difference in how your projects look. Take your time. Follow these steps. You will soon have perfect, balanced stitches on all your sewing projects. Happy sewing!