
Are you new to the world of crafting with needles and thread? Maybe you’ve asked, “What is embroidery for beginners?” or wondered, “Can I learn hand embroidery without much trouble?” The great news is, yes, you absolutely can! Embroidery is a lovely craft. It’s like drawing or painting, but with thread. It lets you add beauty to cloth. Anyone can start this fun hobby. You just need a few things and a little patience. This guide will help you begin your sewing journey today.
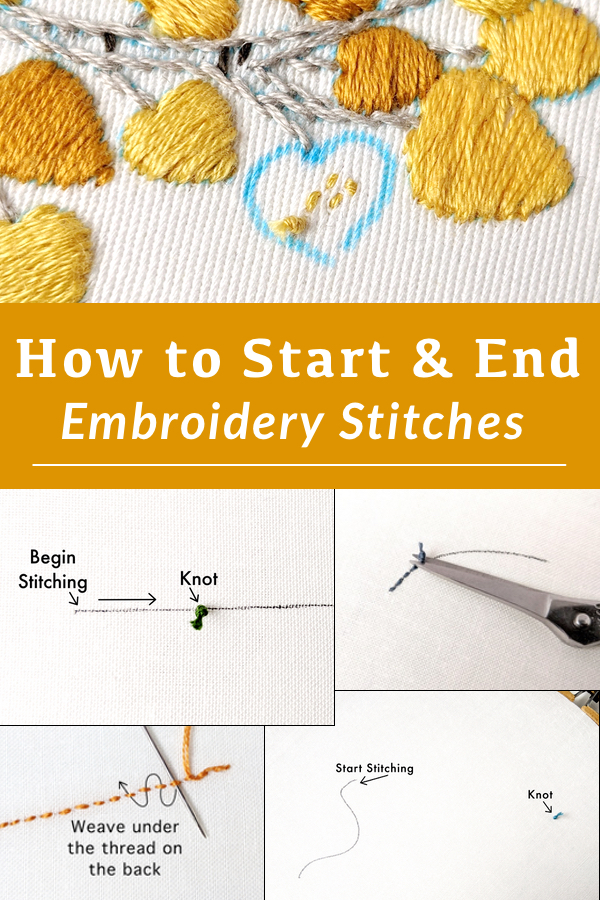
Image Source: www.wanderingthreadsembroidery.com
Why Try Sewing with Thread?
Embroidery is old, but it is still very popular. People enjoy it for many reasons.
* It is calming. Making stitches can feel very peaceful.
* You can make pretty things. Decorate clothes, bags, or make art for your walls.
* It is creative. You pick the colors and the pictures.
* It is a good skill to learn. You can fix clothes or make gifts.
* It is easy to start. You do not need many expensive tools.
Starting embroidery is simple. You do not need to be an artist. You just need to want to try.
Essential Things You Need
To begin sewing with thread, you need some basic items. These are called embroidery supplies. You can find them at craft stores or online. Getting the right things helps you start well.
Picking Your Fabric
You need cloth to sew on. For beginners, it is best to pick fabric that is easy to work with.
* Cotton: This is a great choice. It is not stretchy. It is easy to put your needle through. Things like plain cotton fabric for quilting work well.
* Linen: This is also good. It can be a bit rougher than cotton. But it takes stitches nicely. A linen-cotton mix is often very good for new sewers.
* Muslin: This is a simple, cheap cotton fabric. It is good for practicing stitches.
* Avoid: Do not start with very stretchy fabrics like jersey. Do not use very thin or very thick cloth either.
Look for fabric that is not too tightly woven. This makes pushing the embroidery needles easier. It should hold the shape well when you put it in a hoop.
Choosing Your Thread
The thread you use is called embroidery floss. It is different from sewing thread.
* What it looks like: It is usually shiny. It comes in many bright colors.
* How it is made: It is made of six thin strands twisted together.
* Using the strands: You can use all six strands at once. Or you can pull them apart. Using fewer strands makes thinner lines. Using more makes thicker lines.
* Best for beginners: Most patterns will tell you how many strands to use. Start with a common type like cotton or rayon floss. DMC is a very popular brand.
Get a few colors you like. You do not need many to start. Pick colors that make you happy!
Selecting Your Needles
Not all needles are the same. For embroidery, you need special embroidery needles.
* What they are like: They have a larger eye (hole) than sewing needles. This is because embroidery floss is thicker than sewing thread.
* Sharp tip: Most embroidery uses needles with sharp tips. This helps them go through the fabric easily.
* Sizes: Needles come in different sizes. A bigger number means a thinner needle. Sizes 7 or 9 are good for beginners. They work well with common fabric and floss amounts (like 2-3 strands).
Make sure the needle eye is big enough for the thread strands you plan to use. Pushing thread through a tiny hole is hard!
Getting a Hoop
An embroidery hoop is a must-have tool.
* What it does: It holds your fabric tight like a drum. This makes stitching much easier. It stops the fabric from getting wrinkly while you sew.
* How it works: It has two rings. One ring fits inside the other. You put the fabric over the smaller inner ring. Then you place the larger outer ring over the fabric and the inner ring. You push them together. There is often a screw on the outer ring to help make it tighter.
* Kinds: Hoops are made of wood or plastic. Wood hoops are common and work well. Plastic ones can also be good.
* Sizes: Hoops come in many sizes. A medium size, about 6 or 7 inches wide, is good to start. It is big enough for a small project. It is not too big to hold easily.
Make sure your fabric is pulled tight in the hoop before you start sewing. Loose fabric makes messy stitches.
Other Useful Items
You will need a few more small things:
* Small, sharp scissors: For cutting thread neatly. Nail scissors or small craft scissors are perfect.
* Fabric marker or pencil: For drawing your design onto the fabric. Make sure it is made for fabric and can be washed away or disappears.
* A simple design: To sew! You can draw one yourself. Or use a printed one.
* Light: Good light helps you see your stitches clearly.
Here is a simple list of the things you need to gather:
| Item | Purpose | Beginner Tip |
|---|---|---|
| Embroidery Fabric | What you sew ON | Choose plain cotton or linen mix. Not stretchy. |
| Embroidery Floss | The thread you sew WITH | Get a few colors of 6-strand floss. |
| Embroidery Needles | Push thread through cloth | Get size 7 or 9 with big eyes. Sharp tip. |
| Embroidery Hoop | Holds fabric tight | A 6 or 7-inch wooden hoop is great. |
| Small Scissors | Cut thread | Sharp and pointy works best. |
| Fabric Marker/Pencil | Draw your design | Make sure it washes away! |
| Simple Pattern | What you will sew | Start easy! Dots, lines, simple shapes. |
Gathering these embroidery supplies is the first step. It gets you ready to create.
Getting Ready to Sew
Before you make your first stitch, you need to get your fabric and design ready. This is an important step for embroidery for beginners.
Finding a Design
What do you want to sew?
* Draw it: You can draw something simple right onto your fabric with a fabric pencil. Maybe a heart, a star, or just some wavy lines.
* Print one: Many simple designs are online. Look for “free embroidery patterns for beginners”. Print one out.
* Buy a kit: Some kits come with the design already printed on the fabric. This is super easy!
* Use a coloring book: Find a simple picture in a coloring book. You can use it as a design idea.
Keep your first design simple. Straight lines, curves, and basic shapes are good. Complex pictures with lots of small details can be hard when you are new.
Moving the Picture to Cloth
You need your design on the fabric. There are ways to do this. This is called transfer embroidery pattern.
* Tracing: If your fabric is light-colored and thin, you can trace the design. Put the fabric over the pattern. Hold them up to a window or light box. Use your fabric marker to draw the lines onto the fabric.
* Carbon paper: You can buy special carbon paper for fabric. Place the carbon paper on the fabric (carbon side down). Put your pattern on top of the carbon paper. Trace over the lines of the pattern with a pen or pencil. The carbon paper will leave the design lines on your fabric.
* Water-soluble paper: Some patterns come on special paper that sticks to your fabric. You sew right through the paper. When you are done, you wash the fabric, and the paper goes away. This is easy but costs a bit more.
* Iron-on patterns: Some patterns can be ironed right onto the fabric. Follow the instructions carefully.
Choose the method that seems easiest for you. Make sure the lines are clear enough to follow when you sew.
Putting Fabric in the Hoop
Getting your fabric tight in the embroidery hoop is key.
1. Loosen the screw on the outer hoop. Take the two rings apart.
2. Place the smaller inner ring on a flat surface.
3. Lay your fabric over the inner ring. Make sure the design is centered where you want it.
4. Place the outer ring over the fabric. Gently push the outer ring down over the inner ring. You might need to push hard. Work your way around the hoop, pushing it down evenly.
5. Tighten the screw on the outer hoop. Pull the fabric edges around the hoop tightly as you tighten the screw. You want the fabric to be smooth and tight like a drum head. If it feels loose, loosen the screw, pull the fabric tighter, and tighten again.
Check the fabric tightness often while you sew. If it gets loose, tighten the hoop. Tight fabric makes stitches look neat and even.
Your First Stitches
Now for the fun part: sewing! You will learn hand embroidery by practicing different ways to make stitches. Start with just a few basic ones. These are your basic embroidery stitches.
Starting and Ending Thread
You need to start your thread without a knot on the back. Knots can make the fabric bumpy.
* Starting: Take 2 or 3 strands of floss. Do NOT make a knot at the end. Thread your needle. Push the needle up from the back of the fabric, very close to where your first stitch will be. Leave a tail of about an inch on the back. Hold this tail against the fabric with your finger as you make your first few stitches. Sew over the tail on the back. This holds it in place. After 3-4 stitches, the tail is held firm, and you can let go.
* Ending: When you are almost out of thread, or your sewing is done in that area, you need to secure the thread. Flip your hoop over. Slide the needle under a few stitches you have already made on the back. Pull the thread through. Do this twice. This makes a small loop of thread holding it. Pull gently, then cut the thread close to the fabric. Do not pull too hard or your front stitches might look funny.
No knots make the back of your work look tidy too!
Deciphering Stitch Types
There are many basic embroidery stitches. Here are a few good ones to start with. Practice these on scrap fabric first.
The Running Stitch
This is super simple. It is like making small dashes in a line.
1. Bring your needle up from the back of the fabric.
2. Go back down into the fabric a short distance away.
3. Come up from the back again, a short distance from where you went down.
4. Go back down again, the same distance from where you came up.
5. Keep going! You can load several stitches onto the needle at once before pulling through.
This stitch is good for making outlines or simple dashed lines.
The Back Stitch
This stitch makes a solid line. It is great for words or clear outlines.
1. Bring your needle up from the back.
2. Go back down a short distance away. This makes your first stitch length.
3. Bring your needle up from the back again, the same distance ahead of your first stitch.
4. Now, go back down into the same hole where your first stitch ended.
5. Bring your needle up ahead again, then go back down into the end of the last stitch.
It is called back stitch because you go “back” into the end of the stitch you just made. This stitch gives a clean, solid line.
The Stem Stitch
This stitch makes a rope-like line. It is good for stems (of course!) or curly lines.
1. Bring your needle up from the back.
2. Go down a short distance ahead, but do not pull the thread all the way through. Keep a loop of thread hanging.
3. Bring your needle back up from the back, right next to where you came up the first time, but just inside the loop of thread.
4. Pull the thread through. The loop should wrap around the needle.
5. Repeat: Go down ahead, leave a loop, come up close to where you were, inside the loop.
Each new stitch wraps around the last one, making that nice twisted look.
The Satin Stitch
This stitch fills in shapes. It makes a smooth area of color.
1. Draw the shape you want to fill.
2. Bring your needle up on one edge of the shape.
3. Go straight across the shape and down on the other edge.
4. Bring your needle back up very close to where your first stitch started (on the same edge).
5. Go straight across again and down very close to where your first stitch ended (on the other edge).
6. Repeat, laying flat stitches side-by-side. Make sure the stitches touch but do not overlap.
The goal is to cover the shape completely with smooth, parallel stitches. Keep the tension the same so the surface is even. This stitch uses a lot of thread.
Here is a simple table for your first stitches:
| Stitch Name | What it Looks Like | Good For… | Tips for Beginners |
|---|---|---|---|
| Running Stitch | Dashed line | Simple outlines, dots | Load several stitches on needle before pulling. |
| Back Stitch | Solid line | Outlines, letters | Go back into the end of the last stitch. |
| Stem Stitch | Ropey line | Stems, curves | Keep thread loop below or to the side of your needle. |
| Satin Stitch | Smooth filled shape | Filling shapes | Keep stitches straight and right next to each other. |
Practice these basic embroidery stitches. They are the building blocks for many designs.
Easy Things to Make
Once you know a few stitches, you can make simple embroidery projects. You do not need to make a big picture. Small things are perfect for practicing and finishing something quickly.
Decorated Tea Towels
A plain tea towel is great for sewing on. They are usually cotton or linen. They are flat and easy to handle.
* Ideas: Sew your initial, a simple flower, a fruit, or a row of simple shapes along the edge.
* Why it’s good: You can use running stitch or back stitch for outlines. Use satin stitch for small filled areas. It is useful!
Hooped Wall Art
Your embroidery hoop can also be the frame for your finished piece.
* Ideas: Sew a simple quote, a constellation of stars (using French knots if you learn them!), a basic picture like a mountain or tree, or an abstract design with lines and shapes.
* Why it’s good: It shows off your work. It is easy to hang. Just finish the back neatly (cover it with felt or gather the fabric).
Patches for Clothes
Make a small design on a piece of felt or sturdy fabric. Then sew it onto a jacket, bag, or hat.
* Ideas: A simple shape like a star or heart. A letter. A small animal outline.
* Why it’s good: It lets you add your sewing to things you use. It is often small, so it finishes fast.
Adding Detail to Bags
Give a plain tote bag a special touch.
* Ideas: Sew your name. Add a pocket outline. Sew a design on the pocket. Add flowers or leaves.
* Why it’s good: Bags get noticed. It is a good way to practice stitches on a larger item without needing to fill the whole thing.
These simple embroidery projects help you use what you have learned. They give you something nice to show for your work.
Helpful Hints for New Sewers
Learning any new skill takes time. Here are some tips to help you learn hand embroidery and enjoy the process.
Taking Your Time
Do not rush. Embroidery is not about being fast. It is about enjoying the sewing and making careful stitches. Take breaks if your hands get tired.
Practicing Often
The more you sew, the better you get. Try to sew for a little while each day or week. Even 15-20 minutes helps. Practice stitches on scrap fabric first. It is okay if your first stitches are not perfect. No one’s are!
Fixing Mistakes
Everyone makes mistakes. It is part of learning.
* If you make a wrong stitch, just take it out. Use the tip of your needle or small tweezers.
* Do not be afraid to undo stitches. It is better to fix a mistake early than to be unhappy with how it looks later.
Finding Help Online
The internet is full of help!
* Look for videos showing how to do the basic embroidery stitches. Seeing someone do it helps a lot.
* Find blogs or websites for embroidery for beginners.
* Join online groups where people share their sewing work and ask questions.
* Look at pictures of other people’s simple embroidery projects for ideas.
Seeing how others do things and getting tips can help you learn faster and feel less alone.
Looking After What You Make
After you finish a project, you want it to stay nice.
* Finishing the back: If your work is in a hoop, you can leave it there. Trim the extra fabric. Gather the edge and sew it down. Or glue a piece of felt over the back.
* Cleaning: If your fabric marked are washable, you can wash your piece gently. Use cool water and a mild soap. Do not rub hard. Lay it flat on a towel to dry.
* Storing: Keep your sewing in a clean, dry place. Do not put heavy things on it.
Taking care of your finished work keeps it looking good for a long time.
Why Sewing is Fun
Embroidery is more than just sewing. It is a way to relax. It is a way to be creative. It is a way to make things with your hands. There is a good feeling that comes from turning plain fabric and thread into something pretty or personal. Whether you make a small gift for a friend or art for your home, you made it! You learned something new, and you used your imagination. That feeling is a big part of why people love learn hand embroidery.
Questions People Ask
Here are some common questions from people who are starting out.
How long does it take to learn?
You can learn the very basic embroidery stitches in one afternoon! To feel good about sewing and make nicer things, it takes practice. Many people feel comfortable with a few stitches after a week or two of trying them. Getting really good takes months or years, but you can make beautiful things even when you are new.
What if I mess up?
It is okay! Everyone messes up. The great thing about learn hand embroidery is you can usually fix it. Use small scissors or tweezers to carefully take out the stitches you do not like. Try that part again. Do not worry about being perfect when you start. Just enjoy the process.
Is it expensive to start?
No, it is not. You need some fabric, a hoop, needles, and floss. These embroidery supplies cost much less than starting many other hobbies. You can get enough to start for around $15-$30, maybe less if you find sales or use things you already have. A small embroidery hoop is cheap. A few colors of embroidery floss are not much. You can get started without spending a lot.
Can kids do it?
Yes! With a little help and simpler needles (maybe slightly less sharp, or plastic large-holed needles for yarn-like thread), kids can enjoy sewing. Embroidery for beginners is a great craft for kids too. It helps with focus and fine hand movements. Simple projects with big stitches on easy fabric are perfect for them.
Starting embroidery is an enjoyable and rewarding path. Get your embroidery supplies, pick a simple design, and make your first stitch. You are ready to create something wonderful!